Page 108 of 416
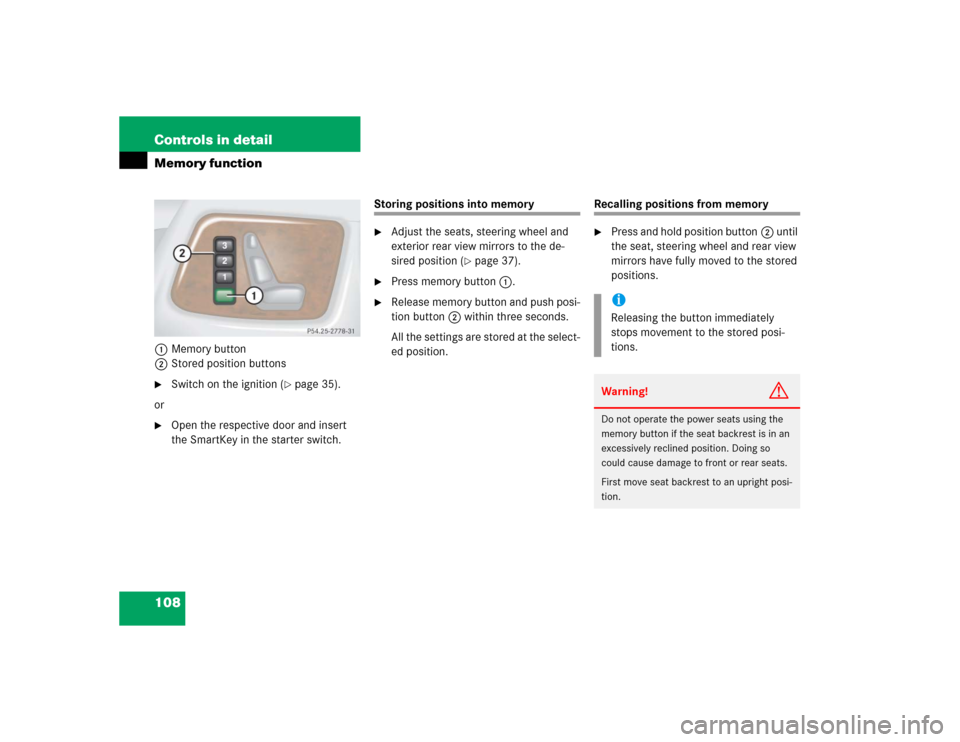
108 Controls in detailMemory function1Memory button
2Stored position buttons�
Switch on the ignition (
�page 35).
or
�
Open the respective door and insert
the SmartKey in the starter switch.
Storing positions into memory�
Adjust the seats, steering wheel and
exterior rear view mirrors to the de-
sired position (
�page 37).
�
Press memory button1.
�
Release memory button and push posi-
tion button2 within three seconds.
All the settings are stored at the select-
ed position.
Recalling positions from memory�
Press and hold position button2 until
the seat, steering wheel and rear view
mirrors have fully moved to the stored
positions.iReleasing the button immediately
stops movement to the stored posi-
tions.Warning!
G
Do not operate the power seats using the
memory button if the seat backrest is in an
excessively reclined position. Doing so
could cause damage to front or rear seats.
First move seat backrest to an upright posi-
tion.
Page 143 of 416

143 Controls in detail
Control system
Setting key-dependency
Use this function to set whether the mem-
ory settings for the seats, the steering
wheel and the exterior mirrors should be
stored separately for each SmartKey
(�page 107).
�
Move the selection marker with
theæ orç button to the CONVENIENCE
submenu.
�
Press buttonj ork repeatedly
until you see this message in the dis-
play:
SETTINGS KEY-DEPENDENT
.
The selection marker is on the current
setting.
�
Pressæ orç to set key depen-
dency to
ON or
OFF
. Setting parking position for exterior rear
view mirror
Use the
MIRROR SETTING WHEN PARKING
function to select whether the passen-
ger-side exterior rear view mirror should be
turned downward during parking maneu-
vers when reverse gear is engaged. For
more information, see “Activating exterior
rear view mirror parking position”
(
�page 161).
�
Move the selection marker with
theæ orç button to the CONVENIENCE
submenu.
�
Press buttonj ork repeatedly
until you see this message in the dis-
play:
MIRROR SETTING WHEN PARKING
.
The selection marker is on the current
setting.
�
Pressæ orç to switch function ON or
OFF
.
iFor safety reasons, resetting the SETTINGS KEY-DEPENDENT
submenu to
factory settings will not reset while
driving.
In the display you will then see the mes-
sage:
CONVENIENCE – CANNOT BE
TOTALLY RESET TO FACTORY SETTINGS
WHILE DRIVING
.
Page 184 of 416
.
�
Pull release lever1 in direction of ar-
row and fold seat backrest forward un-
til it locks in p")
184 Controls in detailLoading
Folding seat backrest forward�
Remove the head restraints
(�page 102).
�
Pull release lever1 in direction of ar-
row and fold seat backrest forward un-
til it locks in place.
Folding seat bench forward
�
Fold seat backrest forward.
�
Pull release lever2 in direction of ar-
row and fold seat bench forward to-
gether with the seat backrest.Returning seat bench and seat back-
rest to sitting position
�
Fold up seat bench until it locks in
place.
�
Pull release lever1 and raise seat
backrest until it locks in place.
�
Check to make sure the seat is locked
by pushing and pulling on the seat
backrest.
Warning!
G
Failure to assure that seats and seat back-
rest are locked into place could result in an
increased chance of injury in an accident.
Never place hands under seat or near any
moving parts while a seat is being adjusted.
For safety reasons, the rear seat bench
must only be adjusted when the vehicle is
stationary.
Never ride vehicle with the tailgate open.
Deadly carbon monoxide (CO) gases may
enter vehicle interior resulting in uncon-
sciousness and death.!Before folding the seat backrest for-
ward and the rear seat bench down, be
sure that all containers in the rear cup
holder are removed.
Warning!
G
Failure to assure that seats and seat back-
rests are locked into place could result in an
increased chance of injury in an accident.
Page 185 of 416
185 Controls in detail
Loading
Partition net* (MB Accessory)
Use of the partition net is a particularly im-
portant safety factor when the vehicle is
loaded higher than the top of the seat
backrests with smaller objects.
While the partition net will help protect you
from smaller objects, it cannot prevent the
movement of large, heavier objects into
the passenger area in an accident. Such
items must be properly secured using the
cargo tie-down rings in the cargo compart-
ment floor.The partition net can be installed behind
the seat backrests of the rear seat bench,
or behind the front seats if the rear seat
bench is folded down.Installation behind rear seat bench
1Partition net
2Mounting
�
Fold the rear seat bench forward
(�page 183).
�
Hook partition net1 in mountings2
on both sides.
iInstallation can be performed by open-
ing the rear doors.
iThis cannot be done by folding the rear
seat backrest forward.
Page 186 of 416
186 Controls in detailLoading3Lift tensioner
4Tie down
Lift tensioner3 on tie downs4 must
point in the direction of the arrow.5Hook
6Ring
�
Set the length of the tie downs4 and
lift tensioner3 to the rings6.
�
Insert tie down hooks5 in rings6.
Pull on loose ends of tie downs until net
is slightly tensioned.
�
Fold up seat bench until it locks in
place.
The partition net will be tightened by
the rear seat bench cushion.
After driving a short period, check the ten-
sion of the partition net, retighten if neces-
sary.Installation behind front seats
1Partition net
2Mounting
�
Fold rear seat bench fully forward
(�page 183).
�
Engage partition net1 in holders2.
Page 188 of 416

188 Controls in detailLoadingThe handling characteristics of a fully load-
ed vehicle depend greatly on the load dis-
tribution. It is therefore recommended to
load the vehicle according to the illustra-
tions shown, with the heaviest items being
placed towards the front of the vehicle.
�
Always place items being carried
against front or rear seat backrests,
and fasten them as securely as possi-
ble.
�
The heaviest portion of the cargo
should always be kept as low as possi-
ble against front or rear seat backrest
since it influences the handling charac-
teristics of the vehicle.
�
For additional safety when transporting
cargo while the rear seats are unoccu-
pied, fasten the outer seat belts cross-
wise into the opposite side buckles.
�
Always pad off sharp edges.
Warning!
G
Always fasten items being carried as secure-
ly as possible using cargo tie-down rings and
fastening materials appropriate for the
weight and size of the load.
In an accident, during hard braking or sud-
den maneuvers, loose items will be thrown
around inside the vehicle, and can cause in-
jury to vehicle occupants unless the items
are securely fastened in the vehicle.
To help avoid personal injury during a colli-
sion or sudden maneuver, always use parti-
tion net when transporting cargo.
Never ride vehicle with the tailgate open.
Deadly carbon monoxide (CO) gases may
enter vehicle interior resulting in uncon-
sciousness and death.
iThe rear cargo compartment is the pre-
ferred place to carry objects. The en-
larged cargo compartment (rear seats
folded) should only be used for items
which do not fit in the rear cargo com-
partment alone.
Page 193 of 416

193 Controls in detail
Useful features
Cup holder in rear passenger footwellParcel net in front passenger footwell
A small convenience parcel net is located
in the front passenger footwell. It is for
small and light items, such as road maps,
mail, etc.Storage bags
Storage bags are located on the rear side
of the front seats.
!Before folding the seat backrest for-
ward and the rear seat bench down, be
sure that all containers in the rear cup
holder are removed.
Warning!
G
Do not place heavy or fragile objects, or ob-
jects having sharp edges in the parcel net.
In an accident, during hard braking or sud-
den maneuvers, they could be thrown
around inside the vehicle and cause injury to
vehicle occupants.!When large objects are stored in the
parcel net, do not slide the seat fully
forward, it could damage them.
Warning!
G
Do not place heavy or fragile objects, or ob-
jects having sharp edges in the storage
bags.
In an accident, during hard braking or sud-
den maneuvers, they could be thrown
around inside the vehicle and cause injury to
vehicle occupants.
Page 271 of 416
 of
automatic transmission, power steering,")
271 Operation
Tires and wheels
Tire and loading terminology
Accessory weight
The combined weight (in excess of those
standard items which may be replaced) of
automatic transmission, power steering,
power brakes, power windows, power
seats, radio, and heater, to the extent that
these items are available as
factory-installed equipment (whether
installed or not).
Air pressure
The amount of air inside the tire pressing
outward on each square inch of the tire.
Air pressure is expressed in pounds per
square inch (psi), or kilopascal (kPa) or
bars.
Aspect ratio
Dimensional relationship between tire
section height and section width
expressed in percentage.Bar
Another metric unit for air pressure. There
are 14.5038 pounds per square inch (psi)
to 1 bar; there are 100 kilopascals (kPa)
to 1 bar.
Bead
The tire bead contains steel wires wrapped
by steel cords that hold the tire onto the
rim.
Cold tire inflation pressure
Tire inflation pressure when your vehicle
has been sitting for at least three hours or
driven no more than one mile (1.6 km).
Curb weight
The weight of a motor vehicle with stan-
dard equipment including the maximum
capacity of fuel, oil, and coolant, and, if so
equipped, air conditioning and additional
optional equipment, but without passen-
gers and cargo.DOT (D
epartment o
f T
ransportation)
A tire branding symbol which denotes the
tire meets requirements of the
U.S. Department of Transportation.
GAWR (G
ross A
xle W
eight R
ating)
The GAWR is the maximum permissible
axle weight. The gross vehicle weight on
each axle must never exceed the GAWR for
the front and rear axle indicated on the
Certification label located on the driver’s
door B-pillar.
GTW (G
ross T
railer W
eight)
The GTW is the weight of the trailer plus
the weight of all cargo, equipment, luggage
etc. loaded on the trailer.

Use of the partition net is a particularly im-
portant safety factor when the vehicle is
loaded higher than the top of the seat
backrests")
