Page 113 of 416

113 Controls in detail
Lighting
Locator lighting and night security illu-
mination
The locator lighting and the night security
illumination are described in the “Control
system section”, see (
�page 138) and
(
�page 139).
Exterior rear view mirror lamps
If the vehicle is centrally unlocked in the
darkness, the lamps in the exterior rear
view mirrors come on.
If a door is opened, the lamp on this side
goes out. If no doors are opened, the
lamps will switch off:
�
after a maximum of 40 seconds
�
immediately, when you switch on the
ignition (
�page 35)Fog lamps
Front fog lamps
�
Switch on the low beam headlamps
(�page 110).
�
Pull out the exterior lamp switch to first
stop.
The front fog lamps switch on.
The green indicator lamp‡ in the
exterior lamp switch comes on
(�page 110).
�
Push in the exterior lamp switch.
The front fog lamps switch off.
The green indicator lamp‡ in the
exterior lamp switch goes out.
Warning!
G
In low ambient lighting or foggy conditions,
only switch from position
U
to
B
with the vehicle at a standstill. Switching
from
U
to
B
will briefly switch off
the headlamps. Doing so while driving in low
ambient lighting conditions may result in an
accident.
iFog lamps will operate with the parking
lamps and/or low beam headlamps on.
Fog lamps should only be used in con-
junction with low beam headlamps.
Consult your State or Province Motor
Vehicle Regulations regarding allow-
able lamp operation.
iFog lamps cannot be switched on with
the exterior lamp switch in
positionU. For switching on the fog
lamps, turn the exterior lamp switch to
positionB first.
Page 120 of 416
.
1Reset button
The instrument clus")
120 Controls in detailInstrument clusterA full view illustration of the instrument
cluster can be found in the “At a glance”
section of this manual (
�page 24).
1Reset button
The instrument cluster is activated when
you:
�
Open a door.
�
Switch on ignition.
�
Press reset button1.
�
Switch on the exterior lamps.
You can change the instrument cluster set-
tings in the Instrument cluster submenu of
the control system (
�page 135).
Instrument cluster illumination
Use the reset button to adjust the illumina-
tion brightness for the instrument cluster.
To brighten illumination�
Turn reset button1 in the instrument
cluster clockwise.
The instrument cluster illumination will
brighten.To dim illumination
�
Turn reset button1 in the instrument
cluster counterclockwise.
The instrument cluster illumination will
dim.
Coolant temperature display
iThe instrument cluster illumination is
dimmed or brightened automatically to
suit ambient light conditions.
The instrument cluster illumination will
also be adjusted automatically when
you switch on the vehicle’s exterior
lamps.
Warning!
G
�
Driving when your engine is badly over-
heated can cause some fluids which
may have leaked into the engine com-
partment to catch fire. You could be se-
riously burned.
�
Steam from an overheated engine can
cause serious burns and can occur just
by opening the hood. Stay away from
the engine if you see or hear steam com-
ing from it.
Turn off the engine, get out of the vehicle
and do not stand near the vehicle until the
engine has cooled down.
Page 121 of 416
.
�
Call up the trip odometer and main
odometer (
�page 123) by pressing
buttonè orÿ on the multifunc-
tion steering w")
121 Controls in detail
Instrument cluster
�
Switch on the ignition (
�page 35).
�
Call up the trip odometer and main
odometer (
�page 123) by pressing
buttonè orÿ on the multifunc-
tion steering wheel (
�page 124).
�
Press buttonj ork until the
coolant temperature display appears.During severe operating conditions, e.g.
stop-and-go traffic, the coolant tempera-
ture may rise close to 248°F (120°C).
The engine should not be operated with
the coolant temperature above 248°F
(120°C). Doing so may cause serious en-
gine damage which is not covered by the
Mercedes-Benz Limited Warranty.
Trip odometer�
Make sure you are viewing the trip
odometer display (
�page 123).
�
If it is not displayed, press buttonè
orÿ on the multifunction steering
wheel (
�page 124) until the trip
odometer appears.
�
Press and hold the reset button on the
instrument cluster (
�page 120) until
the trip odometer is reset.
Tachometer
The red marking on the tachometer de-
notes excessive engine speed.
To help protect the engine, the fuel supply
is interrupted if the engine is operated
within the red marking.
iExcessive coolant temperature triggers
a warning in the multifunction display
(�page 306).
!Avoid driving at excessive engine
speeds, as it may result in serious en-
gine damage that is not covered by the
Mercedes-Benz Limited Warranty.
Page 160 of 416
 and for
setting the exterior rear view mirrors, see
“Mirrors” (
�page 41).
Rea")
160 Controls in detailGood visibilityFor information on windshield wipers, see
“Windshield wipers” (
�page 53) and for
setting the exterior rear view mirrors, see
“Mirrors” (
�page 41).
Rear view mirror
Auto-dimming mirrors
The reflection brightness of the exterior
rear view mirrors and the interior rear view
mirror will respond automatically to glare
when �
ignition is switched on, and
�
incoming light from headlamps falls on
the sensor in the interior rear view
mirror
The interior rear view mirror will not react if
�
reverse gear is engaged
�
the interior lighting is turned on
Warning!
G
The auto-dimming function does not react if
incoming light is not aimed directly at sen-
sors in the interior rear view mirror.
The interior rear view mirror and the exterior
rear view mirrors do not react, for example,
if the cargo compartment is fully loaded.
Glare can endanger you and others.
Warning!
G
In the case of an accident, liquid electrolyte
may escape from the mirror housing if the
mirror glass breaks.
Electrolyte has an irritating effect. Do not al-
low the liquid to come into contact with
eyes, skin, clothing, or the respiratory sys-
tem. In case it does, immediately flush af-
fected area with water, and seek medical
help if necessary.!Electrolyte drops coming into contact
with the vehicle paint finish can be
completely removed only while in the
liquid state by applying plenty of water.
Page 161 of 416

161 Controls in detail
Good visibility
Activating exterior rear view mirror
parking position
Follow these steps to activate the mirror
parking position so that the passen-
ger-side exterior rear view mirror will be
turned downward to the stored position.The buttons are located above the exterior
lamp switch.
1Driver’s side exterior rear view mirror
button
2Passenger-side exterior rear view
mirror button
�
Make sure you have stored a parking
position for the passenger-side exterior
rear view mirror (
�page 109).
�
Make sure the
MIRROR SETTING WHEN
PARKING
function in the
CONVENIENCE
submenu of the control system is
switched to
ON (�page 143).
�
Switch on the ignition (
�page 35).
�
Press button2 for the passenger-side
exterior rear view mirror.
�
Place the gear selector lever in reverse
gear R.
The passenger-side exterior rear view
mirror will be turned downward to the
stored position.
The exterior rear view mirror returns to its
previously stored driving position:
�
ten seconds after you put the gear se-
lector lever out of position R
�
immediately once you exceed a vehicle
speed of approx. 6 mph (10 km/h)
�
immediately when you press button1
for driver’s side exterior rear view
mirror
Warning!
G
Exercise care when using the passen-
ger-side exterior rear view mirror. The mirror
surface is convex (outwardly curved surface
for a wider field of view). Objects in mirror
are closer than they appear. Check your in-
side rear view mirror or glance over your
shoulder before changing lanes.
Page 162 of 416
162 Controls in detailGood visibilityHeadlamp cleaning system
The switch is located to the left of the
steering column.
1Headlamp washer switch�
Switch on the ignition (
�page 35).
�
Press switch1.
The headlamps will be cleaned with a
high-pressure water jet.
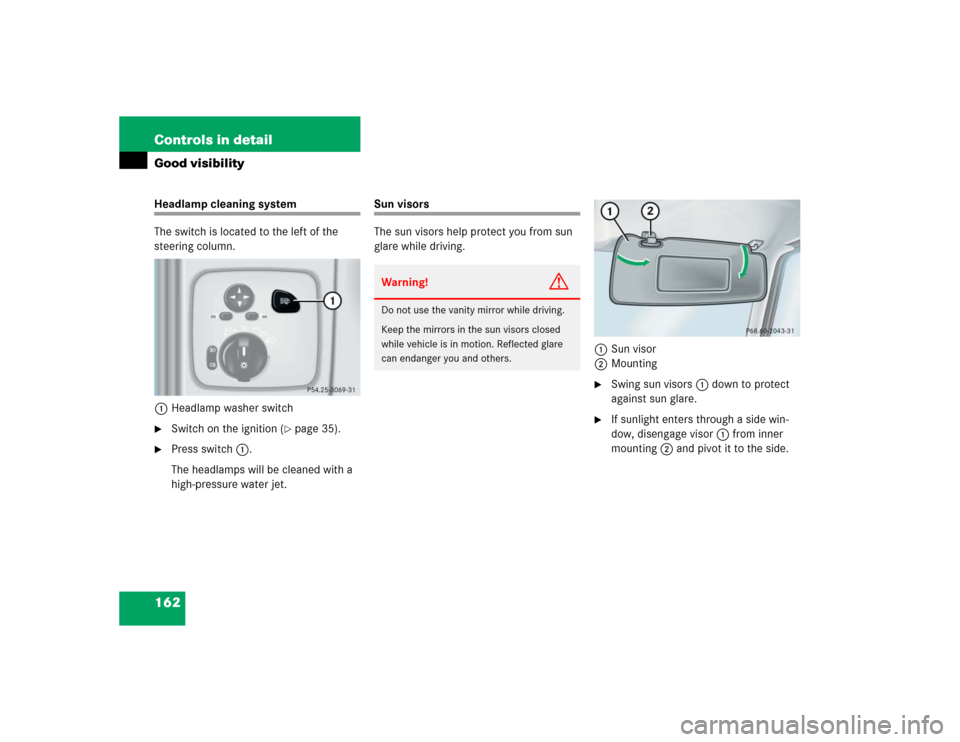
Sun visors
The sun visors help protect you from sun
glare while driving.
1Sun visor
2Mounting
�
Swing sun visors1 down to protect
against sun glare.
�
If sunlight enters through a side win-
dow, disengage visor1 from inner
mounting2 and pivot it to the side.
Warning!
G
Do not use the vanity mirror while driving.
Keep the mirrors in the sun visors closed
while vehicle is in motion. Reflected glare
can endanger you and others.
Page 163 of 416

163 Controls in detail
Good visibility
3Mirror cover
4Mirror lamp�
Make sure the ignition is switched on
and that the sun visor is engaged in
mounting2.
�
Open mirror cover3.
Mirror lamps4 switch on.
Rear window defroster
Switch on the ignition (
�page 35).
Activating
�
Press button F in the control panel
of the climate control.
The indicator lamp in the button comes
on.
Deactivating
�
Press button F in the control panel
of the climate control.
The indicator lamp in the button goes
out.iThe rear window defroster uses a large
amount of power. To keep the battery
drain to a minimum, turn off the de-
froster as soon as the rear window is
clear.
!Heavy accumulation of snow and ice
should be removed before activating
the defroster.
The defroster is automatically turned
off after approximately 6-17 minutes of
operation depending on the outside
temperature and vehicle speed.
If several power consumers are turned
on simultaneously, or the battery is
only partially charged, it is possible that
the defroster will automatically turn it-
self off.
When this happens, the indicator lamp
inside the switch starts blinking.
As soon as the battery has sufficient
voltage, the defroster turns itself back
on.
Page 174 of 416
.Opening and closing the tilt/sliding
sunroof
�
To open, close, raise or lower the
tilt/sliding sunroof, move the")
174 Controls in detailPower tilt/sliding sunroof�
Switch on the ignition (
�page 35).Opening and closing the tilt/sliding
sunroof
�
To open, close, raise or lower the
tilt/sliding sunroof, move the sunroof
switch to resistance point in the re-
quired direction of arrows1to4.
Release the sunroof switch when the
tilt/sliding sunroof has reached the de-
sired position.Fully opening (Express-open) the
tilt/sliding sunroof
�
To open the tilt/sliding sunroof, move
the sunroof switch past the resistance
point in direction of arrow4 and
release.
The tilt/sliding sunroof opens
completely.
Stopping the tilt/sliding sunroof during
Express-operation
�
Move the sunroof switch in any
direction.
!To avoid damaging the seals, do not
transport any objects with sharp edges
which can stick out of the tilt/sliding
sunroof.
Do not open the tilt/sliding sunroof if
there is snow or ice on the roof, as this
could result in malfunctions.
The tilt/sliding sunroof can be opened
or closed manually should an electrical
malfunction occur (
�page 328).
iYou can also open or close the
tilt/sliding sunroof using the SmartKey
(summer opening/convenience closing
feature) (
�page 175).