Page 89 of 416

89 Safety and Security
Anti-theft systems
Disarming the alarm system
The alarm system is disarmed when you
unlock your vehicle with the SmartKey. The
turn signal lamps blink once to indicate
that the alarm system is disarmed.Canceling the alarm
To cancel the alarm:
�
Press the Œ or ‹ button on the
SmartKey.
or
�
Insert the SmartKey in the starter
switch.
Tow-away alarm
Once the tow-away alarm is armed, a visual
and audible alarm will be triggered when
someone attempts to raise the vehicle.
iIf the turn signal lamps do not blink
three times, one of the following ele-
ments may not be properly closed:�
a door
�
the tailgate
�
the hood
Close the respective element and lock
the vehicle again.
iThe tow-away protection alarm is trig-
gered, for example, if the vehicle is lift-
ed on one side.
If the alarm stays on for more than
20 seconds, an emergency call is initi-
ated automatically by the Tele Aid sys-
tem provided Tele Aid service was
subscribed to and properly activated,
and that necessary cellular service and
GPS coverage are available.
Page 92 of 416

92 Controls in detailIn the “Controls in detail” section you will
find detailed information on how to oper-
ate the equipment installed in your vehicle.
If you are already familiar with the basic
functions of your vehicle, this section will
be of particular interest to you.
To quickly familiarize yourself with the ba-
sic functions of the vehicle, refer to the
“Getting started” section of this manual.
The corresponding page numbers are giv-
en at the beginning of each segment.Locking and unlocking
SmartKey
Your vehicle comes supplied with two
SmartKeys, each with remote control and
a removable mechanical key. The locking
tabs for the mechanical key portion of the
two SmartKeys are a different color to help
distinguish each key unit.
The SmartKey provides an extended oper-
ating range. To prevent theft, however, it is
advisable to only unlock the vehicle when
you are in close proximity to it.
The SmartKey centrally locks and unlocks:�
the doors
�
the tailgate
�
the fuel filler flap
SmartKey with remote control1‹ Lock button
2Locking tab for mechanical key
3ΠUnlock button
4Battery check lamp
5Â Panic button (
�page 79)
iYou can also open and close the power
windows (
�page 172) and tilt/sliding
sunroof (
�page 175) using the
SmartKey.
Page 97 of 416
97 Controls in detail
Locking and unlocking
Front doors�
Pull on door handle2 on the respec-
tive front door to open it.
If the door was locked, locking knob1
moves up.
Rear doors
�
Pull up locking knob1 on the respec-
tive rear door to unlock door.
�
Pull on door handle2 on the unlocked
door to open it.
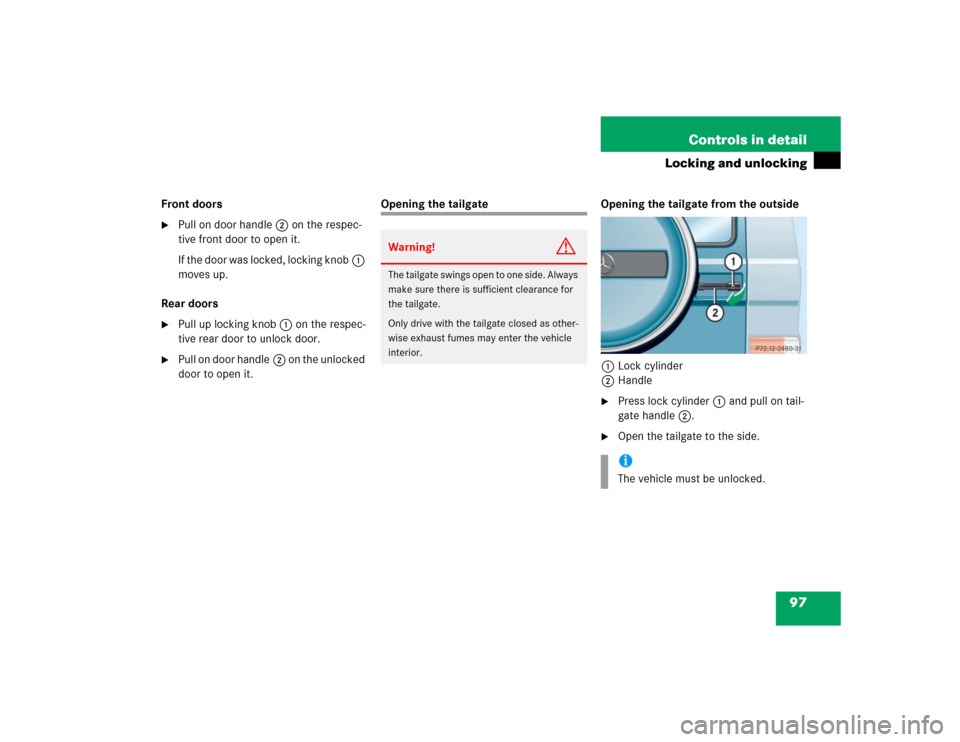
Opening the tailgate Opening the tailgate from the outside
1Lock cylinder
2Handle
�
Press lock cylinder1 and pull on tail-
gate handle2.
�
Open the tailgate to the side.
Warning!
G
The tailgate swings open to one side. Always
make sure there is sufficient clearance for
the tailgate.
Only drive with the tailgate closed as other-
wise exhaust fumes may enter the vehicle
interior.
iThe vehicle must be unlocked.
Page 98 of 416

98 Controls in detailLocking and unlockingOpening the tailgate from inside
1Locking knob
2Inside door handle�
Pull on door handle2.
If door was locked, pull up locking
knob1 to unlock the tailgate. Then
pull on door handle2 to open the
tailgate.
Closing the tailgate
Automatic central locking
The doors and the tailgate automatically
lock when ignition is switched on and the
wheels are turning at vehicle speeds of ap-
proximately 9 mph (15 km/h) or more.
You can open a locked door from the in-
side. Open door only when conditions are
safe to do so.
You can deactivate the automatic locking
mode using the control system
(�page 141).
Warning!
G
Do not leave children unattended in the ve-
hicle. Unsupervised use of vehicle equip-
ment may cause an accident and/or serious
personal injury.
Warning!
G
To prevent possible personal injury, always
keep hands and fingers away from the tail-
gate opening when closing the tailgate. Be
especially careful when small children are
around.Warning!
G
Only drive with the tailgate closed as other-
wise exhaust fumes may enter the vehicle
interior.iTo prevent an inadvertent lockout, do
not place the SmartKey in the cargo
compartment.
iThe doors and the tailgate unlock auto-
matically after an accident if the force
of the impact exceeds a preset
threshold.
To prevent the vehicle door locks from
locking, deactivate the automatic
central locking when the vehicle�
is pushed
�
is on a test stand
Page 108 of 416
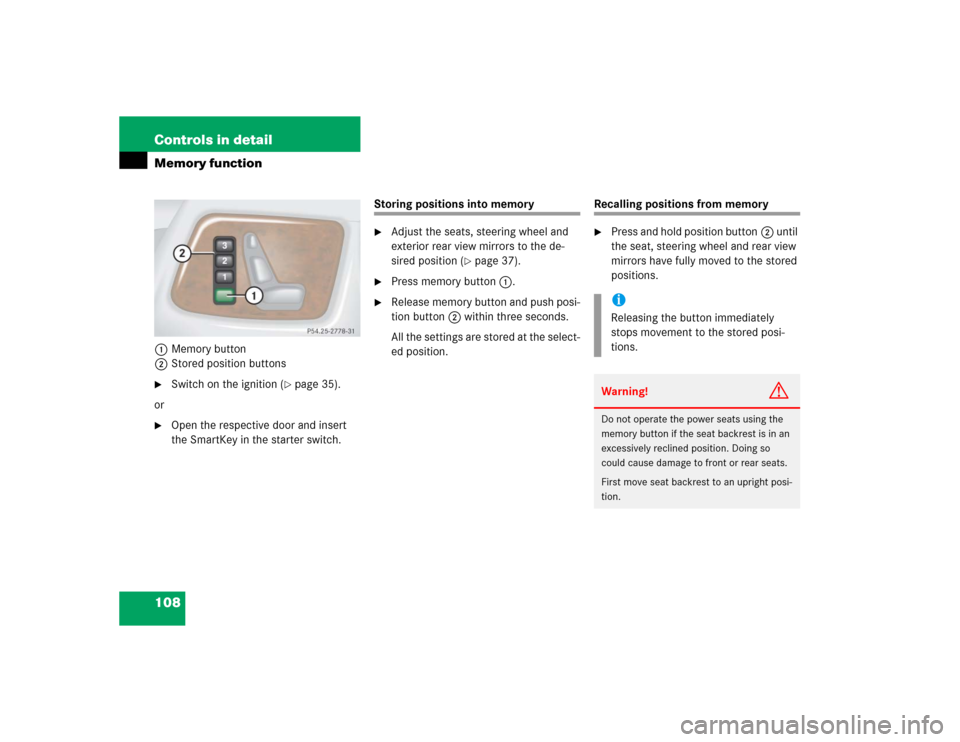
108 Controls in detailMemory function1Memory button
2Stored position buttons�
Switch on the ignition (
�page 35).
or
�
Open the respective door and insert
the SmartKey in the starter switch.
Storing positions into memory�
Adjust the seats, steering wheel and
exterior rear view mirrors to the de-
sired position (
�page 37).
�
Press memory button1.
�
Release memory button and push posi-
tion button2 within three seconds.
All the settings are stored at the select-
ed position.
Recalling positions from memory�
Press and hold position button2 until
the seat, steering wheel and rear view
mirrors have fully moved to the stored
positions.iReleasing the button immediately
stops movement to the stored posi-
tions.Warning!
G
Do not operate the power seats using the
memory button if the seat backrest is in an
excessively reclined position. Doing so
could cause damage to front or rear seats.
First move seat backrest to an upright posi-
tion.
Page 111 of 416

111 Controls in detail
Lighting
Manual headlamp mode
The low beam headlamps and the parking
lamps can be switched on and off with the
exterior lamp switch.
Automatic headlamp mode
The following lamps switch on and off au-
tomatically depending on the brightness of
the ambient light:�
Low beam headlamps
�
Tail and parking lamps
�
License plate lamps
�
Side marker lamps
�
Turn the exterior lamp switch to
positionU.
With the SmartKey in starter switch
position1 only the parking lamps will
switch on and off automatically.
When the engine is running, the low
beam headlamps, the tail and parking
lamps, the license plate lamps, and the
side marker lamps will switch on and
off automatically.
iWith the SmartKey removed from the
starter switch and the driver’s door
open, a warning sounds if the parking
lamps or low beam headlamps are
switched on.
The message
TURN OFF LIGHTS!
ap-
pears in the multifunction display.
Warning!
G
If the exterior lamp switch is set toU,�
the headlamps may switch off unexpect-
edly when the system senses bright am-
bient light, for example light from
oncoming traffic.
�
the headlamps will not be automatically
switched on under foggy conditions.
To minimize risk to you and to others,
activate headlamps by turning exterior
lamp switch to
B
when driving or
when traffic and / or ambient lighting
conditions require you to do so.
In low ambient lighting conditions, only
switch from position U
to
B
with
the vehicle at a standstill. Switching
from
U
to
B
will briefly switch
off the headlamps. Doing so while driv-
ing in low ambient lighting conditions
may result in an accident.
The automatic headlamp feature is only an
aid to the driver. The driver is responsible for
the operation of the vehicle’s lights at all
times.
Page 112 of 416

112 Controls in detailLightingDaytime running lamp mode�
Turn exterior lamp switch to
positionM orU.
When the engine is running, the low
beam headlamps are switched on.
In low ambient light conditions, the
following lamps will switch on
additionally:�
Tail and parking lamps
�
License plate lamps
�
Side marker lamps
For nighttime driving, you should turn the
exterior lamp switch to positionB to
permit activation of the high beam head-
lamps.Canada only:
The daytime running lamp mode is manda-
tory and therefore in a constant mode.
Vehicles with automatic transmission*:
When the engine is running, and you shift
from a driving position to positionN orP,
the low beam headlamps will switch off
with a three-minute delay.
When the engine is running, and you
�
turn the exterior lamp switch to
positionC, the parking lamps
switch on additionally.
�
turn the exterior lamp switch to
positionB, the manual headlamp
mode has priority over the daytime run-
ning lamp mode.
The corresponding exterior lamps
switch on (
�page 110).USA only:
By default, the daytime running lamp mode
is deactivated. Activate the daytime run-
ning lamp mode using the control system,
see “Setting daytime running lamp mode”
(
�page 137).
When the engine is running, and you turn
the exterior lamp switch to
positionCorB, the manual head-
lamp mode has priority over the daytime
running lamp mode.
The corresponding exterior lamps switch
on (�page 110).
iWith the daytime running lamp mode
and the exterior lamp switch in
positionM you cannot switch on the
high beam headlamps.
The high beam flasher is available at all
times.
Page 119 of 416
119 Controls in detail
Lighting
Switching off�
Open the tailgate.
�
Press door lock1 down until it
engages (arrow).Switching on
�
Press lock cylinder2 to activate the
cargo compartment lamps again.
The cargo compartment lamps will
switch on.
!Do not close the tailgate if the lock is
engaged in down position. The lock
could otherwise be damaged.
When locking the tailgate, it is impor-
tant that the door lock be in the same
original position as shown in the illus-
tration.
To return the door lock1 to its origi-
nal position, press lock cylinder2.
Warning!
G
To prevent possible personal injury, always
keep hands and fingers away from the tail-
gate opening when closing the tailgate. Be
especially careful when small children are
around.
Only drive with the tailgate closed as other-
wise exhaust fumes may enter the vehicle
interior.