Page 306 of 416
.
Display symbol
Display message
Possi")
306 Practical hintsWhat to do if …
During severe operating conditions and
stop-and-go city traffic, the coolant tem-
perature may rise close to 248°F (120°C).
Display symbol
Display message
Possible cause
Possible solution
Ï
COOLANT
STOP, ENGINE OFF!
The coolant is too hot.
�
Stop the vehicle and turn off the en-
gine.
�
Only start the engine again after the
message disappears. You could other-
wise damage the engine.
Warning!
G
Driving when your engine is badly overheat-
ed can cause some fluids which may have
leaked into the engine compartment to
catch fire. You could be seriously burned.
Steam from an overheated engine can cause
serious burns and can occur just by opening
the hood. Stay away from the engine if you
see or hear steam coming from it.
Turn off the engine, get out of the vehicle
and do not stand near the vehicle until the
engine has cooled down.
!The engine should not be operated with
the coolant temperature above 248°F
(120°C). Doing so may cause serious
engine damage which is not covered by
the Mercedes-Benz Limited Warranty.
Page 309 of 416

message appears while the engine is run-
ning and at operating temperature, the e")
309 Practical hints
What to do if …
When the
ADD 1.0 QT. ENG. OIL
- WHEN
NEXT REFUELLING!
(Canada:
1.0 LITER
)
message appears while the engine is run-
ning and at operating temperature, the en-
gine oil level has dropped to approximately
the minimum level.When this occurs, the warning will first
come on intermittently and then stay on if
the oil level drops further.
Visually check for oil leaks. If no obvious oil
leaks are noted, drive to the nearest ser-
vice station where the engine oil should be
topped to the required level with an ap-
proved oil specified in the Factory
Approved Service Products pamphlet.
Display symbol
Display message
Possible cause
Possible solution
:
USA only:ADD 1.0 Qt. ENGINE OIL
WHEN NEXT REFUELING!Canada only:ADD 1.0 LITER ENG. OIL
WHEN NEXT REFUELING!
The engine oil level is too low.
�
Add engine oil (
�page 243) and check
the engine oil level (
�page 240).
!The engine oil level warnings should
not be ignored. Extended driving with
the symbol displayed could result in
serious engine damage that is not
covered by the Mercedes-Benz Limited
Warranty.
Page 317 of 416

317 Practical hints
What to do if …
Display symbol
Display message
Possible cause
Possible solution
1
RESTRAINT SYSTEM
SERVICE
The system is malfunctioning. The air-
bags or emergency tensioning device
(ETD) could deploy unexpectedly or fail to
activate in an accident.
�
Drive with added caution to the near-
est authorized Mercedes-Benz Light
Truck Center.
RESTRAINT SYSTEM
DRIVE TO WORKSHOP!
The system is malfunctioning. The air-
bags or emergency tensioning device
(ETD) could deploy unexpectedly or fail to
activate in an accident.
�
Drive with added caution to the near-
est authorized Mercedes-Benz Light
Truck Center.
Warning!
G
In the event a malfunction of the SRS is indi-
cated as outlined above, the SRS may not be
operational.
For your safety, we strongly recommend
that you visit an authorized Mercedes-Benz
Light Truck Center immediately to have the
system checked.
Otherwise the SRS may not be activated
when needed in an accident, which could re-
sult in serious or fatal injury, or it might de-
ploy unexpectedly and unnecessarily which
could also result in injury.
Page 318 of 416
318 Practical hintsWhat to do if …Display symbol
Display message
Possible cause
Possible solution
<
SEAT BELT SYSTEM
DRIVE TO WORKSHOP!
The seat belt system is malfunctioning.
�
Visit an authorized Mercedes-Benz
Light Truck Center as soon as
possible.
§
TC IN NEUTRAL
No gear has been selected in the transfer
case, it is in NEUTRAL.
�
Engage transfer case to gear position
HIGH or LOW (
�page 154).
Warning!
G
If the transfer case is in NEUTRAL, the
Pposition of transmission will not hold vehi-
cle. The parking brake must be applied to
hold vehicle in place.
Page 322 of 416
.
�
O")
322 Practical hintsWhere will I find...?Vehicle jack
The vehicle jack is under the rear bench
seat on the passenger side.
1Cover
2Tab
3Vehicle jack�
Fold the rear bench seat forward
(�page 184).
�
Open cover1.
�
Open tab2 and remove vehicle
jack3.
Please also observe the safety guidelines
in the “Flat tire” section (
�page 346)
when using the jack.
CD changer
The CD changer is located on the left side
of the cargo compartment.CD changer
Warning!
G
The jack is designed exclusively for jacking
up the vehicle under the axle housing. To
help avoid personal injury, use the jack only
to lift the vehicle during a wheel change.
Never get beneath the vehicle while it is sup-
ported by the jack. Keep hands and feet
away from the area under the lifted vehicle.
Always firmly set parking brake and block
wheels before raising vehicle with jack.
Do not disengage parking brake while the
vehicle is raised. Be certain that the jack is
always vertical (plumb line) when in use, es-
pecially on hills. Always try to use the jack
on level surface. Make sure the jack is posi-
tioned correctly under the axle housing. Al-
ways lower the vehicle onto sufficient
capacity jackstands before working under
the vehicle.
iFor CD changer instructions, see sepa-
rate COMAND operator’s manual.
Page 324 of 416
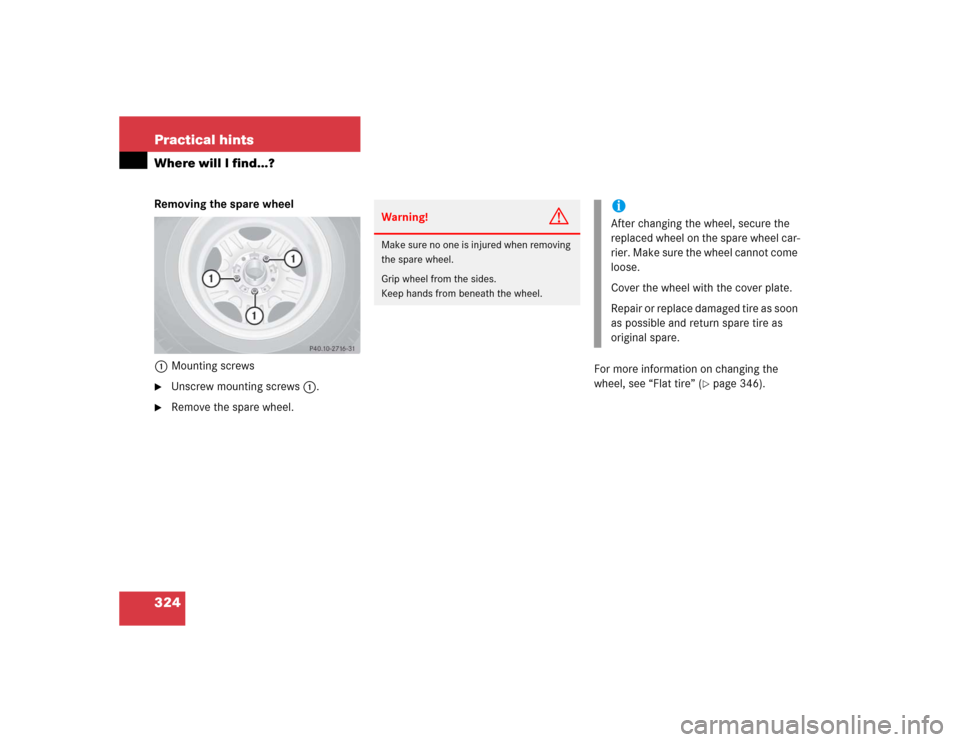
324 Practical hintsWhere will I find...?Removing the spare wheel
1Mounting screws�
Unscrew mounting screws1.
�
Remove the spare wheel.For more information on changing the
wheel, see “Flat tire” (
�page 346).
Warning!
G
Make sure no one is injured when removing
the spare wheel.
Grip wheel from the sides.
Keep hands from beneath the wheel.
iAfter changing the wheel, secure the
replaced wheel on the spare wheel car-
rier. Make sure the wheel cannot come
loose.
Cover the wheel with the cover plate.
Repair or replace damaged tire as soon
as possible and return spare tire as
original spare.
Page 326 of 416

326 Practical hintsUnlocking/locking in an emergency�
Press lock cylinder2 and pull on tail-
gate handle3.
�
Open the tailgate to the side.
Locking the vehicle
If you are unable to lock the vehicle with
the SmartKey, lock it with the mechanical
key as follows:�
Close the passenger doors and the tail-
gate.
�
Press the central locking switch in the
cockpit (
�page 99).
�
Check to see whether the locking
knobs on the passenger doors are still
visible. If necessary, push them down
manually.
�
Slide the mechanical key2 out of the
SmartKey.
�
Lock the driver’s door with the me-
chanical key.
�
Check if the tailgate is locked. If neces-
sary lock the tailgate with the mechan-
ical key.
Fuel filler flap
The emergency release is in the cargo
compartment behind the rear panel trim.
1Edge protection
2Rear panel trim�
Open the tailgate.
�
Remove edge protection1 from the
door pillar.
�
Remove rear panel trim2.
Warning!
G
The tailgate swings open to one side. Always
make sure there is sufficient clearance for
tailgate.iUnlocking your vehicle with the me-
chanical key will trigger the anti-theft
alarm system. To cancel the alarm, do
one of the following:�
Press button Œ or ‹ on the
SmartKey.
�
Insert the SmartKey in the starter
switch.
��
Page 329 of 416
329 Practical hints
Brush guard*
�Brush guard*
Warning!
G
The brush guard is designed solely to en-
hance the appearance of the vehicle and
help protect grille and headlights from minor
mishaps, either on- or off-road. Since the
safety characteristics are limited in the
event of an accident, brush guards are not
intended to prevent injury or damage in the
event of an accident. Also check state and
local regulations on installation and use.
Raise and lower brush guard in an open
space with plenty of room.
To help prevent personal injury when open-
ing or closing the brush guard, use extreme
caution not to trap hands or feet.
The brush guard must be in raised and
locked position while driving.
iOnly lower brush guard to clean head
lamps or to replace bulbs.