Page 272 of 416

The GVW comprises the weight of the
vehicle including fuel, tools, spare wheel,
installed accessories, passengers and
cargo and, if applic")
272 OperationTires and wheelsGVW (G
ross V
ehicle W
eight)
The GVW comprises the weight of the
vehicle including fuel, tools, spare wheel,
installed accessories, passengers and
cargo and, if applicable, trailer tongue
load. The GWV must never exceed the
GWVR indicated on the Certification label
located on the driver’s door B-pillar.
GVWR (G
ross V
ehicle W
eight R
ating)
This is the maximum permissible vehicle
weight of the fully loaded vehicle (weight of
the vehicle including all options, passen-
gers, fuel, and cargo and, if applicable,
trailer tongue load). It is indicated on
Certification label located on the driver’s
door B-pillar.
Kilopascal (kPa)
The metric unit for air pressure. There are
6.9 kPa to one psi; another metric unit for
air pressure is bars. There are
100 kilopascals (kPa) to one bar.Maximum load rating
The maximum load in kilograms and
pounds that can be carried by the tire.
Maximum loaded vehicle weight
The sum of curb weight, accessory weight,
vehicle capacity weight and production
options weight.
Maximum tire inflation pressure
This number is the greatest amount of air
pressure that should ever be put in the tire
under normal driving conditions.
Normal occupant weight
The number of occupants the vehicle is
designed to seat, multiplied by
68 kilograms (150 lbs).
Occupant distribution
The distribution of occupants in a vehicle
at their designated seating positions.Production options weight
The combined weight of those installed
regular production options weighing over
5 lbs (2.3 kilograms) in excess of those
standard items which they replace, not
previously considered in curb weight or
accessory weight, including heavy duty
brakes, ride levelers, heavy duty battery,
and special trim.
PSI (P
ounds per s
quare i
nch)
A standard unit of measure for air pressure
-> bar, kilopascal (kPa).
Recommended tire inflation pressure
Recommended tire inflation pressure
listed on placard located on driver’s door
B-pillar for normal driving conditions.
Provides best handling, tread life and
riding comfort.
Page 275 of 416

275 Operation
Winter driving
�Winter driving
Before the onset of winter, have your
vehicle winterized at an authorized
Mercedes-Benz Light Truck Center. This
service includes:�
Check of anticorrosion and antifreeze
concentration.
�
Addition of cleaning concentrate to the
water of the windshield and headlamp
cleaning system. Add MB Concentrate
“S” to a premixed windshield washer
solvent/antifreeze which is formulated
for below freezing temperatures
(�page 380).
�
Battery test. Battery capacity drops
with decreasing ambient temperature.
A well charged battery helps to make
sure that the engine can be started,
even at low ambient temperatures.
�
Tire change. Mercedes-Benz recom-
mends M+S rated radial-ply tires with a
minimum tread depth of approximately 1/6in (4 mm) on all four wheels for the
winter season.
Winter tires
Always use winter tires at temperatures
below 45°F (7°C) and whenever wintry
road conditions prevail. Use of winter tires
is the only way to achieve the maximum ef-
fectiveness of the ABS, ESP, 4-ETS, and
EBP in winter operation.
For safe handling, make sure that all
mounted winter tires are of the same make
and have the same tread design.Always observe the speed rating of the
winter tires installed on your vehicle. If the
maximum speed for which your tires are
rated is below the speed rating of your
vehicle, you must place a notice to this
effect where it will be seen by the driver.
Such notices are available from your tire
dealer or from any authorized
Mercedes-Benz Light Truck Center.Warning!
G
Winter tires with a tread depth under
1/6in
(4 mm) must be replaced. They are no
longer suitable for winter operation.
Warning!
G
If you use your spare tire when winter tires
are fitted on the other wheels, be aware that
the difference in tire characteristics may
very well impair turning stability and that
overall driving stability may be reduced.
Adapt your driving style accordingly.
Have the spare tire replaced with a winter
tire at the nearest authorized
Mercedes-Benz Light Truck Center.
Page 323 of 416
323 Practical hints
Where will I find...?
Spare wheel
The spare wheel is located under a cover
on the outside of the vehicle’s tailgate.
For information on rim and tire specifica-
tions, see (
�page 369) and (
�page 371).
Removing cover
1Cover ring
2Key
3Tab
�
Open lock for cover ring1 with
key2 for the spare wheel cover.
�
Fold tab3 downwards.
4Cover plate
�
Pull cover ring1 slightly outwards in
direction of arrows and remove.
�
Pull cover plate4 upward towards
you.5Catch
6Recess
iWhen replacing cover plate4, make
sure catch5 engages in recess6.
Make sure the lock faces downwards
when mounting cover ring1.
For safety reasons, check regularly that
the spare wheel is securely fastened.
Page 324 of 416
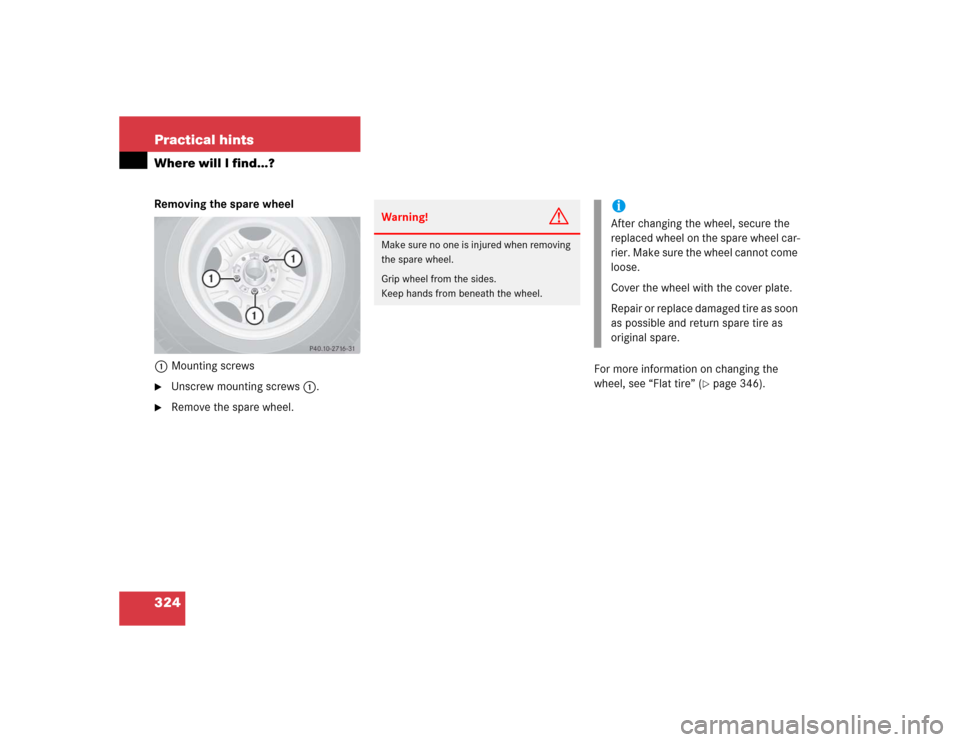
324 Practical hintsWhere will I find...?Removing the spare wheel
1Mounting screws�
Unscrew mounting screws1.
�
Remove the spare wheel.For more information on changing the
wheel, see “Flat tire” (
�page 346).
Warning!
G
Make sure no one is injured when removing
the spare wheel.
Grip wheel from the sides.
Keep hands from beneath the wheel.
iAfter changing the wheel, secure the
replaced wheel on the spare wheel car-
rier. Make sure the wheel cannot come
loose.
Cover the wheel with the cover plate.
Repair or replace damaged tire as soon
as possible and return spare tire as
original spare.
Page 346 of 416

346 Practical hintsFlat tirePreparing the vehicle�
Park the vehicle as far as possible from
moving traffic on a hard surface.
�
Turn on the hazard warning flashers.
�
Engage the steering wheel lock in the
straight ahead position and set the
parking brake.
�
Move the gear selector lever toP.
�
Have any passenger exit the vehicle at
a safe distance from the roadway.
�
Remove the vehicle tool kit
(�page 321) and the jack
(�page 322).
�
Remove the spare wheel from the
spare wheel mounting bracket
(�page 323).Information on spare wheel
When you replace the vehicle’s tires, you
can use the spare wheel as a regular wheel
if:
�
it is not more than six years old
�
rim and tire are the same model as the
regular wheels
Warning!
G
For your safety, remove spare wheel from
the spare wheel mounting bracket before
undertaking any further steps.
Warning!
G
If the spare tire is more than six years old or
is not the same model as the regular tires,
have the spare tire replaced with a new tire
at the nearest Mercedes-Benz Light Truck
Center.
Never operate the vehicle with more than
one spare tire.
Warning!
G
G55AMG:
Vehicles with different tire dimensions on
the front and rear axle: rim and tire size of
spare wheel and normal wheel differ.
Handling will be adversely affected when the
spare wheel is used.
Do not exceed the maximum speed of
50 mph (80 km/h).
Page 347 of 416
.
Lifting the vehicle
�
Prevent the vehicle from rolling away
by blocking wheels with wheel chocks
(not includ")
347 Practical hints
Flat tire
Mounting the spare wheel�
Prepare the vehicle (
�page 346).
Lifting the vehicle
�
Prevent the vehicle from rolling away
by blocking wheels with wheel chocks
(not included) or other sizable objects.
When changing wheel on a level surface:
�
Place one chock in front of and one be-
hind the wheel that is diagonally oppo-
site to the wheel being changed.
When changing wheel on a hill:
�
Place chocks on the downhill side
blocking both wheels of the other axle.
Wheel wrench�
On wheel to be changed, loosen but do
not yet remove the wheel bolts (ap-
proximately one full turn with wrench).
Warning!
G
The jack is designed exclusively for jacking
up the vehicle under the axle housing. To
help avoid personal injury, use the jack only
to lift the vehicle during a wheel change.
Never get beneath the vehicle while it is sup-
ported by the jack. Keep hands and feet
away from the area under the lifted vehicle.
Always firmly set parking brake and block
wheels before raising vehicle with jack.
Do not disengage parking brake while the
vehicle is raised. Be certain that the jack is
always vertical (plumb line) when in use, es-
pecially on hills. Always try to use the jack
on level surface. Make sure the jack is posi-
tioned correctly under the axle housing. Al-
ways lower the vehicle onto sufficient
capacity jackstands before working under
the vehicle.
If the vehicle is not raised as described, it
could slip off the jack as a result of vibra-
tions (e.g. opening or closing a door or the
tailgate).
Page 350 of 416
.
The vehicle is resting fully on its own
weight.
�
R")
350 Practical hintsFlat tireLowering the vehicle�
Using the pump lever, open the lower-
ing screw on the jack approximately
one turn (
�page 348).
The vehicle is resting fully on its own
weight.
�
Remove the jack.
After use, disassemble pump handle
(�page 348) and store jack in the des-
ignated storage compartment
(�page 322).
1-5 Wheel bolts
�
Tighten the five wheel bolts evenly, fol-
lowing the diagonal sequence illustrat-
ed (1 to 5), until all bolts are tight.
Observe a tightening torque of 97 lb-ft
(130 Nm).
�
Press the jack piston in again and close
the lowering screw. Store the jack
(�page 322) and the other vehicle
tools (
�page 321).
�
After changing the wheel, secure the
damaged wheel on the spare wheel
mounting bracket (
�page 324). Make
sure the wheel cannot come loose.
�
Check the tire inflation pressure and
correct it if necessary.
A table with the tire pressure values for
your vehicle is located on the fuel filler
flap.
Warning!
G
Have the tightening torque checked after
changing a wheel as soon as possible. The
wheels could come loose if they are not
tightened to a torque of 97 lb-ft (130 Nm).
Page 371 of 416
371 Technical data
Rims and tires
Spare wheels
G 500
G55AMG
Rims (light alloy)
71/2 J x18 H2
71/2 J x18 H2
Wheel offset
1.69 in (43 mm)
1.69 in (43 mm)
All season tires (radial-ply tires)
265/60 R18 110V M+S
265/60 R18 110V M+S


71/2 J x18 H2
71/2 J x18 H2
Wheel offset
1.69 in (43 mm)
1.69 in (43 mm)
All season tires (radial-ply tires)
265/60 R18 1")