Page 108 of 506

106 Controls in detailLocking and unlockingSelective setting
If you frequently travel alone, you may wish
to reprogram the SmartKey with
KEYLESS-GO so when you grasp the driv-
er’s door handle only the driver’s door and
the fuel filler flap unlocks.�
Press and hold buttonsŒ and‹
simultaneously for about five seconds
until battery check lamp5 flashes
twice.
The SmartKey with KEYLESS-GO will
then function as follows:
Unlocking driver’s door and fuel filler
flap
�
Press buttonΠonce.
All turn signal lamps flash once. The
locking knob in the driver's door moves
up. The anti-theft alarm system is dis-
armed.Global unlocking
�
Press buttonΠtwice.
All turn signal lamps flash once. The
locking knobs in the doors move up.
The anti-theft alarm system is dis-
armed.
Global locking
�
Press button‹.
All turn signal lamps flash three times.
The locking knobs in the doors move
down. The anti-theft alarm system is
armed.
Restoring to factory setting
�
Press and hold buttonsŒ and‹
simultaneously for about six seconds
until battery check lamp5 flashes
twice.
!If you can no longer lock or unlock the
vehicle with the SmartKey with
KEYLESS-GO, then the batteries in the
SmartKey are discharged, the
SmartKey with KEYLESS-GO is mal-
functioning or the vehicle battery is
drained.�
Check the batteries in the
SmartKey with KEYLESS-GO
(�page 107) and replace them if
necessary (
�page 415).
�
Use the mechanical key to unlock
the driver’s door (
�page 410).
�
Have the vehicle battery checked
by an authorized Mercedes-Benz
Center.
�
Use the mechanical key to lock the
driver’s door (
�page 410).
If the SmartKey with KEYLESS-GO is
malfunctioning, contact an authorized
Mercedes-Benz Center.
Page 237 of 506

235 Controls in detail
Driving systems
Distronic*
When activated, the Distronic adaptive
cruise control system increases driving
convenience afforded by the cruise control
during travel on expressways and other
major roads.�
If the Distronic distance sensor detects
a slower moving vehicle directly ahead,
your vehicle speed will be reduced so
that you follow that vehicle at a preset
distance.
�
If there is no vehicle directly ahead of
you, Distronic will function in the same
way as cruise control (
�page 239).
Warning!
G
Distronic adaptive cruise control is no sub-
stitute for active driving involvement. It does
not react to stationary objects, nor recog-
nize or predict the curvature and lane layout
or the movement of vehicles ahead.
Distronic can only apply a maximum of 20%
of the vehicle’s braking power.
It is the driver’s responsibility at all times to
be attentive to traffic and road conditions
and to provide the steering, braking and oth-
er driving inputs necessary to retain control
of the vehicle.Warning!
G
Distronic is a convenience system. Its speed
adjustment reduction capability is intended
to make cruise control more effective and
usable when traffic speeds vary. However, it
is not intended to, nor does it, replace the
need for extreme care. The responsibility for
the vehicle speed and the distance to the ve-
hicle ahead, including most importantly
brake operation to assure safe stopping dis-
tance, always rests with the driver.
Distronic cannot take street and traffic con-
ditions into account.
Warning!
G
Distronic requires familiarity with its opera-
tional characteristics. We strongly recom-
mend that you review the following
information carefully before operating the
system.iUSA only:
This device complies with Part 15 of
the FCC Rules. Operation is subject to
the following two conditions:
(1) This device may not cause harmful
interference, and
(2) this device must accept any inter-
ference received, including interfer-
ence that may cause undesired
operation.
Any unauthorized modification to this
device could void the user’s authority
to operate the equipment.
Page 256 of 506
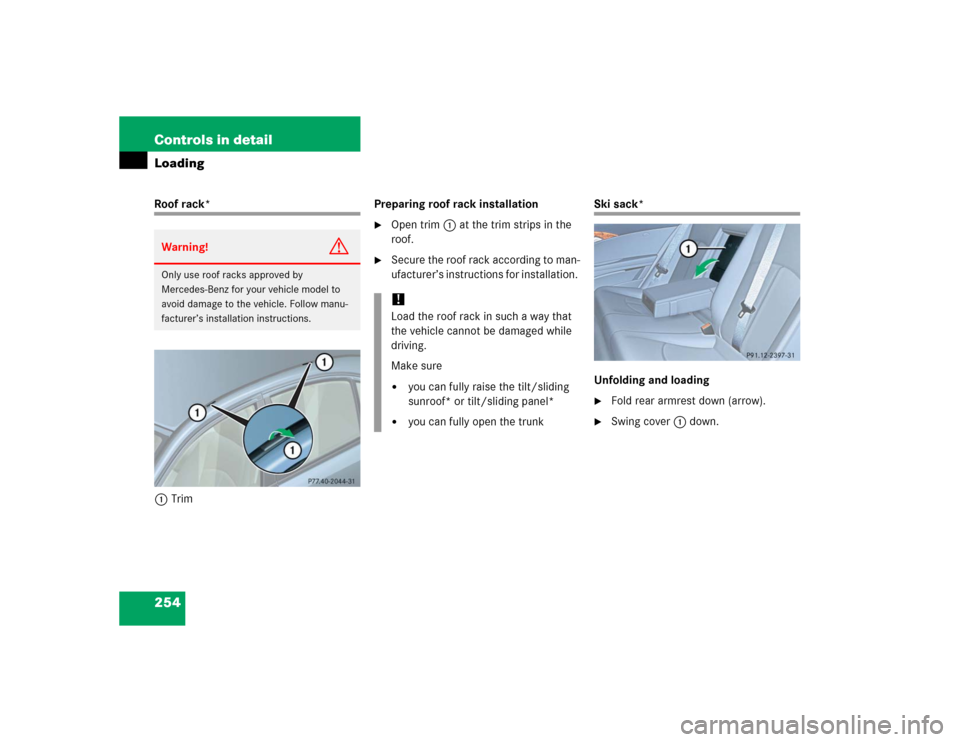
254 Controls in detailLoadingRoof rack*
1TrimPreparing roof rack installation
�
Open trim1 at the trim strips in the
roof.
�
Secure the roof rack according to man-
ufacturer’s instructions for installation.
Ski sack*
Unfolding and loading�
Fold rear armrest down (arrow).
�
Swing cover1 down.
Warning!
G
Only use roof racks approved by
Mercedes-Benz for your vehicle model to
avoid damage to the vehicle. Follow manu-
facturer’s installation instructions.
!Load the roof rack in such a way that
the vehicle cannot be damaged while
driving.
Make sure�
you can fully raise the tilt/sliding
sunroof* or tilt/sliding panel*
�
you can fully open the trunk
Page 257 of 506
255 Controls in detail
Loading
�
Open hook and loop strap1.
�
Pull ski sack into passenger compart-
ment and unfold.
�
From trunk, slide skis into ski sack.
�
Wrap strap around ski sack and rear
armrest.
�
Close clasp (arrows) and pull strap
tight to firmly secure skis.
Warning!
G
The ski sack is designed for up to four pairs
of skis. Do not load the ski sack with other
objects.
Always fasten the ski sack securely. In an
accident, an unfastened ski sack can cause
injury to vehicle occupants.
��
Page 265 of 506
263 Controls in detail
Useful features
Storage compartment in the center
console (no CD changer* installed)
1Opening/closing button�
Press button1 to open.
The control panel swings out upward
and the storage compartment extends
out.
�
Press button1 to close.
Storage space under center armrest
(Vehicles with cup holders in the center
console)
1Storage compartment
2Storage trayOpening storage tray
�
Pull handle2.
Opening storage compartment
�
Pull handle1.
iPrior to closing the glove box, close the
compartment for glasses first.
iNever place any medications in the
storage compartment. If there is a pow-
er failure, the storage compartment
cannot be opened.
Page 266 of 506
264 Controls in detailUseful featuresStorage compartment in the rear cen-
ter console�
Briefly press the top of the compart-
ment.
It extends automatically.Ruffled storage bags
Ruffled storage bags are located on the
back of the front seats.Storage compartment in the rear arm-
rest
�
Press the handle upward and fold the
rear armrest up.
Warning!
G
The ruffled storage bag is intended for stor-
ing light-weight items only.
Heavy objects, objects with sharp edges or
fragile objects may not be transported in the
ruffled storage bag.
The ruffled storage bag cannot protect
transported goods in the event of an acci-
dent.
Page 267 of 506
 or in the
center armrest (
�pag")
265 Controls in detail
Useful features
Cup holders
Depending on production date, your vehi-
cle is equipped with cup holders in either
the center console (
�page 265) or in the
center armrest (
�page 266).
Cup holder in the center console
�
Briefly press the marking in the back of
the cover.
The cover opens.
�
Briefly press marking on the cup hold-
er.
The cup holder extends automatically.
Warning!
G
In order to help prevent spilling liquids on
vehicle occupants, only use containers that
fit into the cup holder. Use lids on open con-
tainers and do not fill containers to a height
where the contents, especially hot liquids,
could spill during braking, vehicle maneu-
vers, or in an accident.
When not in use, keep the cup holder
closed. An open cup holder may cause injury
to you or others when contacted during
braking, vehicle maneuvers, or in an acci-
dent.
Keep in mind that objects placed in the cup
holder may come loose during braking, vehi-
cle maneuvers, or in an accident and be
thrown around in the vehicle interior. Ob-
jects thrown around in the vehicle interior
may cause an accident and/or serious per-
sonal injury.
iThe cup holder can be removed for
cleaning. Clean the cup holder only
with clear, lukewarm water. Make sure
to insert the cup holder in the guides
when reinstalling it.
��
Page 268 of 506
266 Controls in detailUseful features1Left cup holder
2Right cup holder
Removing cup holder�
Take out the cup holder.
Using two fingers in the horizontal slot
at the upper rear side of the cup holder,
lift cup holder upwards to remove.Storage compartment with cup holder
in the center armrest
The storage compartment in the center
armrest contains a removable dual cup
holder.
Opening storage compartment
1Cover
�
Slide cover1 in direction of arrow2.
Cup holder in the center armrest3Dual cup holder
4Telephone* compartment
Closing storage compartment�
Slide cover1 back.iThe cup holder can be removed to in-
crease storage space and for cleaning.
Clean the cup holder only with clear,
lukewarm water.
Make sure to insert the cup holder in
the guides when reinstalling it
(�page 267).
��