Page 417 of 498

415 Practical hints
Flat tire
Removing the wheel
1Alignment bolt�
Unscrew upper-most wheel bolt and
remove.
�
Replace this wheel bolt with alignment
bolt1 supplied in the tool kit.
�
Remove the remaining bolts.
�
Remove the wheel.Mounting the spare wheel
1Wheel bolt for light alloy rims
2Wheel bolt for Minispare wheel,
collapsible tire, or other steel rims
(located in trunk with spare wheel)
�
Clean contact surfaces of wheel and
wheel hub.
!Do not place wheel bolts in sand or dirt.
This could result in damage to the bolts
and wheel hub threads.
!Wheel bolts2 must be used when
mounting the Minispare wheel,
collapsible tire, or other steel rims. The
use of any wheel bolts other than wheel
bolts2 for the Minispare wheel,
collapsible tire, or other steel rims will
physically damage the vehicle’s
brakes.
!To avoid paint damage, place wheel flat
against hub and hold it there while
installing first wheel bolt.Warning!
G
Always replace wheel bolts that are
damaged or rusted.
Never apply oil or grease to wheel bolts.
Damaged wheel hub threads should be
repaired immediately. Do not continue to
drive under these circumstances! Contact
an authorized Mercedes-Benz Center or call
Roadside Assistance.
Incorrect wheel bolts or improperly tight-
ened wheel bolts can cause the wheel to
come off. This could cause an accident.
Make sure to use the correct wheel bolts.
Page 418 of 498
416 Practical hintsFlat tire�
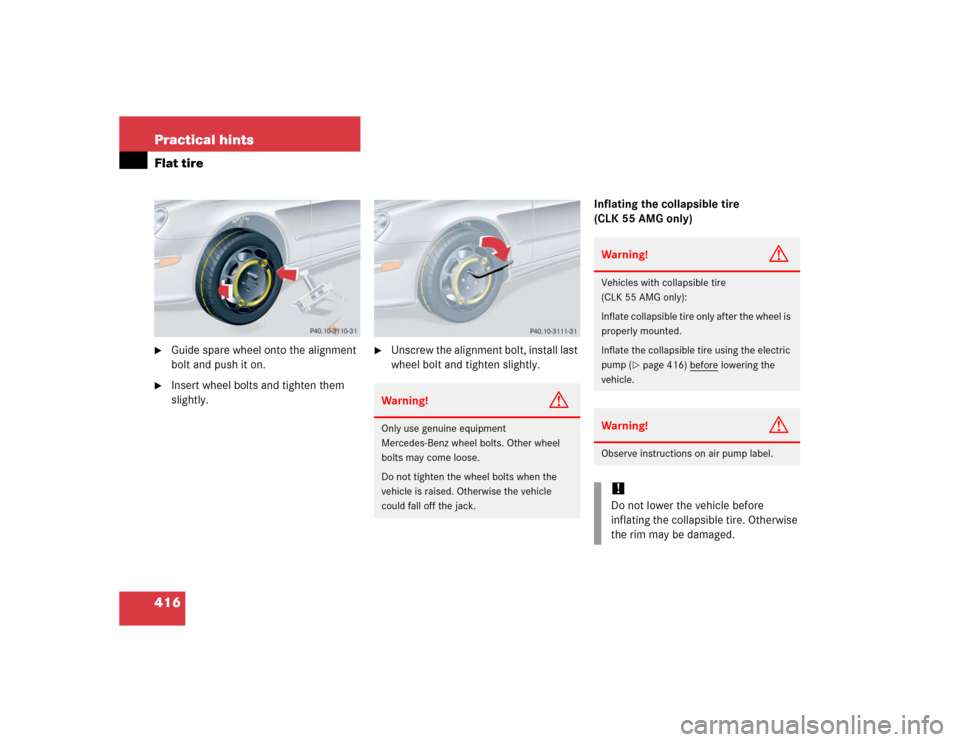
Guide spare wheel onto the alignment
bolt and push it on.
�
Insert wheel bolts and tighten them
slightly.
�
Unscrew the alignment bolt, install last
wheel bolt and tighten slightly.Inflating the collapsible tire
(CLK 55 AMG only)Warning!
G
Only use genuine equipment
Mercedes-Benz wheel bolts. Other wheel
bolts may come loose.
Do not tighten the wheel bolts when the
vehicle is raised. Otherwise the vehicle
could fall off the jack.
Warning!
G
Vehicles with collapsible tire
(CLK 55 AMG only):
Inflate collapsible tire only after the wheel is
properly mounted.
Inflate the collapsible tire using the electric
pump (
�page 416) before
lowering the
vehicle.
Warning!
G
Observe instructions on air pump label.!Do not lower the vehicle before
inflating the collapsible tire. Otherwise
the rim may be damaged.
Page 419 of 498
.
1Flap
2On/off switch
3Electrical plug
4Air hose with pressure gauge and vent
screw
5Union nut
�
Open flap 1")
417 Practical hints
Flat tire
�
Take the electric air pump out of the
trunk (
�page 391).
1Flap
2On/off switch
3Electrical plug
4Air hose with pressure gauge and vent
screw
5Union nut
�
Open flap 1 on electric air pump.
�
Pull out electrical plug 3 and air hose
with pressure gauge 4.
�
Remove the valve cap from the
collapsible tire valve.
�
Screw air hose 4 onto the collapsible
tire valve.
�
Insert electrical plug 3 into vehicle
cigarette lighter socket.
�
Turn the SmartKey in the starter switch
to position1.
�
Press I on electric air pump switch 2.
The electric air pump should now
switch on and inflate the collapsible
tire.
�
Inflate the tire to approximately 36 psi
(2.5 bar).
This takes about five minutes for the
collapsible tire. Air hose 4 and union
nut5 can become hot duration infla-
tion. Exercise proper caution to avoid
burning yourself when using the equip-
ment.
�
Press 0 on electric air pump switch 2.
�
Turn the SmartKey in the starter switch
to position0.
�
If the tire pressure is above 36 psi
(2.5 bar), release excess tire pressure
using the vent screw.!Do not operate the electric air pump
longer than six minutes without inter-
ruption. Otherwise it may overheat.
You may operate the electric air pump
again after it has cooled off.
��
Page 420 of 498

418 Practical hintsFlat tire�
Detach the electric air pump.
�
Store the electrical plug and the air
hose behind the flap and place the
electric air pump back in the trunk.Lowering the vehicle
�
Lower vehicle by turning crank
counterclockwise until vehicle is
resting fully on its own weight.
�
Remove the jack.1 - 5Wheel bolts
�
Tighten the five wheel bolts evenly,
following the diagonal sequence
illustrated (1to5), until all bolts are
tight. Observe a tightening torque
of 80 lb-ft (110 Nm).
Warning!
G
Follow recommend inflation pressures.
Do not overinflate tires. Overinflating tires
can result in sudden deflation (blowout) be-
cause they are more likely to become punc-
tured or damaged by road debris, potholes,
etc.
Do not underinflate tires. Underinflated tires
wear unevenly, adversely affect handling
and fuel economy, and are more likely to fail
from being overheated.
Warning!
G
Vehicles with collapsible tire
(CLK 55 AMG only):
Inflate collapsible tire only after the wheel is
properly mounted.
Inflate the collapsible tire using the electric
pump (
�page 416) before
lowering the ve-
hicle.
��
Page 421 of 498
419 Practical hints
Flat tire
Before storing the jack, it should be fully
collapsed, with handle folded in (storage
position) (
�page 391).
�
Store the jack and the other vehicle
tools in the trunk.Warning!
G
Have the tightening torque checked after
changing a wheel. The wheels could come
loose if they are not tightened to a torque
of 80 lb-ft (110 Nm).
Page 441 of 498

439 Technical data
Rims and tires
�Rims and tires
Only use tires and rims which have been
specifically developed for your vehicle and
tested and approved by Mercedes-Benz.
Other tires and rims can have detrimental
effects, such as�
poor handling characteristics
�
increased noise
�
increased fuel consumption
!Moreover, tires and rims not approved
by Mercedes-Benz may, under load, ex-
hibit dimensional variations and differ-
ent tire deformation characteristics
that could cause them to come into
contact with the vehicle body or axle
parts. Damage to the tires or the vehi-
cle may be the result.
iFurther information on tires and rims is
available at any authorized
Mercedes-Benz Center. A placard with
the recommended tire inflation pres-
sures is located on the driver’s door
B-pillar. Some vehicles may have sup-
plemental tire pressure information for
driving at high speeds (
�page 326) or
for vehicle loads less than the maxi-
mum loaded vehicle condition. If such
information is provided, it can be found
on the placard located on the inside of
the fuel filler flap. The tire inflation
pressure should be checked regularly
and should only be adjusted on cold
tires. Follow tire manufacturer’s main-
tenance recommendation included
with vehicle.
Page 464 of 498
 191
Turning off 192, 204
Turning on 192, 204
Air conditioning re")
462 IndexAir bags 61
Children 62
Front 65
Passenger 65
Safety guidelines 64
Side impact 66
Window curtain 66
Air conditioning (cooling) 191
Turning off 192, 204
Turning on 192, 204
Air conditioning refrigerant 450
Air distribution
Adjusting 188, 198
Air pressure 338
Air pressure see Tire inflation pressure
Air pump, electric
Turning on 417
Air recirculation mode 190, 201
Activating 190, 201
Deactivating 191, 202
Air vents, rear passenger compartment
Adjustable 193, 206
Air volume
Adjusting 199Alarm
Audible 83, 91, 92
Canceling 91, 92
Visual 90
Alarm system
Anti-theft 90
Alignment bolt (vehicle tool kit) 415, 455
Anticorrosion/antifreeze 453
Antiglare
Auto-dimming 178
Antilock brake system (ABS) 455
Anti-theft alarm system
Arming 90
Canceling alarm 91, 92
Disarming 91
Anti-theft systems 89
Anti-theft alarm system 90
Immobilizer 89
Tow-away alarm 91
Aquaplaning see Hydroplaning
Armrest
Front 273
Rear 274
Storage compartments 273Ashtray (Center console) 276
Opening 276
Reinstalling 276
Removing 276
Ashtray (Rear seat) 276
Opening 277
Reinstalling 277
Removing 277
Aspect ratio 338
At the gas station 305
ATF (automatic transmission fluid) 312
AUDIO menu 143
Operate CD player 144
Selecting radio station 143
Selecting satellite radio* station 143
Audio system 207
Audio and telephone, operation 207
Button and soft key operation 210
CD operation 225
Operating and display elements 208
Operating safety 207
Operation 210
Radio operation 215
Switching off 211
Switching on 210
Telephone* operation 232
Page 467 of 498
 158
Unlocking from inside 110
Central locking switch 110
Changing
CDs 225
Key setting 158
Charcoal")
465 Index
Central locking
Automatic 110
From inside 110
Switch 110
Switching on/off
(control system) 158
Unlocking from inside 110
Central locking switch 110
Changing
CDs 225
Key setting 158
Charcoal filter 202
Activating 203
Deactivating 203
Charging
Vehicle battery 422
CHECK ENGINE
malfunction indicator lamp 356
Checking
Coolant level 313
Oil level 307, 310
Tire inflate pressure 307
Vehicle lighting 307Child safety 70
Air bags 62
Front passenger front
air bag off indicator lamp 77
Infant and child
restraint systems 67, 70
LATCH child seat anchors 80
OCS 73
Child safety switch see
Blocking of rear window operation
Child seat anchors see
LATCH child seat anchors
Cigarette lighter 277Cleaning 347
Cup holder 351
Gear selector lever 351
Hard plastic trim items 351
Headlamps 178
Headliner 352
Instrument cluster 351
Leather upholstery 352
Light alloy wheels 351
Nubuck leather upholstery
(CLK 55 AMG) 352
Parktronic system* sensor 350
Plastic and rubber parts 352
Seat belts 352
Steering wheel 351
Upholstery 352
Windows 351
Windshield 53
Wiper blades 350
Wood trims 352
Cleaning and care of vehicle 347
Cleaning tires 318