Page 307 of 498

305 Operation
At the gas station
�At the gas station
Refueling
The fuel filler flap is located on the
right-hand side of the vehicle towards the
rear. Locking/unlocking the vehicle with
the SmartKey or the SmartKey with
KEYLESS-GO* automatically locks/un-
locks the fuel filler flap.1To open the fuel filler flap
2To insert the fuel filler cap
�
Turn the engine off�
by turning the SmartKey to
position0. Remove the SmartKey
from the starter switch.
�
by pressing the KEYLESS-GO*
start/stop button. Open the driv-
er’s door (with driver’s door open,
starter switch is now in position0,
same as with SmartKey removed
from starter switch).
�
Open the fuel filler flap by pushing at
the point indicated by the arrow 1.
The fuel filler flap springs open.
�
Turn fuel cap counterclockwise and
hold on to it until possible pressure is
released.
�
Take off cap and set it in direction of
arrow 2 in the recess on the fuel filler
flap.
To prevent fuel vapors from escaping
into open air, fully insert filler nozzle
unit.
�
Only fill your tank until the filler nozzle
unit cuts out – do not top up or
overfill.
Warning!
G
Gasoline is highly flammable and poisonous.
It burns violently and can cause serious inju-
ry. Whenever you are around gasoline, avoid
inhaling fumes and skin contact, extinguish
all smoking materials. Never allow sparks,
flame or smoking materials near gasoline!
Failure to remove the fuel cap slowly could
result in personal injury.
��
Page 329 of 498

327 Operation
Tires and wheels
Checking tire inflation pressure
Regularly check your tire inflation pressure
at least once a month.
Check and adjust the tire inflation
pressure when the tires are cold. The tires
can be considered cold if the vehicle has
been parked for at least three hours or
driven less than one mile (1.6 km).
If you check the tire inflation pressure
when the tires are warm (the vehicle has
been driven for several miles or sitting less
than three hours), the reading will be
approximately 4 psi (0.3 bar) higher than
the cold reading. This is normal. Do not let
air out to match the specified cold tire in-
flation pressure. Otherwise, the tire will be
underinflated.
Checking tire inflation pressure
manually
Follow the steps below to achieve correct
tire inflation pressure:�
Remove the cap from the valve on one
tire.
�
Firmly press a tire gauge onto the
valve.
�
Read tire inflation pressure on tire
gauge and check against the recom-
mended tire inflation pressure on the
placard on the driver’s door B-pillar
(�page 325). If necessary, add air to
achieve the recommended tire inflation
pressure.
�
Install the valve cap.
�
Repeat this procedure for each tire.Potential problems associated with
underinflated and overinflated tires
Underinflated tire inflation pressure
Underinflated tires can:
�
cause excessive and uneven tire wear
�
adversely affect fuel economy
�
lead to tire failure from being
overheated
�
adversely affect handling
characteristics
iIf you have overfilled the tire, release
tire inflation pressure by pushing the
metal stem of the valve with e.g. a tip of
a pen. Then recheck the tire inflation
pressure with the tire gauge.
Warning!
G
Follow recommended tire inflation
pressures.
Do not underinflate tires. Underinflated tires
wear excessively and / or unevenly,
adversely affect handling and fuel economy,
and are more likely to fail from being
overheated.
Page 401 of 498
399 Practical hints
Unlocking/locking in an emergency
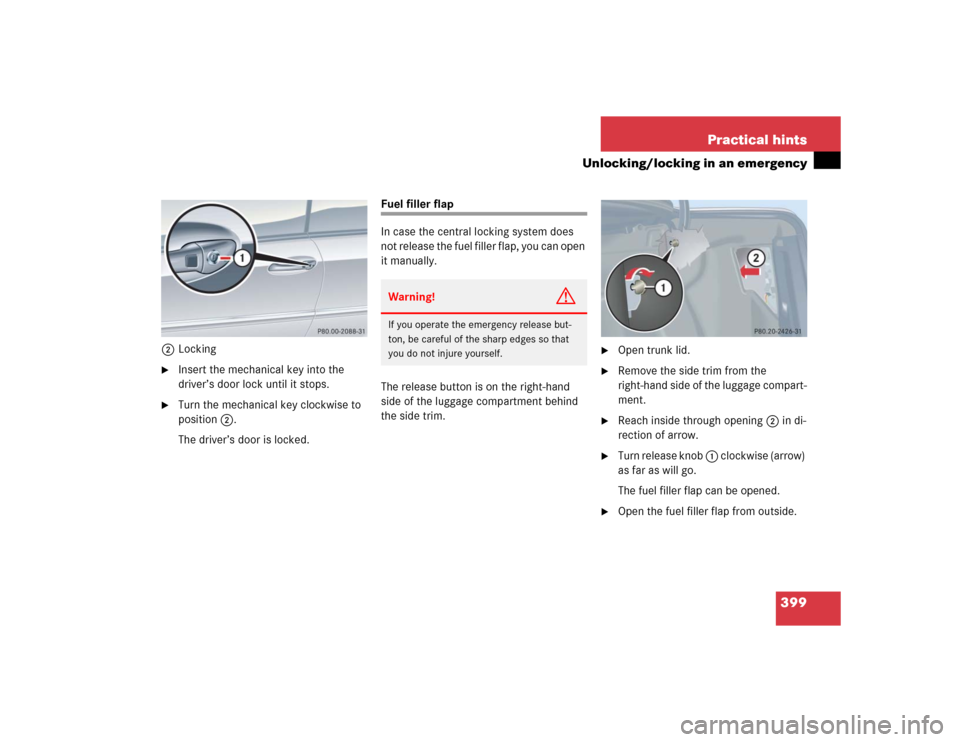
2Locking�
Insert the mechanical key into the
driver’s door lock until it stops.
�
Turn the mechanical key clockwise to
position2.
The driver’s door is locked.
Fuel filler flap
In case the central locking system does
not release the fuel filler flap, you can open
it manually.
The release button is on the right-hand
side of the luggage compartment behind
the side trim.
�
Open trunk lid.
�
Remove the side trim from the
right-hand side of the luggage compart-
ment.
�
Reach inside through opening2 in di-
rection of arrow.
�
Turn release knob 1 clockwise (arrow)
as far as will go.
The fuel filler flap can be opened.
�
Open the fuel filler flap from outside.
Warning!
G
If you operate the emergency release but-
ton, be careful of the sharp edges so that
you do not injure yourself.
Page 489 of 498

CLK 320/CLK 500 427
CLK 55 AMG 428
Installing 427
Installing (CLK 55 AMG) 428
Towing the vehicle 425
Tracking services
For stolen vehicle 286
Traction 171,")
487 Index
Towing eye bolt (vehicle tool kit)
CLK 320/CLK 500 427
CLK 55 AMG 428
Installing 427
Installing (CLK 55 AMG) 428
Towing the vehicle 425
Tracking services
For stolen vehicle 286
Traction 171, 340, 460
Transmission see Automatic transmission
Traveling abroad 302
Tread 340
Tread depth 318
Tread depth (tires) 342
Treadwear indicators 340
Trip computer 160
Trip odometer
Resetting 135Trunk
Auxiliary fuse box 432
Closing 107
Lock button, KEYLESS-GO* 103
Message in display 388
Opening 106
Opening from inside vehicle 107
Tie-down rings 271
Trunk lid 106
Trunk lock 398
Unlocking with KEYLESS-GO* 104
Unlocking with SmartKey 98
Trunk lid emergency release 109
Turn signal lamps
Replacing bulbs 405
Turn signals 51
Additional in mirrors 404
Cleaning lenses 349
Front bulbs 404
Front bulbs (Bi-Xenon*) 409
Front bulbs (Halogen) 407
Indicator lamps 25
Rear bulbs 405, 410
Replacing bulbs 404
Turning off
Engine 56U
Uniform Tire Quality
Grading Standards 340
Units
Setting speedometer units 149
Setting temperature units 149
Unlocking 32, 94
Driver’s door in an emergency 397
Fuel filler flap 305
Gear selector lever manually 400
Global 96
Global with KEYLESS-GO* 101
In an emergency 397
Selective setting 96, 102
Trunk lid with KEYLESS-GO* 104
Trunk lid with SmartKey 98
Vehicle in an emergency 286
With KEYLESS-GO* 33
With the SmartKey 32