Page 407 of 498

405 Practical hints
Replacing bulbs
Rear lamps
Notes on bulb replacement
�
Only use 12 volt bulbs of the same type
and with the specified watt rating.
�
Switch lights off before changing a bulb
to prevent short circuits.
�
Always use a clean lint-free cloth when
handling bulbs.
�
Your hands should be dry and free of oil
and grease.
�
If the newly installed bulb does not
come on, visit an authorized
Mercedes-Benz Center.
�
Have the LEDs and bulbs for the follow-
ing lamps replaced by an authorized
Mercedes-Benz Center.�
Additional turn signal lamps in the
exterior rear view mirrors
�
High mounted brake lamp
�
Bi-Xenon* lamps
�
Front fog lamps
Lamp
Type
7
High mounted brake
lamp
LED
8
Brake lamp
P 21 W
9
Turn signal lamp
P 21 W
a
Tail, parking and stand-
ing lamp, side marker
P 21/4 W
W 5 W
b
Backup lamp
P 21 W
c
License plate lamps
C 5 W
d
Rear fog lamp, driver’s
side
P 21/4 W
Warning!
G
Keep bulbs out of reach of children.
Bulbs and bulb sockets can be very hot. Al-
low the lamp to cool down before changing
a bulb.
Halogen lamps contain pressurized gas. A
bulb can explode if you:�
touch or move it when hot
�
drop the bulb
�
scratch the bulb
Wear eye and hand protection.
Because of high voltage in Xenon lamps, it is
dangerous to replace the bulb or repair the
lamp and its components. We recommend
that you have such work done by a qualified
technician.
iHave the headlamp adjustment
checked regularly.
Page 417 of 498

415 Practical hints
Flat tire
Removing the wheel
1Alignment bolt�
Unscrew upper-most wheel bolt and
remove.
�
Replace this wheel bolt with alignment
bolt1 supplied in the tool kit.
�
Remove the remaining bolts.
�
Remove the wheel.Mounting the spare wheel
1Wheel bolt for light alloy rims
2Wheel bolt for Minispare wheel,
collapsible tire, or other steel rims
(located in trunk with spare wheel)
�
Clean contact surfaces of wheel and
wheel hub.
!Do not place wheel bolts in sand or dirt.
This could result in damage to the bolts
and wheel hub threads.
!Wheel bolts2 must be used when
mounting the Minispare wheel,
collapsible tire, or other steel rims. The
use of any wheel bolts other than wheel
bolts2 for the Minispare wheel,
collapsible tire, or other steel rims will
physically damage the vehicle’s
brakes.
!To avoid paint damage, place wheel flat
against hub and hold it there while
installing first wheel bolt.Warning!
G
Always replace wheel bolts that are
damaged or rusted.
Never apply oil or grease to wheel bolts.
Damaged wheel hub threads should be
repaired immediately. Do not continue to
drive under these circumstances! Contact
an authorized Mercedes-Benz Center or call
Roadside Assistance.
Incorrect wheel bolts or improperly tight-
ened wheel bolts can cause the wheel to
come off. This could cause an accident.
Make sure to use the correct wheel bolts.
Page 418 of 498
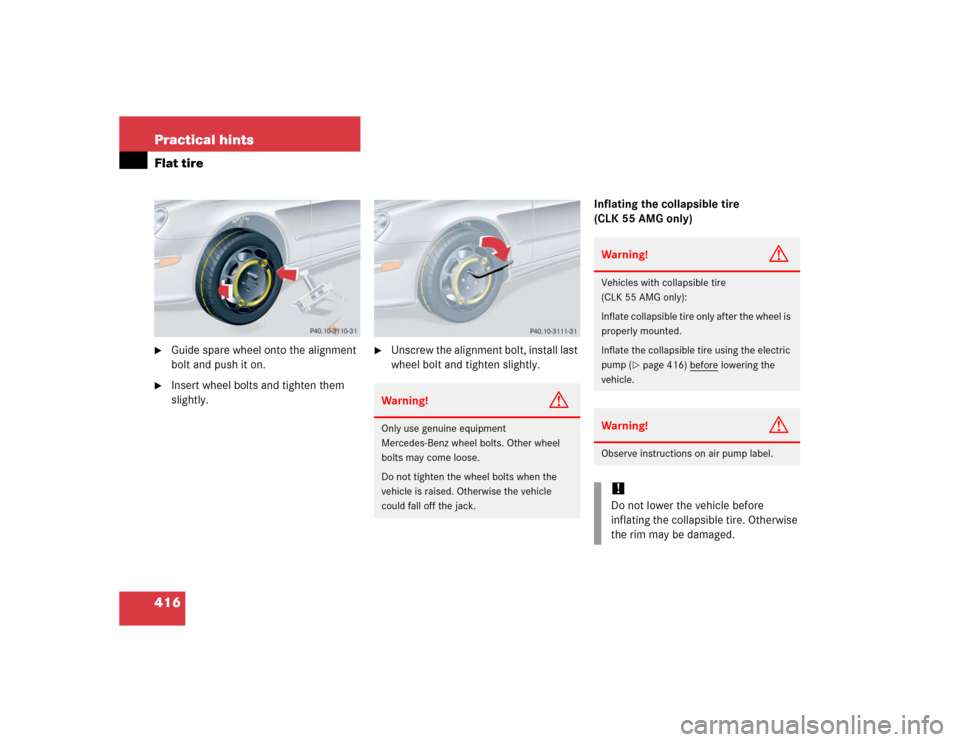
416 Practical hintsFlat tire�
Guide spare wheel onto the alignment
bolt and push it on.
�
Insert wheel bolts and tighten them
slightly.
�
Unscrew the alignment bolt, install last
wheel bolt and tighten slightly.Inflating the collapsible tire
(CLK 55 AMG only)Warning!
G
Only use genuine equipment
Mercedes-Benz wheel bolts. Other wheel
bolts may come loose.
Do not tighten the wheel bolts when the
vehicle is raised. Otherwise the vehicle
could fall off the jack.
Warning!
G
Vehicles with collapsible tire
(CLK 55 AMG only):
Inflate collapsible tire only after the wheel is
properly mounted.
Inflate the collapsible tire using the electric
pump (
�page 416) before
lowering the
vehicle.
Warning!
G
Observe instructions on air pump label.!Do not lower the vehicle before
inflating the collapsible tire. Otherwise
the rim may be damaged.
Page 426 of 498

424 Practical hintsJump startingThe battery is located on the right side of
the engine compartment. For jump start-
ing use the terminals in front of the bat-
tery.�
Make sure the two vehicles do not
touch.
�
Turn off all electrical consumers.
�
Apply parking brake.
�
Shift gear selector lever to positionP.
�
Open the hood.1Positive terminal of charged battery
2Positive under hood terminal in front of
discharged battery
3Negative under hood terminal in front
of discharged battery
4Negative terminal of charged battery
�
Connect the positive terminal1 of the
charged battery with the positive under
hood terminal 2 in front of the dis-
charged battery with the jumper cable.
Clamp cable to charged battery1
first.
�
Start engine of the vehicle with the
charged battery and run at idle speed.
�
Connect the negative terminal4 of
the charged battery with the negative
under hood terminal 3 in front of the
discharged battery with the jumper ca-
ble. Clamp cable to charged battery4
first.
�
Start the engine of the disabled vehi-
cle.
You can now turn on the electrical con-
sumers. Do not turn on the lights under
any circumstances.
�
Remove the jumper cables first from
the negative terminals3 and4 and
then from the positive terminals1
and2.
You can now turn on the lights.
�
Have the battery checked at the near-
est authorized Mercedes-Benz Center.
Warning!
G
Keep flames or sparks away from battery.
Do not smoke.
Observe all safety instructions and precau-
tions when handling automotive batteries
(�page 314).
!Never invert the terminal connections.
!Do not tow-start the vehicle.
Page 457 of 498

Prevents the wheels from locking up
during braking so that the vehicle can
continue to be steered.
Alignment bolt
Metal pin with thread. The center")
455 Technical terms
ABS
(A
ntilock B
rake S
ystem)
Prevents the wheels from locking up
during braking so that the vehicle can
continue to be steered.
Alignment bolt
Metal pin with thread. The centering
pin is an aid used when changing a tire
to align the wheel with the wheel hub.BAS
(B
rake A
ssist S
ystem)
System for potentially reducing braking
distances in emergency braking situa-
tions. The system is activated when it
senses an emergency based on how
fast the brake is applied.
Bi-Xenon headlamps*
Headlamps which use an electric arc as
the light source and produce a more in-
tense light than filament headlamps.
Bi-Xenon headlamps produce low
beam and high beam.CAC
(C
ustomer A
ssistance C
enter)
Mercedes-Benz customer service cen-
ter, which can help you with any ques-
tions about your vehicle and provide
assistance in the event of a break-
down.
CAN system
(C
ontroller A
rea N
etwork)
Data bus network serving to control ve-
hicle functions such as door locking or
windshield wiping.
Cockpit
All instruments, switches, buttons and
indicator/warning lamps in the passen-
ger compartment needed for vehicle
operation and monitoring.
Page 475 of 498

473 Index
Instrument cluster 24, 134, 457
Cleaning 351
Coolant temperature indicator 135
Illumination 134
Lamps in 354–359
Multifunction display 137
Outside temperature indicator 136
Selecting language 150
Instruments and controls see Cockpit
Interior lighting 132
Activating automatic control 132
Deactivating automatic control 132
Delayed switch-off 157
Manual operation 133
Interior rear view mirror
Adjusting 41
Auto-dimming 178
Interior storage compartments 272
Intermittent wipe 53
J
Jack 389
Jump starting 423K
Key, mechanical 397
Key, SmartKey with KEYLESS-GO*
Replacing the batteries 403
Key-dependency memory
Settings 160
KEYLESS-GO* 457
Activating ignition with 36
Closing power
tilt/sliding sunroof* with 250, 253
Closing windows with 250, 253
Factory setting 101
Global locking 101
Global unlocking 101
Important notes 100
Locking the vehicle 103
Messages in display 381
Remote controls 99
Starting the engine 47
Turning off the engine 57
Unlocking with 33
Unlocking, trunk lid 104
Kickdown 171, 457
Kilometers/miles in speedometer 149
Kilopascal 339
Km/h or mph in speedometer 149L
Labels, identification 436
Lamp bulbs, exterior 404
Lamp sensor
Messages in display 383
Lamps, exterior
Front 404
Light sensor 383
Messages in display 382–385
Rear 405
Lamps, indicator and warning
ABS 354
Battery (SmartKey) 96, 102
Brakes 355
Center console 360
CHECK ENGINE 356
Coolant 357, 375
Engine diagnostics 356
ESP 358
Front passenger front
air bag off indicator lamp 66, 360
Fuel reserve 359
Instrument cluster 354–359
Page 476 of 498

474 Index
Maintenance service indicator 344
Parktronic system*
warning indicators 262
Seat belts 359
SRS 61, 359
Turn signals 25
Language
Multifunction display 150
Setting 150
LATCH child seat anchors 80
Folding back 81
Folding out 81
Layout of poly-V-belt drive 437
Leather upholstery
Cleaning 352
License plate lamps
Messages in display 383
Replacing bulbs 405, 410
Light alloy wheels
Cleaning 351
Technical data 440
Light sensor 383
Lighter see Cigarette lighterLighting 124
Automatic headlamp mode 125
Combination switch 129
Cornering fog lamps* 130
Daytime running lamp mode 126
Door entry lamps 133
Exterior lamp switch 124
Front fog lamps 128
High beam flasher 129
High beams 129
Instrument cluster illumination 134
Interior 132
Locator lighting 127
Low beam 124
Manual headlamp mode 125
Night security illumination 127
Parking lamps 124
Rear fog lamp 128
Settings (control system) 154
Limiting the gear range 168
Limp Home Mode 177
Line of fall 457Loading 264
Cargo tie-down rings 271
Instructions 269
Roof rack 264
Ski sack* 264
Split rear bench seat 267
Loading terminology 338
Loading the vehicle 319
Locator lighting 127
Setting 156
Lock buttons 457
Door handle (KEYLESS-GO*) 58
Locking 55, 94
Fuel filler flap 305
Global with KEYLESS-GO* 101
Global, SmartKey 96
The vehicle with KEYLESS-GO* 103
Vehicle in an emergency 398
Loss of Service and
Warranty Information Booklet 435
Loss of SmartKey 98
Loss of SmartKey
with KEYLESS-GO* 105
Page 484 of 498

482 IndexS
Safety
Occupant 60
Safety belts see Seat belts
Safety defects
Reporting 18
Safety systems
Driving 84
Seat belt force limiter 69
Seat belts 67
Cleaning 352
Fastening 43
Proper use of 45, 68
Safety guidelines 64
Warning lamp 359
Seat cushion depth
Adjusting 118
Seat heating* 119
Switching off 119
Switching on 119
Seat ventilation* 120
Switching off 120
Switching on 120
Seating capacity 321Seats 112
Adjusting 37
Easy entry/exit feature 112
Multicontour seat* 118
Seat heating* 119
Seat ventilation* 120
Split rear bench seat 267
Securing cargo
Cargo tie-down rings 271
Selecting
Automatic time change
(Daylight Saving Time
(DST) summer/winter) 153
Display 150
Selecting display 151
Self-test
OCS 78
Tele Aid 280
Service
Parts service 434
Service (maintenance) 344
Service and Warranty Booklet
Loss of 435
Service and warranty information 10
Service life (tires) 317Service System see
Maintenance service system
Setting
Convenience functions 148, 158
Cruise control 256
Date (day) 153
Date (month) 153
Date (year) 154
Daytime running lamp mode 155
Higher speed in cruise control 258
Hours (clock) 152
Individual vehicle settings 146
Interior lighting
delayed switch-off 157
Key-dependent memory 160
Lamps and lighting
(control system) 154
Language, multifunction display 150
Locator lighting 156
Lower speed in cruise control 258
Miles/kilometers
in speedometer 149
Minutes (clock) 152
Parking position for
exterior rear view mirrors 160
Slower speed in cruise control 258