Page 255 of 498
 will also
be opened or closed when you operate")
253 Controls in detail
Power tilt/sliding sunroof*
Opening and closing the power
tilt/sliding sunroof with the SmartKey
The power windows (
�page 249) will also
be opened or closed when you operate the
tilt/sliding sunroof with the SmartKey.
�
Aim transmitter eye at the driver’s door
handle.
Opening (Summer opening feature)
�
Press and hold button Πafter
unlocking the vehicle.
The windows and the tilt/sliding
sunroof begin to open after
approximately one second.
�
Release the Πbutton to stop
procedure.Closing (Convenience feature)
�
Press and hold button ‹ after
locking the vehicle.
The windows and the tilt/sliding
sunroof begin to close after
approximately one second.
�
Release ‹ button to stop
procedure.
Make sure all side windows and the
tilt/sliding sunroof are properly closed
before leaving the vehicle.
Closing the power tilt/sliding sunroof
with KEYLESS-GO* (Convenience
feature)
The power windows (
�page 249) will also
be closed when the power tilt/sliding
sunroof is operated with the KEYLESS-GO
function.
�
Press and hold lock button at door
(�page 58) until the side windows and
the tilt/sliding sunroof are closed.
Warning!
G
Never operate the windows or tilt/sliding
sunroof if there is the possibility of anyone
being harmed by the opening or closing pro-
cedure.
In the event that the procedure causes
potential danger, the procedure can be
immediately halted by releasing the
transmit button on the SmartKey. To reverse
direction of movement, press button Œ
for opening or ‹ for closing.
Page 256 of 498

254 Controls in detailPower tilt/sliding sunroof*
Synchronizing the power tilt/sliding sunroof
The tilt/sliding sunroof must be
synchronized each time after:�
the battery has been disconnected or
discharged
�
the tilt/sliding sunroof has been closed
manually (
�page 401)
�
the tilt/sliding sunroof does not open
smoothly
�
a malfunction
�
Switch on the ignition (
�page 36).
�
Move and hold the sunroof switch in
the direction of arrow 1 (
�page 251)
until the tilt/sliding sunroof is fully
raised at the rear.
Hold the sunroof switch for
approximately one second.
�
Check the Express-open feature
(�page 252).
If the tilt/sliding sunroof opens
completely, the tilt/sliding sunroof is
synchronized. Otherwise repeat the
above steps.
Warning!
G
When closing the windows and the
tilt/sliding sunroof, make sure there is no
danger of anyone being harmed by the clos-
ing procedure.
The tilt/sliding sunroof will not automatical-
ly reopen if blocked during convenience
closing.
If potential danger exists, proceed as fol-
lows:�
Release the lock button.
�
Pull on the door handle and hold firmly.
The side windows and the tilt/sliding
sunroof will open for as long as the door
handle is held but the door not opened.
Page 266 of 498
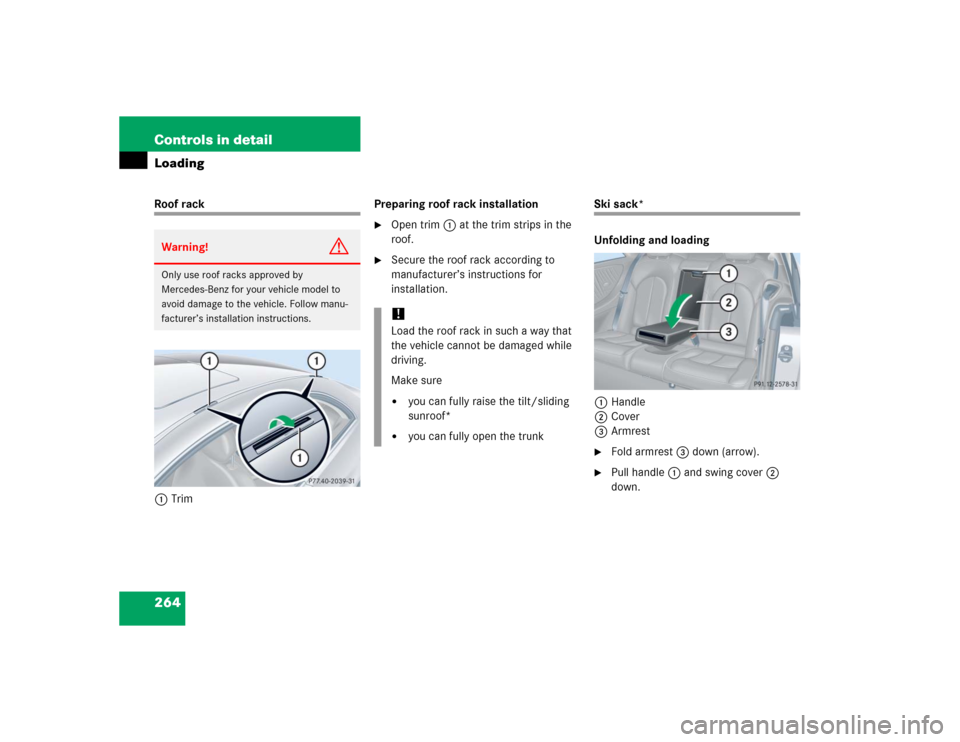
264 Controls in detailLoadingRoof rack
1TrimPreparing roof rack installation
�
Open trim1 at the trim strips in the
roof.
�
Secure the roof rack according to
manufacturer’s instructions for
installation.
Ski sack*
Unfolding and loading
1Handle
2Cover
3Armrest�
Fold armrest3 down (arrow).
�
Pull handle1 and swing cover2
down.
Warning!
G
Only use roof racks approved by
Mercedes-Benz for your vehicle model to
avoid damage to the vehicle. Follow manu-
facturer’s installation instructions.
!Load the roof rack in such a way that
the vehicle cannot be damaged while
driving.
Make sure�
you can fully raise the tilt/sliding
sunroof*
�
you can fully open the trunk
Page 297 of 498

295 Operation
Driving instructions
�Driving instructions
Drive sensibly – save fuel
Fuel consumption, to a great extent, de-
pends on driving habits and operating con-
ditions.
To save fuel you should:�
Keep tires at the recommended infla-
tion pressures.
�
Remove unnecessary loads.
�
Remove roof rack when not in use.
�
Allow engine to warm up under low
load use.
�
Avoid frequent acceleration and decel-
eration.
�
Have all maintenance work performed
at the intervals specified in the
Maintenance Booklet and as required
by the Maintenance System (U.S. vehi-
cles) or FSS (Canada vehicles). Contact
an authorized Mercedes-Benz Center.
Fuel consumption is also increased by
driving in cold weather, in stop-and-go
traffic, on short trips and in hilly area.
Drinking and driving
PedalsPower assistance
Warning!
G
Drinking and driving and/or taking drugs
and driving are very dangerous combina-
tions. Even a small amount of alcohol or
drugs can affect your reflexes, perceptions
and judgement.
The possibility of a serious or even fatal ac-
cident are greatly increased when you drink
or take drugs and drive.
Do not drink or take drugs and drive or allow
anyone to drive who has been drinking or
taking drugs.
Warning!
G
Keep driver’s foot area clear at all times. Ob-
jects stored in this area may impair pedal
movement.Warning!
G
With the engine not running, there is no
power assistance for the brake and steering
systems. In this case, it is important to keep
in mind that a considerably higher degree of
effort is necessary to brake and steer the ve-
hicle.
Page 341 of 498

This is the maximum permissible vehicle
weight of the fully loaded vehicle (weight of
the vehicle including all options, passen-")
339 Operation
Tires and wheels
GVWR (G
ross V
ehicle W
eight R
ating)
This is the maximum permissible vehicle
weight of the fully loaded vehicle (weight of
the vehicle including all options, passen-
gers, fuel, and cargo and, if applicable,
trailer tongue load). It is indicated on
certification label located on the driver’s
door B-pillar.
Kilopascal (kPa)
The metric unit for air pressure. There are
6.9 kPa to one psi; another metric unit for
air pressure is bars. There are
100 kilopascals (kPa) to one bar.
Maximum load rating
The maximum load in kilograms and
pounds that can be carried by the tire.
Maximum loaded vehicle weight
The sum of curb weight, accessory weight,
vehicle capacity weight and production
options weight.Maximum tire inflation pressure
This number is the greatest amount of air
pressure that should ever be put in the tire
under normal driving conditions.
Normal occupant weight
The number of occupants the vehicle is
designed to seat, multiplied by
68 kilograms (150 lbs).
Occupant distribution
The distribution of occupants in a vehicle
at their designated seating positions.
Production options weight
The combined weight of those installed
regular production options weighing over
5 lbs (2.3 kilograms) in excess of those
standard items which they replace, not
previously considered in curb weight or
accessory weight, including heavy duty
brakes, ride levelers, roof rack, heavy duty
battery, and special trim.PSI (P
ounds per s
quare i
nch)
A standard unit of measure for air pressure
-> bar, kilopascal (kPa).
Recommended tire inflation pressure
Recommended tire inflation pressure
listed on placard located on driver’s door
B-pillar for normal driving conditions.
Provides best handling, tread life and
riding comfort.
Rim
A metal support for a tire or a tire and tube
assembly upon which the tire beads are
seated.
Sidewall
The portion of a tire between the tread and
the bead.
Page 349 of 498

347 Operation
Vehicle care
�Vehicle care
Cleaning and care of vehicle
While in operation, even while parked, your
vehicle is subjected to varying external
influences which, if gone unchecked, can
attack the paintwork as well as the
underbody and cause lasting damage.Such damage is caused not only by
extreme and varying climatic conditions,
but also by:
�
Air pollution
�
Road salt
�
Tar
�
Gravel and stone chipping
To avoid paint damage, you should
immediately remove:
�
Grease and oil
�
Fuel
�
Coolant
�
Brake fluid
�
Bird droppings
�
Insects
�
Tree resins, etc.
Frequent washing reduces and / or elimi-
nates the aggressiveness and potency of
the above adverse influences.More frequent washings are necessary to
deal with unfavorable conditions:
�
near the ocean
�
in industrial areas (smoke, exhaust
emissions)
�
during winter operation
You should check your vehicle from time to
time for stone chipping or other damage.
Any damage should be repaired as soon as
possible to prevent corrosion.
In doing so, do not neglect the underbody
of the vehicle. A prerequisite for a thor-
ough check is a washing of the underbody
followed by a thorough inspection. Dam-
aged areas need to be re-undercoated.
Your vehicle has been treated at the facto-
ry with a wax-base rustproofing in the body
cavities which will last for the lifetime of
the vehicle. Post-production treatment is
neither necessary nor recommended by
Mercedes-Benz because of the possibility
of incompatibility between materials used
in the production process and others
applied later.
Warning!
G
Many cleaning products can be hazardous.
Some are poisonous, others are flammable.
Always follow the instructions on the partic-
ular container. Always open your vehicle’s
doors or windows when cleaning the inside.
Never use fluids or solvents that are not
designed for cleaning your vehicle.
Page 390 of 498
388 Practical hintsWhat to do if …?Display symbol
Display message
Possible cause
Possible solution
K
Close
sunroof!
You have opened the driver’s door with
the SmartKey removed from the starter
switch and the tilt/sliding sunroof open.
�
Close the tilt/sliding sunroof
(�page 251).
J
Close
sunroof!
You have opened the driver’s door with
the SmartKey removed from the starter
switch and the tilt/sliding sunroof open.
�
Close the tilt/sliding sunroof
(�page 251).
t
Function
Unavailable
This display appears if button t or
son the multifunction steering wheel
is pressed and the vehicle is not equipped
with a telephone.
Ê
Trunk open!
This message will appear whenever the
trunk lid is open.
�
Close the trunk lid.
W
Washer fluid
Check level
The fluid level has dropped to about
1/3 of
total reservoir capacity.
�
Add washer fluid (
�page 315).
Page 403 of 498
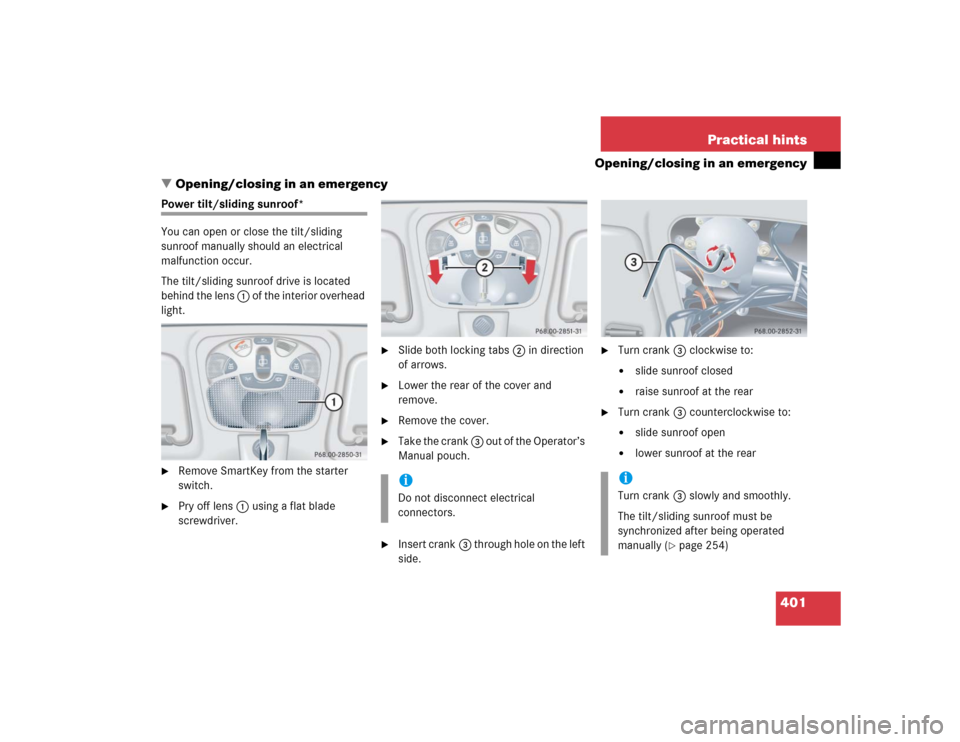
401 Practical hints
Opening/closing in an emergency
�Opening/closing in an emergency
Power tilt/sliding sunroof*
You can open or close the tilt/sliding
sunroof manually should an electrical
malfunction occur.
The tilt/sliding sunroof drive is located
behind the lens 1 of the interior overhead
light.�
Remove SmartKey from the starter
switch.
�
Pry off lens1 using a flat blade
screwdriver.
�
Slide both locking tabs2 in direction
of arrows.
�
Lower the rear of the cover and
remove.
�
Remove the cover.
�
Take the crank 3 out of the Operator’s
Manual pouch.
�
Insert crank3 through hole on the left
side.
�
Turn crank3 clockwise to:�
slide sunroof closed
�
raise sunroof at the rear
�
Turn crank3 counterclockwise to:�
slide sunroof open
�
lower sunroof at the rear
iDo not disconnect electrical
connectors.
iTurn crank3 slowly and smoothly.
The tilt/sliding sunroof must be
synchronized after being operated
manually (
�page 254)