Page 122 of 498

120 Controls in detailSeatsSeat ventilation*
Both switches for the front seats are
located in the center console.
1Seat ventilation switchThe blue indicator lamps in the switch1
show which ventilation level you have
selected:
�
Switch on ignition (
�page 36).
All lamps in the instrument cluster
come on.
Switching on seat ventilation
�
Press seat ventilation switch1.
Three blue indicator lamps come on.
�
Press seat ventilation switch1
repeatedly until the desired seat venti-
lation level is reached.Switching off seat ventilation
�
Press seat ventilation switch1
repeatedly until all blue indicator lamps
go out.
Level3
Three indicator lamps on
2
Two indicator lamps on
1
One indicator lamp on
off
No indicator lamp on
iIf one or all of the indicator lamps flash
on the seat ventilation switch1, there
is insufficient voltage due to too many
electrical consumers being switched
on. The seat ventilation switches off au-
tomatically.
The seat ventilation will switch back on
again automatically as soon as suffi-
cient voltage is available.
Page 124 of 498
.
or
�
Open the respec")
122 Controls in detailMemory functionThe memory button and memory position
switch are located on the door.
1Memory button
2Memory position switch�
Switch on ignition (
�page 36).
or
�
Open the respective door and insert
the SmartKey in the starter switch.
Storing positions into memory�
Adjust the seats, steering wheel and
exterior rear view mirrors to the
desired position (
�page 38).
�
Turn memory position switch2 to the
desired memory position.
�
Press memory button1.
�
Release memory button1 and press
memory position switch2 within
three seconds.
All settings are stored to the selected
position.
Recalling positions from memory�
Turn memory position switch2 to the
desired memory position.
�
Press and hold memory position
switch2 until the seat, steering wheel
and exterior rear view mirrors have
completely moved to the stored
positions.!Do not operate the seats using the
memory button if the seat backrest is
in an excessively reclined position.
Doing so could cause damage to front
or rear seats.
First move the seat backrest to an
upright position.iReleasing the memory position switch
stops movement to the stored
positions immediately.
Page 125 of 498

123 Controls in detail
Memory function
Storing exterior rear view mirror park-ing position
For easier parking, you can adjust the
passenger-side exterior rear view mirror so
that you can see the right rear wheel as
soon as you engage reverse gearR.
For information on activating the parking
position feature, see “Setting parking posi-
tion for exterior rear view mirror”
(�page 160) and “Activating exterior rear
view mirror parking position”
(�page 180).1Memory button
2Adjustment button
3Passenger side exterior rear view
mirror button
�
Stop the vehicle.
�
Switch on ignition (
�page 36).
�
Press button3.
The passenger-side exterior rear view
mirror is selected.
�
Adjust the passenger-side exterior rear
view mirror with button2 so that you
see the rear wheel and the road curb.
�
Press memory button1.
�
Within three seconds, press bottom of
adjustment button2.
The parking position is stored if the
mirror does not move.
iYou can store a parking position for the
passenger-side exterior rear view
mirror for each SmartKey or SmartKey
with KEYLESS-GO*.
iIf the mirror does move, repeat the
above steps. After the setting is stored
you can move the mirror again.
Page 133 of 498

131 Controls in detail
Lighting
Driving rearward
Switching on cornering fog lamps�
Place the gear selector lever in
positionR.
The inverse front fog lamp comes on
automatically depending on the steer-
ing direction and steering angle.
Switching on cornering fog lamps
�
Place the gear selector lever out of
positionR.
The respective front fog lamp goes out.
Hazard warning flasher
The hazard warning flasher can be
switched on at all times, even with the
SmartKey or the SmartKey with
KEYLESS-GO* removed from the starter
switch or with the SmartKey with
KEYLESS-GO* removed from the vehicle.
The hazard warning flasher switches on
automatically when an air bag deploys.
The hazard warning flasher switch is
located on the upper part of the center
console.
1Hazard warning flasher switchSwitching on hazard warning flasher
�
Press hazard warning flasher
switch1.
All turn signals are flashing.
Switching off hazard warning flasher
�
Press hazard warning flasher switch1
again.iWith the hazard warning flasher
activated and the combination switch
set for either left or right turn, only the
respective turn signals will operate
when the ignition is switched on.iIf the hazard warning flasher has been
activated automatically, press hazard
warning flasher switch1 once to
switch it off.
Page 136 of 498
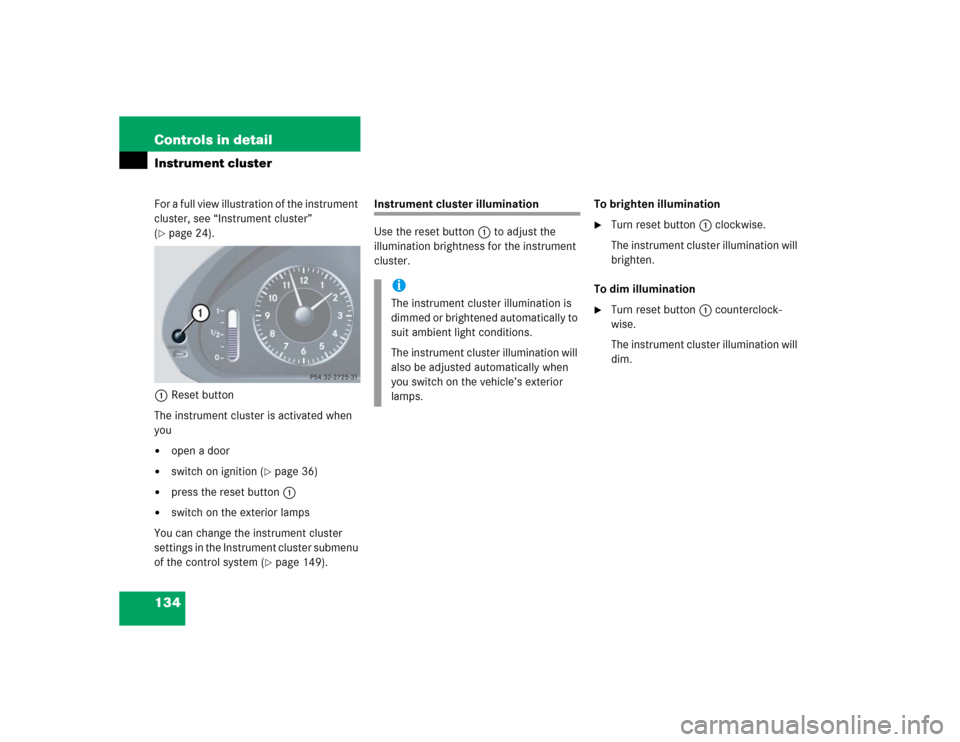
134 Controls in detailInstrument clusterFor a full view illustration of the instrument
cluster, see “Instrument cluster”
(�page 24).
1Reset button
The instrument cluster is activated when
you
�
open a door
�
switch on ignition (
�page 36)
�
press the reset button1
�
switch on the exterior lamps
You can change the instrument cluster
settings in the Instrument cluster submenu
of the control system (
�page 149).
Instrument cluster illumination
Use the reset button1 to adjust the
illumination brightness for the instrument
cluster.To brighten illumination
�
Turn reset button1 clockwise.
The instrument cluster illumination will
brighten.
To dim illumination
�
Turn reset button1 counterclock-
wise.
The instrument cluster illumination will
dim.
iThe instrument cluster illumination is
dimmed or brightened automatically to
suit ambient light conditions.
The instrument cluster illumination will
also be adjusted automatically when
you switch on the vehicle’s exterior
lamps.
Page 180 of 498
178 Controls in detailGood visibilityFor information on the windshield wipers,
see “Windshield wipers” (
�page 52).
Headlamp cleaning system*
The switch is located on the left side of the
dashboard.
1Headlamp washer switch
�
Switch on ignition (
�page 36).
�
Press switch1.
The headlamps are cleaned with a
high-pressure water jet.
For information on filling up the washer
reservoir, see “Windshield washer system
and headlamp cleaning system*”
(
�page 454).
Rear view mirrors
For more information on setting the rear
view mirrors, see “Mirrors” (
�page 41).
Auto-dimming rear view mirrors
The reflection brightness of the exterior
rear view mirror on the driver’s side and
the interior rear view mirror will respond
automatically to glare when
�
the ignition is switched on,
and
�
incoming light from headlamps falls on
the sensor in the interior rear view
mirror.
The rear view mirror will not react if
�
reverse gearR is engaged
�
the interior lighting is turned on
Page 182 of 498

180 Controls in detailGood visibilityActivating exterior rear view mirror
parking position
Follow these steps to activate the mirror
parking position so that the
passenger-side exterior rear view mirror
will be turned downward to the stored
position.
The buttons are located above the exterior
lamp switch.
1Driver’s side exterior rear view mirror
button
2Passenger-side exterior rear view
mirror button
�
Make sure you have stored a parking
position for the passenger-side exterior
rear view mirror (
�page 123).
�
Make sure the
Mirror adjustment
parking aid function
in the
Convenience
submenu of the control
system is switched to
on (�page 160).
�
Switch on ignition (
�page 36).
�
Press button2 for the passenger-side
exterior rear view mirror.
�
Place the gear selector lever in reverse
gearR.
The passenger-side exterior rear view
mirror will be turned downward to the
stored position.The exterior rear view mirror returns to its
previously stored driving position:
�
ten seconds after you put the gear se-
lector lever out of positionR
�
immediately once your vehicle exceeds
a speed of approx. 6 mph (10 km/h)
�
immediately when you press button1
for the driver’s side mirror.
Page 184 of 498
.
Always raise the sunshade fully fo")
182 Controls in detailGood visibilityRear window sunshade*
The switch is located in the center console.
1Rear window sunshade switch�
Switch on ignition (
�page 36).
Always raise the sunshade fully for its sup-
port against the window frame.Raising the sunshade
�
Press switch1 briefly.
The sunshade is raised completely.
Stopping the raising procedure
�
Press switch1 again.
The sunshade stops.
Lowering the sunshade
�
Press switch1 briefly.
The sunshade is lowered completely.
Stopping the lowering procedure
�
Press switch1 again.
The sunshade stops.
!Make sure that the movement of the
rear window sunshade is not restricted
by objects on the rear window shelf.
Otherwise, the sunshade or the objects
could be damaged.
Warning!
G
When operating the rear window sunshade,
make sure there is no danger of anyone be-
ing harmed by the raising or lowering
procedure.
The raising or lowering procedure can be
immediately halted by briefly pressing the
switch
1
.
Briefly press switch
1
again to raise or low-
er the rear window sunshade completely.
Warning!
G
When leaving the vehicle, always remove the
SmartKey or SmartKey with KEYLESS-GO*
from the starter switch, take it with you, and
lock the vehicle. Do not leave children unat-
tended in the vehicle, or with access to an
unlocked vehicle. Unsupervised use of vehi-
cle equipment may cause an accident
and/or serious personal injury.