Page 343 of 498

341 Operation
Tires and wheels
Rotating tires
Tire rotation can be performed on vehicles
with tires of the same dimension all
around. If your vehicle is equipped with
tires of the same dimension all around,
tires can be rotated, observing a a
front-to-rear rotation pattern that will
maintain the intended rotation (spinning)
direction of the tire (
�page 319).
In some cases, such as when your vehicle
is equipped with mixed-size tires (different
tire dimension front vs. rear), tire rotation
is not possible.If applicable to your vehicle’s tire configu-
ration, tires can be rotated according to
the tire manufacturer’s recommended in-
tervals in the tire manufacturer’s warranty
pamphlet located in your vehicle literature
portfolio. If none is available, tires should
be rotated every 3 000 to 6 000 miles
(5 000 to 10 000 km), or sooner if neces-
sary, according to the degree of tire wear.
The same rotation (spinning) direction
must be maintained (
�page 319).
Rotate tires before the characteristic tire
wear pattern becomes visible (shoulder
wear on front tires and tread center wear
on rear tires).
Thoroughly clean the mounting face of
wheels and brake disks, i.e. the inner side
of the wheels/tires, during each rotation.
Check for and ensure proper tire inflation
pressure.For information on wheel change, see the
“Practical hints” section (
�page 389) and
(
�page 412).
Warning!
G
Rotate front and rear wheels only if the tires
are of the same dimension.
If your vehicle is equipped with mixed-size
tires (different tire dimensions front vs.
rear), tire rotation is not possible.
Warning!
G
Have the tightening torque checked after
changing a wheel. Wheels could become
loose if not tightened with a torque of
80 lb-ft (110 Nm).
Only use genuine Mercedes-Benz wheel
bolts specified for your vehicle’s rims.
Page 355 of 498
353 Practical hints
What to do if …?
Where will I find...?
Unlocking/locking in an emergency
Opening/closing in an emergency
Replacing bulbs
Replacing wiper blades
Flat tire
Battery
Jump starting
Towing the vehicle
Fuses
Page 396 of 498

394 Practical hintsWhere will I find...?
In the case of a flat tire, you may
temporarily use the Minispare wheel when
observing the following restrictions:�
Do not exceed a vehicle speed of
50 mph (80 km/h).
�
Drive to the nearest tire repair facility
to have the flat tire repaired or
replaced as appropriate.
�
Do not operate vehicle with more than
one Minispare wheel mounted.
For more information, see “Rims and tires”
(
�page 439).
Collapsible tire (CLK 55 AMG only)
The collapsible tire is located in the
storage compartment underneath the
trunk floor.
Removing the collapsible tire�
Lift up trunk floor cover and engage
trunk floor handle in upper edge of
trunk.
1Collapsible tire
2Vehicle tool kit (under collapsible tire)
3Retaining screw
!To prevent damage, always disengage
trunk floor handle from upper edge of
trunk and lower trunk floor before
closing the trunk lid.Warning!
G
The dimensions of the Minispare wheel are
different from those of the road wheels. As
a result, the vehicle handling characteristics
change when driving with a Minispare wheel
mounted.
The Minispare wheel should only be used
temporarily, and should be replaced with a
regular road wheel as quickly as possible.
Page 397 of 498

395 Practical hints
Where will I find...?
�
Loosen retaining screw3 by turning it
counterclockwise.
�
Remove collapsible tire1.
Storing the collapsible tire
If you wish to store the collapsible tire after
use, carry out the following steps.
Otherwise the collapsible tire will not fit
the storage compartment.
�
Unscrew the valve cap from the valve
of the collapsible tire.
�
Take the valve extractor from the
vehicle tool kit (
�page 391).
�
Unscrew the valve insert from the valve
and allow the air to escape.
�
Screw the valve insert back into the
valve.
�
Screw the valve cap back on the valve.
�
Pull the protective wrap provided with
the vehicle tool kit over the collapsible
tire.
�
Store the collapsible tire and the valve
extractor in the storage compartment
underneath the trunk floor.
�
Pierce the protective wrap with
retaining screw3.
�
Secure the collapsible tire by turning
retaining screw3clockwise.
!Make sure the collapsible tire is dry
when storing it.
iIt may take a few minutes for the col-
lapsible tire to deflate completely.
!To prevent damage, always disengage
trunk floor handle from upper edge of
trunk and lower trunk floor before
closing the trunk lid.Warning!
G
The dimensions of the collapsible tire are
different from those of the road wheels. As
a result, the vehicle handling characteristics
change when driving with a collapsible tire
mounted.
The collapsible tire should only be used tem-
porarily, and should be replaced with a reg-
ular road wheel as quickly as possible.
Page 398 of 498
396 Practical hintsWhere will I find...?In the case of a flat tire, you may
temporarily use the collapsible tire when
observing the following restrictions:�
Do not exceed a vehicle speed of
50 mph (80 km/h).
�
Drive to the nearest tire repair facility
to have the flat tire repaired or
replaced as appropriate.
�
Do not operate vehicle with more than
one collapsible tire mounted.
For more information, see “Rims and tires”
(
�page 439).
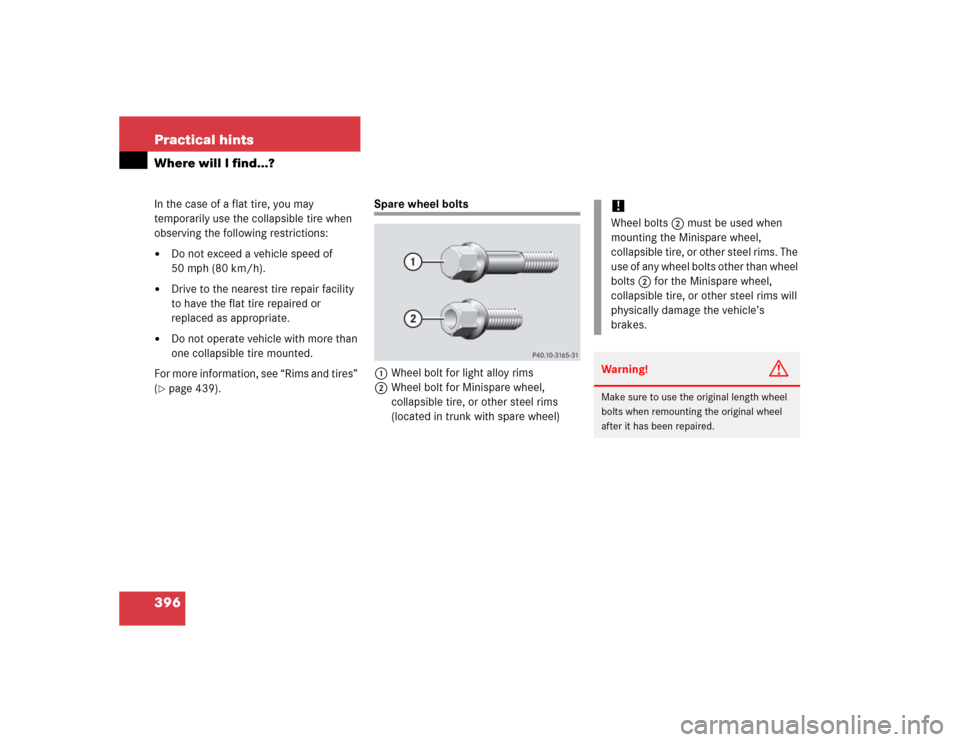
Spare wheel bolts
1Wheel bolt for light alloy rims
2Wheel bolt for Minispare wheel,
collapsible tire, or other steel rims
(located in trunk with spare wheel)
!Wheel bolts2 must be used when
mounting the Minispare wheel,
collapsible tire, or other steel rims. The
use of any wheel bolts other than wheel
bolts2 for the Minispare wheel,
collapsible tire, or other steel rims will
physically damage the vehicle’s
brakes. Warning!
G
Make sure to use the original length wheel
bolts when remounting the original wheel
after it has been repaired.
Page 414 of 498
.
�
Turn the steering w")
412 Practical hintsFlat tire
Preparing the vehicle�
Park the vehicle as far as possible from
moving traffic on a hard surface.
�
Turn on the hazard warning flasher
(�page 131).
�
Turn the steering wheel so that the
front wheels are in a straight ahead
position.
�
Set the parking brake (
�page 55).
�
Move the gear selector lever toP.
Vehicles with SmartKey:
�
Turn off the engine (
�page 56).
�
Remove the SmartKey from the starter
switch.Vehicles with SmartKey with
KEYLESS-GO*:
�
Turn off the engine by pressing the
KEYLESS-GO* start/stop button on the
gear selector lever once (
�page 57).
�
Open the driver’s door (this puts the ig-
nition in position0, same as with the
SmartKey removed from the starter
switch). The driver’s door then can be
closed again.
�
Have any passenger exit the vehicle at
a safe distance from the roadway.
Warning!
G
The dimensions of the spare wheel
(Minispare or collapsible tire) are different
from those of the road wheels. As a result,
the vehicle handling characteristics change
when driving with a spare wheel mounted.
Adapt your driving style accordingly.
The spare wheel is for temporary use only.
When driving with spare wheel mounted,
ensure proper tire pressure and do not ex-
ceed a vehicle speed of 50 mph (80 km/h).
Drive to the nearest Mercedes-Benz Center
as soon as possible to have the spare wheel
replaced with a regular road wheel.
Never operate the vehicle with more than
one spare wheel mounted.
iOpen door only when conditions are
safe to do so.
Page 415 of 498
.
Vehicles with Minispare wheel:
�
Take the wheel wrench, the wheel
bolts, an")
413 Practical hints
Flat tire
Mounting the spare wheel
Preparing the vehicle
Prepare the vehicle as described
(�page 412).
Vehicles with Minispare wheel:
�
Take the wheel wrench, the wheel
bolts, and the jack out of the trunk
(�page 389).
�
Take the Minispare wheel out of the
trunk (
�page 393).
Vehicles with collapsible tire
(CLK 55 AMG only):
�
Take the collapsible tire, wheel wrench,
wheel bolts, jack, and electric air pump
out of the trunk (
�page 390).Lifting the vehicle
�
Prevent the vehicle from rolling away
by blocking wheels with wheel chocks
or other sizable objects.
One wheel chock is included with the
vehicle tool kit (
�page 389).
When changing wheel on a level surface:
�
Place the wheel chock in front of and
another sizable object behind the
wheel that is diagonally opposite to the
wheel being changed.
When changing wheel on a hill:
�
Place the wheel chock and another
sizable object on the downhill side
blocking both wheels of the other axle.
Warning!
G
The jack is designed exclusively for jacking
up the vehicle at the jack take-up brackets
built into both sides of the vehicle. To help
avoid personal injury, use the jack only to lift
the vehicle during a wheel change. Never
get beneath the vehicle while it is supported
by the jack. Keep hands and feet away from
the area under the lifted vehicle. Always
firmly set parking brake and block wheels
before raising vehicle with jack.
Do not disengage parking brake while the
vehicle is raised. Be certain that the jack is
always vertical (plumb line) when in use,
especially on hills. Always try to use the jack
on level surface. Make sure the jack arm is
fully seated in the jack take-up bracket. Al-
ways lower the vehicle onto sufficient ca-
pacity jackstands before working under the
vehicle.
Page 416 of 498
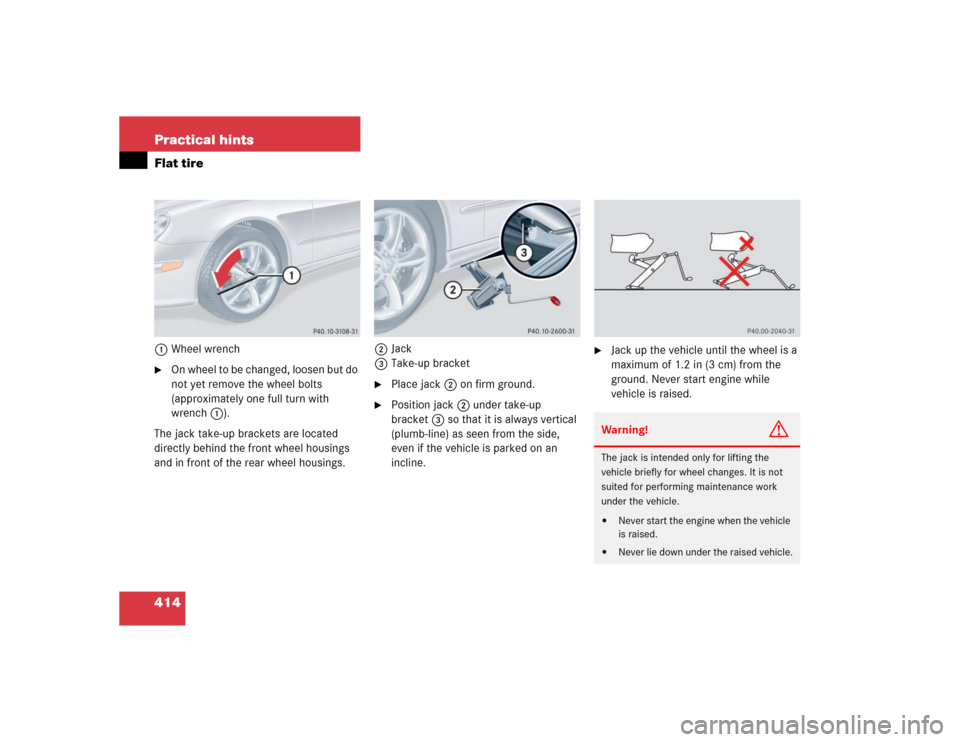
414 Practical hintsFlat tire1Wheel wrench�
On wheel to be changed, loosen but do
not yet remove the wheel bolts
(approximately one full turn with
wrench 1).
The jack take-up brackets are located
directly behind the front wheel housings
and in front of the rear wheel housings.2Jack
3Take-up bracket
�
Place jack2 on firm ground.
�
Position jack2 under take-up
bracket3 so that it is always vertical
(plumb-line) as seen from the side,
even if the vehicle is parked on an
incline.
�
Jack up the vehicle until the wheel is a
maximum of 1.2 in (3 cm) from the
ground. Never start engine while
vehicle is raised.Warning!
G
The jack is intended only for lifting the
vehicle briefly for wheel changes. It is not
suited for performing maintenance work
under the vehicle.�
Never start the engine when the vehicle
is raised.
�
Never lie down under the raised vehicle.