Page 405 of 498

403 Practical hints
Replacing batteries in the SmartKey/SmartKey with KEYLESS-GO*
�
Remove the batteries.
3Battery
4Contact spring
�
Using a lint-free cloth, insert new
batteries 3 under the contact
spring4 with the plus (+) side facing
up.
�
Return battery compartment 2 into
housing until it locks into place.
�
Slide mechanical key 1 back into the
SmartKey.
�
Check the operation of the SmartKey.
SmartKey with KEYLESS-GO*
Replacement batteries: Lithium, type
CR 2025 or equivalent.�
Remove mechanical key (
�page 397).
�
Insert the mechanical key in side open-
ing and push grey slide.
The battery compartment is unlatched.
�
Pull the battery compartment out of the
SmartKey housing.
1Battery
2Tilt battery up
3Mechanical key
�
Using mechanical key3, apply
pressure to position2.
Battery1 tilts up slightly.
�
Pull batteries1 out in direction of
arrow.
�
Using a lint-free cloth, insert new
batteries1 with the plus (+) side
facing up.
�
Return battery compartment into hous-
ing until it locks into place.
�
Slide mechanical key 3 back into the
SmartKey.
�
Check the operation of the SmartKey
and the KEYLESS-GO*.
Page 413 of 498

411 Practical hints
Replacing wiper blades
�Replacing wiper blades
Removing wiper blades�
Remove SmartKey from starter switch.
�
Fold the wiper arm forward.1Unlock
2Lock
�
Pull the tab in direction of arrow1 and
remove windshield wiper.
Installing wiper blades�
Slide the wiper blade into the cutout on
the wiper arm (see arrows).
�
Slide the tab back in the direction of
arrow2 until it audibly engages.
�
Fold the wiper arm backward to rest on
the windshield. Make sure you hold on
to the wiper when folding the wiper arm
back.
Warning!
G
For safety reasons, switch off wipers and
remove SmartKey from starter switch
(vehicles with KEYLESS-GO*: make sure the
vehicle’s on-board electronics have
status
0) before replacing a wiper blade.
Otherwise, the wiper motor could suddenly
turn on and cause injury.
!Never open the hood when the wiper
arms are folded forward.
Hold on to the wiper when folding the
wiper arm back. If released, the force
of the impact from the tensioning
spring could crack the windshield.
Do not allow the wiper arms to contact
the windshield glass without a wiper
blade inserted.
Make certain that the wiper blades are
properly installed. Improperly installed
wiper blades may cause windshield
damage.
For your convenience, we recommend
that you have this work carried out by
an authorized Mercedes-Benz Center.
Page 414 of 498
.
�
Turn the steering w")
412 Practical hintsFlat tire
Preparing the vehicle�
Park the vehicle as far as possible from
moving traffic on a hard surface.
�
Turn on the hazard warning flasher
(�page 131).
�
Turn the steering wheel so that the
front wheels are in a straight ahead
position.
�
Set the parking brake (
�page 55).
�
Move the gear selector lever toP.
Vehicles with SmartKey:
�
Turn off the engine (
�page 56).
�
Remove the SmartKey from the starter
switch.Vehicles with SmartKey with
KEYLESS-GO*:
�
Turn off the engine by pressing the
KEYLESS-GO* start/stop button on the
gear selector lever once (
�page 57).
�
Open the driver’s door (this puts the ig-
nition in position0, same as with the
SmartKey removed from the starter
switch). The driver’s door then can be
closed again.
�
Have any passenger exit the vehicle at
a safe distance from the roadway.
Warning!
G
The dimensions of the spare wheel
(Minispare or collapsible tire) are different
from those of the road wheels. As a result,
the vehicle handling characteristics change
when driving with a spare wheel mounted.
Adapt your driving style accordingly.
The spare wheel is for temporary use only.
When driving with spare wheel mounted,
ensure proper tire pressure and do not ex-
ceed a vehicle speed of 50 mph (80 km/h).
Drive to the nearest Mercedes-Benz Center
as soon as possible to have the spare wheel
replaced with a regular road wheel.
Never operate the vehicle with more than
one spare wheel mounted.
iOpen door only when conditions are
safe to do so.
Page 419 of 498
.
1Flap
2On/off switch
3Electrical plug
4Air hose with pressure gauge and vent
screw
5Union nut
�
Open flap 1")
417 Practical hints
Flat tire
�
Take the electric air pump out of the
trunk (
�page 391).
1Flap
2On/off switch
3Electrical plug
4Air hose with pressure gauge and vent
screw
5Union nut
�
Open flap 1 on electric air pump.
�
Pull out electrical plug 3 and air hose
with pressure gauge 4.
�
Remove the valve cap from the
collapsible tire valve.
�
Screw air hose 4 onto the collapsible
tire valve.
�
Insert electrical plug 3 into vehicle
cigarette lighter socket.
�
Turn the SmartKey in the starter switch
to position1.
�
Press I on electric air pump switch 2.
The electric air pump should now
switch on and inflate the collapsible
tire.
�
Inflate the tire to approximately 36 psi
(2.5 bar).
This takes about five minutes for the
collapsible tire. Air hose 4 and union
nut5 can become hot duration infla-
tion. Exercise proper caution to avoid
burning yourself when using the equip-
ment.
�
Press 0 on electric air pump switch 2.
�
Turn the SmartKey in the starter switch
to position0.
�
If the tire pressure is above 36 psi
(2.5 bar), release excess tire pressure
using the vent screw.!Do not operate the electric air pump
longer than six minutes without inter-
ruption. Otherwise it may overheat.
You may operate the electric air pump
again after it has cooled off.
��
Page 422 of 498

420 Practical hintsBatteryThe battery is located in the engine
compartment on the right hand side.
1Clamps
Removing filter box:�
Release clamps1.
�
Remove filter box.
Installing filter box:
�
Insert filter box properly.
�
Secure it with clamps1.
Warning!
G
Failure to follow these instructions can re-
sult in severe injury or death.
Observe all safety instructions and
precautions when handling automotive
batteries (
�page 314).
Never lean over batteries while connecting,
you might get injured.
Battery fluid contains sulfuric acid. Do not
allow this fluid to come in contact with eyes,
skin or clothing. In case it does, immediately
flush affected area with water and seek
medical help if necessary.
A battery will also produce hydrogen gas,
which is flammable and explosive. Keep
flames or sparks away from battery, avoid
improper connection of jumper cables,
smoking, etc.
!Never loosen or detach battery termi-
nal clamps while the engine is running
or the SmartKey is in the starter switch.
Otherwise the alternator and other
electronic components could be se-
verely damaged.
Have the battery checked regularly by
an authorized Mercedes-Benz Center.
Refer to Maintenance Booklet for
maintenance intervals or contact an
authorized Mercedes-Benz Center for
further information.Warning!
G
Do not place metal objects on the battery as
this could result in a short circuit.
Use leak-proof battery only to avoid the risk
of acid burns in the event of an accident.
Page 423 of 498
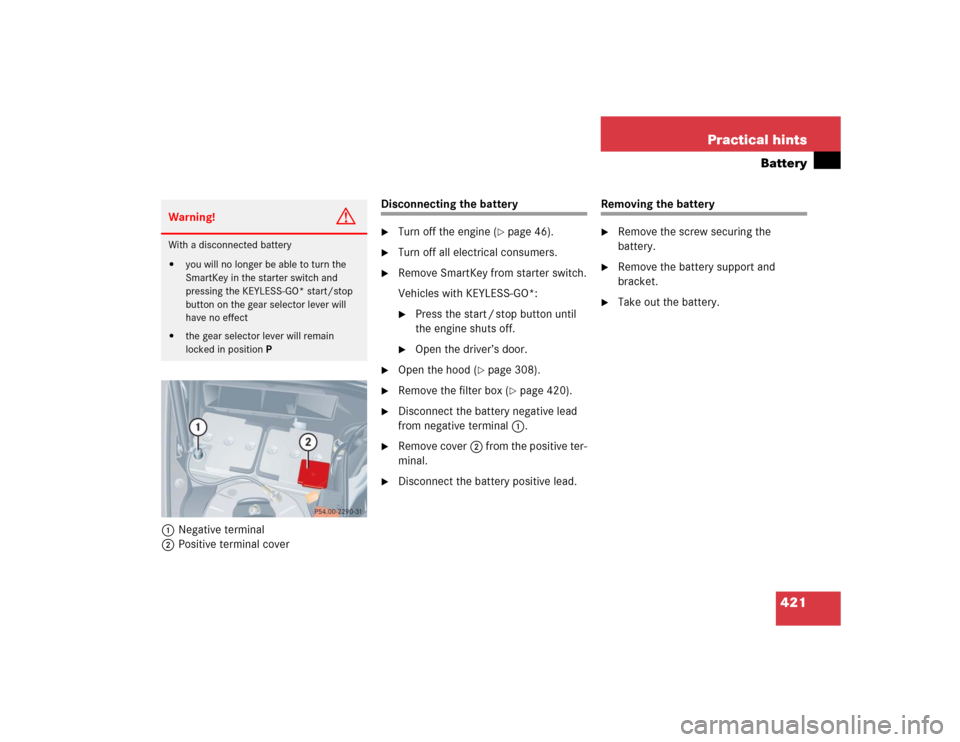
421 Practical hints
Battery
1Negative terminal
2Positive terminal cover
Disconnecting the battery�
Turn off the engine (
�page 46).
�
Turn off all electrical consumers.
�
Remove SmartKey from starter switch.
Vehicles with KEYLESS-GO*:�
Press the start / stop button until
the engine shuts off.
�
Open the driver’s door.
�
Open the hood (
�page 308).
�
Remove the filter box (
�page 420).
�
Disconnect the battery negative lead
from negative terminal1.
�
Remove cover2 from the positive ter-
minal.
�
Disconnect the battery positive lead.
Removing the battery�
Remove the screw securing the
battery.
�
Remove the battery support and
bracket.
�
Take out the battery.
Warning!
G
With a disconnected battery�
you will no longer be able to turn the
SmartKey in the starter switch and
pressing the KEYLESS-GO* start/stop
button on the gear selector lever will
have no effect
�
the gear selector lever will remain
locked in positionP
Page 424 of 498

422 Practical hintsBatteryCharging and reinstalling battery�
Charge battery in accordance with the
instructions of the battery charger
manufacturer.
�
Reinstall the charged battery. Follow
the previously described steps in
reverse order.
Reconnecting the battery�
Turn off all electrical consumers.
�
Remove SmartKey from starter switch.
Vehicles with KEYLESS-GO*:�
Press the start / stop button until
the engine shuts off.
�
Open the driver’s door.
�
Connect the battery positive lead and
fasten its cover 2.
�
Connect the battery negative lead.
�
Reinstall the filter box (
�page 420).Batteries contain materials that can harm
the environment if disposed of improperly.
Large 12-volt storage batteries contain
lead. Recycling of batteries is the preferred
method of disposal. Many states require
sellers of batteries to accept old batteries
for recycling.
Warning!
G
Never charge a battery while still installed in
the vehicle. Gases may escape during charg-
ing and cause explosions that may result in
paint damage, corrosion or personal injury.
!NEVER invert the terminal connections!!The battery, its filler caps and the vent
tube must always be securely installed
when the vehicle is in operation.
iThe following procedures must be car-
ried out following any interruption of
battery power (e.g. due to reconnect-
ing):�
Set the clock (
�page 151) (vehi-
cles with COMAND*: see COMAND
operator’s manual).
�
Resynchronize the side windows
(�page 250).
�
Resynchronize the tilt/sliding
sunroof* (
�page 254).
Page 427 of 498

425 Practical hints
Towing the vehicle
�Towing the vehicle
Towing the vehicle
Mercedes-Benz recommends that the vehi-
cle be transported with all wheels off the
ground using flatbed or appropriate wheel
lift/dolly equipment.When circumstances do not permit the
recommended towing methods, the vehi-
cle may be towed with all wheels on the
ground or front wheels raised only so far as
necessary to have the vehicle moved to a
safe location where the recommended
towing methods can be employed.
!Use flatbed or wheel lift/dolly equip-
ment with SmartKey in starter switch
turned to position0.
Do not tow with sling-type equipment.
Towing with sling-type equipment over
bumpy roads will damage radiator and
supports.
To prevent damage during transport,
do not tie down vehicle by its chassis or
suspension parts.
Switch off the tow-away alarm
(�page 91) and the automatic central
locking (
�page 158).
!If the vehicle is towed with the front
axle raised, the engine must be shut off
(SmartKey in starter switch position0
or1). Otherwise, the ESP will immedi-
ately be engaged and will apply the rear
wheel brakes.
When towing the vehicle with all wheels
on the ground, the selector lever must
be in positionN and the SmartKey
must be in starter switch position2.
When towing the vehicle with all wheels
on the ground or the front axle raised,
the vehicle may be towed only for dis-
tances up to 30 miles (50 km) and at a
speed not to exceed 30 mph
(50 km/h).
!To be certain to avoid a possibility of
damage to the transmission, however,
we recommend the drive shaft be dis-
connected at the rear axle drive flange
for any towing beyond a short tow to a
nearby garage.