Page 217 of 426

215 Controls in detail
Power windows
�Power windows
Opening and closing the windows
The side windows can be opened and
closed electrically. The switches for all the
side windows are on the driver’s door. The
switches for the respective windows are
on the front passenger door and the rear
doors.
1Left front window
2Right front window
3Right rear window
4Left rear window
5Rear window override switch
(
�page 77)
Warning!
G
When closing the windows, make sure there
is no danger of anyone being harmed by the
closing procedure.
The closing of the door windows can be im-
mediately halted by releasing the switch or,
if switch was pulled past the resistance
point and released, by either pressing or
pulling the respective switch.
If the window encounters an obstruction
that blocks its path in a circumstance where
you pulled the switch past the resistance
point and released it to close the window,
the automatic reversal function will stop the
window and open it slightly.
If the window encounters an obstruction
that blocks its path in a circumstance where
you are closing the window by pulling and
holding the switch, or by pressing and hold-
ing button‹ on the SmartKey, the auto-
matic reversal function will not operate.
When leaving the vehicle, always remove the
SmartKey from starter switch, take it with
you, and lock your vehicle. Do not leave
children unattended in the vehicle, or with
access to an unlocked vehicle. Unsuper-
vised use of vehicle equipment can cause an
accident and/or serious personal injury.
Page 219 of 426
 will
also be ope")
217 Controls in detail
Power windows
Stopping windows�
Press or pull respective switch again.Opening and closing the windows with
the SmartKey
The tilt/sliding sunroof* (
�page 221) will
also be opened or closed when the power
windows are operated with the SmartKey .
!If the upward movement of the window
is blocked during the closing
procedure, the window will stop and
open slightly.
Remove the obstruction, pull the
switch again past the resistance point
and release.
If the window still does not close when
there is no obstruction, then pull and
hold the switch again. The side window
will then close without the obstruction
sensor function
Warning!
G
Driver’s door only:
If within five seconds you again pull the
switch past the resistance point and
release, the automatic reversal will not
function.
Warning!
G
Never operate the windows or tilt/sliding
sunroof* if there is the possibility of anyone
being harmed by the opening or closing pro-
cedure.
In the event that the procedure causes
potential danger, the procedure can be
immediately halted by releasing the
transmit button on the SmartKey. To reverse
direction of movement, press buttonŒ
for opening or‹ for closing.
Page 223 of 426

221 Controls in detail
Power tilt/sliding sunroof*
Stopping the power tilt/sliding sunroof
during Express-operation�
Move the sunroof switch in any
direction.Opening and closing the tilt/sliding
sunroof with the SmartKey
The power windows (
�page 217) will also
be opened or closed when you operate the
tilt/sliding sunroof with the SmartKey .
�
Aim transmitter eye at the driver’s door
handle.
Opening (Summer opening feature)
�
Press and hold buttonΠafter
unlocking the vehicle.
The windows and the tilt/sliding
sunroof begin to open after
approximately one second.
�
Release theΠbutton to stop
procedure.
iIf the movement of the tilt/sliding
sunroof is blocked during the closing
procedure, the tilt/sliding sunroof will
stop and reopen slightly.
Warning!
G
Never operate the windows or tilt/sliding
sunroof if there is the possibility of anyone
being harmed by the opening or closing pro-
cedure.
In the event that the procedure causes
potential danger, the procedure can be
immediately halted by releasing the
transmit button on the SmartKey. To reverse
direction of movement, press buttonŒ
for opening or‹ for closing.
Page 228 of 426

226 Controls in detailLoadingRoof rack*�
Attach the roof rack only to the roof
rails.
�
Secure the roof rack according to
manufacturer’s instructions for
installation.
Parcel net in cargo compartment
There is a parcel net located on left side of
the cargo compartment. Dependent on the
equipment of your vehicle, there is another
parcel net located on right side of the car-
go compartment.
Warning!
G
Only use roof racks approved by
Mercedes-Benz for your vehicle model to
avoid damage to the vehicle. Follow manu-
facturer’s installation instructions.
!Load the roof rack in such a way that
the vehicle cannot be damaged while
driving.
Make sure�
you can fully raise the tilt/sliding
sunroof*.
�
you can fully open the tailgate.
Warning!
G
The parcel net is designed only to carry light
loads.
Do not place heavy or fragile objects, or ob-
jects having sharp edges, in the parcel net.
In an accident, during hard braking or sud-
den maneuvers, they could be thrown
around inside the vehicle, and cause injury
to vehicle occupants.
Page 229 of 426
227 Controls in detail
Loading
1Rail
2Mounting lug
Removal of parcel net�
Slide rails1 upward and remove.
Installation of parcel net
�
Place mounting lugs2 in opening.
�
Slide rails1 down as far as they can
go.Storage compartment under cargo
compartment floor
To open cargo compartment floor�
Press handle1 on the recess.
�
Lift compartment cover.To close cargo compartment floor
�
Lower the cover and lock by applying
light pressure to handle1.
iThe compartment can be used to store
small, light or flat objects.
Warning!
G
If items are stored in the compartment,
make sure compartment is securely closed.
In an accident, during hard braking or sud-
den maneuvers, they could be thrown
around inside the vehicle, and cause injury
to vehicle occupants.
Page 240 of 426

238 Controls in detailUseful featuresOpening cup holder�
Briefly press the front of cup holder1.
The cup holder slides out slightly.
�
Pull out the cup holder until it stops.
Closing cup holder
�
Slide cup holder1 in until it engages.
Parcel net in front passenger footwell
A small convenience parcel net is located
in the front passenger footwell. It is for
small and light items, such as road maps,
mail, etc.
Ashtrays
Center console ashtray
1Cover plate
2Sliding button
3Ashtray insert�
Briefly press the bottom of cover
plate1.
The cover plate opens automatically.Removing ashtray insert
�
Secure vehicle from movement by
setting the parking brake.
�
Move the gear selector lever to
positionN.
Now you have more room to take out
the insert.
�
Push sliding button2 to the right.
The ashtray insert3 slides out
slightly.
�
Remove the ashtray insert.
Warning!
G
Do not place heavy or fragile objects, or ob-
jects having sharp edges, in the parcel net.
In an accident, during hard braking or sud-
den maneuvers, they could be thrown
around inside the vehicle, and cause injury
to vehicle occupants.
Warning!
G
Remove front ashtray only with vehicle
standing still. Set the parking brake to
secure vehicle from movement. Move gear
selector lever to positionN. With gear selec-
tor lever in positionN, turn off the engine.
Page 241 of 426
239 Controls in detail
Useful features
Reinstalling the ashtray insert�
Push the ashtray insert3 down into
the retainer until it engages.
�
Push down cover plate1 to close
ashtray.
The cover plate engages.
Rear seat ashtray
1Button
2Ashtray insert
3Cover
�
Pull at top of cover3.Removing ashtray insert
�
Push button1 to disengage ashtray
insert2 and remove it.
Reinstalling ashtray insert
�
Push the ashtray insert2 down into
the retainer until it engages.
�
Push at top of cover3 to close
ashtray.
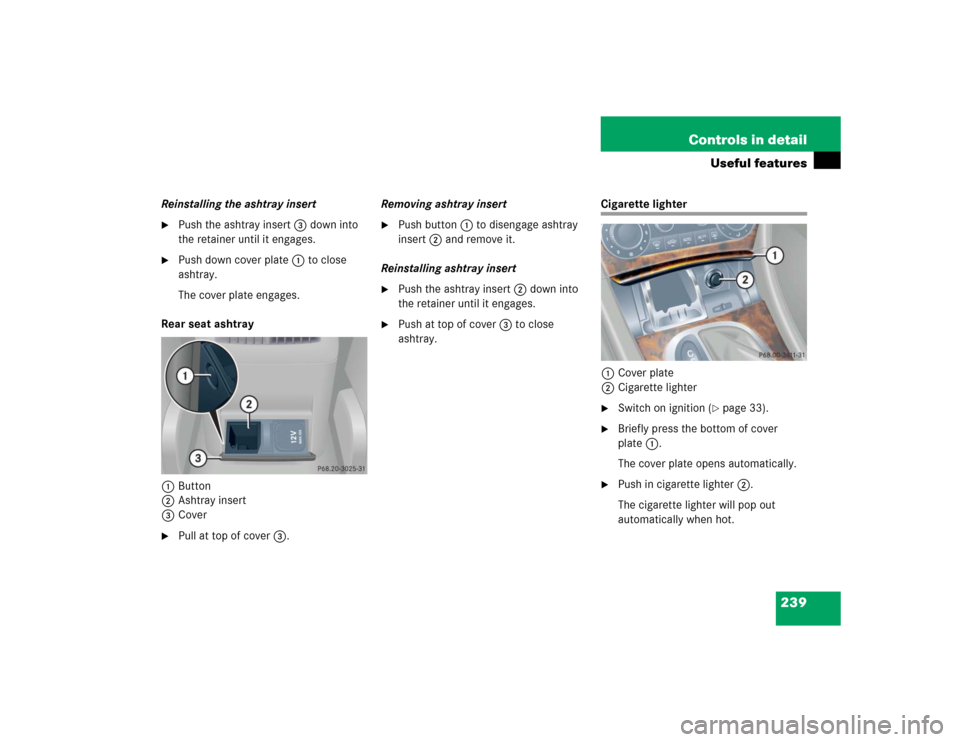
Cigarette lighter
1Cover plate
2Cigarette lighter�
Switch on ignition (
�page 33).
�
Briefly press the bottom of cover
plate1.
The cover plate opens automatically.
�
Push in cigarette lighter2.
The cigarette lighter will pop out
automatically when hot.
Page 242 of 426

240 Controls in detailUseful features�
Push down cover plate1 to close
ashtray.
The cover plate engages.
Electrical outlet
Electrical outlet in the rear passenger
compartment
1Electrical outlet
2Cover
�
Switch on ignition (
�page 33).
�
Pull at top of cover2.
�
Flip cover1 to the left and insert
electrical plug (cigarette lighter type).
Electrical outlet in the cargo
compartment
�
Switch on ignition (
�page 33).
�
Flip up cover and insert electrical plug
(cigarette lighter type).
Warning!
G
Never touch the heating element or sides of
the lighter; they are extremely hot. Hold the
knob only.
When leaving the vehicle, always remove the
SmartKey from the starter switch, and lock
your vehicle. Do not leave children unat-
tended in the vehicle, or with access to an
unlocked vehicle. Unsupervised use of vehi-
cle equipment may cause an accident
and/or serious personal injury.iThe lighter socket can be used to
accommodate electrical accessories
up to a maximum 85 W.
iThe electrical outlet can be used to
accommodate electrical consumers
(e.g. air pump, auxiliary lamps) up to a
maximum of 180 W.