Page 129 of 474
128 Controls in detailControl system
Standard display menu
In the standard display, the main odometer
and the trip odometer are shown in the
multifunction display.
1Trip odometer
2Main odometerIf you see another display, press
buttonè orÿ repeatedly until the
standard display appears.
You can select the functions in the
standard display menu with buttonk
orj.
The following functions are available:
iThe headings used in the menus table
are designed to facilitate navigation
within the system and are not neces-
sarily identical to those shown in the
control system displays.
The first function displayed in each
menu will automatically show you
which part of the system you are in.
Function
Page
Display digital speedometer or
outside temperature
129
Call up maintenance service
display
330
Check engine oil level
293
Page 130 of 474
129 Controls in detail
Control system
Display digital speedometer or outside
temperature�
Press buttonj ork repeatedly
until the digital speedometer appears
in the multifunction display.
The current vehicle speed is shown in
the multifunction display.
1Digital speedometer
AUDIO menu
The functions in the
AUDIO
menu operate
the audio equipment which you currently
have turned on.
If no audio equipment is currently turned
on, the message
AUDIO OFF
appears in the
multifunction display.
The following functions are available:
iYou can have the outside temperature
displayed instead of the digital speed-
ometer. You can select the setting in
the submenu
Instr.Cl.
via the
function
Status line display
(
�page 138).
Function
Page
Select radio station
130
Select satellite radio station*
(USA only)
130
Operate CD player*
131
Page 131 of 474
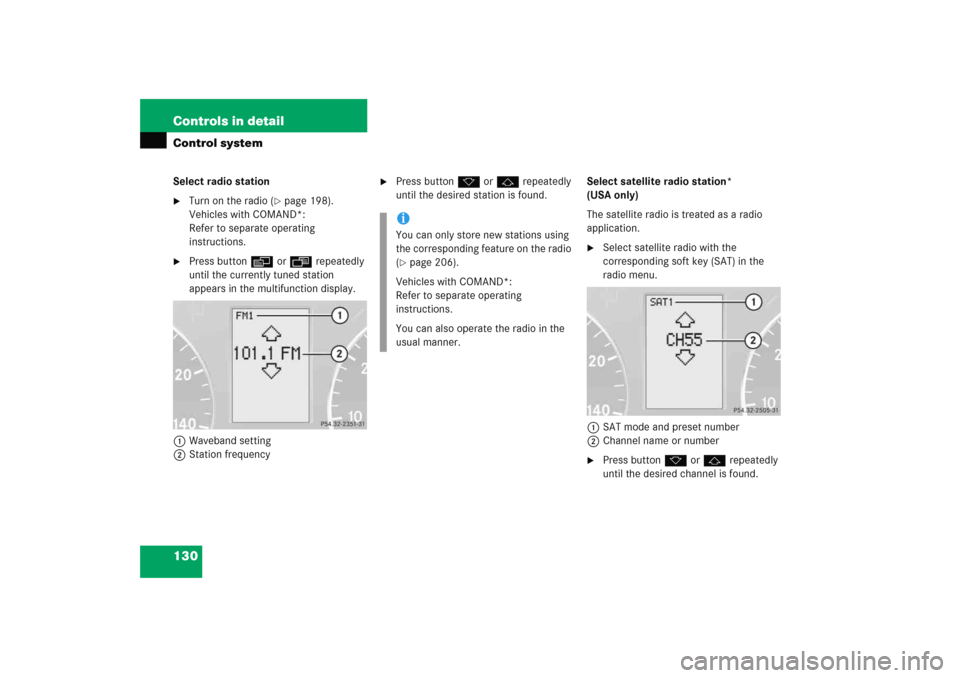
130 Controls in detailControl systemSelect radio station�
Turn on the radio (
�page 198).
Vehicles with COMAND*:
Refer to separate operating
instructions.
�
Press buttonè orÿ repeatedly
until the currently tuned station
appears in the multifunction display.
1Waveband setting
2Station frequency
�
Press buttonk orj repeatedly
until the desired station is found.Select satellite radio station*
(USA only)
The satellite radio is treated as a radio
application.
�
Select satellite radio with the
corresponding soft key (SAT) in the
radio menu.
1SAT mode and preset number
2Channel name or number
�
Press buttonk orj repeatedly
until the desired channel is found.
iYou can only store new stations using
the corresponding feature on the radio
(�page 206).
Vehicles with COMAND*:
Refer to separate operating
instructions.
You can also operate the radio in the
usual manner.
Page 133 of 474

132 Controls in detailControl systemVehicle status message memory menu
Use the vehicle status message memory
menu to scan malfunction and warning
messages that may be stored in the sys-
tem. Such messages appear in the
multifunction display and are based on
conditions or system status the vehicle’s
system has recorded.
�
Press buttonè orÿ repeatedly
until the vehicle status message
memory appears in the multifunction
display.No vehicle status messages
If no conditions are recorded in memory,
the message in the multifunction display
is:
No message
Vehicle status messages have been
recorded
If conditions have occurred causing status
messages to be recorded, the number of
messages appears in the multifunction
display:
1Number of messages
Warning!
G
Malfunction and warning messages are only
indicated for certain systems and are inten-
tionally not very detailed. The malfunction
and warning messages are simply a remind-
er with respect to the operation of certain
systems and do not replace the owner’s
and/or driver’s responsibility to maintain
the vehicle’s operating safety by having all
required maintenance and safety checks
performed on the vehicle and by bringing
the vehicle to an authorized Mercedes-Benz
Center to address the malfunction and
warning messages (
�page 347).
Page 134 of 474

133 Controls in detail
Control system
�
Press buttonk orj.
The stored messages will now be
displayed in the order in which they
have occurred. For malfunction and
warning messages, see “Vehicle status
messages in the multifunction display”
(�page 347).
Should the vehicle’s system record any
conditions while driving, the number of
messages will reappear in the multifunc-
tion display when the SmartKey in the
starter switch is turned to position0 or
removed from the starter switch.
Settings menu
In the
Settings
menu there are two
functions:
�
The function
Reset to factory
settings
, with which you can reset all
the settings to the original factory
settings.
�
A collection of submenus with which
you can make individual settings for
your vehicle.
�
Press buttonè orÿ repeatedly
until the
Settings
menu appears in the
multifunction display.Resetting all settings
You can reset all the functions of all
submenus to the factory settings.
�
Press the reset button in the
instrument cluster (
�page 119) for
approximately three seconds.
The request to press the reset button
once more to confirm appears in the
multifunction display.
�
Press the reset button once more.
The functions of all the submenus will
reset to factory settings.
iThe vehicle status message memory
will be cleared when you turn the
SmartKey in the starter switch to
position1 or2. You will then only see
high-priority messages in the
multifunction display (
�page 347).
Page 136 of 474
135 Controls in detail
Control system
Resetting the functions of a submenu
For each submenu you can reset all the
functions to the factory settings.�
Move to a function in the submenu.
�
Press the reset button (
�page 119) in
the instrument cluster for approxi-
mately three seconds.
The request to press the reset button
once more to confirm appears in the
multifunction display.
�
Press the reset button once more.
All functions of the submenu will reset
to factory settings.iThe settings you have changed will not
be reset unless you confirm the action
by pressing the reset button a second
time. Approximately five seconds after
pressing the reset button for the
second time, the
Settings
menu
reappears in the multifunction display.
Page 137 of 474
136 Controls in detailControl systemThe table below shows what settings can
be changed within the various menus.
Detailed instructions on making individual
settings can be found on the following
pages.Instrument cluster
Time/Date
Lighting
Vehicle
Convenience
Selecting temperature
display mode
Time synchronization with
head unit*
Setting daytime running
lamp mode (USA only)
Setting automatic
locking
Activating
easy-entry/exit feature
Selecting speedometer
display mode
Setting the time (hours)
Setting locator lighting
Setting key-dependency
Selecting language
Setting the time (minutes)
Setting night security
illumination
Setting parking position
for exterior rear view
mirror
Selecting display (speed
display or outside tempera-
ture) for status indicator
Selecting time display mode
Setting interior lighting
delayed shut-off
Selecting automatic time
change (Daylight Saving
Time (DST) summer/winter)Setting the date (month)Setting the date (day)Setting the date (year)
Page 140 of 474

139 Controls in detail
Control system
Time/Date submenu
Access the
Time/Date
submenu via the
Settings
menu. Use the
Time/Date
submenu to change the instrument cluster
display settings. The following functions
are available:Time synchronization with head unit*
This function can only be seen on vehicles
with COMAND* and navigation module*.
�
Move the selection marker with
buttonæ orç to the
Time/Date
submenu.
�
Press buttonj ork repeatedly
until the message
Time synchro.
w/Head Unit
appears in the multifunc-
tion display.
The selection marker is on the current
setting.
�
Press buttonæ orç to select
the desired setting.Setting the time (hours)
This function can be seen in vehicles with
audio system, or in vehicles with
COMAND* if the time synchronization with
head unit* feature was set to
Off
.
�
Move the selection marker with
buttonæ orç to the
Time/Date
submenu.
�
Press buttonj ork repeatedly
until the message
Time Hours
appears
in the multifunction display.
Function
Page
Time synchronization with
head unit*
139
Setting time (hours)
139
Setting time (minutes)
140
Selecting time display mode
141
Selecting automatic time change
(Daylight Saving Time (DST)
summer/Standard Time winter)
141
Setting date (month)
141
Setting date (day)
142
Setting date (year)
143
iVehicles with COMAND*:
For information on setting the time in
COMAND, refer to the separate
COMAND operating instructions.
��