Page 337 of 474

336 OperationVehicle careWiper blades�
Fold wiper arms forward.
�
Clean the wiper blade inserts with a
clean cloth and detergent solution.Window cleaning
�
Fold wiper arms forward.
�
Use a window cleaning solution on all
glass surfaces.
An automotive glass cleaner is
recommended.Light alloy wheels
Mercedes-Benz approved Wheel Care
should be used for regular cleaning of the
light alloy wheels.
If possible, clean wheels once a week with
Mercedes-Benz approved Wheel Care, us-
ing a soft bristle brush and a strong spray
of water.
Follow the instructions on container.
Warning!
G
For safety reasons, switch off wipers and
remove SmartKey from starter switch
before cleaning the wiper blades. Other-
wise, the wiper motor could suddenly turn
on and cause injury.!Fold the windshield wiper arms back
onto the windshield before turning the
SmartKey in the starter switch.
Hold on to the wiper when folding the
wiper arm back. If released, the force
of the impact from the tensioning
spring could crack the windshield.
Warning!
G
For safety reasons, switch off wipers and
remove SmartKey from starter switch
before cleaning the windshield. Otherwise,
the wiper motor could suddenly turn on and
cause injury.!Fold the windshield wiper arms back
onto the windshield before turning the
SmartKey in the starter switch.
Hold onto the wiper when folding the
wiper arm back. If released, the force
of the impact from the tensioning
spring could crack the windshield.
iOnly use acid-free cleaning materials.
Acid may cause corrosion or damage
the clear coat.
Page 338 of 474

337
Operation
Vehicle care
Instrument cluster
Use a gentle dishwashing detergent or
mild detergent for delicate fabrics as a
washing solution. Wipe with a cloth moist-
ened in lukewarm solution. Do not use
scouring agents.
Steering wheel and gear selector lever
Wipe with a damp cloth and dry thoroughly
or clean with Mercedes-Benz approved
Leather Care.
Cup holders
Use a gentle dishwashing detergent or
mild detergent for delicate fabrics as a
washing solution. Wipe with a cloth moist-
ened in lukewarm solution. Do not use
scouring agents.
Hard plastic trim items
Pour Mercedes-Benz approved Interior
Care onto soft lint-free cloth and apply
with light pressure. Headliner
Clean with soft bristle brush, or use a
dry-shampoo cleaner in case of excessive
dirt.
Seat belts
The webbing must not be treated with
chemical cleaning agents. Use only clear,
lukewarm water and soap. Do not dry the
webbing at temperatures above 176°F
(80°C) or in direct sunlight.
Warning!
G
Do not bleach or dye seat belts as this may
severely weaken them. In a crash they may
not be able to provide adequate protection.
Page 377 of 474

376 Practical hintsWhere will I find ...?Storing the spare wheel
If you wish to store the spare wheel after
use, carry out the following steps. Other-
wise the spare wheel will not fit the wheel
well.�
Unscrew the valve cap from the valve
of the spare wheel.
�
Carefully push the tip of the valve cap
into the spare wheel valve and allow
the air to escape.
�
Screw the valve cap back on the valve.
�
Place spare wheel1 in wheel well.
�
Turn retaining screw 3 clockwise to
its stop to secure the spare wheel.
�
Install the trunk floor. Spare wheel bolts
1 Wheel bolt for light alloy rims
2 Wheel bolt for light alloy spare wheel
rim size 4
1/2B x15 H2 For more information on model and spare
wheel rim size, see “Technical data”
section (
�page 422).
iIt may take a few minutes for the col-
lapsible tire to deflate completely.
!Wheel bolts
2 must be used when
mounting spare wheel rim
size 4
1/2Bx15 H2 (
�page 422).
The use of any wheel bolts other than
wheel bolts 2 for spare wheel rim
size 4
1/2B x15 H2 can cause physical
damage to the vehicle.
Warning!
G
Make sure to use the original length wheel
bolts when remounting the original wheel af-
ter it has been repaired.
Page 387 of 474

386 Practical hintsReplacing bulbs
Notes on bulb replacement�
Use only 12-volt bulbs of the same type
and with the specified watt rating.
�
Switch lights off before replacing a bulb
to prevent short circuits.
�
Always use a clean lint-free cloth when
handling bulbs.
�
Your hands should be dry and free of oil
and grease.
�
If the newly installed bulb does not
come on, visit an authorized
Mercedes-Benz Center.
Have the LEDs and bulbs for the following
lamps replaced by an authorized
Mercedes-Benz Center.
�
Additional turn signals in the exterior
rear view mirrors
�
High mounted brake lamp
�
Xenon* lamps
�
Front fog lamps
Replacing bulbs for front lamps
Before you start to replace a bulb for a
front lamp, do the following first:�
Turn the exterior lamp switch to
position M (
�page 110).
�
Open the hood (
�page 291) (except
for side marker lamps).
Halogen headlamps
Left headlamp, mirror-image of right
headlamp1 Housing cover for low beam headlamp
2 Housing cover for high beam head-
lamp, parking and standing lamp
Warning!
G
Bulbs and bulb sockets can be very hot. Al-
low the lamp to cool down before changing
a bulb.
Keep bulbs out of reach of children.
Halogen lamps contain pressurized gas.
A bulb can explode if you�
touch or move it when hot
�
drop the bulb
�
scratch the bulb
Wear eye and hand protection.
Because of high voltage in Xenon lamps, it is
dangerous to replace the bulb or repair the
lamp and its components. We recommend
that you have such work done by a qualified
technician.
Page 398 of 474

397
Practical hints
Flat tire
Mounting the spare wheel
1 Wheel bolt for light alloy rims
2 Wheel bolt for light alloy spare wheel
rim size 4
1/2B x15 H2
�
Clean contact surfaces of wheel and
wheel hub.
�
Guide the spare wheel onto the align-
ment bolt and push it on.
�
Insert wheel bolts and tighten them
slightly.
�
Inflate the spare tire using the electric
air pump (
�page 398).
!Wheel bolts 2 must be used when
mounting spare wheel rim
size 4
1/2Bx15 H2 (
�page 422).
The use of any wheel bolts other than
wheel bolts 2 for spare wheel rim
size 4
1/2B x15 H2 can cause physical
damage to the vehicle.
!To avoid paint damage, place wheel flat
against hub and hold it there while
installing first wheel bolt.Warning!
G
Always replace wheel bolts that are dam-
aged or rusted.
Never apply oil or grease to wheel bolts.
Damaged wheel hub threads should be re-
paired immediately. Do not continue to drive
under these circumstances! Contact an
authorized Mercedes-Benz Center or call
Roadside Assistance.
Incorrect wheel bolts or improperly tight-
ened wheel bolts can cause the wheel to
come off. This could cause an accident.
Make sure to use the correct mounting
bolts.
Warning!
G
Inflate spare wheel with collapsible tire only
after the wheel is properly mounted.
Inflate the spare wheel tire using the electric
air pump before lowering the vehicle.
��
Page 399 of 474
398 Practical hintsFlat tire�
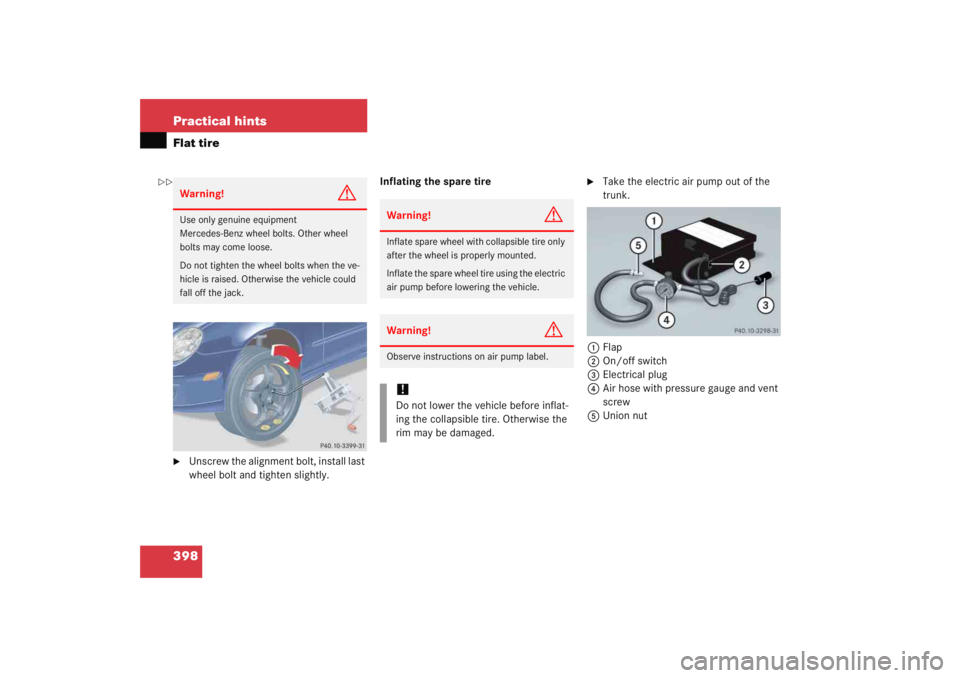
Unscrew the alignment bolt, install last
wheel bolt and tighten slightly.Inflating the spare tire
�
Take the electric air pump out of the
trunk.
1 Flap
2 On/off switch
3 Electrical plug
4 Air hose with pressure gauge and vent
screw
5 Union nut
Warning!
G
Use only genuine equipment
Mercedes-Benz wheel bolts. Other wheel
bolts may come loose.
Do not tighten the wheel bolts when the ve-
hicle is raised. Otherwise the vehicle could
fall off the jack.
Warning!
G
Inflate spare wheel with collapsible tire only
after the wheel is properly mounted.
Inflate the spare wheel tire using the electric
air pump before lowering the vehicle.Warning!
G
Observe instructions on air pump label.!Do not lower the vehicle before inflat-
ing the collapsible tire. Otherwise the
rim may be damaged.
��
Page 400 of 474

399
Practical hints
Flat tire
�
Open flap
1 on electric air pump.
�
Pull out electrical plug 3 and air hose
with pressure gauge 4.
�
Remove the valve cap from valve.
�
Screw air hose 4 onto the tire valve.
�
Insert electrical plug 3 into vehicle
cigarette lighter socket.
�
Turn the SmartKey in the starter switch
to position 1.
�
Press I on electric air pump switch 2.
The electric air pump should now
switch on and inflate the spare tire.
�
Inflate the spare tire to approximately
36 psi (2.5 bar).
This takes about five minutes for the
spare tire. Air hose 4 and union
nut 5 can become hot during infla-
tion. Exercise proper caution to avoid
burning yourself when using the equip-
ment.
�
Press 0on electric air pump switch 2.
�
Turn the SmartKey in the starter switch
to position 0.
�
If the tire pressure is above 36 psi
(2.5 bar), release excess tire pressure
using the vent screw.
�
Detach the electric air pump.
�
Store the electrical plug and the air
hose behind the flap and place the air
pump back in the trunk.
!Do not operate the electric air pump
longer than six minutes without
interruption. Otherwise it may over-
heat.
You may operate the electric air pump
again after it has cooled off.
Warning!
G
Follow recommended inflation pressures.
Do not overinflate tires. Overinflated tires
can result in sudden deflation (blowout) be-
cause they are more likely to become punc-
tured or damaged by road debris, potholes,
etc.
Do not underinflate tires. Underinflated tires
wear unevenly, adversely affect handling
and fuel economy, and are more likely to fail
from being overheated.
Page 406 of 474

405
Practical hints
Jump starting
The battery is located in the engine com-
partment on the right hand side. The
terminals for jump starting are located in
front of the battery.�
Make sure the two vehicles do not
touch.
�
Turn off the engine.
On both vehicles:
�
Turn off all electrical consumers.
�
Apply parking brake.
�
Shift gear selector lever to position P
(manual transmission to Neutral). 1
Positive terminal of charged battery
2 Positive under hood terminal in front of
discharged battery
3 Negative terminal of charged battery
4 Negative under hood terminal in front
of discharged battery
�
Connect positive terminal 1 of the
charged battery with positive under
hood terminal 2 in front of the dis-
charged battery with the jumper ca-
bles. Clamp cable to charged
battery 1 first.
�
Start engine of the vehicle with the
charged battery and run at idle speed.
�
Connect negative terminal 3 of the
charged battery with negative under
hood terminal 4 in front of the dis-
charged battery with the jumper
cables. Clamp cable to charged
battery 3 first.
�
Start the engine of the disabled
vehicle.
Now you can turn on the electrical con-
sumers. Do not turn on the lights under
any circumstances.
�
Remove the jumper cables first from
negative terminals 4 and 3 and then
from positive terminals 2 and 1.
You can now turn on the lights.
�
Have the battery checked at the
nearest authorized Mercedes-Benz
Center.
Warning!
G
Keep flames or sparks away from battery.
Do not smoke.
Observe all safety instructions and precau-
tions when handling automotive batteries
(�page 297).
!Vehicles with automatic transmission:
Do not tow-start the vehicle.