Page 88 of 474
87
Safety and Security
Anti-theft systems
�
Lock the vehicle with the SmartKey.
The turn signal lamps flash three times
to indicate that the alarm system is
activated. Indicator lamp
1 begins to
flash after approximately 30 seconds
after arming the alarm system. Disarming the alarm system
�
Unlock the vehicle with the SmartKey.
The turn signal lamps flash once to
indicate that the alarm system is deac-
tivated.
Canceling the alarm
To cancel the alarm:
�
Press the Œ or ‹ button on the
SmartKey.
or
�
Insert the SmartKey in the starter
switch.
Tow-away alarm*
Once the tow-away alarm is armed, a visual
and audible alarm will be triggered when
someone attempts to raise the vehicle.
iIf the turn signal lamps do not flash
three times one of the following ele-
ments may not be properly closed:�
a door
�
the trunk lid
�
the hood
Close the respective element and lock
the vehicle again.
iThe alarm system will rearm automati-
cally after approximately 40 seconds if
a door or the trunk lid is not opened.
iThe tow away protection alarm is
triggered, for example, if the vehicle is
lifted on one side.
If the alarm stays on for more than
30 seconds, a call to the Response
Center is initiated automatically by the
Tele Aid system* (
�page 261) provid-
ed Tele Aid service was subscribed to
and properly activated, and that neces-
sary cellular service and GPS coverage
are available.
Page 93 of 474
92 Controls in detailLocking and unlockingFactory setting
Global unlocking�
Press buttonŒ.
All turn signal lamps flash once. The
locking knobs in the doors move up.
The anti-theft alarm system* is
disarmed.
The vehicle will lock again automatically
and reactivate the anti-theft alarm sys-
tem* within approximately 40 seconds of
unlocking if:
�
neither door nor trunk lid is opened
�
the SmartKey is not inserted in the
starter switch
�
the central locking switch is not
activated Global locking
�
Press button
‹.
With the hood, trunk and all doors
closed, all turn signal lamps flash three
times. The locking knobs in the doors
move down. The anti-theft alarm sys-
tem* is armed.
Selective setting
If you frequently travel alone, you may wish
to reprogram the SmartKey so that
pressing Œ only unlocks the driver’s
door and the fuel filler flap.
�
Press and hold buttons Œ and‹
simultaneously for about five seconds
until battery check lamp 4 flashes
twice.
The SmartKey will then function as
follows: Unlocking driver’s door and fuel filler
flap
�
Press button
Πonce.
All turn signal lamps flash once. The
locking knob in the driver’s door moves
up. The anti-theft alarm system*
disarmed.
Global unlocking
�
Press button Πtwice.
All turn signal lamps flash once. The
locking knobs in the doors move up.
The anti-theft alarm system* is
disarmed.
Page 94 of 474
93
Controls in detail
Locking and unlocking
Global locking�
Press button
‹.
With the hood, trunk and all doors
closed, all turn signal lamps flash three
times. The locking knobs in the doors
move down. The anti-theft alarm sys-
tem* is armed.
Restoring to factory setting
�
Press and hold buttons Œ and‹
simultaneously for about six seconds
until battery check lamp 4 flashes
twice. Checking the batteries
�
Press button
‹ orŒ .
Battery check lamp 4 comes on brief-
ly to indicate that the SmartKey batter-
ies are in order.
!If you can no longer lock or unlock the
vehicle with the SmartKey, then either
the batteries in the SmartKey are dis-
charged, the SmartKey is malfunction-
ing or the vehicle battery is drained.�
Check the batteries in the
SmartKey and replace them if
necessary (
�page 383).
�
Use the mechanical key to unlock
the driver’s door (
�page 377).
�
Use the mechanical key to lock the
driver’s door (
�page 379).
�
Have the vehicle battery and the
battery connections checked
(�page 401).
If the SmartKey is malfunctioning,
contact an authorized Mercedes-Benz
Center.
iIf battery check lamp 4 does not
come on briefly during check, then the
SmartKey batteries are discharged.
Replace the batteries (
�page 383).
You can obtain the required batteries
at any authorized Mercedes-Benz
Center.
iIf the batteries are checked within sig-
nal range of the vehicle, pressing
the ‹ orŒ button will lock or
unlock the vehicle accordingly.
Page 97 of 474
96 Controls in detailLocking and unlocking
Trunk lid emergency release
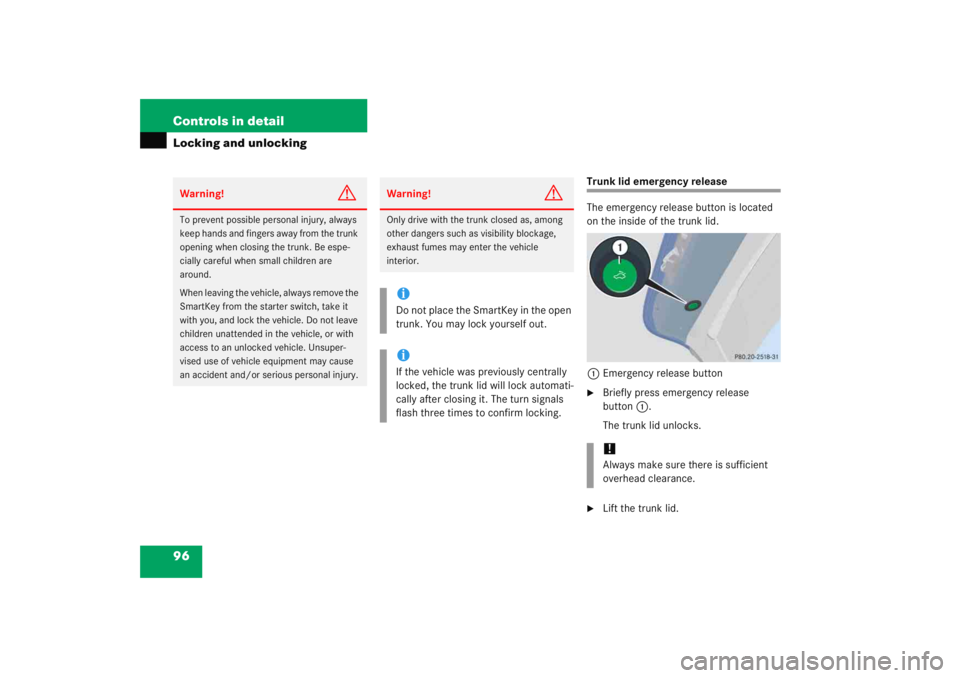
The emergency release button is located
on the inside of the trunk lid.1 Emergency release button�
Briefly press emergency release
button 1.
The trunk lid unlocks.
�
Lift the trunk lid.
Warning!
G
To prevent possible personal injury, always
keep hands and fingers away from the trunk
opening when closing the trunk. Be espe-
cially careful when small children are
around.
When leaving the vehicle, always remove the
SmartKey from the starter switch, take it
with you, and lock the vehicle. Do not leave
children unattended in the vehicle, or with
access to an unlocked vehicle. Unsuper-
vised use of vehicle equipment may cause
an accident and/or serious personal injury.
Warning!
G
Only drive with the trunk closed as, among
other dangers such as visibility blockage,
exhaust fumes may enter the vehicle
interior.iDo not place the SmartKey in the open
trunk. You may lock yourself out.iIf the vehicle was previously centrally
locked, the trunk lid will lock automati-
cally after closing it. The turn signals
flash three times to confirm locking.
!Always make sure there is sufficient
overhead clearance.
Page 111 of 474

110 Controls in detailLightingFor more information on how to switch on
the headlamps and use the turn signals,
see “Switching on headlamps” (
�page 51)
and “Turn signals”(
�page 52).
Exterior lamp switch
The exterior lamp switch is located on the
dashboard to the left of the steering wheel.Exterior lamp switchM Off
Daytime running lamp mode
(
�page 144)
U Automatic headlamp mode
Daytime running lamp mode
(�page 144) C
Parking lamps (also side marker
lamps, tail lamps, license plate
lamps, instrument panel lamps)
Canada only: When engine is run-
ning, the low beam is also switched
on.
B Low beam headlamps (or high
beam headlamps when the combi-
nation switch pushed forward) and
parking lamps.
ˆ Standing lamps, right (turn left one
stop)
‚ Standing lamps, left (turn left two
stops)
‡ Indicator lamp for front fog lamps
† Indicator lamp for rear fog lamp
iIf you drive in countries where vehicles
drive on the other side of the road than
the country where the vehicle is regis-
tered, you must have the headlamps
modified for symmetrical low beams.
Relevant information can be obtained
at an authorized Mercedes-Benz
Center.
Page 116 of 474
115
Controls in detail
Lighting
Driving forward
Switching on cornering fog lamps�
Depending on whether you are turning
left or right, switch on the left or right
turn signal (
�page 52).
The respective front fog lamp comes on
and illuminates the road into which you
are turning. Switching off cornering fog lamps
The combination switch for the turn signal
resets automatically after major steering
wheel movements. This will switch off the
cornering fog lamps if they were activated
by switching on the left or right turn signal.
If the turn signal should stay on after mak-
ing the turn, the turn signal and cornering
fog lamp can be switched off by returning
the combination switch to its original posi-
tion. Driving rearward
Switching on cornering fog lamps
�
Place the gear selector lever (manual
transmission: gearshift lever) in
position
R.
The inverse front fog lamp comes on
automatically depending on the
steering direction and steering angle.
Switching off cornering fog lamps
�
Place the gear selector lever (manual
transmission: gearshift lever) out of
position R.
The respective front fog lamp goes out.
iThe cornering fog lamps will come on
automatically depending on the steer-
ing angle, even if you did not switch on
either turn signal. If the cornering fog
lamps came on automatically, they will
also go out automatically depending on
the steering angle.
Page 117 of 474
116 Controls in detailLightingHazard warning flasher
The hazard warning flasher can be
switched on all times, even with the
SmartKey removed from the starter
switch.
The hazard warning flasher switches on
automatically when an air bag deploys.
The hazard warning flasher switch is locat-
ed on the upper part of the center console.1 Hazard warning flasher switch Switching on the hazard warning
flasher
�
Press hazard warning flasher
switch
1.
All turn signal lamps are flashing. Switching off the hazard warning
flasher
�
Press hazard warning flasher
switch
1again.
iWith the hazard warning flasher acti-
vated and the combination switch set
for either left or right turn, only the re-
spective turn signals will operate when
the ignition is switched on (
�page 33).
iIf the hazard warning flasher has been
activated automatically, press hazard
warning flasher switch 1 once to
switch it off.
Page 213 of 474

212 Controls in detailAudio systemTuning via scan search
Scan search is characterized as follows:�
Scan search plays a channel for ap-
proximately eight seconds and then
skips to the next channel within the
current category.
�
Scan search can be terminated manu-
ally.
�
Press
SC soft key.
The search starts.
SC appears in the
display.
�
Press
SC soft key again.
The search stops. Obtaining additional text information
Additional text information (artist, title) re-
lated to the current channel can be dis-
played.
�
Press
INF
soft key.
The title being played is displayed.
�
Press
INF
soft key again.
The name of the artist performing the
title being played is displayed. Storing stations
�
Tune in desired station.
�
Press and hold desired station button
1
to R until a brief signal tone is
heard.
The frequency is stored on the selected
station button.
The radio saves the current station at
the memory preset selected. The mem-
ory preset selected appears in the sta-
tus line, e.g. S3.
iIf a button is not pressed within
four seconds, the radio will return to
the standard display.
iThere are ten presets available.
An existing entry is overwritten in the
memory list when a new entry is given.