Page 376 of 474
375
Practical hints
Where will I find ...?
Setting up the collapsible wheel chock
The collapsible wheel chock serves to ad-
ditionally secure the vehicle, e.g. while
changing the wheel.
1 Tilt the plates upward
2 Fold the lower plate outward
3 Insert the plate
�
Tilt both plates upward 1.
�
Fold the lower plate outward 2.
�
Guide the tabs of the lower plate all the
way into the openings of the base
plate 3.
Spare wheel
The spare wheel is located under the trunk
floor.
Removing the spare wheel�
Lift trunk floor.
1 Spare wheel
2 Storage tray with vehicle tool kit
3 Mounting screw for spare wheel/cover
for vehicle tools
�
Turn the mounting screw 3 counter-
clockwise.
�
Remove the spare wheel 1.
Page 377 of 474

376 Practical hintsWhere will I find ...?Storing the spare wheel
If you wish to store the spare wheel after
use, carry out the following steps. Other-
wise the spare wheel will not fit the wheel
well.�
Unscrew the valve cap from the valve
of the spare wheel.
�
Carefully push the tip of the valve cap
into the spare wheel valve and allow
the air to escape.
�
Screw the valve cap back on the valve.
�
Place spare wheel1 in wheel well.
�
Turn retaining screw 3 clockwise to
its stop to secure the spare wheel.
�
Install the trunk floor. Spare wheel bolts
1 Wheel bolt for light alloy rims
2 Wheel bolt for light alloy spare wheel
rim size 4
1/2B x15 H2 For more information on model and spare
wheel rim size, see “Technical data”
section (
�page 422).
iIt may take a few minutes for the col-
lapsible tire to deflate completely.
!Wheel bolts
2 must be used when
mounting spare wheel rim
size 4
1/2Bx15 H2 (
�page 422).
The use of any wheel bolts other than
wheel bolts 2 for spare wheel rim
size 4
1/2B x15 H2 can cause physical
damage to the vehicle.
Warning!
G
Make sure to use the original length wheel
bolts when remounting the original wheel af-
ter it has been repaired.
Page 395 of 474

394 Practical hintsFlat tire
Preparing the vehicle�
Park the vehicle as far as possible from
moving traffic on a hard surface.
�
Turn on the hazard warning flashers.
�
Turn the steering wheel so that the
front wheels are in a straight ahead
position.
�
Move the gear selector lever toP
(manual transmission to first or reverse
gear).
�
Turn off the engine (
�page 58).
�
Remove the SmartKey from the starter
switch.
�
Have any passenger exit the vehicle at
a safe distance from the roadway.
Mounting the spare wheel
Preparing the vehicle
Prepare the vehicle as described
(�page 394).
�
Take the wheel wrench and the jack
out of wheel well below the trunk floor
(�page 373).
�
Take the spare wheel out of the trunk
(�page 375).
Warning!
G
The dimensions of the spare wheel are dif-
ferent from those of the road wheels. As a
result, the vehicle handling characteristics
change when driving with a spare wheel
mounted. Adapt your driving style accord-
ingly.
The spare wheel is for temporary use only.
When driving with spare wheel mounted, en-
sure proper tire pressure and do not exceed
vehicle speed of 50 mph (80 km/h).
Drive to the nearest Mercedes-Benz Center
as soon as possible to have the spare wheel
replaced with a regular road wheel.
Never operate the vehicle with more than
one spare wheel mounted.
Page 398 of 474

397
Practical hints
Flat tire
Mounting the spare wheel
1 Wheel bolt for light alloy rims
2 Wheel bolt for light alloy spare wheel
rim size 4
1/2B x15 H2
�
Clean contact surfaces of wheel and
wheel hub.
�
Guide the spare wheel onto the align-
ment bolt and push it on.
�
Insert wheel bolts and tighten them
slightly.
�
Inflate the spare tire using the electric
air pump (
�page 398).
!Wheel bolts 2 must be used when
mounting spare wheel rim
size 4
1/2Bx15 H2 (
�page 422).
The use of any wheel bolts other than
wheel bolts 2 for spare wheel rim
size 4
1/2B x15 H2 can cause physical
damage to the vehicle.
!To avoid paint damage, place wheel flat
against hub and hold it there while
installing first wheel bolt.Warning!
G
Always replace wheel bolts that are dam-
aged or rusted.
Never apply oil or grease to wheel bolts.
Damaged wheel hub threads should be re-
paired immediately. Do not continue to drive
under these circumstances! Contact an
authorized Mercedes-Benz Center or call
Roadside Assistance.
Incorrect wheel bolts or improperly tight-
ened wheel bolts can cause the wheel to
come off. This could cause an accident.
Make sure to use the correct mounting
bolts.
Warning!
G
Inflate spare wheel with collapsible tire only
after the wheel is properly mounted.
Inflate the spare wheel tire using the electric
air pump before lowering the vehicle.
��
Page 399 of 474
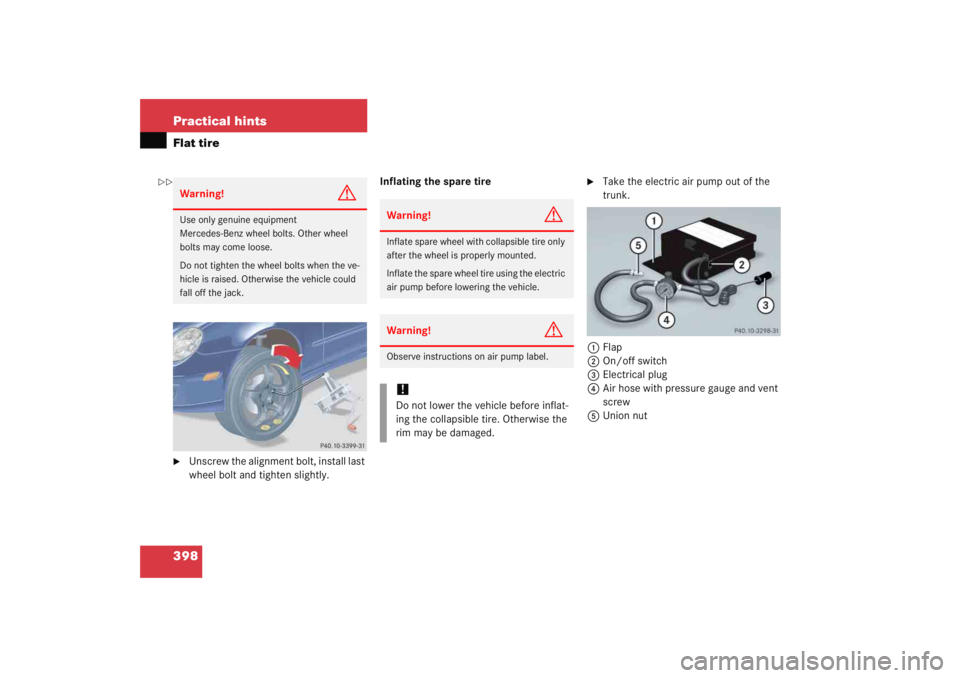
398 Practical hintsFlat tire�
Unscrew the alignment bolt, install last
wheel bolt and tighten slightly.Inflating the spare tire
�
Take the electric air pump out of the
trunk.
1 Flap
2 On/off switch
3 Electrical plug
4 Air hose with pressure gauge and vent
screw
5 Union nut
Warning!
G
Use only genuine equipment
Mercedes-Benz wheel bolts. Other wheel
bolts may come loose.
Do not tighten the wheel bolts when the ve-
hicle is raised. Otherwise the vehicle could
fall off the jack.
Warning!
G
Inflate spare wheel with collapsible tire only
after the wheel is properly mounted.
Inflate the spare wheel tire using the electric
air pump before lowering the vehicle.Warning!
G
Observe instructions on air pump label.!Do not lower the vehicle before inflat-
ing the collapsible tire. Otherwise the
rim may be damaged.
��
Page 401 of 474
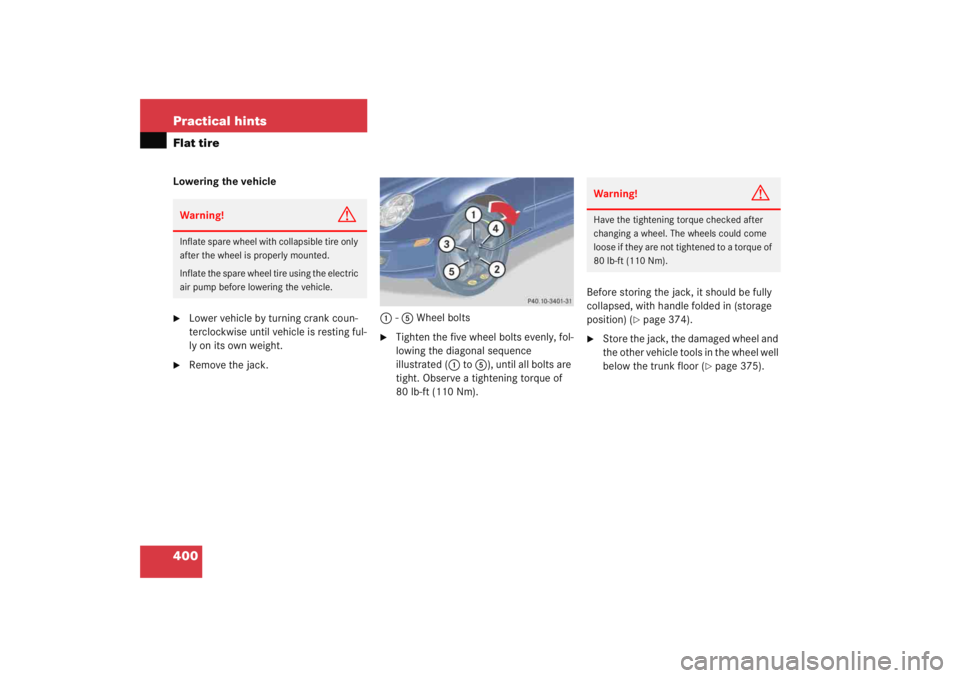
400 Practical hintsFlat tireLowering the vehicle�
Lower vehicle by turning crank coun-
terclockwise until vehicle is resting ful-
ly on its own weight.
�
Remove the jack.1
-5 Wheel bolts
�
Tighten the five wheel bolts evenly, fol-
lowing the diagonal sequence
illustrated ( 1 to 5 ), until all bolts are
tight. Observe a tightening torque of
80 lb-ft (110 Nm). Before storing the jack, it should be fully
collapsed, with handle folded in (storage
position) (
�page 374).
�
Store the jack, the damaged wheel and
the other vehicle tools in the wheel well
below the trunk floor (
�page 375).
Warning!
G
Inflate spare wheel with collapsible tire only
after the wheel is properly mounted.
Inflate the spare wheel tire using the electric
air pump before lowering the vehicle.
Warning!
G
Have the tightening torque checked after
changing a wheel. The wheels could come
loose if they are not tightened to a torque of
80 lb-ft (110 Nm).
Page 411 of 474

410 Practical hintsFusesThe electrical fuses in your vehicle serve to
stop the supply of electricity to a device
that is malfunctioning. This helps to
prevent damage to the other vehicle
electronics.
The following aids are available to help you
change fuses.�
Fuse chart
�
Spare fuses
�
Fuse extractorThe electrical fuses are located in different
fuse boxes.
�
Main fuse box in passenger compart-
ment (
�page 411)
�
Fuse box in engine compartment
(�page 411)
�
Fuse box in trunk (
�page 412)
Aids for changing fuses
Fuse chart
The fuse chart is found in the main fuse
box in the passenger compartment
(�page 411). The amperages of the fuses
are also given there.
Spare fuses
Spare fuses are found in the vehicle tool kit
in the spare wheel well (
�page 373).
Fuse extractor
The fuse extractor is found in the fuse box
cover in the trunk (
�page 412).
Warning!
G
Only use fuses approved for Mercedes-Benz
with the specified amperage for the system
in question. Otherwise, a short circuit could
result and cause a fire.
!Only install fuses that have been tested
and approved by Mercedes-Benz and
that have the specified amperage
rating.
Otherwise, electrical parts or systems
could be damaged.
Never attempt to repair or bridge a
blown fuse. Have the cause determined
and remedied by an authorized
Mercedes-Benz Center.
Page 423 of 474
422 Technical dataRims and TiresSpare wheel
C 230 Kompressor
C320
Rim (light alloy)
4.5Bx15H2
4.5Bx16H2
Wheel offset
0.47 in (12 mm)
0.47 in (12 mm)
Collapsible Tire
165 - 15 89P
1
165/70 - 16 92P
1
1Must not be used with snow chains.


4.5Bx15H2
4.5Bx16H2
Wheel offset
0.47 in (12 mm)
0.47 in (12 mm)
Collapsible Tire
165 - 15 89P
1
165/70 - 16 92P
1
1")