Page 325 of 364

Laser
Prepa-
ration
Imme-
diate
use
Advanced
use
If
necessary
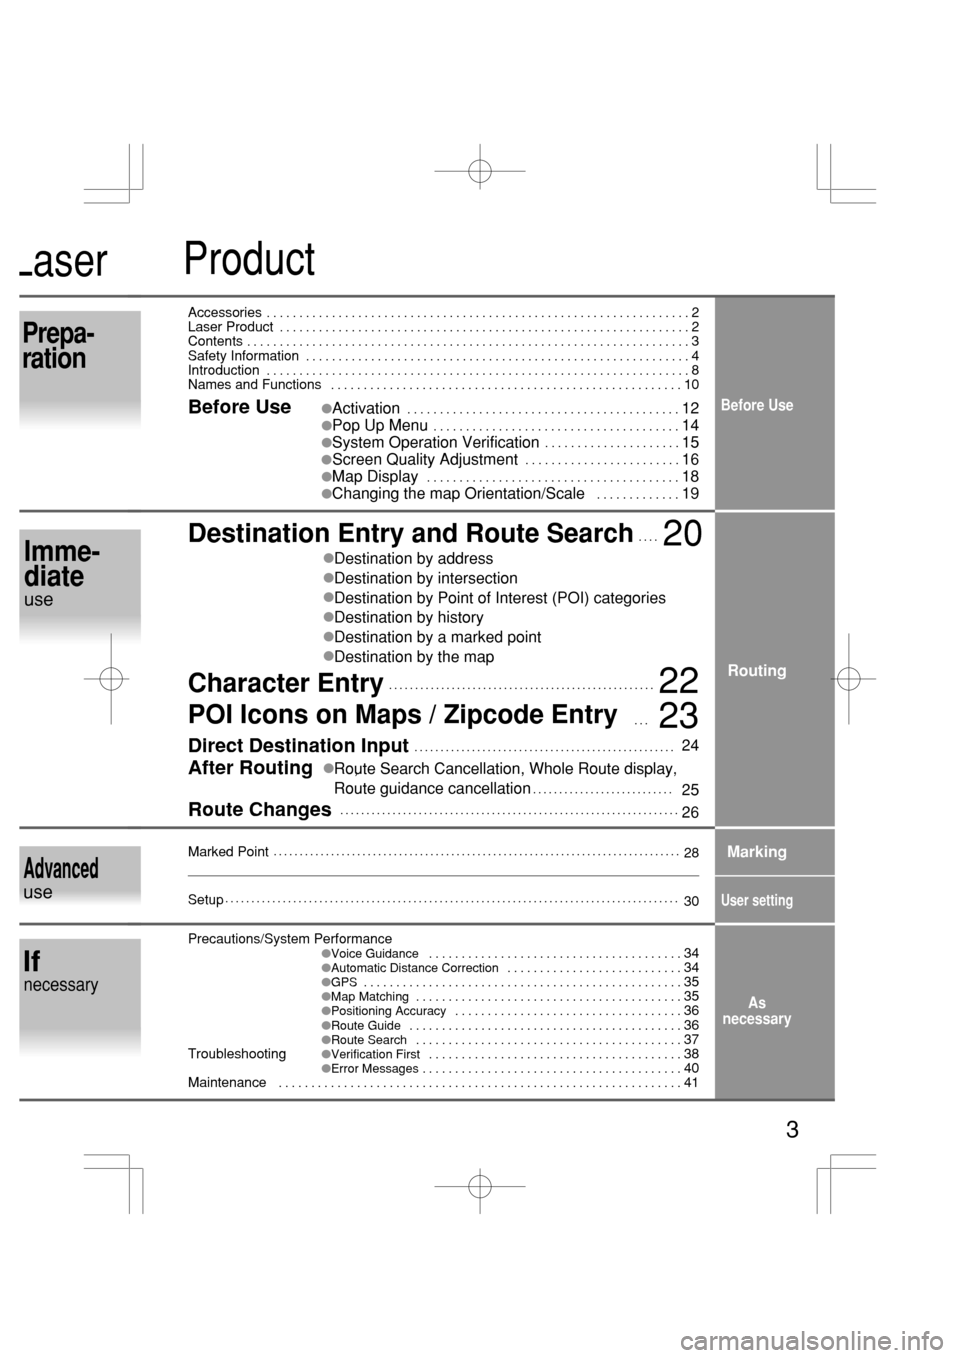
�Activation . . . . . . . . . . . . . . . . . . . . . . . . . . . . . . . . . . . . . . . . . .12
�Pop Up Menu . . . . . . . . . . . . . . . . . . . . . . . . . . . . . . . . . . . . . .14
�System Operation Verification . . . . . . . . . . . . . . . . . . . . .
. . . . . . . . . . . . . . . . . . . . . . . .15
16 Screen Quality Adjustment
�Map Display . . . . . . . . . . . . . . . . . . . . . . . . . . . . . . . . . . . . . . .18
�Changing the map Orientation/Scale . . . . . . . . . . . . .19
As
necessary
3
Marked Point
Direct Destination Input
After Routing
Route Changes
�Destination by address
�Destination by intersection
�Destination by Point of Interest (POI) categories
�Destination by history
�Destination by a marked point
�Destination by the map
Product
Before Use
�Route Search Cancellation, Whole Route display,,
Route guidance cancellation
Setup
Precautions/System Performance�Voice Guidance . . . . . . . . . . . . . . . . . . . . . . . . . . . . . . . . . . . . . . .34�Automatic Distance Correction . . . . . . . . . . . . . . . . . . . . . . . . . . .34�GPS . . . . . . . . . . . . . . . . . . . . . . . . . . . . . . . . . . . . . . . . . . . . . . . . .35�Map Matching . . . . . . . . . . . . . . . . . . . . . . . . . . . . . . . . . . . . . . . . .35�Positioning Accuracy . . . . . . . . . . . . . . . . . . . . . . . . . . . . . . . . . . .36�Route Guide . . . . . . . . . . . . . . . . . . . . . . . . . . . . . . . . . . . . . . . . . .36�Route Search . . . . . . . . . . . . . . . . . . . . . . . . . . . . . . . . . . . . . . . . .37
Troubleshooting�Verification First . . . . . . . . . . . . . . . . . . . . . . . . . . . . . . . . . . . . . . .38�Error Messages . . . . . . . . . . . . . . . . . . . . . . . . . . . . . . . . . . . . . . . .40
Maintenance . . . . . . . . . . . . . . . . . . . . . . . . . . . . . . . . . . . . . . . . . . . . . . . . . . . . . . . . . . . . . .41
Routing
28
30Marking
User setting
Destination Entry and Route Search
24
25
26
Character Entry
20
22
POI Icons on Maps / Zipcode Entry
Accessories . . . . . . . . . . . . . . . . . . . . . . . . . . . . . . . . . . . . . . . . . . . . . . . . . . . . . . . . . . . . . . . . .2
Laser Product . . . . . . . . . . . . . . . . . . . . . . . . . . . . . . . . . . . . . . . . . . . . . . . . . . . . . . . . . . . . . . .2
Contents . . . . . . . . . . . . . . . . . . . . . . . . . . . . . . . . . . . . . . . . . . . . . . . . . . . . . . . . . . . . . . . . . . . .3
Safety Information . . . . . . . . . . . . . . . . . . . . . . . . . . . . . . . . . . . . . . . . . . . . . . . . . . . . . . . . . . .4
Introduction . . . . . . . . . . . . . . . . . . . . . . . . . . . . . . . . . . . . . . . . . . . . . . . . . . . . . . . . . . . . . . . . .8
Names and Functions . . . . . . . . . . . . . . . . . . . . . . . . . . . . . . . . . . . . . . . . . . . . . . . . . . . . . .10
Before Use
23
�
Page 330 of 364

8
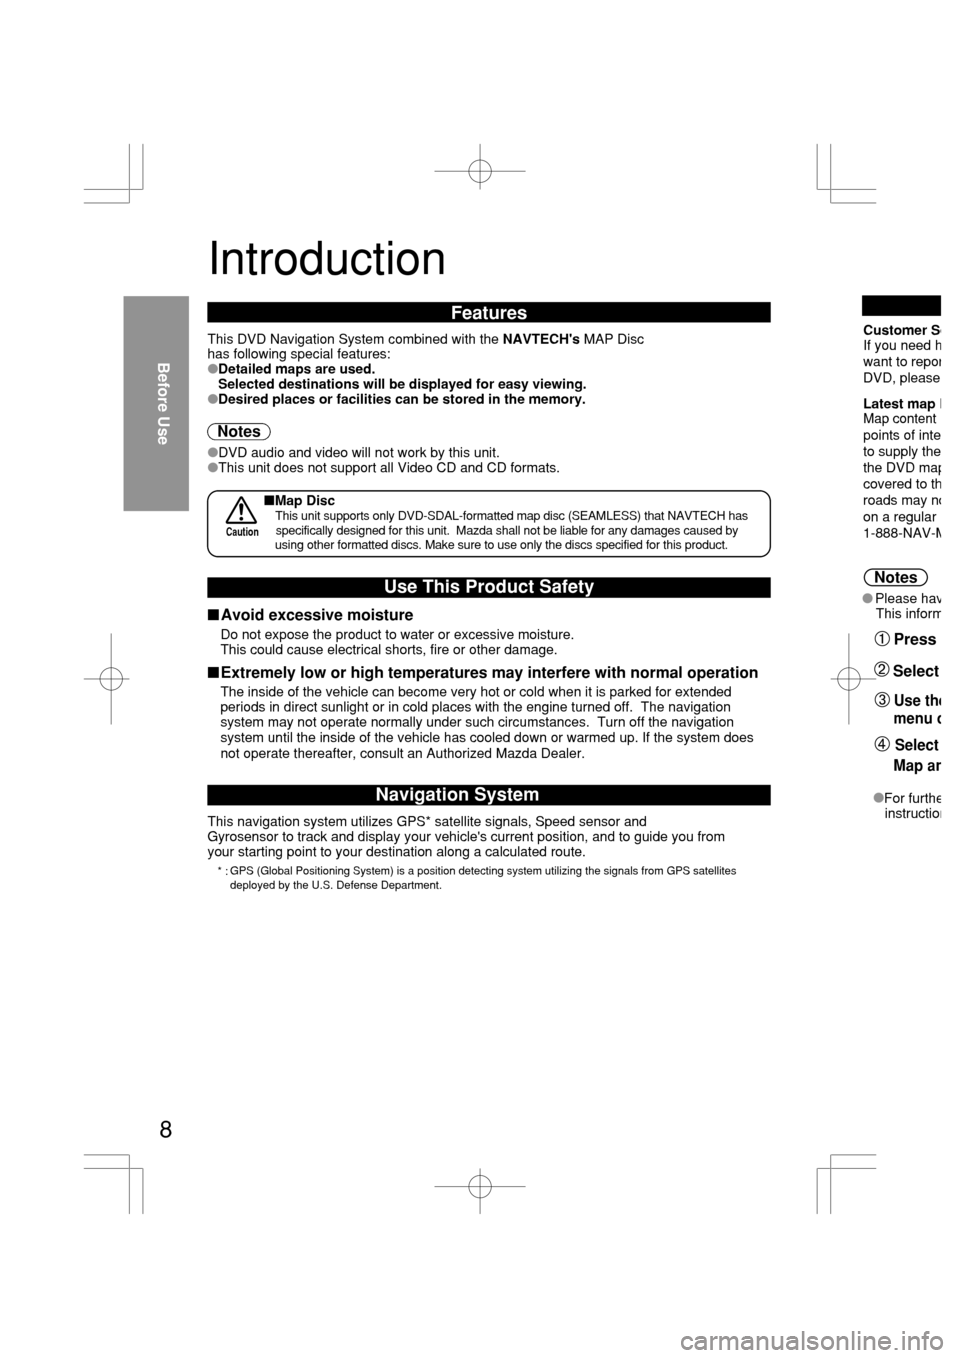
Introduction
Navigation System
This navigation system utilizes GPS* satellite signals, Speed sensor and
Gyrosensor to track and display your vehicle's current position, and to guide you from
your starting point to your destination along a calculated route.
GPS (Global Positioning System) is a position detecting system utilizing the signals from GPS satellites
deployed by the U.S. Defense Department.
This DVD Navigation System combined with the NAVTECH's MAP Disc
has following special features:
�Detailed maps are used.
Selected destinations will be displayed for easy viewing.
�Desired places or facilities can be stored in the memory.
Features
�DVD audio and video will not work by this unit.
�This unit does not support all Video CD and CD formats.
Notes
Use This Product Safety
Do not expose the product to water or excessive moisture.
This could cause electrical shorts, fire or other damage.
�Avoid excessive moisture
The inside of the vehicle can become very hot or cold when it is parked for extended
periods in direct sunlight or in cold places with the engine turned off. The navigation
system may not operate normally under such circumstances. Turn off the navigation
system until the inside of the vehicle has cooled down or warmed up. If the system does
not operate thereafter, consult an Authorized Mazda Dealer.
�Extremely low or high temperatures may interfere with normal operation
Before Use
* :
Map Disc
specifically designed for this unit. Mazda shall not be liable for any damages caused by CautionThis unit supports only DVD-SDAL-formatted map disc (SEAMLESS) that NAVTECH has
using other formatted discs. Make sure to use only the discs specified for this product.
Customer SeIf you need h
want to repor
DVD, please
Latest map DMap content
points of inte
to supply the
the DVD ma
p
covered to th
roads may no
on a regular
1-888-NAV-
M
Please havThis inform
Notes
Press
Use the
menu o
Map an
Select
Select
For furtheinstruction
Page 331 of 364

from
satellites
ended
gation
igation
stem does
operation
aused by TECH has
roduct.
Map Related Issues
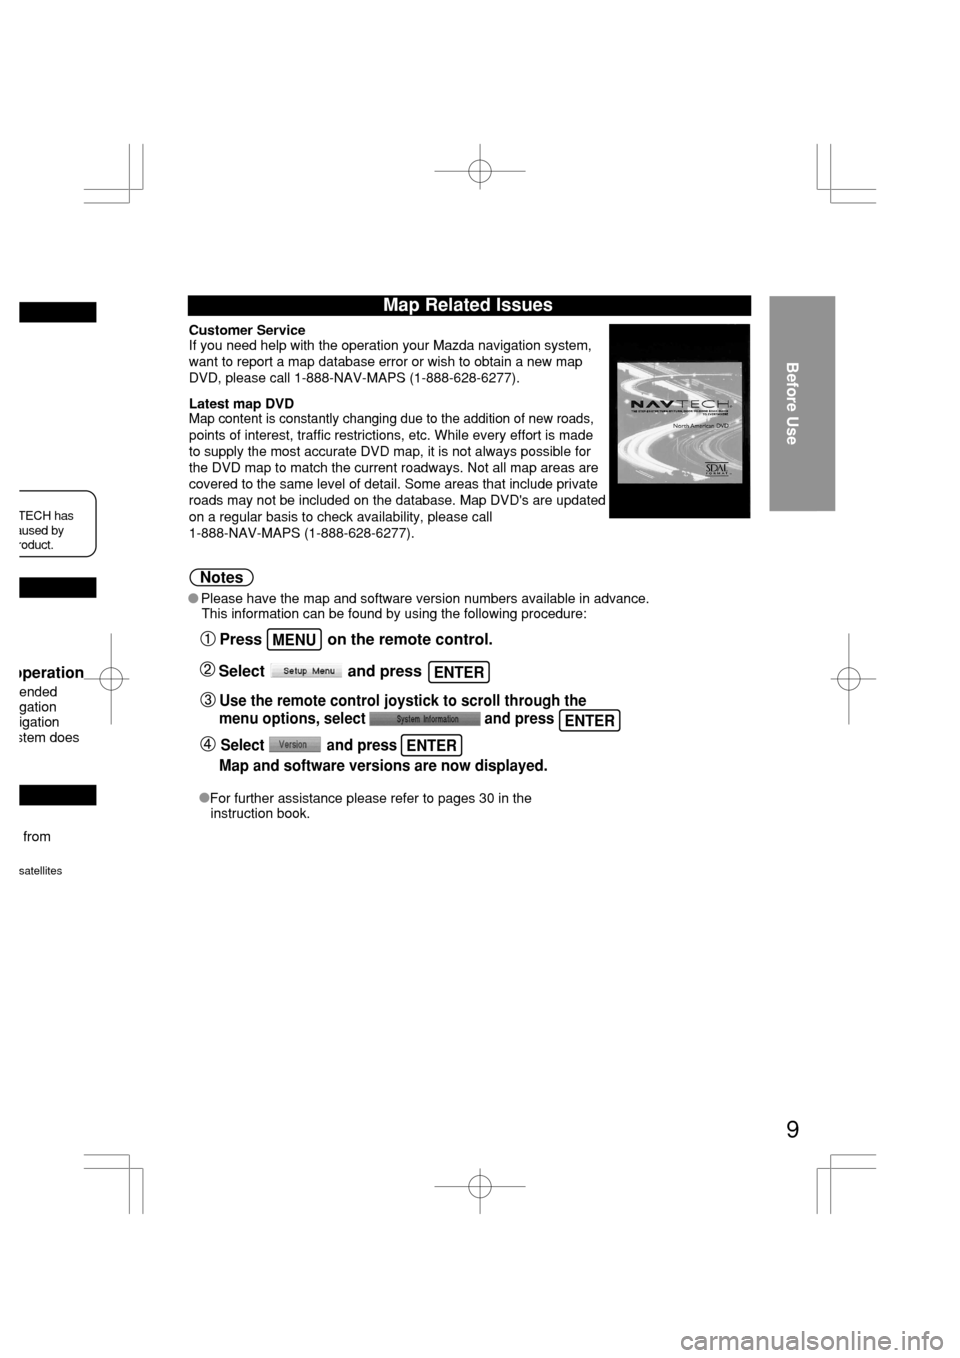
Customer ServiceIf you need help with the operation your Mazda navigation system,
want to report a map database error or wish to obtain a new map
DVD, please call 1-888-NAV-MAPS (1-888-628-6277).
Latest map DVDMap content is constantly changing due to the addition of new roads,
points of interest, traffic restrictions, etc. While every effort is made
to supply the most accurate DVD map, it is not always possible for
the DVD map to match the current roadways. Not all map areas are
covered to the same level of detail. Some areas that include private
roads may not be included on the database. Map DVD's are updated
on a regular basis to check availability, please call
1-888-NAV-MAPS (1-888-628-6277).
Before Use
Please have the map and software version numbers available in advance.
This information can be found by using the following procedure:
Notes
Press on the remote control.
Use the remote control joystick to scroll through the
menu options, select and press
Map and software versions are now displayed.Select and press
Select and press
For further assistance please refer to pages 30 in the
instruction book.
9
ENTER
ENTER
MENU
ENTER
Page 332 of 364
Names and Functions
Before Use
10
MENU key
Displays menu.MENU
VOICE key
Initiates vocal guidance
for route maneuvers.VOICE
Adjusts screen quality.
( page 16)
Page 333 of 364
Before Use
11
ENTER key
Executes a selected item.ENTER
RET key
Returns to the previous screen.
POS (Position) key
Displays your current position.
( page 18)
POS
Joystick
Selects items
by tilting it up, down, right, and left.ENTER
RET
ZOOM key
Changes the map scale.
( page 19)
( page 14)
ZOOM
Displays pop up menu.
Scrolls map.
ance rs.
ality.
Page 336 of 364

14
Before Use
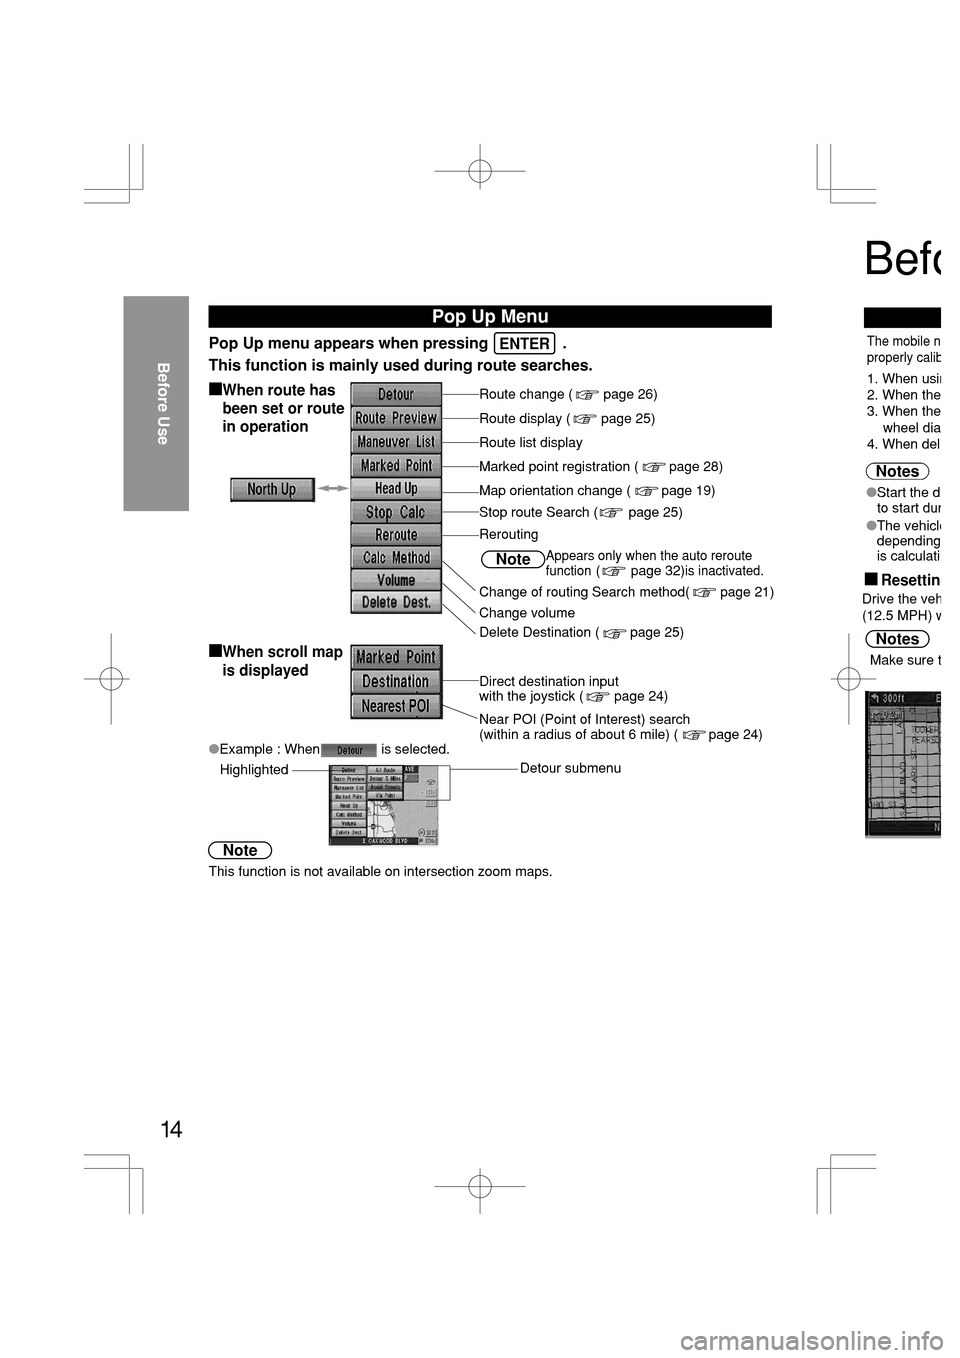
Pop Up Menu
Pop Up menu appears when pressing .
This function is mainly used during route searches.
Route change ( page 26)�When route has
been set or route
in operation
Route display ( page 25)
Route list display
Marked point registration ( page 28)
Map orientation change ( page 19)
Rerouting
Change of routing Search method( page 21)
Change volume
Stop route Search ( page 25)
Direct destination input
with the joystick ( page 24)
�When scroll map
is displayed
Near POI (Point of Interest) search
(within a radius of about 6 mile) ( page 24)
�Example : When is selected.
Detour submenu
Highlighted
NoteAppears only when the auto reroute
function ( page 32)is inactivated.
Note
This function is not available on intersection zoom maps.
ENTER
Delete Destination ( page 25)
�Start the d
to start dur
�The vehicle
depending
is calculati
The mobile n
properly calib
1. When usin
2. When the
3. When the
wheel dia
4. When del
Notes
LOtrs PTrso
ETIQrsoRrsQrR
KyJZdsLHz'sM
Notes
Befo
�Resetting
Page 338 of 364
16
Screen quality
adjustment
Open [Display
Menu]Select
Select
Screen off
Day / Night
mode selector
Before Use
Select /
1Press and hold
Screen Quality Adjustment
2
Screen display turns off.
Press any button to
return to screen display.
headlights OFF - DAY MODE
headlights ON - NIGHT MODE
When the headlights are on,
daytime mode can also be
selected (if extra screen
certain nighttime conditions).
This selection can only be done
when the headlights are on.
Press to switch
between day and night modes.
Before Use
brightness is required under
maiADDdrDhDdrDh
DdrDh
3
Page 339 of 364
ent
n display turns off.
any button to
to screen display.
ts OFF - DAY MODE
ts ON - NIGHT MODE
e headlights are on,
mode can also be
(if extra screen
ighttime conditions).
ection can only be donee headlights are on.
to switch
day and night modes.
ss is required under
ENTER
ENTER
17
Before Use
3
Adjust screen
contrast.
Returns screen to
initial settings. Adjust screen
brightness.
ENTER
ENTERENTER
ENTER
ENTER