Page 122 of 328

away from the HomeLink�button you wish to program (located on your
overhead console) while keeping the display in view.
3. Sim")
2. Position the end of your hand-held transmitter 1–3 inches (2–8 cm)
away from the HomeLink�button you wish to program (located on your
overhead console) while keeping the display in view.
3. Simultaneously press and hold
both the HomeLink�and hand-held
transmitter button. The message
CHANNEL “X” (1,2 or 3) TRAINING
will appear on the display.Do not
release the buttons until step 4
has been completed.
Some entry gates and garage door openers may require you to replace
step 3 with procedures noted in the “Gate Operator and Canadian
Programming” section for Canadian residents.
4. When the message CHANNEL “X”
(1,2 or 3) TRAINED appears on the
display, release both the HomeLink�
and hand held transmitter buttons.
•DID NOT TRAIN will be displayed
if the channel did not properly
train.
5. Press and hold the just-trained HomeLink�button and observe the
HomeLink�house icon on the display. If the indicator light(s)
2005 Town Car(tow)
Owners Guide (post-2002-fmt)
USA_English(fus)
Driver Controls
122
Page 124 of 328

while you press and release —
every two seconds(“cycle”)
your hand-held transmitter until
the fre")
•Continue to press and hold the
HomeLink�button (note step 3
in the “Programming” section)
while you press and release —
every two seconds(“cycle”)
your hand-held transmitter until
the frequency signal has been
accepted by the HomeLink�. The
message CHANNEL “X” (1,2 or 3)
TRAINING will appear on the
display.
•Proceed with step 4 in the “Programming” section.
Operating the HomeLink�Wireless Control System
To operate, simply press and release the appropriate HomeLink�button.
Activation will now occur for the trained product (garage door, gate
operator, security system, entry door lock, or home or office lighting
etc.). For convenience, the hand-held transmitter of the device may also
be used at any time. In the event that there are still programming
difficulties, contact HomeLink�atwww.homelink.comor
1–800–355–3515.
Erasing HomeLink�buttons
To erase the three programmed buttons (individual buttons cannot be
erased):
•Press and hold the two outside
buttons. The message CLEARING
CHANNELS will appear on the
HomeLink�display.
2005 Town Car(tow)
Owners Guide (post-2002-fmt)
USA_English(fus)
Driver Controls
124
Page 125 of 328
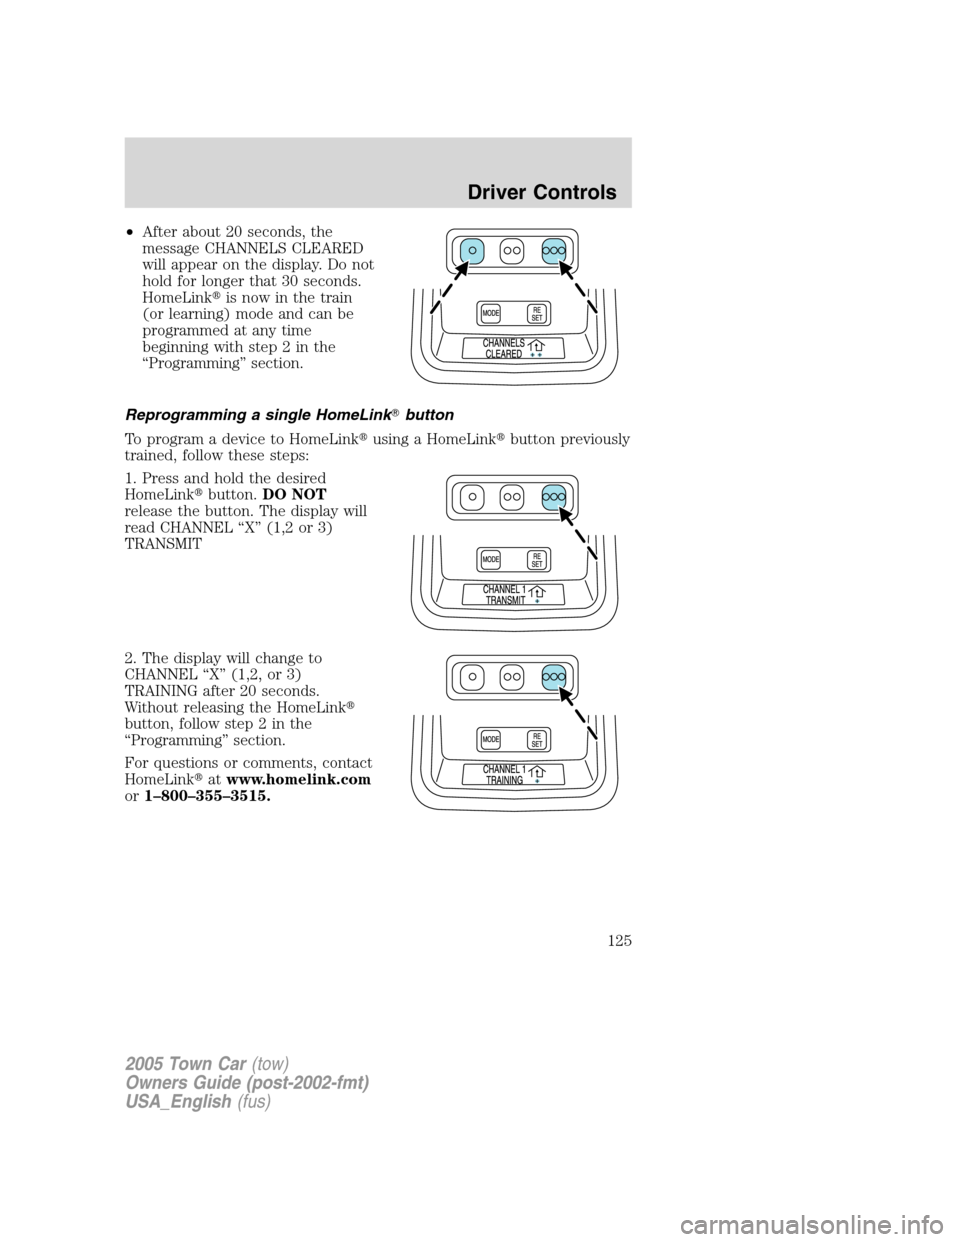
•After about 20 seconds, the
message CHANNELS CLEARED
will appear on the display. Do not
hold for longer that 30 seconds.
HomeLink�is now in the train
(or learning) mode and can be
programmed at any time
beginning with step 2 in the
“Programming” section.
Reprogramming a single HomeLink�button
To program a device to HomeLink�using a HomeLink�button previously
trained, follow these steps:
1. Press and hold the desired
HomeLink�button.DO NOT
release the button. The display will
read CHANNEL “X” (1,2 or 3)
TRANSMIT
2. The display will change to
CHANNEL “X” (1,2, or 3)
TRAINING after 20 seconds.
Without releasing the HomeLink�
button, follow step 2 in the
“Programming” section.
For questions or comments, contact
HomeLink�atwww.homelink.com
or1–800–355–3515.
2005 Town Car(tow)
Owners Guide (post-2002-fmt)
USA_English(fus)
Driver Controls
125
Page 126 of 328

Oil minder mode
Normal mode
To enter oil minder mode, press the
MODE button repeatedly until OIL
LIFE XX% is displayed. XX will be
6–100 when oil life is OK.
Change oil soon
The overhead console will warn the
user that it is time to change the oil
based on the number of engine
revolution counts, number of miles
driven or the calendar time since
the last “Oil Life” reset. These
values are constantly updated while
the vehicle is running. When
CHANGE OIL SOON is displayed as a warning, it will be displayed until
the RESET button is pressed and revert back to the previous mode.
Change oil now
The overhead console will warn the
user that the oil needs changing
when CHANGE OIL NOW is
displayed. This warning will remain
on until the oil life is reset in oil
minder mode (unless a higher
priority message is requested). In
any other mode, the CHANGE OIL
NOW warning can be cleared by pressing RESET button but will return
after a period of time.
Reset oil life mode
To reset oil minder when the vehicle oil is changed:
2005 Town Car(tow)
Owners Guide (post-2002-fmt)
USA_English(fus)
Driver Controls
126
Page 127 of 328

1. Press the MODE button
repeatedly until one of these three
messages is displayed; OIL LIFE
XX%, CHANGE OIL SOON or
CHANGE OIL NOW.
2. Press and hold the MODE button
for 5 seconds until RESET FOR
NEW OIL LIFE is displayed.
3. Press and hold the RESET button
for 2 seconds. The oil life value will
be reset to 100%
Note:If the RESET button is not pressed after one minute of no activity,
the original oil life will be restored.
Note:If power is interrupted during the reset oil life mode, the overhead
console resets the oil life to the original value.
Park assist de-activation (if equipped)
Park assist can be de-activated/re-activated with the transmission in R
(reverse) by pressing the control on the overhead console. The system
will re-activate every time the ignition key is turned ON.
To de-activate park assist:
1. Press the
OFF button to
de-activate. PARK ASSIST
DISABLED will be displayed and the
button will be backlitamber.
2. Press the
OFF button again
to re-activate. The button will be
backlitgreenat night time when
the headlamps are ON.
2005 Town Car(tow)
Owners Guide (post-2002-fmt)
USA_English(fus)
Driver Controls
127
Page 128 of 328

Power outlets are designed for
accessory plugs o")
CLOCK
Press the right control to move the
time display foward.
Press the left control to move the
time display backwards.
AUXILIARY POWER POINT (12VDC)
Power outlets are designed for
accessory plugs only. Do not
hang any type of accessory or
accessory bracket from the plug.
Improper use of the power
outlet can cause damage not
covered by your warranty.
Do not plug optional electrical
accessories into the cigarette lighter.
Use the power point.
Do not use the power point for operating the cigarette lighter element.
The maximum power each power point can supply depends on the fuse
rating. For example: a 20A fuse should supply a maximum of 240 Watts,
a 15A fuse should supply a maximum of 180 Watts and a 10A fuse should
supply a maximum of 120 Watts. Exceeding these limits will result in a
blown fuse.
Always keep the power point caps closed when not being used.
The auxiliary power point is located under the instrument panel.
F
E1
2FILL ON
LEFT<
SHUF MUTE
SELBALBASS
FADETREB
SCAN CD
AM/FM
SEEKREWFF
COMP
56 34 12SIDE TUNETAPE
RDS
AUTO
SET
AUTO OFFDUAL A/C
R EXT
F/ CFF
2005 Town Car(tow)
Owners Guide (post-2002-fmt)
USA_English(fus)
Driver Controls
128
Page 133 of 328
Setting speed control
The controls for using your speed
control are located on the steering
wheel for your convenience.
1. Press the ON control and release
it.
2. Accelerate to the desired speed.
3. Press the SET + control and
release it.
4. Take your foot off the accelerator
pedal.
5. The message “SPEED CONTROL”
will be displayed in the message
center.
Note:
•Vehicle speed may vary momentarily when driving up and down a
steep hill.
•If the vehicle speed increases above the set speed on a downhill, you
may want to apply the brakes to reduce the speed.
•If the vehicle speed decreases more than 10 mph (16 km/h) below
your set speed on an uphill, your speed control will disengage.
Disengaging speed control
To disengage the speed control:
•Depress the brake pedal
Disengaging the speed control will not erase previous set speed.
2005 Town Car(tow)
Owners Guide (post-2002-fmt)
USA_English(fus)
Driver Controls
133
Page 136 of 328
In any mode:
•Press VOL + or - to adjust the
volume.
Climate control features (if equipped)
•Press TEMP + or - to adjust
temperature.
Navigation control features (if
equipped)
Press and hold VOICE briefly until
the voice
icon appears on the
Navigation display to use the
Navigation voice command.
Press the top portion of the control
to hear previous command repeated
from the navigation system.
Rear console radio/climate controls (if equipped)
Refer toEntertainment Systems and Climate Controlschapters for
operation instructions.
2005 Town Car(tow)
Owners Guide (post-2002-fmt)
USA_English(fus)
Driver Controls
136


•Press TEMP + or - to adjust
temperature.
Navigation control features (if
equipped)
Press and hold VOICE")