Page 108 of 328
3. Turn on the low beam headlamps to illuminate the wall or screen and
open the hood.
4. On the wall or screen you will
observe an area of high intensity
light. The top of the high intensity
area should touch the horizontal
reference line, if not, the beam will
need to be adjusted.
To see a clearer light pattern for
adjusting, you may want to block
the light from one headlamp while
adjusting the other.
5. Locate the vertical adjuster on
each headlamp. Usinga4mm
wrench, turn the adjuster either
clockwise (to adjust down) or
counterclockwise (to adjust up).
The horizontal edge of the brighter
light should touch the horizontal
reference line.
6. HORIZONTAL AIM IS NOT REQUIRED FOR THIS VEHICLE AND IS
NON-ADJUSTABLE.
7. Close the hood and turn off the lamps.
TURN SIGNAL CONTROL
•Push down to activate the left
turn signal.
•Push up to activate the right turn
signal.
2005 Town Car(tow)
Owners Guide (post-2002-fmt)
USA_English(fus)
Lights
108
Page 110 of 328

Using the right bulbs
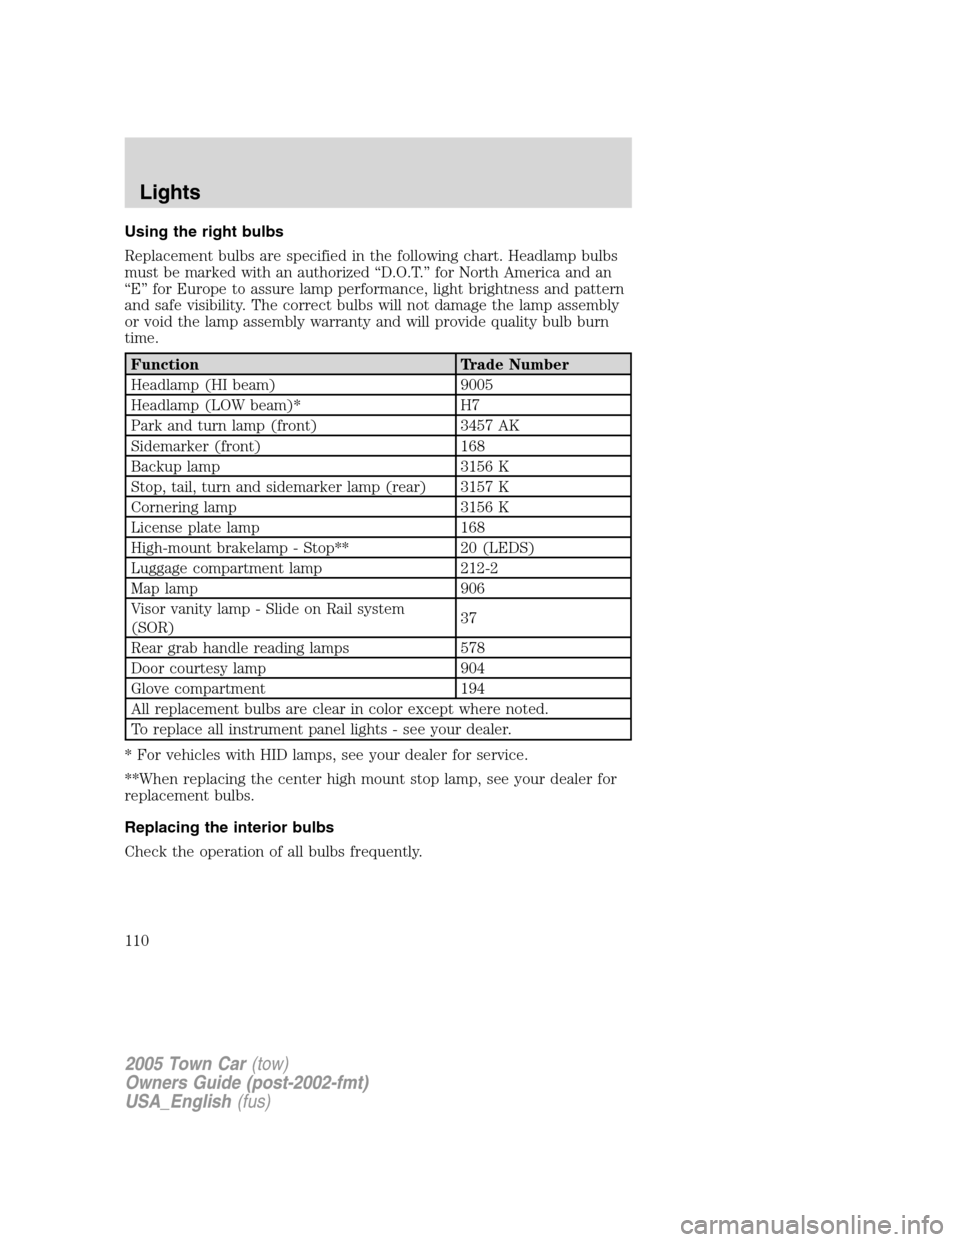
Replacement bulbs are specified in the following chart. Headlamp bulbs
must be marked with an authorized “D.O.T.” for North America and an
“E” for Europe to assure lamp performance, light brightness and pattern
and safe visibility. The correct bulbs will not damage the lamp assembly
or void the lamp assembly warranty and will provide quality bulb burn
time.
Function Trade Number
Headlamp (HI beam) 9005
Headlamp (LOW beam)* H7
Park and turn lamp (front) 3457 AK
Sidemarker (front) 168
Backup lamp 3156 K
Stop, tail, turn and sidemarker lamp (rear) 3157 K
Cornering lamp 3156 K
License plate lamp 168
High-mount brakelamp - Stop** 20 (LEDS)
Luggage compartment lamp 212-2
Map lamp 906
Visor vanity lamp - Slide on Rail system
(SOR)37
Rear grab handle reading lamps 578
Door courtesy lamp 904
Glove compartment 194
All replacement bulbs are clear in color except where noted.
To replace all instrument panel lights - see your dealer.
* For vehicles with HID lamps, see your dealer for service.
**When replacing the center high mount stop lamp, see your dealer for
replacement bulbs.
Replacing the interior bulbs
Check the operation of all bulbs frequently.
2005 Town Car(tow)
Owners Guide (post-2002-fmt)
USA_English(fus)
Lights
110
Page 111 of 328

Replacing headlamp bulbs
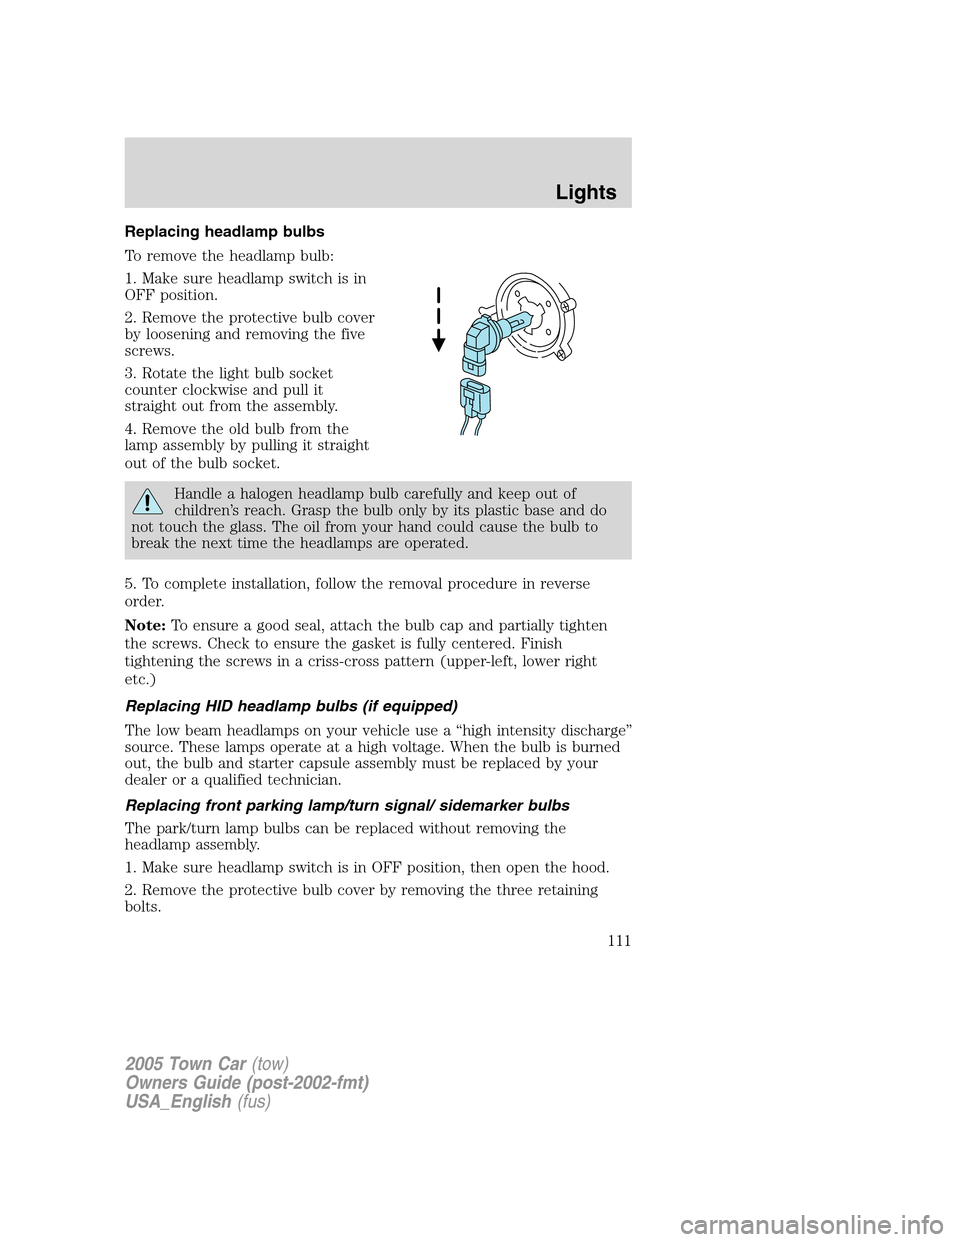
To remove the headlamp bulb:
1. Make sure headlamp switch is in
OFF position.
2. Remove the protective bulb cover
by loosening and removing the five
screws.
3. Rotate the light bulb socket
counter clockwise and pull it
straight out from the assembly.
4. Remove the old bulb from the
lamp assembly by pulling it straight
out of the bulb socket.
Handle a halogen headlamp bulb carefully and keep out of
children’s reach. Grasp the bulb only by its plastic base and do
not touch the glass. The oil from your hand could cause the bulb to
break the next time the headlamps are operated.
5. To complete installation, follow the removal procedure in reverse
order.
Note:To ensure a good seal, attach the bulb cap and partially tighten
the screws. Check to ensure the gasket is fully centered. Finish
tightening the screws in a criss-cross pattern (upper-left, lower right
etc.)
Replacing HID headlamp bulbs (if equipped)
The low beam headlamps on your vehicle use a “high intensity discharge”
source. These lamps operate at a high voltage. When the bulb is burned
out, the bulb and starter capsule assembly must be replaced by your
dealer or a qualified technician.
Replacing front parking lamp/turn signal/ sidemarker bulbs
The park/turn lamp bulbs can be replaced without removing the
headlamp assembly.
1. Make sure headlamp switch is in OFF position, then open the hood.
2. Remove the protective bulb cover by removing the three retaining
bolts.
2005 Town Car(tow)
Owners Guide (post-2002-fmt)
USA_English(fus)
Lights
111
Page 256 of 328

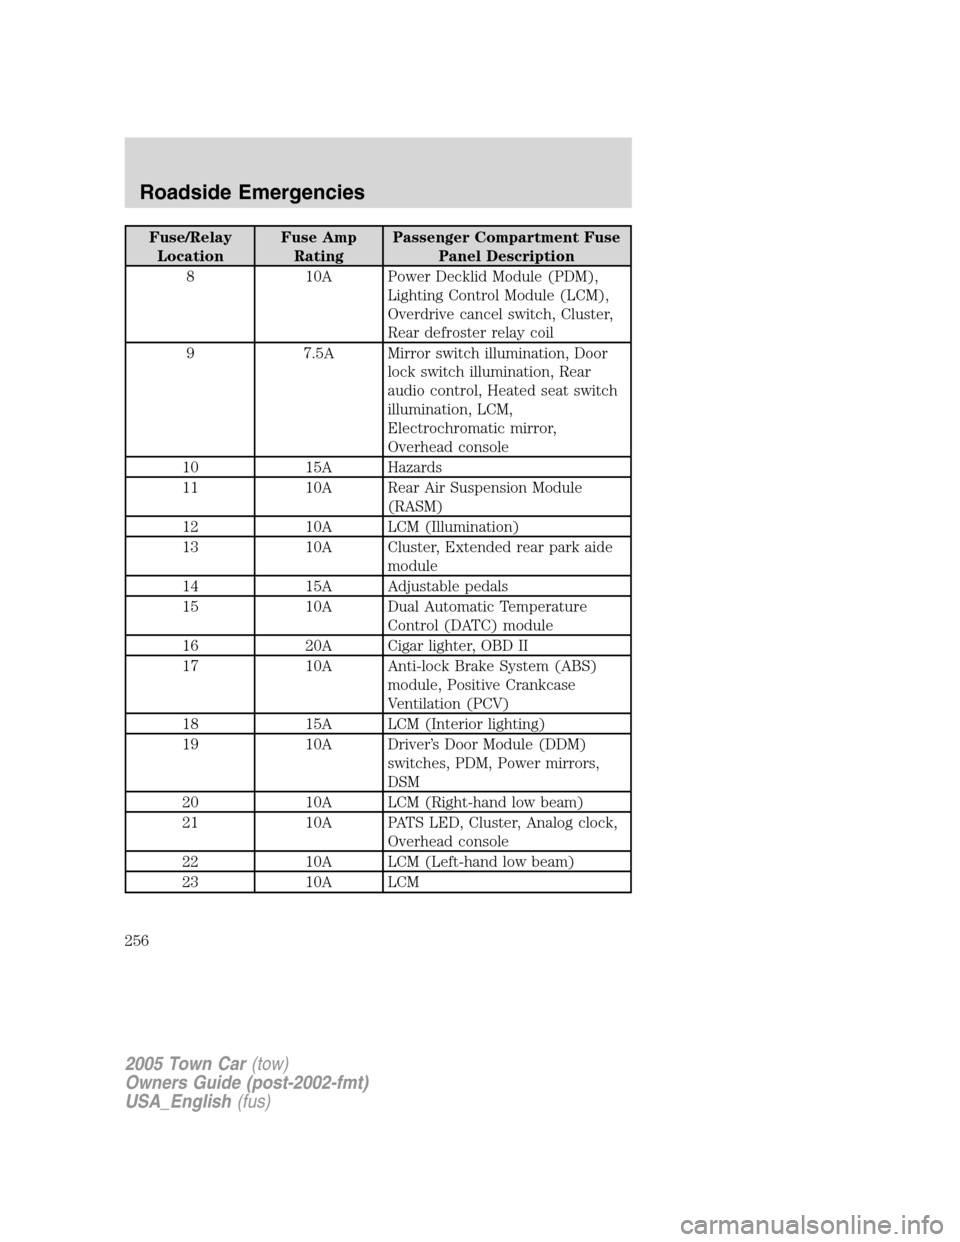
Fuse/Relay
LocationFuse Amp
RatingPassenger Compartment Fuse
Panel Description
8 10A Power Decklid Module (PDM),
Lighting Control Module (LCM),
Overdrive cancel switch, Cluster,
Rear defroster relay coil
9 7.5A Mirror switch illumination, Door
lock switch illumination, Rear
audio control, Heated seat switch
illumination, LCM,
Electrochromatic mirror,
Overhead console
10 15A Hazards
11 10A Rear Air Suspension Module
(RASM)
12 10A LCM (Illumination)
13 10A Cluster, Extended rear park aide
module
14 15A Adjustable pedals
15 10A Dual Automatic Temperature
Control (DATC) module
16 20A Cigar lighter, OBD II
17 10A Anti-lock Brake System (ABS)
module, Positive Crankcase
Ventilation (PCV)
18 15A LCM (Interior lighting)
19 10A Driver’s Door Module (DDM)
switches, PDM, Power mirrors,
DSM
20 10A LCM (Right-hand low beam)
21 10A PATS LED, Cluster, Analog clock,
Overhead console
22 10A LCM (Left-hand low beam)
23 10A LCM
2005 Town Car(tow)
Owners Guide (post-2002-fmt)
USA_English(fus)
Roadside Emergencies
256