Page 1 of 438
 FOREWORD
i
Congratulations on your selection of this Lexus. In Lexus vehicles we h\
ave invested all our engineering and design resources; all
the know−
how we have gained in over 60 years of makin")
FOREWORD
i
Congratulations on your selection of this Lexus. In Lexus vehicles we h\
ave invested all our engineering and design resources; all
the know−
how we have gained in over 60 years of making automobiles; the highest m\
otivation of our most talented employees; and
our tradition of incessant striving toward ever greater quality.
This Owner’s Manual explains the features of your new Lexus. Please read it and fol\
low the instructions carefully so that you can
enjoy many years of safe motoring.
When it comes to service, remember that your Lexus dealer knows your veh\
icle very well and is interested in your complete
satisfaction. Your Lexus dealer will provide quality maintenance and any other assistan\
ce you may require.
If there is not a Lexus dealer near you, or you need emergency assistanc\
e for any reason, please call the following number:
U.S. OWNERS
� When traveling in the U.S. mainland or Canada:
Lexus Roadside Assistance 1�800�25�LEXUS (Toll�Free)
(1�800�255�3987)
� HAWAII:
Lexus Customer Service Assistance 1�800�25�LEXUS (Toll�Free)
(1�800�255�3987)
CANADIAN OWNERS
� When traveling in Canada or the U.S. mainland:
Lexus Roadside Assistance/Customer Service 1�800�26�LEXUS (Toll�Free)
(1�800�265�3987)
Please leave this Owner’s Manual in this vehicle at the time of resale. The next owner will nee\
d this information also.
All information and specifications in this manual are current at the time o\
f printing. However, because of the Lexus policy
of continual product improvement, we reserve the right to make changes a\
t any time without notice.
Please note that this manual applies to all models and explains all equipment, \
including options. Therefore, you may find
some explanations for equipment not installed on your vehicle.
Page 20 of 438
To adjust the position of the accelerator and brake pedals:
1. Set the parking brake firmly.
2. Turn the ignition key to the “ON” position with theautomatic transmission selector lever in the “P” position.
3. Push the “�” side of the switch to move the pedals to the
front most position.
4. Push the “� ” side of the switch to move the pedals
toward you until you can fully depress the brake pedal.
5. After adjusting, depress the pedals a few times to get used to the feel. BE070 (center/4)
QUICK REFERENCE
3
3. POWER ADJUSTABLE PEDALS
Page 40 of 438
KEYS AND DOORS
23
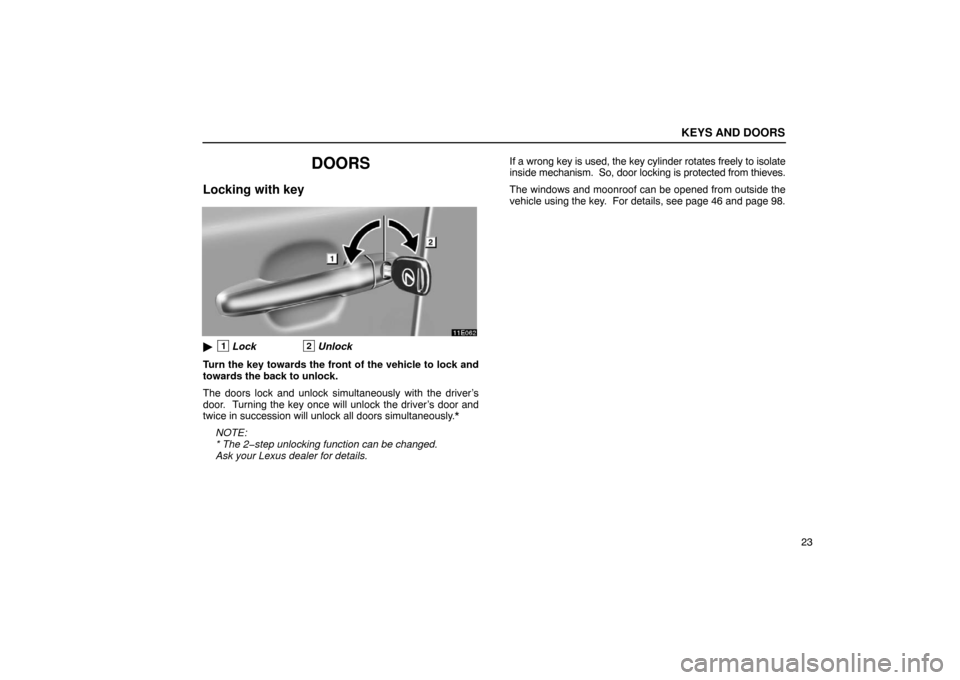
DOORS
Locking with key
�1Lock2Unlock
Turn the key towards the front of the vehicle to lock and
towards the back to unlock.
The doors lock and unlock simultaneously with the driver’s
door. Turning the key once will unlock the driver’s door and
twice in succession will unlock all doors simultaneously.* NOTE:
* The 2�step unlocking function can be changed.
Ask your Lexus dealer for details. If a wrong key is used, the key cylinder rotates freely to isolate
inside
mechanism. So, door locking is protected from thieves.
The windows and moonroof can be opened from outside the
vehicle using the key. For details, see page 46 and page 98.
Page 56 of 438
 SWITCHES
39
Twist the interval adjuster upward to increase the wiping
time
interval between sweeps, and downward to decrease
it.
The wiper lever must be in the “INT” position.
To make the washer")
SWITCHES
39
Twist the interval adjuster upward to increase the wiping
time
interval between sweeps, and downward to decrease
it.
The wiper lever must be in the “INT” position.
To make the washer squirt, pull the lever toward you and
release it.
Also, the wipers will automatically operate a couple of times
after the washer squirts even with the lever in the “OFF”
position.
The low washer fluid warning light in the instrument cluster
comes on when the fluid level in the tank becomes nearly
empty. For information on adding washer fluid, see “Adding
washer fluid” on page 403.
In cold weather, warm the windshield with the defroster before
using the washer. This will help prevent icing, which could
block your vision.
NOTICE
Do not operate the wipers if the windshield is dry. It may
scratch the glass.
When waxing your vehicle, make sure that the washer nozzles
do not become blocked. If a nozzle becomes blocked, contact
your Lexus dealer to have the vehicle serviced.
NOTICE
If a nozzle becomes blocked, do not try to clear it with
a pin or other object. The nozzle will be damaged.
Page 58 of 438
 SWITCHES
41
When
the ignition switch is turned off with the wiper lever in the
“AUTO” position, and then the ignition switch is turned on
again, the automatic operation may not work even if rai")
SWITCHES
41
When
the ignition switch is turned off with the wiper lever in the
“AUTO” position, and then the ignition switch is turned on
again, the automatic operation may not work even if raindrops
are on the windshield.
In this case, move the lever to another position and return it to
the “AUTO” position again.
CAUTION
Be careful not to get your fingers caught between the
wipers and windshield.
When the wiper lever is in the “AUTO” position with the
ignition switch on, the wipers could operate
automatically in the following cases:
� If you touch the upper center of the windshield
adjacent to the sensor.
� If you wipe the upper center of the windshield
(adjacent to which the sensor is located) with a towel.
� If the windshield vibrates.
� If you touch the sensor.
NOTICE
Do not apply detergent to or wet the automatic wiper
control sensor when cleaning the inside of the
windshield.
To make the washer squirt, pull the lever toward you and
release it.
Also, the wipers will automatically operate a couple of times
after the washer squirts even with the lever in the “OFF”
position.
The low washer fluid warning light in the instrument cluster
comes on when the fluid level in the tank becomes nearly
empty. For information on adding washer fluid, see “Adding
washer fluid” on page 403.
In cold weather, warm the windshield with the defroster before
using the washer. This will help prevent icing, which could
block your vision.
NOTICE
Do not operate the wipers if the windshield is dry. It may
scratch the glass.
When waxing your vehicle, make sure that the washer nozzles
do not become blocked. If a nozzle becomes blocked, contact
your Lexus dealer to have the vehicle serviced.
NOTICE
If a nozzle becomes blocked, do not try to clear it with
a pin or other object. The nozzle will be damaged.
Page 67 of 438
 SWITCHES
50
NOTICE
�Do not put unevenly weighted objects on the seat and
do not stick sharp objects (needles, nails, etc.) into
the seat.
� When cleaning the seats, do not use organic
substances (pai")
SWITCHES
50
NOTICE
�Do not put unevenly weighted objects on the seat and
do not stick sharp objects (needles, nails, etc.) into
the seat.
� When cleaning the seats, do not use organic
substances (paint thinner, benzine, alcohol,
gasoline, etc.). They may damage the seat
ventilation/heating system or seat surface.
� Before cleaning the seats, fully wring out the towel
that will be used. W ater entering the seats may cause
the seat ventilation/heating system to malfunction.
� To prevent the battery from being discharged, turn
the switches off when the engine is not running.
Seat ventilator
To turn on the seat ventilator, push the knob to pop it out
and then turn the knob counterclockwise. The indicator
light (green) comes on.
The ignition switch must be in the “ON” position to activate seat
ventilators.
Three setting levels are available.
To disable this function, turn the knob to the center position.
The indicator light goes off.
Push the knob into the recessed position when not in use.
Page 68 of 438
SWITCHES
51
NOTICE
�Do not put unevenly weighted objects on the seat and
do not stick sharp objects (needles, nails, etc.) into
the seat.
� When cleaning the seats, do not use organic
substances (paint thinner, benzine, alcohol,
gasoline, etc.). They may damage the seat
ventilation/heating system or seat surface.
� Before cleaning the seats, fully wring out the towel
that will be used. W ater entering the seats may cause
the seat ventilation/heating system to malfunction.
� To prevent the battery from being discharged, turn
the switches off when the engine is not running.
Page 72 of 438
GAUGES, METERS AND SERVICE REMINDER INDICATORS
55
ENGINE COOLANT
TEMPERATURE GAUGE
� Normal range
The gauge indicates the engine coolant temperature when
the ignition switch is on. The engine operating
temperature will vary with changes in weather and engine
load.
If the needle points to the red zone or higher, stop your vehicle
and allow the engine to cool. Your vehicle may overheat during severe operating conditions,
such as:
�
Driving up a long hill on a hot day.
� Reducing speed or stopping after high speed driving.
� Idling for a long period with the air conditioning on in
stop−and−go traffic.
� Towing a trailer.
NOTICE
�Do not remove the thermostat in the engine cooling
system as this may cause the engine to overheat. The
thermostat is designed to control the flow of coolant
to keep the temperature of the engine within the
specified operating range.
� Do not continue driving with an overheated engine.
See “If your vehicle overheats” on page 303.
 To adjust the position of the accelerator and brake pedals:
1. Set the parking brake firmly.
2. Turn the ignition key to the “ON” position with theautomatic transmission selector lever in the �")