Page 6 of 438

HOW TO USE THIS MANUAL
vi
HOW TO USE THIS MANUAL
The contents of this manual are explained briefly on this
page to help you make the best use of the manual. Please
read this page and the rest of the Owner’s Manual
carefully to make sure you fully understand the operation
of your vehicle.
This will help you enjoy safe and comfortable driving.
TABLE OF CONTENTS
The table of contents and the pictorial index provide easy
reference to the appropriate pages.
BASIC OPERATION — QUICK REFERENCE
Operation of basic equipment is briefly explained in an easily
understandable way for quick reference.
SECTION 1 — INSTRUMENTS AND CONTROLS
The vehicle’s equipment is divided into the 7 groups listed
below. Use of the equipment is explained, including any points
you should pay particular attention to.
1. Keys and doors
2. Switches
3. Gauges, meters and service reminder indicators
4. Interior equipment
5. Exterior equipment
6. Occupant restraint system
7. Steering wheel and mirrors
SECTION 2 — AIR CONDITIONING AND AUDIO
The features of the vehicle’s air conditioning and audio are
explained in detail. Be sure to read this Section so that you can
make full use of them.
SECTION 3 — STARTING AND DRIVING
Starting the engine, driving, stopping, operation of features
affecting vehicle handling, hints on vehicle safety and safe
driving techniques are all explained. Please read everything
in this Section, and remember — drive safely!
SECTION 4 — IN CASE OF AN EMERGENCY
This Section explains what to do in the event of an urgent
situation such as the engine not starting or getting a flat tire,
etc. If such a problem occu rs, check the contents of this
Owner’s Manual and follow the instructions given.
SECTION 5 — MAINTENANCE
This Section explains the importance of regular maintenance.
Regular and periodic inspection and maintenance of your
Lexus will help to keep your vehicle in its best condition.
SECTION 6 — SERVICE PROCEDURES AND
SPECIFICATIONS
Simple maintenance procedure and service data are provided
here for your reference should you wish to perform inspection
and maintenance yourself.
Page 16 of 438
PICTORIAL INDEX
xvi
EXTERIOR VIEW
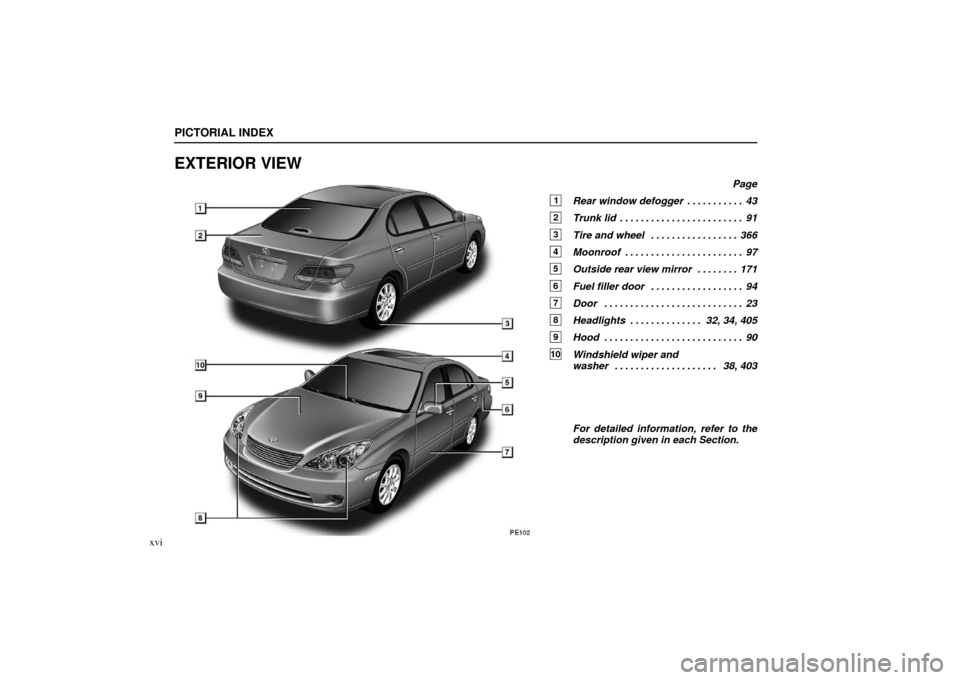
Page
1Rear window defogger43
. . . . . . . . . . .
2Trunk lid 91
. . . . . . . . . . . . . . . . . . . . . . . .
3Tire and wheel 366
. . . . . . . . . . . . . . . . .
4Moonroof 97
. . . . . . . . . . . . . . . . . . . . . . .
5Outside rear view mirror 171 . . . . . . . .
6Fuel filler door 94
. . . . . . . . . . . . . . . . . .
7Door 23
. . . . . . . . . . . . . . . . . . . . . . . . . . .
8Headlights 32, 34, 405
. . . . . . . . . . . . . .
9Hood 90
. . . . . . . . . . . . . . . . . . . . . . . . . . .
10Windshield wiper and
washer 38, 403 . . . . . . . . . . . . . . . . . . . .
For detailed information, refer to the
description given in each Section.
Page 50 of 438

SWITCHES
33
The automatic light control sensor is on the top of the driver’s
side instrument panel.
Do not place anything on the instrument panel, and/or do not
affix anything on the windshield to block this sensor.
When the headlights are on, they automatically turn off about
30 seconds after any door or trunk lid is opened and closed with
the ignition key turned to the “ACC” or “LOCK” position.* If y\
ou
want to turn off the lights immediately, push the “LOCK” button
on the wireless remote control key twice. The lights also can
be turned off immediately by pushing the “LOCK” button on the
wireless remote control key with all the doors locked and the
trunk lid closed.
NOTE:
* The time before turning off the lights can be changed.
Ask your Lexus dealer for details.
When only the tail lights are on, they automatically turn off with
the driver’s door opened and the ignition key turned to the
“ACC” or “LOCK” position. To turn on the lights again, turn the ignition key to the “ON”
position, or twist the knob on the end of lever to the “AUTO”
position and then twist the knob until the first or second
clickstop.
If you are going to park for over one week, make sure the knob
is in the “AUTO” or “DRL OFF” position.
Daytime Running Light (DRL) System
When the knob is set in the “AUTO” position, the headlights
turn on at reduced intensity when the parking brake
is released
with the engine started. They will not go off until the ignition
switch is turned off.
The headlights will automatically adjust to full intensity and/or
turn on the other lights depending on the darkness of the
surroundings.
To turn on the other exterior lights and instrument panel lights,
twist the knob to the first clickstop.
Twist the knob to the second clickstop to turn on the headlights
to full intensity for driving at night.
To cancel the DRL system, twist the knob to the “DRL OFF”
position.
NOTICE
To prevent the battery from being discharged, do not
leave the lights on longer than necessary when the
engine is not running.
Page 53 of 438

SWITCHES
36To turn on the lights again, turn the ignition key to the “ON”
position, or turn the headlight switch off and then twist the knob
until the first or second clickstop.
If you are going to park for over one week, make sure the
headlight switch is off.
Daytime Running Light System
The headlights turn on at reduced intensity when the parking
brake is released with the engine started, even with the light
switch in the “OFF” position. They will not go off until the
ignition switch is turned off.
To turn on the other exterior lights and instrument panel lights,
twist the knob to the first clickstop.
Twist
the knob to the second clickstop to turn on the headlights
to full intensity for driving at night.
When setting the knob to the third clickstop (“AUTO”), the
headlights will automatically adjust to full intensity and/or turn
on the other lights depending on the darkness of the
surroundings. Likewise, as the surroundings become brighter,
the headlights will turn to reduced intensity, ultimately turning
off the other lights.
NOTICE
To prevent the battery from being discharged, do not
leave the lights on longer than necessary when the
engine is not running.
Automatic headlight leveling system (vehicles
with discharge headlight only)
Vehicle position changes according to loading condition,
passengers getting on and off, vehicle acceleration and
deceleration, etc. However, the headlight beam level is always
maintained automatically by the system at the proper level so
that your headlights do not dazzle other road users.
If this system fails, the warning light in the instrument cluster
comes on. If this occurs, have your vehicle checked by your
Lexus dealer.
If you replace the rear suspension and/or the vehicle height
changes, contact your Lexus dealer to check the automatic
headlight leveling system and headlight beam level.
Page 106 of 438
SECTION 1 – 5
89
INSTRUMENTS AND CONTROLS
Exterior equipment
Hood90
. . . . . . . . . . . . . . . . . . . . . . . . . . . . . . . . . . . . .\
. . . . . . . . . . . . . . .
Trunk lid 91
. . . . . . . . . . . . . . . . . . . . . . . . . . . . . . . . . . . . .\
. . . . . . . . . . . .
Fuel tank cap 94
. . . . . . . . . . . . . . . . . . . . . . . . . . . . . . . . . . . . .\
. . . . . . . .
Moonroof 97
. . . . . . . . . . . . . . . . . . . . . . . . . . . . . . . . . . . . \
. . . . . . . . . . . .
Page 107 of 438
EXTERIOR EQUIPMENT
90
HOOD
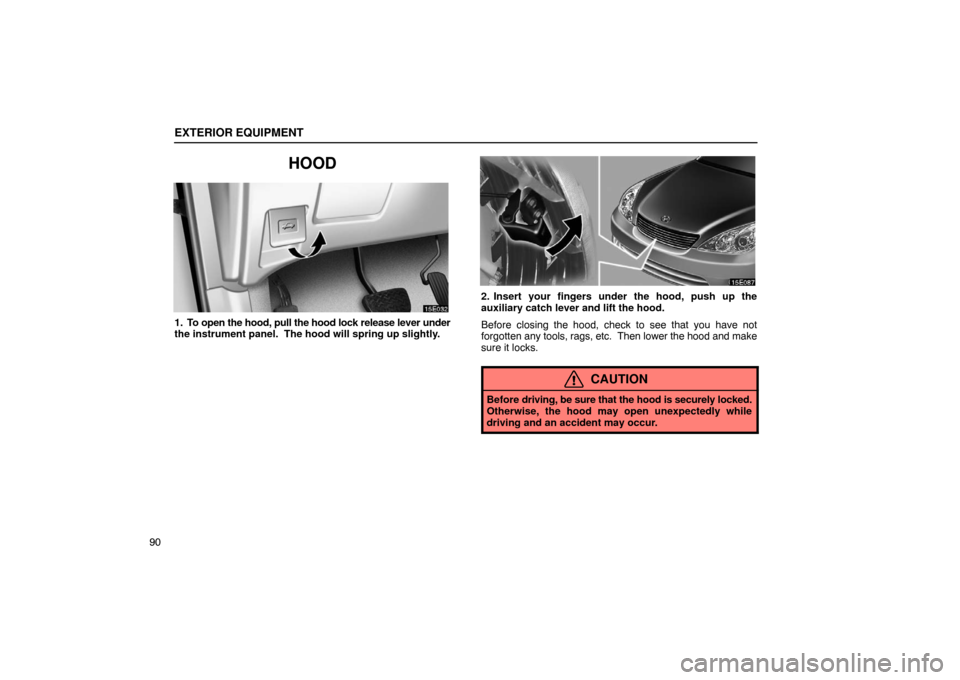
1. To open the hood, pull the hood lock release lever under
the instrument panel. The hood will spring up slightly.
2. Insert your fingers under the hood, push up the
auxiliary catch lever and lift the hood.
Before closing the hood, check to see that you have not
forgotten any tools, rags, etc. Then lower the hood and make
sure it locks.
CAUTION
Before driving, be sure that the hood is securely locked.
Otherwise, the hood may open unexpectedly while
driving and an accident may occur.
Page 108 of 438
EXTERIOR EQUIPMENT
91
TRUNK LID
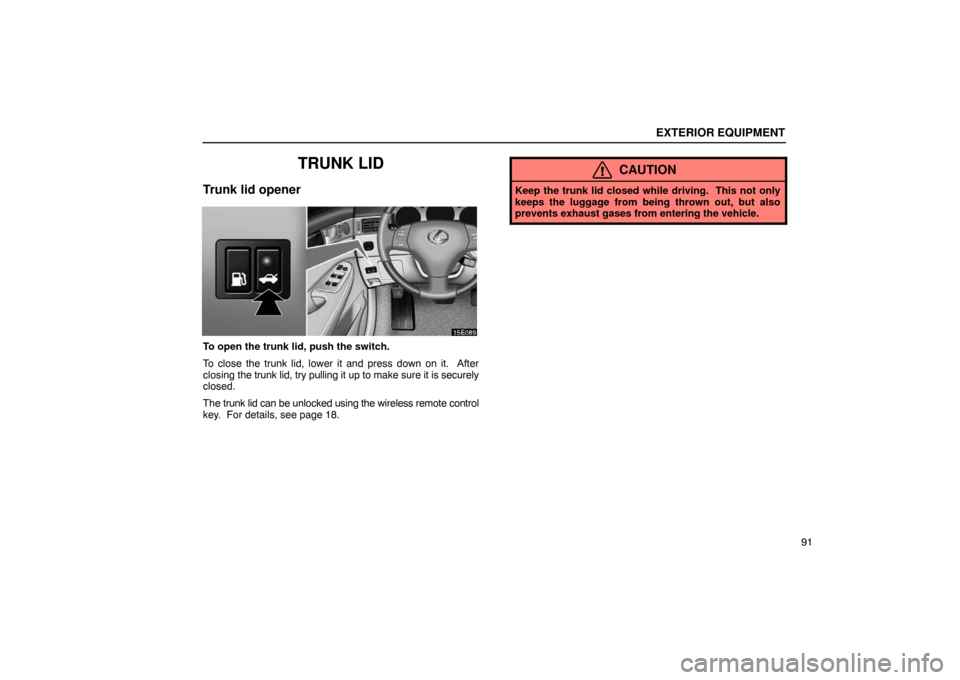
Trunk lid opener
To open the trunk lid, push the switch.
To close the trunk lid, lower it and press down on it. After
closing the trunk lid, try pulling it up to make sure it is securely
closed.
The trunk lid can be unlocked using the wireless remote control
key. For details, see page 18.
CAUTION
Keep the trunk lid closed while driving. This not only
keeps the luggage from being thrown out, but also
prevents exhaust gases from entering the vehicle.
Page 109 of 438
EXTERIOR EQUIPMENT
92
Trunk lid opener main switch
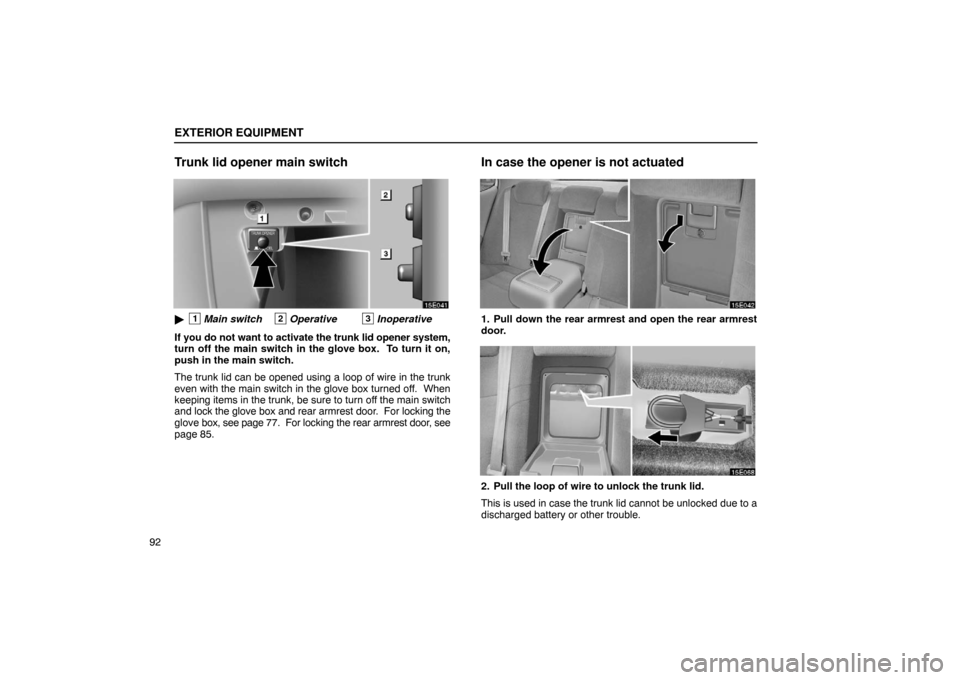
�1Main switch2Operative3Inoperative
If you do not want to activate the trunk lid opener system,
turn off the main switch in the glove box. To turn it on,
push in the main switch.
The trunk lid can be opened using a loop of wire in the trunk
even with the main switch in the glove box turned off. When
keeping items in the trunk, be sure to turn off the main switch
and lock the glove box and rear armrest door. For locking the
glove box, see page 77. For locking the rear armrest door, see
page 85.
In case the opener is not actuated
1. Pull down the rear armrest and open the rear armrest
door.
2. Pull the loop of wire to unlock the trunk lid.
This is used in case the trunk lid cannot be unlocked due to a
discharged battery or other trouble.
 SECTION 1 – 5
89
INSTRUMENTS AND CONTROLS
Exterior equipment
Hood90
. . . . . . . . . . . . . . . . . . . . . . . . . . . . . . . . . . . . .\
. . . . . . . . . . . . . . .
Trunk lid 91
. . . .")