Page 295 of 969
(From July, 2003)
2484 Author�: Date�:
2005 LEXUS ES330 REPAIR MANUAL (RM1124U)
BRAKE ACTUATOR ASSY (W/VSC)(From July, 2003)
ON-VEHICLE INSPECTION
1")
3203J-09
32-50
- BRAKEBRAKE ACTUATOR ASSY (W/VSC)(From July, 2003)
2484 Author�: Date�:
2005 LEXUS ES330 REPAIR MANUAL (RM1124U)
BRAKE ACTUATOR ASSY (W/VSC)(From July, 2003)
ON-VEHICLE INSPECTION
1. CONNECT HAND-HELD TESTER:
(a) Connect the hand-held tester to the DLC3.
(b) Start the engine and run it at idle.
(c) Select the ACTIVE TEST mode on the hand-held tester.
HINT:
Please refer to the hand-held tester operator's manual for further details.
2. INSPECT ACTUATOR MOTOR OPERATION
(a) With the motor relay ON, check the actuator motor operation noise.
(b) Turn the motor relay OFF.
(c) Depress the brake pedal and hold it for about 15 seconds. Check that the brake pedal cannot be de-
pressed.
(d) With the motor relay ON, check that the pedal does not pulsate.
NOTICE:
Do not keep motor relay ON for more than 5 seconds continuously. When operating it continuously,
set the interval of more than 20 seconds.
(e) Turn the motor relay OFF and release the brake pedal.
3. INSPECT RIGHT FRONT WHEEL OPERATION
NOTICE:
Never turn ON the solenoid which is not described below.
(a) With the brake pedal depressed, perform the following operations.
(b) Turn the SFRH and SFRR solenoid ON simultaneously, and check that the pedal cannot be depressed.
NOTICE:
Do not keep solenoid ON for more than 10 seconds continuously. When operating it continuously,
set the interval of more than 20 seconds.
(c) Turn the SFRH and SFRR solenoid OFF simultaneously, and check that the pedal can be depressed.
(d) Turn the motor relay ON, and check that the pedal returns.
NOTICE:
Do not keep motor relay ON for more than 5 seconds continuously. When operating it continuously,
set the interval of more than 20 seconds.
(e) Turn the motor relay OFF and release the brake pedal.
4. INSPECT OTHER WHEEL OPERATION
(a) As in the same procedure, check the solenoids of other wheels.
HINT:
Left front wheel: SFLH, SFLR
Right rear wheel: SRRH, SRRR
Left rear wheel: SRLH, SRLR
Page 299 of 969
3203N-09
F41016
F41018F41017
C84803
32-54
- BRAKESPEED SENSOR FRONT LH
2488 Author�: Date�:
2005 LEXUS ES330 REPAIR MANUAL (RM1124U)
SPEED SENSOR FRONT LH
REPLACEMENT
HINT:
Replace the RH side by the same procedures with LH side.
1. REMOVE FRONT WHEEL
2. REMOVE FRONT FENDER LINER LH
3. REMOVE SPEED SENSOR FRONT LH
(a) Disconnect the speed sensor connector and clamp.
(b) Remove the 2 clamp bolts holding the sensor harness
and clamp from the body and shock absorber.
(c) Remove the bolt and speed sensor FR LH.
NOTICE:
Do not stick and foreign matter on the sensor tip.
Page 300 of 969
C84803
F41018F41017
A
B
F41016
- BRAKESPEED SENSOR FRONT LH
32-55
2489 Author�: Date�:
2005 LEXUS ES330 REPAIR MANUAL (RM1124U)
4. INSTALL SPEED SENSOR FRONT LH
(a) Install the speed sensor FR LH with the bolt.
Torque: 8.0 NVm (82 kgfVcm, 71 in.Vlbf)
NOTICE:
Make sure the sensor tip is clean.
(b) Install the sensor harness clamps with the 2 bolts ºAº and
ºBº to the body and shock absorber.
Torque:
Bolt A: 5.0 NVm (51 kgfVcm, 44 in.Vlbf)
Bolt B: 18.8 NVm (192 kgfVcm, 14 ftVlbf)
(c) Connect the clamp to the knuckle.
(d) Connect the speed sensor connector and clamp.
5. INSTALL FRONT FENDER LINER LH
6. INSTALL FRONT WHEEL
Torque: 103 NVm (1,050 kgfVcm, 76 ftVlbf)
7. CHECK ABS SPEED SENSOR SIGNAL (SEE PAGE 05-420 or 05-471)
Page 301 of 969
3203O-06
F40301
C83035
32-56
- BRAKESKID CONTROL SENSOR
2490 Author�: Date�:
2005 LEXUS ES330 REPAIR MANUAL (RM1124U)
SKID CONTROL SENSOR
REPLACEMENT
HINT:
Replace the RH side by the same procedure with LH side.
1. REMOVE REAR WHEEL
2. SEPARATE SKID CONTROL SENSOR WIRE
(a) Disconnect the connector from the skid control sensor.
3. REMOVE REAR DISC BRAKE CALIPER ASSY LH (SEE PAGE 32-41)
4. REMOVE REAR DISC
5. REMOVE REAR AXLE HUB & BEARING ASSY LH
(a) Remove the 4 bolts and rear axle hub & bearing assy.
Page 303 of 969
C83035
32-58
- BRAKESKID CONTROL SENSOR
2492 Author�: Date�:
2005 LEXUS ES330 REPAIR MANUAL (RM1124U)
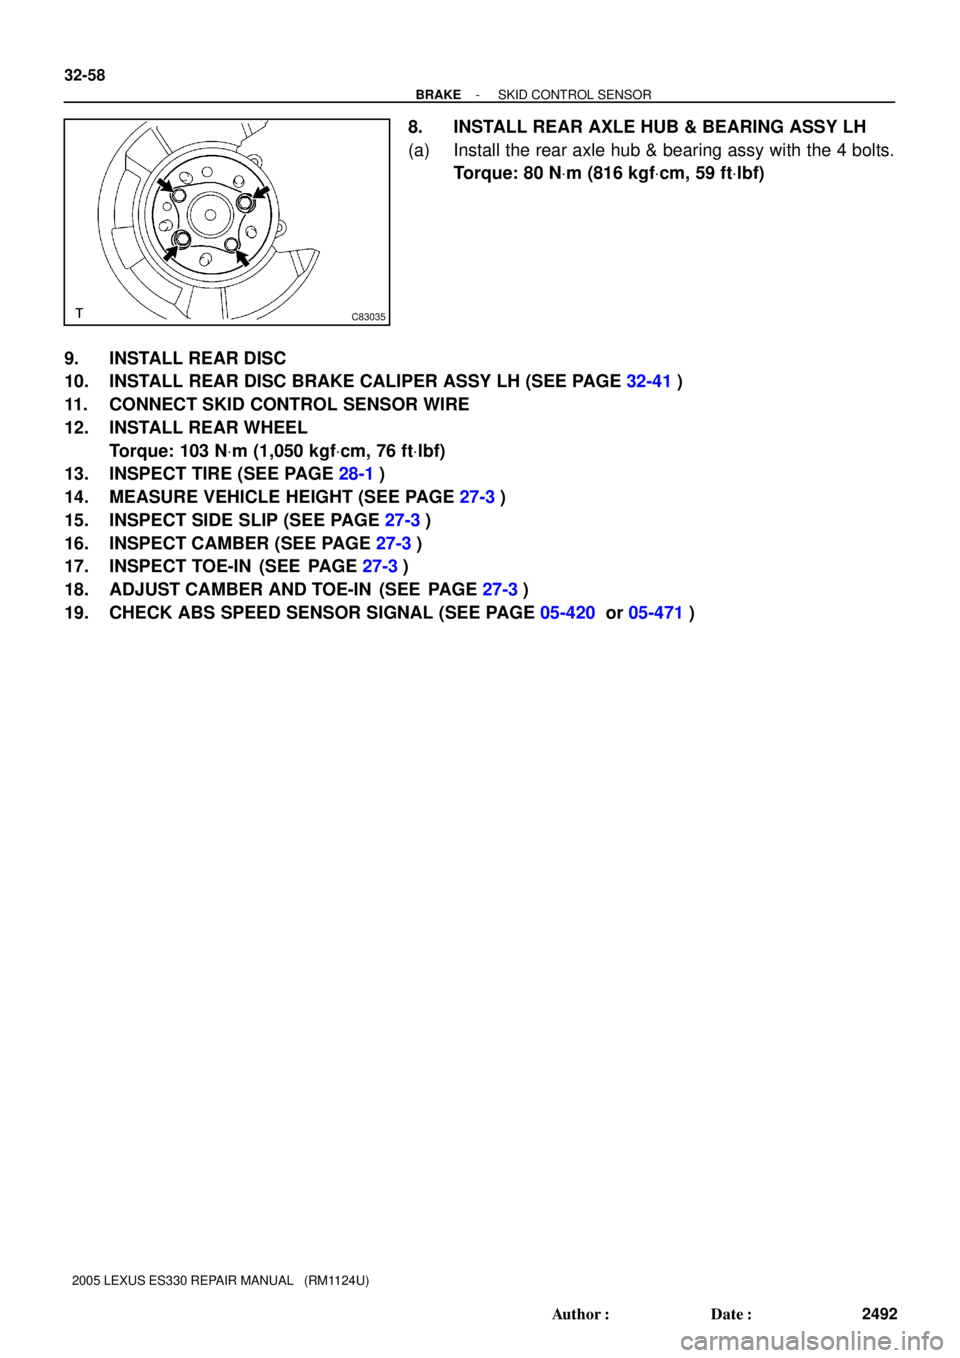
8. INSTALL REAR AXLE HUB & BEARING ASSY LH
(a) Install the rear axle hub & bearing assy with the 4 bolts.
Torque: 80 NVm (816 kgfVcm, 59 ftVlbf)
9. INSTALL REAR DISC
10. INSTALL REAR DISC BRAKE CALIPER ASSY LH (SEE PAGE 32-41)
11. CONNECT SKID CONTROL SENSOR WIRE
12. INSTALL REAR WHEEL
Torque: 103 NVm (1,050 kgfVcm, 76 ftVlbf)
13. INSPECT TIRE (SEE PAGE 28-1)
14. MEASURE VEHICLE HEIGHT (SEE PAGE 27-3)
15. INSPECT SIDE SLIP (SEE PAGE 27-3)
16. INSPECT CAMBER (SEE PAGE 27-3)
17. INSPECT TOE-IN (SEE PAGE 27-3)
18. ADJUST CAMBER AND TOE-IN (SEE PAGE 27-3)
19. CHECK ABS SPEED SENSOR SIGNAL (SEE PAGE 05-420 or 05-471)
Page 305 of 969

STEERING SENSOR
REPLACEMENT
1. PRECAUTION (SEE PAGE 60-1)
2. SEPARATE BATTERY NEGATIVE TERMINAL (")
3203S-1 1
32-60
- BRAKESTEERING SENSOR
2494 Author�: Date�:
2005 LEXUS ES330 REPAIR MANUAL (RM1124U)
STEERING SENSOR
REPLACEMENT
1. PRECAUTION (SEE PAGE 60-1)
2. SEPARATE BATTERY NEGATIVE TERMINAL (SEE PAGE 60-1)
3. PLACE FRONT WHEELS FACING STRAIGHT AHEAD
4. REMOVE HORN BUTTON ASSY (SEE PAGE 60-22)
5. REMOVE STEERING WHEEL ASSY (SEE PAGE 50-8)
6. REMOVE STEERING COLUMN LOWER COVER (SEE PAGE 50-8)
7. REMOVE SPIRAL CABLE SUB-ASSY (SEE PAGE 60-31)
8. REMOVE WINDSHIELD WIPER SWITCH ASSY
9. REMOVE STEERING SENSOR
10. INSTALL STEERING SENSOR
11. INSPECT SPIRAL CABLE SUB-ASSY
(a) If the following condition is identified, replace the spiral cable sub-assy with new one.
Condition:
Scratches or cracks on the connector
Cracks, dents or chipping of the spiral cable sub-assy
12. INSTALL WINDSHIELD WIPER SWITCH ASSY
13. PLACE FRONT WHEELS FACING STRAIGHT AHEAD
14. INSTALL SPIRAL CABLE SUB-ASSY (SEE PAGE 60-31)
15. INSTALL STEERING COLUMN LOWER COVER (SEE PAGE 50-8)
16. CENTER SPIRAL CABLE (SEE PAGE 60-31)
17. INSTALL STEERING WHEEL ASSY (SEE PAGE 50-8)
18. INSPECT STEERING WHEEL CENTER POINT (SEE PAGE 50-8)
19. INSTALL HORN BUTTON ASSY (SEE PAGE 60-22)
20. INSPECT SRS WARNING LIGHT (SEE PAGE 05-818)
Page 309 of 969

ADJUSTMENT
1. REMOVE REAR WHEEL
2. ADJUST PARKING BRAKE")
3305G-02
F41011
Adjusting Nut
Lock Nut 33-2
- PARKING BRAKEPARKING BRAKE SYSTEM
2498 Author�: Date�:
2005 LEXUS ES330 REPAIR MANUAL (RM1124U)
ADJUSTMENT
1. REMOVE REAR WHEEL
2. ADJUST PARKING BRAKE SHOE CLEARANCE(See page 33-16)
3. INSTALL REAR WHEEL
Torque: 103 NVm (1,050 kgfVcm, 76 ftVlbf)
4. INSPECT PARKING BRAKE PEDAL TRAVEL
(a) Slowly depress the parking brake pedal all the way, and count the number of clicks.
Parking brake pedal travel: 3 - 6 clicks at 300 N (31 kgf, 68.3 lbf)
5. ADJUST PARKING BRAKE PEDAL TRAVEL
(a) Depress the parking brake pedal 3 notches to make a
room for the procedure, and loosen the lock nut.
(b) Return the parking brake pedal to the original position.
(c) Turn the adjusting nut until the parking brake pedal travel
is correct.
(d) Depress the parking brake pedal 3 notches to make a
room for the procedure, and tighten the lock nut.
Torque: 5.4 NVm (55 kgfVcm, 48 in.Vlbf)
(e) Return the parking brake pedal to the original position.
(f) Check whether parking brake drags or not.
(g) When operating the parking brake pedal, check that the
parking brake pedal indicator light lights up.
Page 318 of 969

PARKING BRAKE CABLE ASSY NO.3
REPLACEMENT
HINT:
�COMPON")
3305K-02
C90471
C90462F41690
- PARKING BRAKEPARKING BRAKE CABLE ASSY NO.3
33-1 1
2507 Author�: Date�:
2005 LEXUS ES330 REPAIR MANUAL (RM1124U)
PARKING BRAKE CABLE ASSY NO.3
REPLACEMENT
HINT:
�COMPONENTS: See page 33-3
�For parking brake cable No.2, employ the same procedure to the RH side.
1. REMOVE REAR WHEEL
2. REMOVE REAR DISC BRAKE CALIPER ASSY LH
(a) Remove the 2 bolts and separate the rear disc brake caliper assy LH.
HINT:
Do not the flexible hose from the brake caliper assy LH.
3. REMOVE REAR DISC(See page 33-16)
4. REMOVE PARKING BRAKE SHOE RETURN TENSION SPRING(See page 33-16)
5. REMOVE PARKING BRAKE SHOE STRUT COMPRESSION SPRING(See page 33-16)
6. REMOVE PARKING BRAKE SHOE STRUT LH(See page 33-16)
7. REMOVE PARKING BRAKE SHOE(See page 33-16)
8. REMOVE PARKING BRAKE CABLE HEAT INSULATOR
(a) Remove the 3 nuts and parking brake heat insulator.
9. REMOVE PARKING BRAKE CABLE ASSY NO.3
(a) Remove the 2 bolts and disconnect the parking brake
cable assy No.3 from the backing plate.
(b) Remove the 2 nuts, bolt and parking brake cable assy
No.3.