2005 KIA Sportage tires
[x] Cancel search: tiresPage 252 of 354
535
Driving tips
1
2
3
4
5
6
7
8
9
Safety chains You should always attach chains
between your vehicle and your trail-
er. Cross the safety chains under the
tongue of the trailer so that the
tongue will not drop to the road if it
becomes separated from the hitch.
Instructions about safety chains may
be provided by the hitch manufactur-
er or by the trailer manufacturer.
Follow the manufacturer’s recom-
mendation for attaching safety
chains. Always leave just enough
slack so you can turn with your trail-
er. And, never allow safety chains to
drag on the ground.
Trailer brakes If your trailer weighs more than the
maximum trailer weight without trail-
er brakes loaded, then it needs its
own brakes and they must be ade-
quate. Be sure to read and follow the
instructions for the trailer brakes so
you’ll be able to install, adjust and
maintain them properly.
Don’t tap into your vehicle's brake
system.
Driving with a trailer Towing a trailer requires a certain
amount of experience. Before setting
out for the open road, you must get
to know your trailer. Acquaint your-
self with the feel of handling and
braking with the added weight of the
trailer. And always keep in mind that
the vehicle you are driving is now a
good deal longer and not nearly so
responsive as your vehicle is by
itself.
Before you start, check the trailer
hitch and platform, safety chains,
electrical connector(s), lights, tires
and mirror adjustment. If the trailer
has electric brakes, start your vehicle
and trailer moving and then apply the
trailer brake controller by hand to be
sure the brakes are working. This lets
you check your electrical connection
at the same time.
During your trip, check occasionally
to be sure that the load is secure,
and that the lights and any trailer
brakes are still working.
WARNING
Do not use a trailer with its own
brakes unless you are absolute-
ly certain that you have properly
set up the brake system. This is
not a task for amateurs. Use an
experienced, competent trailer
shop for this work.
KM CAN (ENG) 5.qxd 9/13/2004 4:48 PM Page 35
Page 259 of 354
Driving tips42 5
1
2
3
4
5
6
7
8
9
Refer to your vehicle's tire and load-
ing information label for specific
information about your vehicle's
capacity weight and seating posi-
tions. The combined weight of the
driver, passengers and cargo should
never exceed your vehicle's capacity
weight.
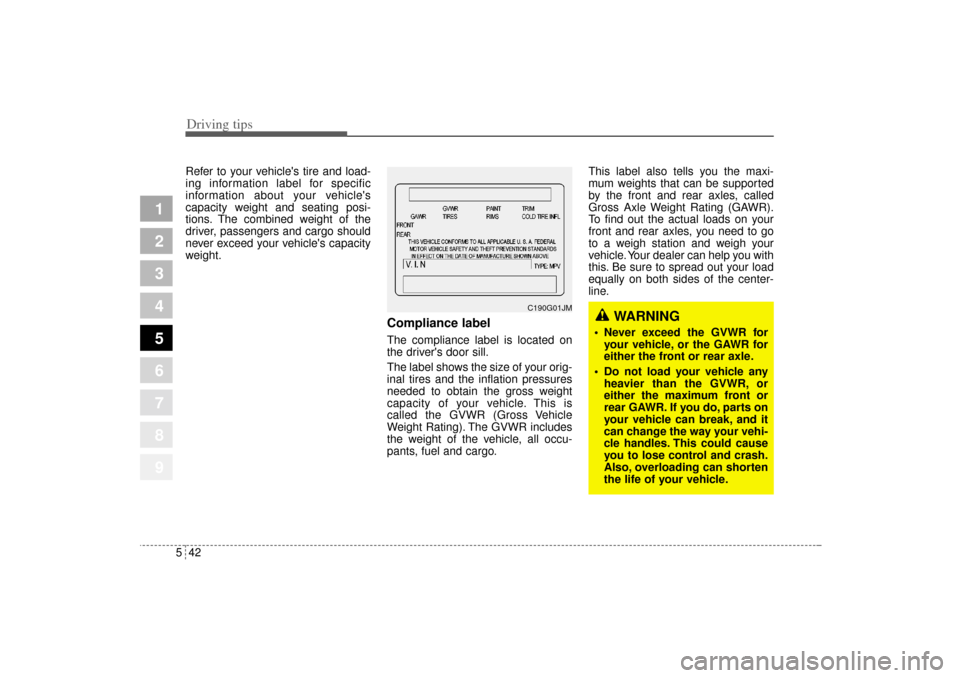
Compliance labelThe compliance label is located on
the driver's door sill.
The label shows the size of your orig-
inal tires and the inflation pressures
needed to obtain the gross weight
capacity of your vehicle. This is
called the GVWR (Gross Vehicle
Weight Rating). The GVWR includes
the weight of the vehicle, all occu-
pants, fuel and cargo.This label also tells you the maxi-
mum weights that can be supported
by the front and rear axles, called
Gross Axle Weight Rating (GAWR).
To find out the actual loads on your
front and rear axles, you need to go
to a weigh station and weigh your
vehicle. Your dealer can help you with
this. Be sure to spread out your load
equally on both sides of the center-
line.
WARNING
Never exceed the GVWR for
your vehicle, or the GAWR for
either the front or rear axle.
Do not load your vehicle any
heavier than the GVWR, or
either the maximum front or
rear GAWR. If you do, parts on
your vehicle can break, and it
can change the way your vehi-
cle handles. This could cause
you to lose control and crash.
Also, overloading can shorten
the life of your vehicle.
C190G01JM
KM CAN (ENG) 5.qxd 9/13/2004 4:48 PM Page 42
Page 286 of 354
In case of an emergency18 6
1
2
3
4
5
6
7
8
9
When your vehicle is being
towed by another vehicle
other than a tow truck (in case
of an emergency) Turn the ignition switch to ACC so
the steering wheel isn’t locked.
Place the transaxle shift lever in N
(Neutral).
Release the parking bake.
Vehicles equipped with automatic
transaxles should not exceed 45
km/h (28 mph) and should not be
towed more than 80 km (50 miles).
Vehicles equipped with manual
transaxle should not be towed in
excess of 88 km/h (55 mph) and
should not be towed more than
645 km (400 miles). Press the brake pedal with more
force than normal since you will
have reduced brake performance.
More steering effort will be
required because the power steer-
ing system will be disabled.
If you are driving down a long hill,
the brakes may overheat and brake
performance will be reduced. Stop
often and let the brakes cool off.
✽ ✽
NOTICETo prevent internal damage to the
transaxle, never tow your vehicle
from the rear (backwards) with all
four tires in contact with the sur-
face.
Tips for towing a stuck vehicleThe following methods are effective
when your vehicle is stuck in mud,
sand or similar substances that pre-
vent the vehicle from being driven
out under its own power.
Remove the soil and sand, etc.
from the front and the back of the
tires.
Place a stone or wood under the
tires.
KM CAN (ENG) 6.qxd 9/13/2004 4:47 PM Page 18
Page 288 of 354
In case of an emergency20 6The compact spare should be inflat-
ed to 420 kPa (60 psi).✽ ✽
NOTICECheck the inflation pressure after
installing the spare tire. Adjust it to
the specified pressure, as necessary.
When using a compact spare tire,
observe the following precautions:
Under no circumstances should
you exceed 80 km/h (50 mph); a
higher speed could damage the
tire.
Ensure that you drive slowly
enough for the road conditions to
avoid all hazards. Any road hazard,
such as a pothole or debris, could
seriously damage the compact
spare.
Any continuous road use of this tire
could result in tire failure, loss of
vehicle control, and possible per-
sonal injury.
Do not exceed the vehicle’s maxi-
mum load rating or the load-carry-
ing capacity shown on the sidewall
of the compact spare tire.
Avoid driving over obstacles. The
compact spare tire diameter is
smaller than the diameter of a con-
ventional tire and reduces the
ground clearance approximately
25 mm (1 inch), which could result
in damage to the vehicle. Do not take this vehicle through an
automatic car wash.
Do not use tire chains on this tire.
Because of the smaller size, a tire
chain will not fit properly. This could
damage the vehicle and result in
loss of the chain.
This tire should not be installed on
the front axle if the vehicle must be
driven in snow or on ice.
Do not use the compact spare tire
on any other vehicle because this
tire has been designed especially
for your vehicle.
The compact spare tire’s tread life
is shorter than a regular tire.
Inspect your compact spare tire
regularly and replace worn com-
pact spare tires with the same size
and design, mounted on the same
wheel.
1
2
3
4
5
6
7
8
9
CAUTION
This spare tire should be used
only for VERY short distances.
Compact spares should NEVER
be used for long drives or
extended distances.
KM CAN (ENG) 6.qxd 9/13/2004 4:47 PM Page 20
Page 289 of 354
621
In case of an emergency
1
2
3
4
5
6
7
8
9
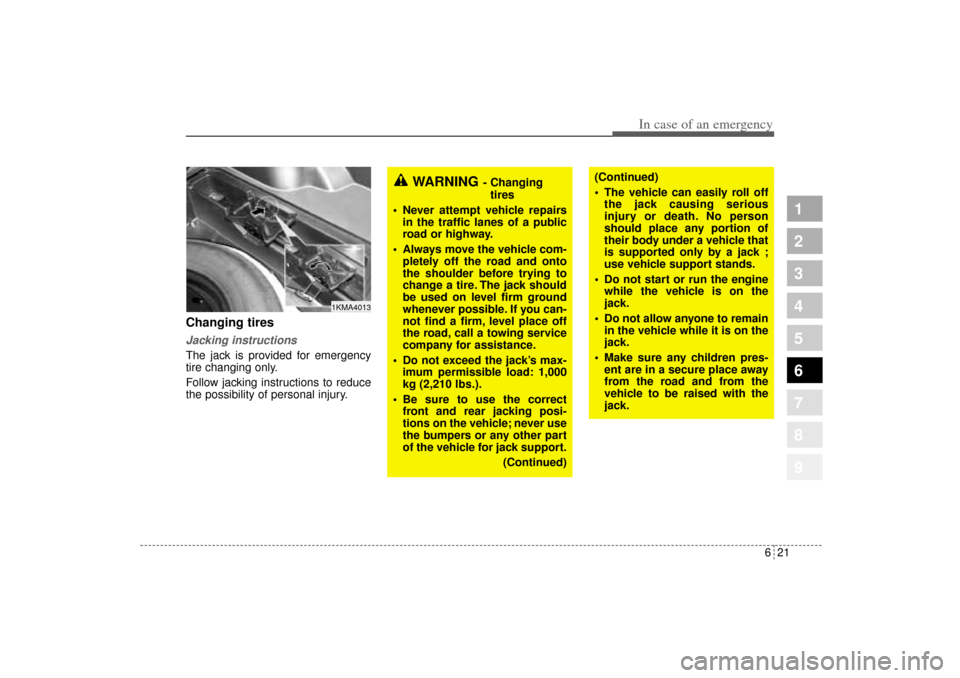
Changing tires Jacking instructions The jack is provided for emergency
tire changing only.
Follow jacking instructions to reduce
the possibility of personal injury.
WARNING
- Changing
tires
Never attempt vehicle repairs
in the traffic lanes of a public
road or highway.
Always move the vehicle com-
pletely off the road and onto
the shoulder before trying to
change a tire. The jack should
be used on level firm ground
whenever possible. If you can-
not find a firm, level place off
the road, call a towing service
company for assistance.
Do not exceed the jack’s max-
imum permissible load: 1,000
kg (2,210 lbs.).
Be sure to use the correct
front and rear jacking posi-
tions on the vehicle; never use
the bumpers or any other part
of the vehicle for jack support.
(Continued)
(Continued)
The vehicle can easily roll off
the jack causing serious
injury or death. No person
should place any portion of
their body under a vehicle that
is supported only by a jack ;
use vehicle support stands.
Do not start or run the engine
while the vehicle is on the
jack.
Do not allow anyone to remain
in the vehicle while it is on the
jack.
Make sure any children pres-
ent are in a secure place away
from the road and from the
vehicle to be raised with the
jack.
1KMA4013
KM CAN (ENG) 6.qxd 9/13/2004 4:47 PM Page 21
Page 295 of 354
1
2
3
4
5
6
7
8
9
Battery / 7-31
Tires and wheels / 7-34
Lubricant specifications / 7-49
Exterior care / 7-51
Interior care / 7-55
Maintenance
1
2
3
4
5
6
7
8
9KM CAN (ENG) 7.qxd 9/13/2004 4:47 PM Page 2
Page 299 of 354
Maintenance6 7
1
2
3
4
5
6
7
8
9
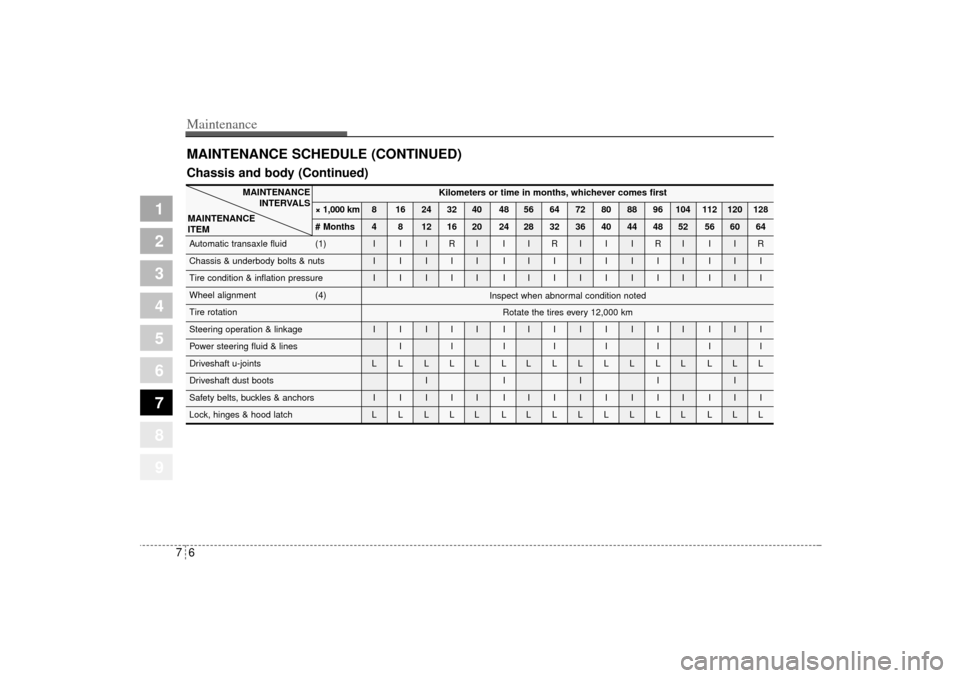
MAINTENANCE SCHEDULE (CONTINUED)
Kilometers or time in months, whichever comes first
× 1,000 km 8 16 24 32 40 48 56 64 72 80 88 96 104 112 120 128
# Months 4 8 12 16 20 24 28 32 36 40 44 48 52 56 60 64
Automatic transaxle fluid (1) I I I R I I I R I I I R I I I R
Chassis & underbody bolts & nuts I I I I I IIIIIIII III
Tire condition & inflation pressure I I I I I IIIIIIII III
Wheel alignment (4)
Tire rotation
Steering operation & linkage I I I I I IIIIIIII III
Power steering fluid & lines I I IIIIII
Driveshaft u-joints L L L L L LLLLLLLL LLL
Driveshaft dust boots I I I I I
Safety belts, buckles & anchors I I I I I IIIIIIII III
Lock, hinges & hood latch L L L L L LLLLLLLL LLL
MAINTENANCE
INTERVALS
MAINTENANCE
ITEM
Inspect when abnormal condition noted
Rotate the tires every 12,000 km
Chassis and body (Continued)
KM CAN (ENG) 7.qxd 9/13/2004 4:47 PM Page 6
Page 301 of 354
Maintenance8 7
1
2
3
4
5
6
7
8
9
OWNER MAINTENANCE Owner maintenance schedule The following lists are vehicle checks
and inspections that should be per-
formed by the owner or an
Authorized Kia Dealer at the fre-
quencies indicated to help ensure
safe, dependable operation of your
vehicle.
Any adverse conditions should be
brought to the attention of your deal-
er as soon as possible.
These Owner Maintenance Checks
are generally not covered by war-
ranties and you may be charged for
labor, parts and lubricants used.
When you stop for fuel: Check the engine oil level.
Check coolant level in coolant
reservoir.
Check the windshield washer fluid
level.
Look for low or under-inflated tires.
While operating your vehicle: Note any changes in the sound of
the exhaust or any smell of
exhaust fumes in the vehicle.
Check for vibrations in the steering
wheel. Notice any increased steer-
ing effort or looseness in the steer-
ing wheel, or change in its straight-
ahead position.
Notice if your vehicle constantly
turns slightly or “pulls” to one side
when traveling on smooth, level
road.
When stopping, listen and check
for strange sounds, pulling to one
side, increased brake pedal travel
or “hard-to-push” brake pedal.
If any slipping or changes in the
operation of your transaxle occurs,
check the transaxle fluid level.
Check automatic transaxle P
(Park) function.
Check parking brake.
Check for fluid leaks under your
vehicle (water dripping from the air
conditioning system during or after
use is normal).
WARNING
Be careful when checking your
engine coolant level when the
engine is hot. Scalding hot
coolant and steam may blow out
under pressure. This could
cause serious injury.
KM CAN (ENG) 7.qxd 9/13/2004 4:47 PM Page 8