Page 26 of 354
315
Knowing your vehicle
1
2
3
4
5
6
7
8
9
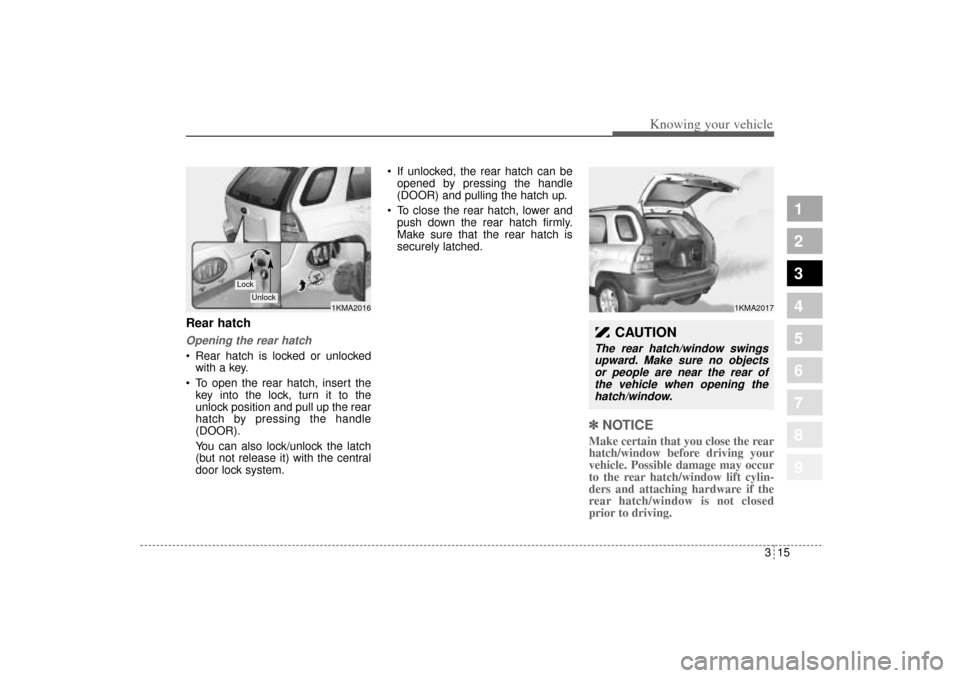
Rear hatchOpening the rear hatch Rear hatch is locked or unlocked
with a key.
To open the rear hatch, insert the
key into the lock, turn it to the
unlock position and pull up the rear
hatch by pressing the handle
(DOOR).
You can also lock/unlock the latch
(but not release it) with the central
door lock system. If unlocked, the rear hatch can be
opened by pressing the handle
(DOOR) and pulling the hatch up.
To close the rear hatch, lower and
push down the rear hatch firmly.
Make sure that the rear hatch is
securely latched.
✽ ✽
NOTICEMake certain that you close the rear
hatch/window before driving your
vehicle. Possible damage may occur
to the rear hatch/window lift cylin-
ders and attaching hardware if the
rear hatch/window is not closed
prior to driving.
1KMA2017
CAUTION
The rear hatch/window swings
upward. Make sure no objects
or people are near the rear of
the vehicle when opening the
hatch/window.
1KMA2016
Lock
Unlock
KM CAN (ENG) 3 (~57).qxd 9/13/2004 4:49 PM Page 15
Page 27 of 354
Knowing your vehicle16 3
1
2
3
4
5
6
7
8
9
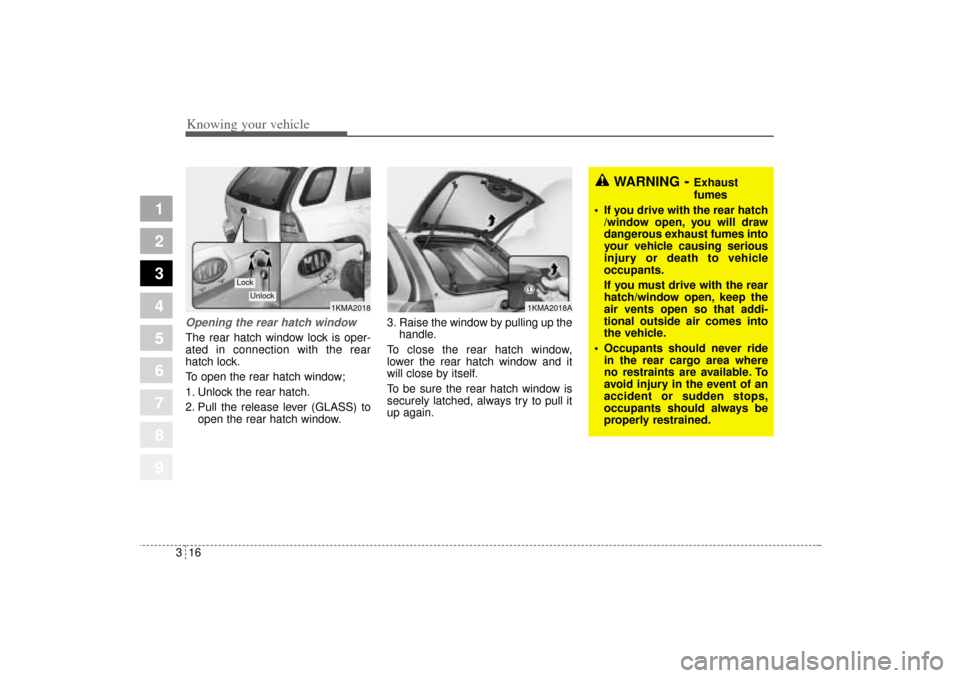
Opening the rear hatch windowThe rear hatch window lock is oper-
ated in connection with the rear
hatch lock.
To open the rear hatch window;
1. Unlock the rear hatch.
2. Pull the release lever (GLASS) to
open the rear hatch window.3. Raise the window by pulling up the
handle.
To close the rear hatch window,
lower the rear hatch window and it
will close by itself.
To be sure the rear hatch window is
securely latched, always try to pull it
up again.
1KMA2018A
1KMA2018
Lock
Unlock
WARNING
- Exhaust
fumes
If you drive with the rear hatch
/window open, you will draw
dangerous exhaust fumes into
your vehicle causing serious
injury or death to vehicle
occupants.
If you must drive with the rear
hatch/window open, keep the
air vents open so that addi-
tional outside air comes into
the vehicle.
Occupants should never ride
in the rear cargo area where
no restraints are available. To
avoid injury in the event of an
accident or sudden stops,
occupants should always be
properly restrained.
KM CAN (ENG) 3 (~57).qxd 9/13/2004 4:49 PM Page 16
Page 28 of 354
317
Knowing your vehicle
1
2
3
4
5
6
7
8
9
Power windows ➀Driver’s door power window switch
➁Front passenger’s door power win-
dow switch
➂Rear door (left) power window
switch
➃Rear door (right) power window
switch
➄Window opening and closing
(see page 3-18)
➅Automatic power window down
(Driver’s window, see page 3-18)
➆Power window lock switch
(see page 3-18)
WINDOWS
1KMB2011
KM CAN (ENG) 3 (~57).qxd 9/13/2004 4:49 PM Page 17
Page 29 of 354
Knowing your vehicle18 3
1
2
3
4
5
6
7
8
9
The ignition switch must be in the ON
position for power windows to oper-
ate. Each door has a power window
switch that controls that door’s win-
dow. However, the driver has a power
window lock switch which can block
the operation of passenger windows.
The power windows can be operated
for approximately 30 seconds after
the ignition key is removed or turned
to the ACC or LOCK position.
However, if the front doors are
opened, the power windows cannot
be operated even within the 30 sec-
onds after the ignition key removal.
If you notice buffeting and pulsation
(wind shock) with either side window
open, you should open the opposite
window slightly to reduce the condi-
tion.
✽ ✽
NOTICE• To prevent the power window sys-
tem from the possibility of dam-
age, do not open or close two win-
dows at the same time. This will
also ensure the longevity of the
fuse.
• Never try to operate the main
switch on the driver's door and the
individual door window switch in
opposing directions at the same
time. If this is done, the window
will stop and cannot be opened or
closed.
CAUTION
Make sure heads and hands
are safely out of the way
before closing a window.
Do not allow children to play
with the power windows. Keep
the driver’s door power win-
dow lock switch in the LOCK
position (depressed). Serious
injury can result from uninten-
tional window operation by
the child.
Do not extend face or arms
outside through the window
opening while driving.
Always double check to make
sure all arms, hands and other
obstructions are safely out of
the way before closing a win-
dow.
KM CAN (ENG) 3 (~57).qxd 9/13/2004 4:49 PM Page 18
Page 30 of 354
319
Knowing your vehicle
1
2
3
4
5
6
7
8
9
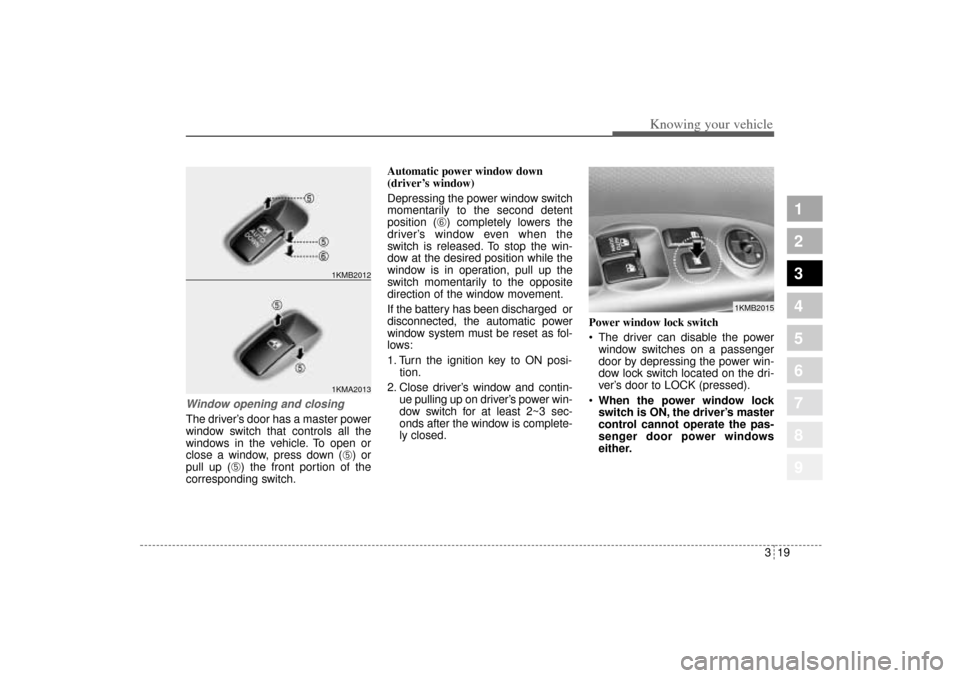
Window opening and closingThe driver’s door has a master power
window switch that controls all the
windows in the vehicle. To open or
close a window, press down (
➄) or
pull up (
➄) the front portion of the
corresponding switch.Automatic power window down
(driver’s window)
Depressing the power window switch
momentarily to the second detent
position (
➅) completely lowers the
driver’s window even when the
switch is released. To stop the win-
dow at the desired position while the
window is in operation, pull up the
switch momentarily to the opposite
direction of the window movement.
If the battery has been discharged or
disconnected, the automatic power
window system must be reset as fol-
lows:
1. Turn the ignition key to ON posi-
tion.
2. Close driver’s window and contin-
ue pulling up on driver’s power win-
dow switch for at least 2~3 sec-
onds after the window is complete-
ly closed.Power window lock switch
The driver can disable the power
window switches on a passenger
door by depressing the power win-
dow lock switch located on the dri-
ver’s door to LOCK (pressed).
When the power window lock
switch is ON, the driver’s master
control cannot operate the pas-
senger door power windows
either.
1KMA20131KMB2012
1KMB2015
KM CAN (ENG) 3 (~57).qxd 9/13/2004 4:49 PM Page 19
Page 82 of 354
371
1
2
3
4
5
6
7
8
9
Knowing your vehicle
If the curtain airbag deploys, it
remains inflated for approximately
3 seconds. The curtain airbag
deployment occurs only on the
side of the vehicle affected by the
impact.
The side airbags (side and curtain
airbags) are not designed to
deploy during collisions from the
front or rear of the vehicle or in
most rollover situations.
The curtain airbags are designed
to deploy only during certain side-
impact collisions, depending on the
crash severity, angle, speed and
impact. The curtain airbags are not
designed to deploy in all side
impact situations.
WARNING
In order for side airbags (side
and curtain airbags) to pro-
vide its best protection, both
front seat occupants and both
outboard rear occupants
should sit in an upright posi-
tion with the seat belts proper-
ly fastened. Importantly, chil-
dren should sit in a proper
child restraint system in the
rear seat.
When children are seated in
the rear outboard seats, they
must be seated in the proper
child restraint system. Make
sure to put the child restraint
system as far away from the
door side as possible, and
secure the child restraint sys-
tem in a locked position.
(Continued)
(Continued)
Do not allow the passengers
to lean their heads or bodies
onto doors, put their arms on
the doors, stretch their arms
out of the window, or place
objects between the doors
and passengers when they are
seated on seats equipped with
side airbags.
Never try to open or repair any
components of the side cur-
tain airbag system. This
should only be done by an
authorized Kia dealer.
Failure to follow the above men-
tioned instructions can result in
injury or death to the vehicle
occupants in an accident.
KM CAN (ENG) 3 (~112).qxd 9/13/2004 4:50 PM Page 71
Page 99 of 354
Knowing your vehicle88 3
1
2
3
4
5
6
7
8
9
Outside rearview mirror Be sure to adjust mirror angles
before driving.
Your vehicle is equipped with both
left-hand and right-hand outside
rearview mirrors. The mirrors can be
adjusted remotely with the control
levers or remote switch, depending
on the type of mirror control installed.
The mirror heads can be folded back
to prevent damage duning an auto-
matic car wash or when passing in a
narrow street.
✽ ✽
NOTICEDo not scrape ice off the mirror
face; this may damage the surface of
the glass. If ice should restrict move-
ment of the mirror, do not force the
mirror for adjustment. To remove
ice, use a deicer spray, or a sponge
or soft cloth with very warm water.
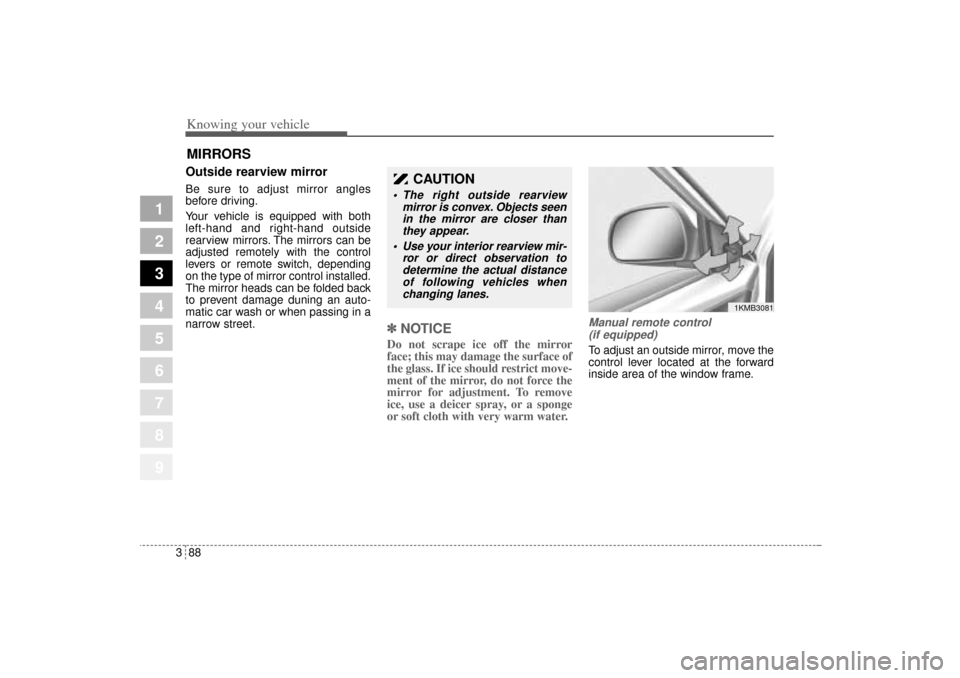
Manual remote control
(if equipped)To adjust an outside mirror, move the
control lever located at the forward
inside area of the window frame.
MIRRORS
CAUTION
The right outside rearview
mirror is convex. Objects seen
in the mirror are closer than
they appear.
Use your interior rearview mir-
ror or direct observation to
determine the actual distance
of following vehicles when
changing lanes.
1KMB3081
KM CAN (ENG) 3 (~112).qxd 9/13/2004 4:50 PM Page 88
Page 101 of 354
Knowing your vehicle90 3
1
2
3
4
5
6
7
8
9
Outside rearview mirror heater
(if equipped) The outside rearview mirror heater is
actuated in connection with the rear
window defroster. To heat the outside
rearview mirror glass, push the but-
ton for the rear window defroster.
The rearview mirror heater (and rear
window defroster) will not operate
unless the engine is running.
The outside rearview mirror glass will
be heated for defrosting or defogging
and will give you improved rear
vision in inclement weather condi-
tions. Push the button again to turn
the heater off. The outside rearview
mirror heater automatically turns off
after 20 minutes.
Day/night rearview mirror Adjust the rearview mirror to center
on the view through the rear window.
Make this adjustment before you
start driving.
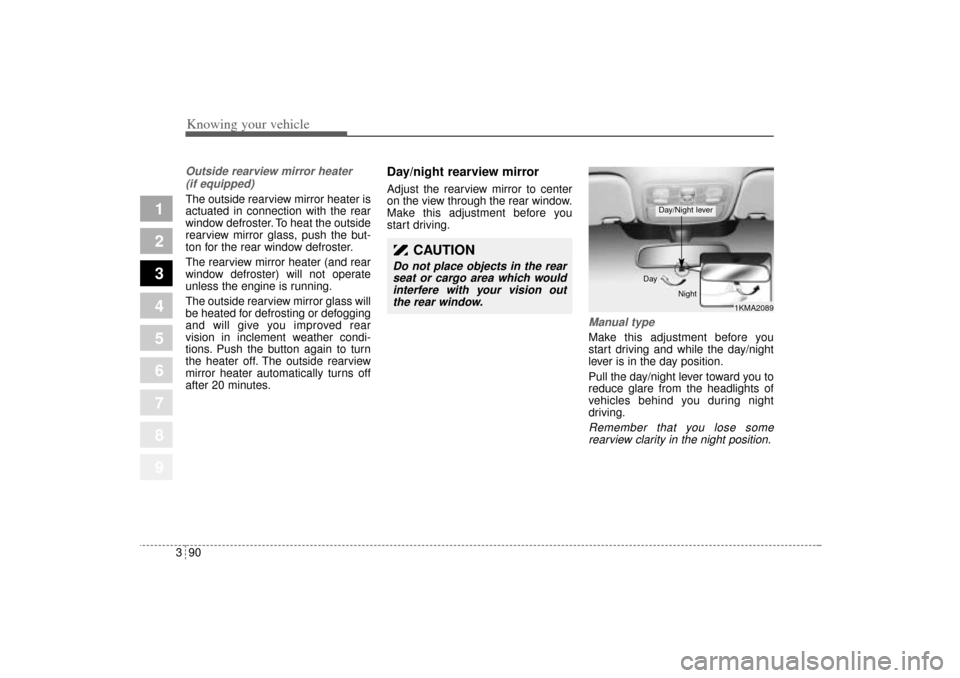
Manual type Make this adjustment before you
start driving and while the day/night
lever is in the day position.
Pull the day/night lever toward you to
reduce glare from the headlights of
vehicles behind you during night
driving.Remember that you lose some
rearview clarity in the night position.
CAUTION
Do not place objects in the rear
seat or cargo area which would
interfere with your vision out
the rear window.
1KMA2089 Day
Night
Day/Night lever
KM CAN (ENG) 3 (~112).qxd 9/13/2004 4:51 PM Page 90