Page 75 of 424
Defrosters
Check operation by selecting the defrost mode and place
the blower control on high speed. You should feel the air
directed against the windshield.
Safety Checks You Should Make Outside The
Vehicle
Tires
Examine tires for excessive tread wear or uneven wear
patterns. Check for stones, nails, glass, or other objects
lodged in the tread. Inspect for tread cuts or sidewall
cracks. Check wheel nuts for tightness and tires (includ-
ing spare) for proper pressure.
Lights
Have someone observe the operation of all exterior lights
while you work the controls. Check turn signal and high
beam indicator lights on the instrument panel.
Fluid Leaks
Check area under vehicle after overnight parking for fuel,
coolant, oil or other fluid leaks. Also, if gasoline fumes
are detected, the cause should be located and corrected
immediately.
THINGS TO KNOW BEFORE STARTING YOUR VEHICLE 75
2
Page 137 of 424

Tire PSI
Shows the pressure and location of each tire, except for
the spare tire. The tire location will blink when under
pressure.
Blank Screen
Shows a blank screen. Pressing the C/T button returns to
the Compass and Temperature display. Pressing the STEP
button returns you to the Average Miles per Gallon
display.
Automatic Compass Calibration
This compass is self-calibrating which eliminates the
need to manually set the compass. When the vehicle is
new, the compass may appear erratic and the CAL
symbol will be displayed.
After completing three 360 degree turns in an area free
from large metal or metallic objects, the CAL symbol will
turn off and the compass will function normally.
Manual Compass Calibration
If the compass appears erratic and the CAL symbol does
not appear, you must manually put the compass into the
“Calibration” mode.
To Put Into a Calibration Mode
Turn on the ignition and set the display to “Compass/
Temperature.” Press and hold the RESET button (more
than 10 seconds) to change the display between VARI-
ANCE (compass variance) and CAL (compass calibra-
tion) modes. When the CAL symbol is displayed com-
plete three 360 degree turns in an area free from large
metal objects or power lines. The CAL symbol will turn
off and the compass will function normally.
UNDERSTANDING THE FEATURES OF YOUR VEHICLE 137
3
Page 169 of 424

the vehicle’s handling and stopping ability. Each tire,
including the spare, should be checked monthly when
cold and set to the recommended inflation pressure as
specified on the vehicle placard. (See page 268 for more
information.)
6. 4LO Mode Indicator Light — If Equipped
This light alerts the driver that the vehicle is in
the 4 LO four–wheel drive mode. The front and
rear driveshafts are mechanically locked to-
gether forcing the front and rear wheels to
rotate at the same speed. (See page 236 for more infor-
mation.)
7. Fog Light Indicator Light — If Equipped
This light shows when the front fog lights are on.8. Malfunction Indicator Light
This light is part of an onboard diagnostic system
called OBD II which monitors engine and auto-
matic transmission control systems. This light
will illuminate when the ignition is in the ON position
before engine start. If the bulb does not come on when
turning the ignition key from OFF to ON, have the
condition checked promptly.
Certain conditions such has a loose or missing gas cap,
poor fuel quality, etc. may illuminate the light after
engine start. The vehicle should be serviced if the light
stays on through several typical driving cycles. In most
situations, the vehicle will drive normally and will not
require towing.
When the engine is running, the “Malfunction Indicator
Light” may flash to alert of serious conditions that could
lead to immediate loss of power or severe catalytic
UNDERSTANDING YOUR INSTRUMENT PANEL 169
4
Page 254 of 424

TIRE SAFETY INFORMATION
Tire Markings
NOTE:
•P(Passenger)-Metric tire sizing is based on U.S. design
standards. P-Metric tires have the letter “P” molded
into the sidewall preceding the size designation. Ex-
ample: P215/65R15 95H.
•European Metric tire sizing is based on European
design standards. Tires designed to this standard have
the tire size molded into the sidewall beginning with
the section width. The letter�P�is absent from this tire
size designation. Example: 215/65R15 96H
•LT(Light Truck)-Metric tire sizing is based on U.S.
design standards. The size designation for LT-Metric
tires is the same as for P-Metric tires except for the
letters “LT” that are molded into the sidewall preced-
ing the size designation. Example: LT235/85R16.
•Temporary Spare tires are high pressure compact
spares designed for temporary emergency use only.
Tires designed to this standard have the letter “T”
molded into the sidewall preceding the size designa-
tion. Example: T145/80D18 103M.
•High Flotation tire sizing is based on U.S. design
standards and begins with the tire diameter molded
into the sidewall. Example: 31x10.5 R15 LT.
254 STARTING AND OPERATING
Page 255 of 424
Tire Sizing Chart
EXAMPLE:
Size Designation:
P= Passenger car tire size based on U.S. design standards
�....blank....�= Passenger car tire based on European design standards
LT= Light Truck tire based on U.S. design standards
T= Temporary Spare tire
31= Overall Diameter in Inches (in)
215= Section Width in Milimeters (mm)
65= Aspect Ratio in Percent (%)
—Ratio of section height to section width of tire.
10.5= Section Width in Inches (in)
R= Construction Code
—�R�means Radial Construction.
—�D�means Diagonal or Bias Construction.
15= Rim Diameter in Inches (in)
STARTING AND OPERATING 255
5
Page 259 of 424

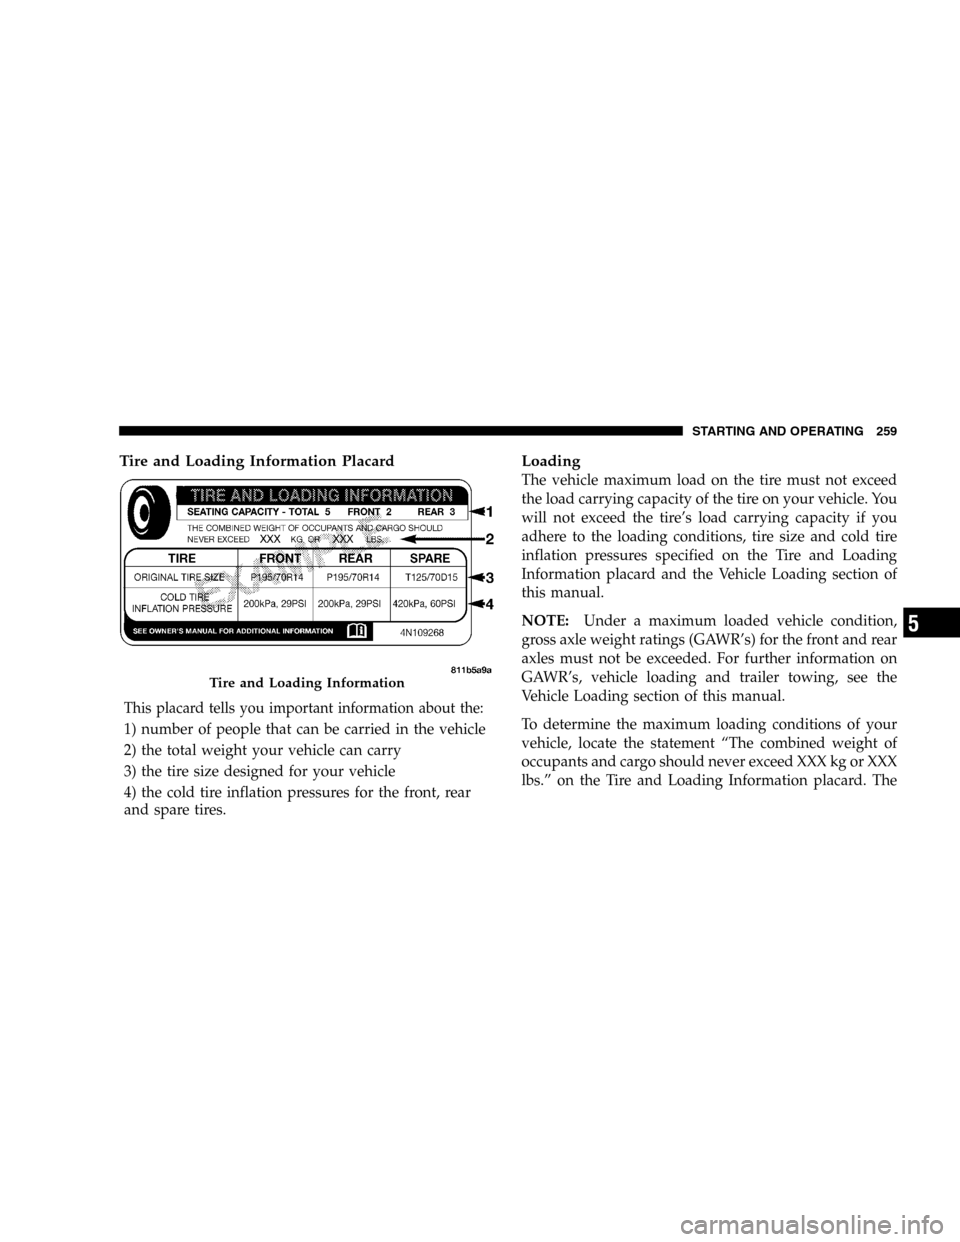
Tire and Loading Information Placard
This placard tells you important information about the:
1) number of people that can be carried in the vehicle
2) the total weight your vehicle can carry
3) the tire size designed for your vehicle
4) the cold tire inflation pressures for the front, rear
and spare tires.
Loading
The vehicle maximum load on the tire must not exceed
the load carrying capacity of the tire on your vehicle. You
will not exceed the tire’s load carrying capacity if you
adhere to the loading conditions, tire size and cold tire
inflation pressures specified on the Tire and Loading
Information placard and the Vehicle Loading section of
this manual.
NOTE:Under a maximum loaded vehicle condition,
gross axle weight ratings (GAWR’s) for the front and rear
axles must not be exceeded. For further information on
GAWR’s, vehicle loading and trailer towing, see the
Vehicle Loading section of this manual.
To determine the maximum loading conditions of your
vehicle, locate the statement “The combined weight of
occupants and cargo should never exceed XXX kg or XXX
lbs.” on the Tire and Loading Information placard. The
Tire and Loading Information
STARTING AND OPERATING 259
5
Page 268 of 424

Tires may also cause the vehicle to pull left or right.
Alignment will not correct this problem. See your dealer
for proper diagnosis of the problem.
Improper alignment will not normally cause vehicle
vibration, which may be a result of tire and wheel
out-of-balance. Proper balancing will reduce vibration
and avoid tire cupping and spotty wear.
TIRE PRESSURE MONITOR SYSTEM — IF
EQUIPPED
Tire Pressure Monitoring — Base System
The Tire Pressure Monitor System (TPM) system uses
wireless technology with wheel rim mounted electronic
sensors to monitor tire pressure levels (EXCLUDING
THE SPARE TIRE). Sensors, mounted to each wheel as
part of the valve stem, transmit tire pressure readings to
the Receiver Module.NOTE:
It is particularly important, for you to check the
tire pressure in all of your tires regularly and to maintain
the proper pressure.
The Tire Pressure Monitoring Indicator Lamp will
illuminate in the instrument cluster, and an au-
dible chime will be activated when one or more
tire pressures is low. The Tire Pressure Monitoring Indi-
cator Lamp will flash on and off for ten seconds when a
system fault is detected. The flash cycle will repeat every
ten minutes or until the fault condition is removed and
reset.
The Tire Pressure Monitoring System consists of the
following components:
•Receiver Module
•4/5 Wheel Sensors
•Amber Colored Tire Pressure Monitoring Indicator
Lamp
268 STARTING AND OPERATING
Page 269 of 424

The system will consist of tire pressure monitoring
sensors attached to each wheel through the valve stem
mounting hole, a central receiver module and an amber
colored Indicator Lamp. A sensor is located in the spare
wheel if the vehicle is equipped with a matching full size
spare wheel and tire assembly.
NOTE:For vehicles with optional wheel/tire sizes and
significantly different tire placard pressures, the placard
pressure value and the low-pressure threshold value is
re-programmable at your authorized dealer to accommo-
date the customer selected wheel/tire combinations rec-
ommended by DaimlerChrysler.CAUTION!
The TPM system has been optimized for the original
equipment tires and wheels. TPM system pressures
have been established for the tire size equipped on
your vehicle. Undesirable system operation or sen-
sor damage may result when using replacement
equipment that is not of the same size, type, and/or
style. After-market wheels can cause sensor damage.
Do not use tire sealant from a can, or balance beads
if your vehicle is equipped with a TPM system, as
damage to the sensors may result.
STARTING AND OPERATING 269
5