Page 333 of 424
Use only manufacturer’s recommended brake fluid, refer
to Recommended Fluids, Lubricants, and Genuine Parts
for correct fluid type.
WARNING!
Use of a brake fluid that may have a lower initial
boiling point or unidentified as to specification, may
result in sudden brake failure during hard pro-
longed braking. You could have an accident.
WARNING!
Overfilling the brake fluid reservoir can result in
spilling brake fluid on hot engine parts and the
brake fluid catching fire.
Use only brake fluid that has been in a tightly closed
container to avoid contamination from foreign matter. Do
not allow petroleum base fluid to contaminate the brake
fluid as seal damage will result.
Automatic Transmission
Selection of Lubricant
It is important that the proper lubricant is used in the
transmission to assure optimum transmission perfor-
mance. Use only manufacturer’s recommended transmis-
sion fluid, refer to Recommended Fluids, Lubricants, and
Genuine Parts for correct fluid type. It is important that
the transmission fluid be maintained at the prescribed
level using the recommended fluid.
MAINTAINING YOUR VEHICLE 333
7
Page 335 of 424
(cross-hatched area) on the oil level indicator. The fluid
level indicator should be in the COLD region at 70° F (21°
C) fluid temperature.
If the fluid level is low, add sufficient fluid to bring to the
proper level. Refer to Recommended Fluids, Lubricants
and Genuine Parts for correct fluid type.
Fluid is added through the dipstick tube.
NOTE:To prevent dirt and water from entering the
transmission after checking or replenishing fluid, make
certain that the dipstick cap is properly reseated.
Special Additives
The manufacturer recommends against the addition of
any additives to the transmission. Exception to this
policy is the use of special dyes to aid in detecting fluid
leaks.
Hydraulic Clutch Fluid — Manual Transmission
The clutch hydraulic system is a sealed maintenance free
system. In the event of leakage or other malfunction, the
system must be replaced.
Manual Transmission
Selection of Lubricant
Use only manufacturer’s recommended manual trans-
mission fluid, refer to Recommended Fluids, Lubricants,
and Genuine Parts for correct fluid type.
Fluid Level Check
Check the fluid level by removing the fill plug. The fluid
level should be between the bottom of the fill hole and a
point not more than 3/16” (4.76 mm) below the bottom of
the hole.
Add fluid, if necessary, to maintain the proper level.
MAINTAINING YOUR VEHICLE 335
7
Page 337 of 424
CAUTION!
When installing plugs, do not overtighten. You could
damage them and cause them to leak.
Selection of Lubricant
Use only manufacturer’s recommended fluid, refer to
Recommended Fluids, Lubricants, and Genuine Parts for
correct fluid type.
Front/Rear Axle Fluid
The front axle has a threaded “fill plug” on the cover
plate, and a threaded “drain plug” on the bottom side of
the carrier.
Fluid Level Check
Lubricant should be 1/2�(1 cm) below the oil fill hole.
Adding Fluid
Add lubricant only at the fill hole and only to the level
specified above.
Selection of Lubricant
Use only manufacturer’s recommended fluid, refer to
Recommended Fluids, Lubricants, and Genuine Parts for
correct fluid type.
Appearance Care And Protection From Corrosion
Protection Of Body And Paint From Corrosion
Vehicle body care requirements vary according to geo-
graphic locations and usage. Chemicals that make roads
passable in snow and ice, and those that are sprayed on
trees and road surfaces during other seasons, are highly
corrosive to the metal in your vehicle. Outside parking,
which exposes your vehicle to airborne contaminants,
road surfaces on which the vehicle is operated, extreme
MAINTAINING YOUR VEHICLE 337
7
Page 339 of 424
CAUTION!
Do not use abrasive or strong cleaning materials
such as steel wool or scouring powder, which will
scratch metal and painted surfaces.
Special Care
•
If you drive on salted or dusty roads or if you drive
near the ocean, hose off the undercarriage at least once
a month.
•It is important that the drain holes in the lower edges
of the doors, rocker panels and tailgate must be kept
clear and open.
•If you detect any stone chips or scratches in the paint,
touch them up immediately. The cost of such repairs is
considered the responsibility of the owner.
•If your vehicle is damaged due to an accident or
similar cause which destroys the paint and protective
coating have your vehicle repaired as soon as possible.
The cost of such repairs is considered the responsibil-
ity of the owner.
•All wheels and wheel trim, especially aluminum and
chrome plated wheels should be cleaned regularly
with mild soap and water to prevent corrosion. To
remove heavy soil, select a non-abrasive, non-acidic
cleaner. Do not use scouring pads, steel wool, a bristle
brush, or metal polishes. Only Mopar�Cleaners are
recommended. Do not use oven cleaner. Avoid auto-
matic car washes that use acidic solutions or harsh
brushes that may damage the wheel’s protective fin-
ish.
•If you carry special cargo such as chemicals, fertilizers,
de-icer salt, etc., be sure that such materials are well
packaged and sealed.
MAINTAINING YOUR VEHICLE 339
7
Page 340 of 424
•If a lot of driving is done on gravel roads, consider
mud or stone shields behind each wheel.
•Use Mopar�Touch Up Paint on scratches or chips as
soon as possible. Your authorized dealer has touch up
paint to match the color of your vehicle.
Interior Care
Use Mopar�Fabric Cleaner to clean fabric upholstery
and carpeting.
Use Mopar�Vinyl Cleaner to clean vinyl or leather
upholstery.
Mopar�Vinyl Cleaner is specifically recommended for
interior vinyl trim.
Leather Seat Care & Cleaning
Leather is best preserved by regular cleaning with a
damp soft cloth. Small particles of dirt can act as an
abrasive and damage the leather surface and should be
removed promptly with a damp cloth. Stubborn soils canbe removed easily with a soft cloth and Mopar�Total
Clean. Care should be taken to avoid soaking the leather
with any liquid. Please do not use polishes, oils, cleaning
fluids, solvents, detergents, or ammonia based cleaners
to clean the leather. Application of a leather conditioner is
not required to maintain the original condition.
WARNING!
Do not use volatile solvents for cleaning purposes.
Many are potentially flammable, and if used in
closed areas they may cause respiratory harm.
Glass Surfaces
All glass surfaces should be cleaned on a regular basis
with any commercial household-type glass cleaner.
Never use an abrasive type cleaner. Use caution when
340 MAINTAINING YOUR VEHICLE
Page 341 of 424

cleaning inside rear windows equipped with electric
defrosters. Do not use scrapers or other sharp instru-
ments which may scratch the elements.
When cleaning the rear view mirror, spray cleaner on the
towel or rag that you are using. Do not spray cleaner
directly on the mirror.
Carpet
Vacuum your carpet regularly to prevent a soil build-up.
Shampoo soiled carpet with a reliable upholstery cleaner,
using a natural sponge or soft bristle brush. After carpet
dries, vacuum it thoroughly.
Seat Belt Maintenance
Do not bleach, dye or clean the belts with chemical
solvents or abrasive cleaners. This will weaken the fabric.
Sun damage will also weaken the fabric.If the belts need cleaning, use a mild soap solution or
lukewarm water. Do not remove the belts from the
vehicle to wash them.
Replace the belts if they appear frayed or worn or if the
buckles do not work properly.
Maintenance After Off-Pavement Driving
After extended operation in mud, sand or water, or
similar dirty conditions, have your brake drums, brake
linings, and axle joints inspected and cleaned as soon as
possible. This will prevent any abrasive material from
causing excessive wear or unpredictable braking action.
Following off-pavement usage, completely inspect the
underbody of your vehicle. Check tires, body structure,
steering, suspension and exhaust system for damage.
Check threaded fasteners for looseness, particularly on
the chassis, drivetrain components, steering and suspen-
sion. Retighten, if required, to torque values specified in
the Service Manual. Also check for accumulations of
MAINTAINING YOUR VEHICLE 341
7
Page 351 of 424
BULB REPLACEMENT
Head Light
1. Open the hood.
2. Reach behind the headlamp unit in the engine com-
partment to access the headlamp bulb lock ring.
3. Firmly grasp the lock ring on the back of the headlamp
unit housing.
4. Rotate the lock ring on the back of the headlamp
housing counter-clockwise to unlock it.
CAUTION!
Do not touch the new bulb with your fingers. Oil
contamination will severely shorten bulb life. If the
bulb comes in contact with any oily surface, clean
the bulb with rubbing alcohol.
5. Disconnect the electrical connector and replace the
bulb.
MAINTAINING YOUR VEHICLE 351
7
Page 352 of 424
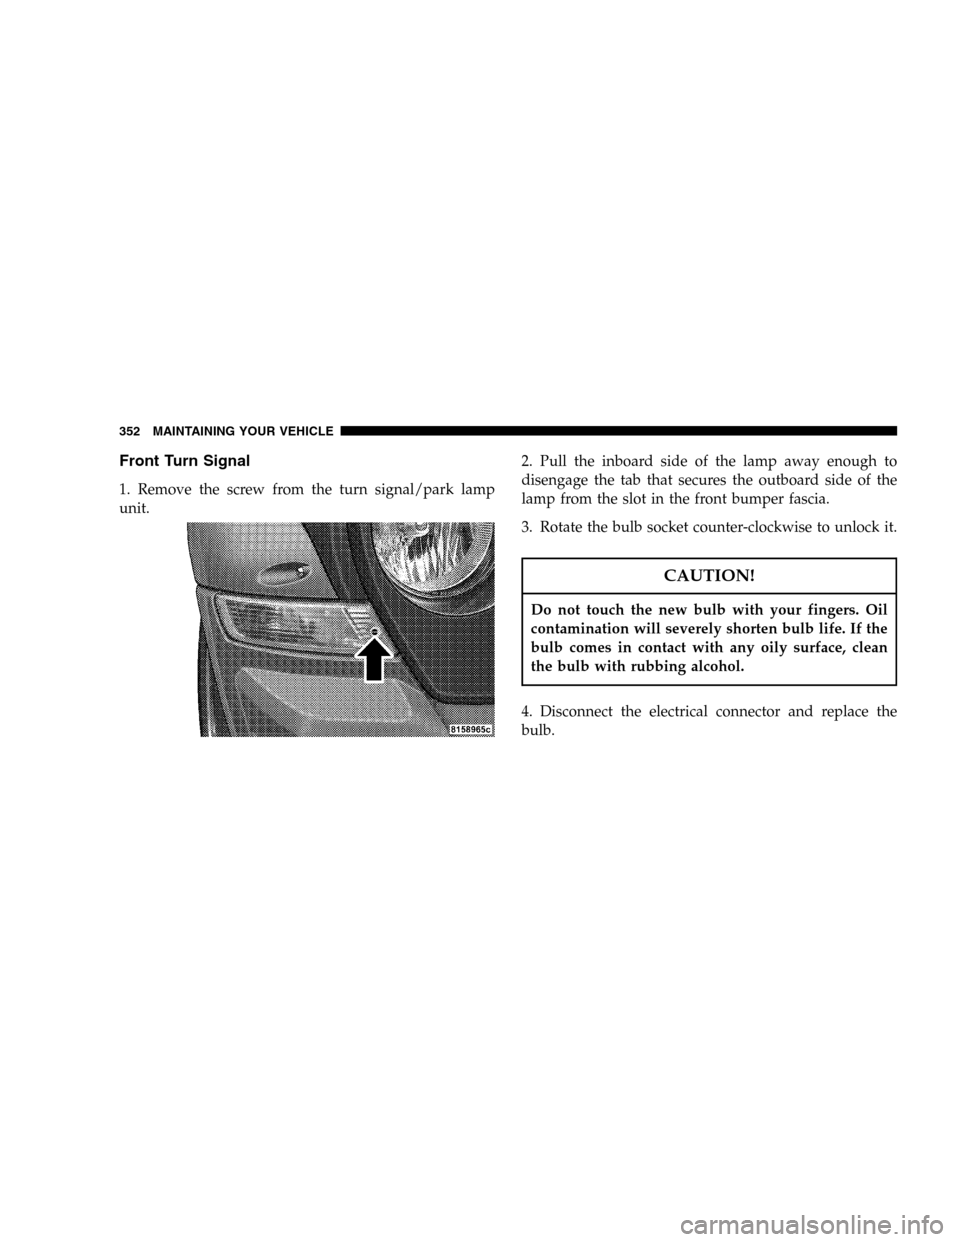
Front Turn Signal
1. Remove the screw from the turn signal/park lamp
unit.2. Pull the inboard side of the lamp away enough to
disengage the tab that secures the outboard side of the
lamp from the slot in the front bumper fascia.
3. Rotate the bulb socket counter-clockwise to unlock it.
CAUTION!
Do not touch the new bulb with your fingers. Oil
contamination will severely shorten bulb life. If the
bulb comes in contact with any oily surface, clean
the bulb with rubbing alcohol.
4. Disconnect the electrical connector and replace the
bulb.
352 MAINTAINING YOUR VEHICLE