2005 HYUNDAI XG350 battery
[x] Cancel search: batteryPage 122 of 247

1FEATURES OF YOUR HYUNDAI
110
B940R02L-AAT1. Playing CDo Insert the CD with the label facing upward.
o Insert the CD to start CD playback, during
radio operation or cassette tape playing.
o When a disc is in the CD deck, if you press
the CD button, the CD player will begin
playing even if the radio or cassette player
is being used.
o The CD player can be used when the ignition
switch is in either the "ON" or "ACC" position.2. FF/REWWhile the disc is playing, if you hold down the FF
button continuously, the selected track is ad-
vanced. Holding down the REW button continu-
ously moves the selected track back.3. TRACK UP/DOWNo The desired track on the disc currently being
played can be selected using the track
number.
o Press once to skip forward to the beginn-
ing of the next track.
o Press once to skip back to the beginning
of the track.
4. REPEATo To repeat the track you are currently listen-
ing to, press the RPT button. To cancel,
press again.
o If you do not release RPT operation after all
the tracks are played back, the unit will play
back again from the first track.5. EQ ButtonPress the EQ button to select the CLASSIC,
JAZZ, ROCK and DEFEAT MODE for the
desired tone quality. Each press of the button
changes the display as follows;
NOTE:o To assure proper operation of the unit,
keep the vehicle interior temperature
within a normal range by using the
vehicle's air conditioning or heating sys-
tem.
o When replacing the fuse, replace it with
a fuse having the correct capacity.
o The preset station frequencies are all
erased when the car battery is discon-
nected. Therefore, all data will have to be
set again if this should occur.
o Do not add any oil to the rotating parts.
Keep magnets, screwdrivers and other
metallic objects away from the tape
mechanism and head.
o This equipment is designed to be used
only in a 12 volt DC battery system with
negative ground.
o This unit is made of precision parts. Do
not attempt to disassemble or adjust
any parts.
o When driving your vehicle, be sure to
keep the volume of the unit set low
enough to allow you to hear sounds
coming from the outside.
o Do not expose this equipment (includ-
ing the speakers and tape) to water or
excessive moisture. CLASSIC → JAZZ → ROCK → DEFEAT
↑
6. EJECT ButtonWhen the EJECT button is pressed with a CD
loaded, CD will eject.
xgflhma-1.p656/16/04, 3:05 PM 110
Page 125 of 247

1
FEATURES OF YOUR HYUNDAI
113
B940T02L-AATThe CD auto changer is located in the left side
of the trunk.
o To use the CD auto changer
1. Open the sliding lid of the CD auto changer.
2. To eject the compact disc magazine, press
the EJECT button located in the CD auto
changer.
3. Insert the discs into the magazine.
4. Push the magazine into the CD auto changer
and close the sliding lid.
o The CD auto changer can be used when the
ignition switch is in either "ON" or "ACC"
position.1. CDCHG ButtonWhen the CD changer magazine contains discs,
press the CDCHG button and the CD changer
can be used even if the radio is being used. The
Hyundai CD changer can hold up to eight discs.
The disc number will be lit, and the track number,
and elapsed time will be displayed.
2. FF/REWWhile the disc is playing, if you hold down the FF
button continuously, the selected track is ad-
vanced. Holding down the REW button continu-
ously moves the selected track back.3. TRACK UP/DOWNo The desired track on the disc currently being
played can be selected using the track
number.
o Press once to skip forward to the beginn-
ing of the next track.
o Press once to skip back to the beginning
of the track.4. DISC Select ButtonTo select the CD you want, push "DISC +" or
"DISC-" to change the disc number.5. REPEATo To repeat the track you are listening to,
press the RPT button. To cancel, press
again.
o If you do not release RPT operation after all
the tracks are played back, the unit will play
back again from the first track.
6. EQ ButtonPress the EQ button to select the CLASSIC,
JAZZ, ROCK and DEFEAT MODE for the
desired tone quality. Each press of the button
changes the display as follows;NOTE:o When replacing the fuse, replace it with
a fuse having the correct capacity.
o This equipment is designed to be used
only in a 12 volt DC battery system with
negative ground.
o This unit is made of precision parts. Do
not attempt to disassemble or adjust
any parts.
o When driving your vehicle, be sure to
keep the volume of the unit set low
enough to allow you to hear sounds
coming from the outside. CLASSIC → JAZZ → ROCK → DEFEAT
↑
xgflhma-1.p656/16/04, 3:05 PM 113
Page 133 of 247

DRIVING YOUR HYUNDAI
32
KEY POSITIONS COMBINATION IGNITION SWITCH
BEFORE STARTING THE ENGINE
!
C020A01A-AATBefore you start the engine, you should always:
1. Look around the vehicle to be sure there are
no flat tires, puddles of oil, water or other
indications of possible trouble.
2. After entering the car, check to be sure the
parking brake is engaged.
3. Check that all windows, and lights are clean.
4. Check that the interior and exterior mirrors
are clean and in position.
5. Check your seat, seatback and headrest to
be sure they are in their proper positions.
6. Lock all the doors.
7. Fasten your seat belt and be sure that all
other occupants have fastened theirs.
8. Turn off all lights and accessories that are
not needed.
9. When you turn the ignition switch to "ON",
check that all appropriate warning lights are
operating and that you have sufficient fuel.
10.Check the operation of warning lights and all
bulbs when key is in the "ON" position.
C030A01L-AATTo Start the Engineo Place the shift lever in "P" (park) and de-
press the brake pedal fully.
o To start the engine, insert the ignition key and
turn it to the "START" position. Release it as
soon as the engine starts. Do not hold the
key in the "START" position for more than 15
seconds.NOTE:o For safety, the engine will not start if the
shift lever is not in "P" or "N" Position.
o The ignition key cannot be turned from
"ACC" position to "LOCK" position un-
less the shift lever is in the "P" (Park)
position or the negative battery terminal
is disconnected from the battery. To
remove the key, always confirm that the
shift lever is securely positioned in "P"
(Park).
o For additional information about start-
ing, see page 2-4.
C040A01A-AAT
WARNING:
The engine should not be turned off or the
key removed from the ignition key cylinder
while the vehicle is in motion. The steering
wheel is locked by removing the key.o "START"The engine is started in this position. It will crank
until you release the key.NOTE:Do not hold the key in the "START" position
for more than 15 seconds.LOCKACC
ON
START
C040A01E-1
xgflhma-2.p656/16/04, 3:00 PM 3
Page 134 of 247

2
DRIVING YOUR HYUNDAI4
STARTING!
C070C02A-AATTo remove the ignition key
C050A01A-AAT
1. Turn the ignition key to the "ACC" position.
2. Turn the ignition key counterclockwise from
the "ACC" position to the "LOCK" position.
3. The key can be removed in the "LOCK"
position.
WARNING:
Never run the engine in a closed or poorly
ventilated area any longer than is needed to
move your car in or out of the area. The
carbon monoxide gas emitted is odorless
and can cause serious injury or death.
C070C01E-1C050A01E-1
o "ON"When the key is in the "ON" position, the ignition
is on and all accessories may be turned on. If
the engine is not running, the key should not be
left in the "ON" position. This will discharge the
battery and may also damage the ignition sys-
tem.o "ACC"With the key in the "ACC" position, some elec-
trical accessories (radio, etc.) may be oper-
ated.o "LOCK"The key can be removed or inserted in this
position.
To protect against theft, the steering wheel
locks by removing the key.NOTE:To unlock the steering wheel, insert the key,
and then turn the steering wheel and key
simultaneously.LOCKACC
ON
START
xgflhma-2.p656/16/04, 3:00 PM 4
Page 135 of 247

DRIVING YOUR HYUNDAI
52
AUTOMATIC TRANSAXLE
C050B01L-AATNormal Conditions:The Starting Procedure:
1. Insert key, and fasten the seat belt.
2. Depress the brake pedal fully and place the
selector lever in "P" (park) position.
3. After turning the ignition key to the "ON"
position, make certain all warning lights and
gauges are functioning properly before start-
ing the engine.
4. Turn the ignition key to the "Start" position
and release it when the engine starts.
After the engine has started, allow the engine
to run for 10 to 20 seconds prior to placing
the vehicle in gear.
The starter should not be operated for more
than 15 seconds at a time. Wait 15-30 sec-
onds between starting attempts to protect
the starter from overheating.
C090A02L-AATThe highly efficient Hyundai automatic transaxle
has five forward speeds and one reverse speed.
The individual speeds are selected automati-
cally, depending on the position of the speed
selector lever. The selector lever has 2 gates;
the main gate and the manual gate.NOTE:For information on manual gate operation,
refer to "Sports Mode".
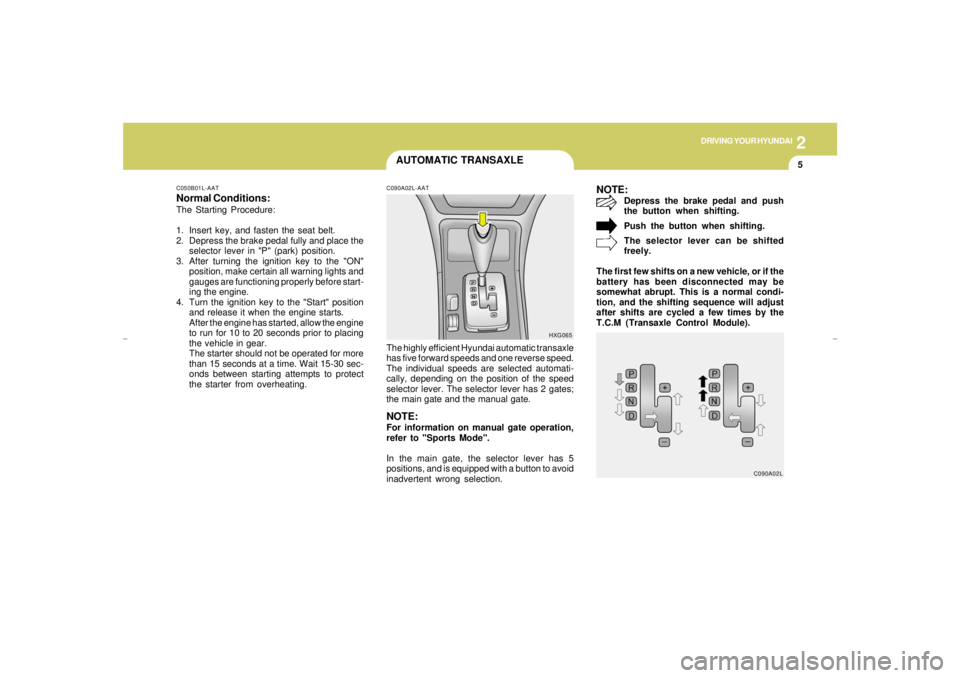
In the main gate, the selector lever has 5
positions, and is equipped with a button to avoid
inadvertent wrong selection.
NOTE:
Depress the brake pedal and push
the button when shifting.
Push the button when shifting.
The selector lever can be shifted
freely.
The first few shifts on a new vehicle, or if the
battery has been disconnected may be
somewhat abrupt. This is a normal condi-
tion, and the shifting sequence will adjust
after shifts are cycled a few times by the
T.C.M (Transaxle Control Module).
HXG065
C090A02L
xgflhma-2.p656/16/04, 3:00 PM 5
Page 143 of 247

DRIVING YOUR HYUNDAI
132
WINTER DRIVING
C160B01A-AATSnowy or Icy ConditionsTo drive your vehicle in deep snow, it may be
necessary to use snow tires or to install tire
chains on your tires. If snow tires are needed,
it is necessary to select tires equivalent in size
and type of the original equipment tires. Failure
to do so may adversely affect the safety and
handling of your car. Furthermore, speeding,
rapid acceleration, sudden brake applications,
and sharp turns are potentially very hazardous
practices.
During deceleration, use engine braking to the
fullest extent. Sudden brake applications on
snowy or icy roads may cause skids to occur.
You need to keep sufficient distance between
the vehicle in operation in front and your vehicle.
Also, apply the brake gently. It should be noted
that installing tire chains on the tire will provide
a greater driving force, but will not prevent side
skids.NOTE:Tire chains are not legal in all states. Check
state laws before fitting tire chains.
C160C01A-AATUse High Quality Ethylene Glycol
CoolantYour Hyundai is delivered with high quality
ethylene glycol coolant in the cooling system. It
is the only type of coolant that should be used
because it helps prevent corrosion in the cool-
ing system, lubricates the water pump and
prevents freezing. Be sure to replace or replen-
ish your coolant in accordance with the main-
tenance schedule in Section 5. Before winter,
have your coolant tested to assure that its
freezing point is sufficient for the temperatures
anticipated during the winter.C160D01A-AATCheck Battery and CablesWinter puts additional burdens on the battery
system. Visually inspect the battery and cables
as described in Section 6. The level of charge
in your battery can be checked by your Hyundai
dealer or a service station.
C160A01A-AATThe more severe weather conditions of winter
result in greater wear and other problems. To
minimize the problems of winter driving, you
should follow these suggestions:
xgflhma-2.p656/16/04, 3:00 PM 13
Page 154 of 247

32WHAT TO DO IN AN EMERGENCY
IF THE ENGINE WILL NOT START!
D010A01A-AAT D010B01L-AAT
If Engine Doesn't Turn Over or Turns
Over Slowly
D010C02A-AATIf Engine Turns Over Normally but Does
Not Start1. Check fuel level.
2. With the key in the "OFF" position, check all
connectors at ignition coil and spark plugs.
Reconnect any that may be disconnected or
loose.
3. Check the fuel line in the engine compart-
ment.
4. If the engine still does not start, call a Hyundai
dealer or seek other qualified assistance.D010D01A-AATIf Engine Stalls While Driving1. Reduce your speed gradually, keeping a
straight line. Move cautiously off the road to
a safe place.
2. Turn on your emergency flashers.
3. Try to start the engine again. If your vehicle
will not start, contact a Hyundai dealer or
seek other qualified assistance.
WARNING:
If the engine will not start, do not push or
pull the car to start it. This could result in a
collision or cause other damage. In addi-
tion, push or pull starting may cause the
catalytic converter to be overloaded and
create a fire hazard.
1. Be sure the gear selector lever is in "N" or "P"
and the emergency brake is set.
2. Check the battery connections to be sure
they are clean and tight.
3. Turn on the interior light. If the light dims or
goes out when you operate the starter, the
battery is discharged.
4. Check the starter connections to be sure
they are securely tightened.
5. Do not push or pull the vehicle to start it. See
instructions for "Jump Starting" on the fol-
lowing pages.
D010B01L
xgflhma-3.p656/16/04, 3:00 PM 2
Page 155 of 247

3
WHAT TO DO IN AN EMERGENCY
3
JUMP STARTINGD020A03A-AAT
WARNING:
The gas produced by the battery during the
jump-start operation is highly explosive. If
these instructions are not followed exactly,
serious personal injury and damage to the
vehicle may occur! If you are not sure how
to follow this procedure, seek qualified
assistance. Automobile batteries contain
sulfuric acid. This is poisonous and highly
corrosive. When jump starting, wear pro-
tective glasses and be careful not to get
acid on yourself, your clothing or on the car.
!
D020A01L-1
Booster batteryDischarged
battery
o If you should accidentally get acid on your
skin or in your eyes, immediately remove
any contaminated clothing and flush the area
with clear water for at least 15 minutes. Then
promptly obtain medical attention. If you
must be transported to an emergency facil-
ity, continue to apply water to the affected
area with a sponge or cloth.
o The gas produced by the battery during the
jump-start operation is highly explosive. Do
not smoke or allow a spark or an open flame
in the vicinity.
o The battery being used to provide the jump
start must be 12-volt. If you cannot deter-
mine that it is a 12-volt battery, do not attempt
to use it for the jump start.
o To jump start a car with a discharged battery,
follow this procedure exactly:
1. If the booster battery is installed in another
vehicle, be sure the two vehicles are not
touching.
2. Turn off all unnecessary lights and acces-
sories in both vehicles.
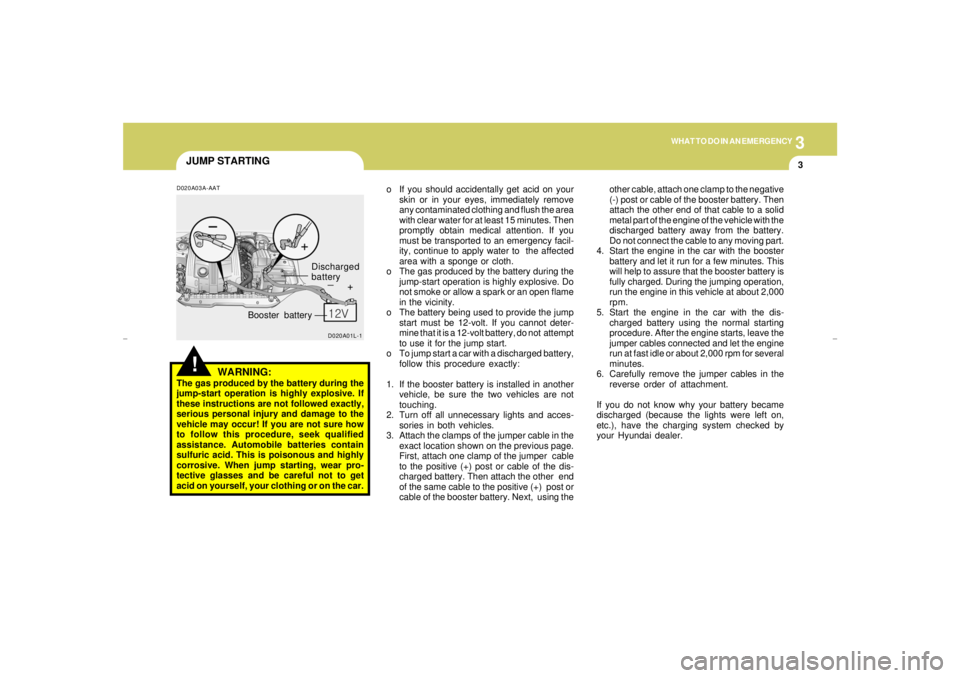
3. Attach the clamps of the jumper cable in the
exact location shown on the previous page.
First, attach one clamp of the jumper cable
to the positive (+) post or cable of the dis-
charged battery. Then attach the other end
of the same cable to the positive (+) post or
cable of the booster battery. Next, using theother cable, attach one clamp to the negative
(-) post or cable of the booster battery. Then
attach the other end of that cable to a solid
metal part of the engine of the vehicle with the
discharged battery away from the battery.
Do not connect the cable to any moving part.
4. Start the engine in the car with the booster
battery and let it run for a few minutes. This
will help to assure that the booster battery is
fully charged. During the jumping operation,
run the engine in this vehicle at about 2,000
rpm.
5. Start the engine in the car with the dis-
charged battery using the normal starting
procedure. After the engine starts, leave the
jumper cables connected and let the engine
run at fast idle or about 2,000 rpm for several
minutes.
6. Carefully remove the jumper cables in the
reverse order of attachment.
If you do not know why your battery became
discharged (because the lights were left on,
etc.), have the charging system checked by
your Hyundai dealer.
xgflhma-3.p656/16/04, 3:00 PM 3