2005 HYUNDAI TUCSON power steering
[x] Cancel search: power steeringPage 202 of 273
5
VEHICLE MAINTENANCE REQUIREMENTS
5
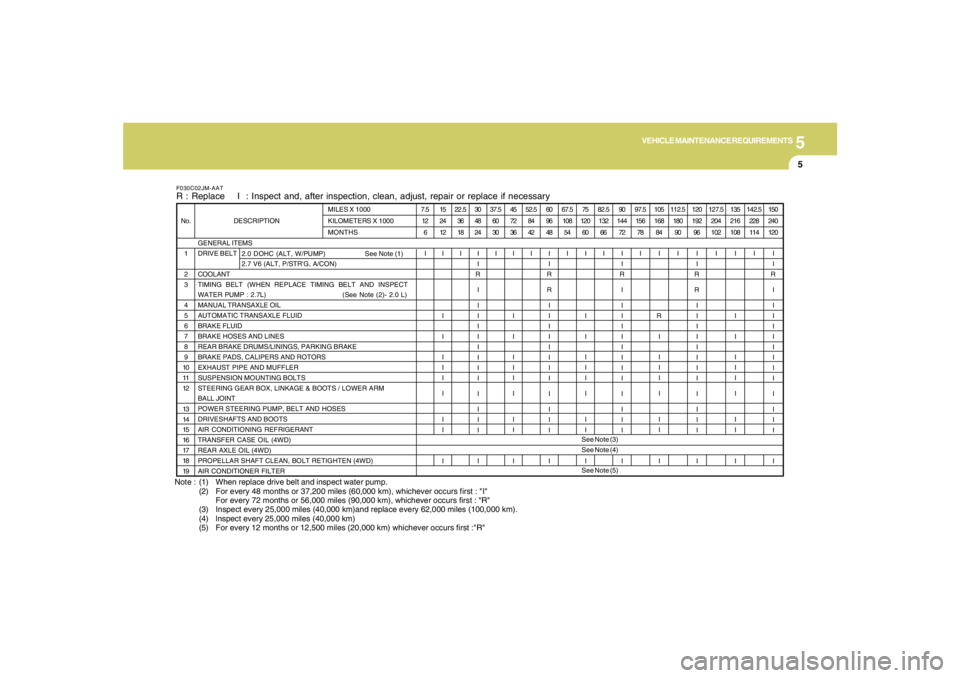
Note : (1) When replace drive belt and inspect water pump.
(2) For every 48 months or 37,200 miles (60,000 km), whichever occurs first : "I"
For every 72 months or 56,000 miles (90,000 km), whichever occurs first : "R"
(3) Inspect every 25,000 miles (40,000 km)and replace every 62,000 miles (100,000 km).
(4) lnspect every 25,000 miles (40,000 km)
(5) For every 12 months or 12,500 miles (20,000 km) whichever occurs first :"R"F030C02JM-AATR : Replace I : Inspect and, after inspection, clean, adjust, repair or replace if necessary
GENERAL ITEMS
DRIVE BELT
COOLANT
TIMING BELT (WHEN REPLACE TIMING BELT AND INSPECT
WATER PUMP : 2.7L) (See Note (2)- 2.0 L)
MANUAL TRANSAXLE OIL
AUTOMATIC TRANSAXLE FLUID
BRAKE FLUID
BRAKE HOSES AND LINES
REAR BRAKE DRUMS/LININGS, PARKING BRAKE
BRAKE PADS, CALIPERS AND ROTORS
EXHAUST PIPE AND MUFFLER
SUSPENSION MOUNTING BOLTS
STEERING GEAR BOX, LINKAGE & BOOTS / LOWER ARM
BALL JOINT
POWER STEERING PUMP, BELT AND HOSES
DRIVESHAFTS AND BOOTS
AIR CONDITIONING REFRIGERANT
TRANSFER CASE OIL (4WD)
REAR AXLE OIL (4WD)
PROPELLAR SHAFT CLEAN, BOLT RETIGHTEN (4WD)
AIR CONDITIONER FILTER 1
2
3
4
5
6
7
8
9
10
11
12
13
14
15
16
17
18
19 No. DESCRIPTIONMILES X 1000
KILOMETERS X 1000
MONTHS
2.0 DOHC (ALT, W/PUMP) See Note (1)
2.7 V6 (ALT, P/STR'G, A/CON)7.5
12
6
I15
24
12
I
I
I
I
I
I
I
I
I
I22.5
36
18
I30
48
24
I
I
R
I
I
I
I
I
I
I
I
I
I
I
I
I
I37.5
60
30
I45
72
36
I
I
I
I
I
I
I
I
I
I52.5
84
42
I60
96
48
I
I
R
R
I
I
I
I
I
I
I
I
I
I
I
I
I67.5
108
54
I75
120
60
I
I
I
I
I
I
I
I
I
I82.5
132
66
I90
144
72
I
I
R
I
I
I
I
I
I
I
I
I
I
I
I
I
I97.5
156
78
I105
168
84
I
R
I
I
I
I
I
I
I
I112.5
180
90
I120
192
96
I
I
R
R
I
I
I
I
I
I
I
I
I
I
I
I
I127.5
204
102
I135
216
108
I
I
I
I
I
I
I
I
I
I142.5
228
114
I150
240
120
I
I
R
I
I
I
I
I
I
I
I
I
I
I
I
I
I See Note (3)
See Note (4)
See Note (5)
Page 206 of 273
5
VEHICLE MAINTENANCE REQUIREMENTS
9
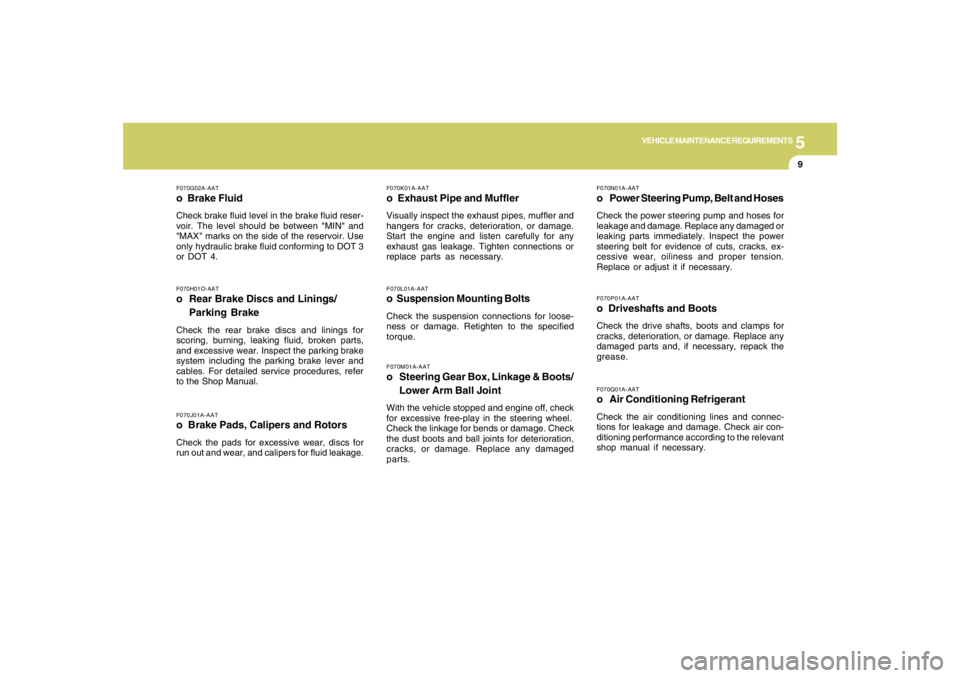
F070L01A-AATo Suspension Mounting BoltsCheck the suspension connections for loose-
ness or damage. Retighten to the specified
torque.
F070G02A-AATo Brake FluidCheck brake fluid level in the brake fluid reser-
voir. The level should be between "MIN" and
"MAX" marks on the side of the reservoir. Use
only hydraulic brake fluid conforming to DOT 3
or DOT 4.
F070K01A-AATo Exhaust Pipe and MufflerVisually inspect the exhaust pipes, muffler and
hangers for cracks, deterioration, or damage.
Start the engine and listen carefully for any
exhaust gas leakage. Tighten connections or
replace parts as necessary.
F070J01A-AATo Brake Pads, Calipers and RotorsCheck the pads for excessive wear, discs for
run out and wear, and calipers for fluid leakage.F070H01O-AATo Rear Brake Discs and Linings/
Parking BrakeCheck the rear brake discs and linings for
scoring, burning, leaking fluid, broken parts,
and excessive wear. Inspect the parking brake
system including the parking brake lever and
cables. For detailed service procedures, refer
to the Shop Manual.
F070M01A-AATo Steering Gear Box, Linkage & Boots/
Lower Arm Ball JointWith the vehicle stopped and engine off, check
for excessive free-play in the steering wheel.
Check the linkage for bends or damage. Check
the dust boots and ball joints for deterioration,
cracks, or damage. Replace any damaged
parts.
F070Q01A-AATo Air Conditioning RefrigerantCheck the air conditioning lines and connec-
tions for leakage and damage. Check air con-
ditioning performance according to the relevant
shop manual if necessary.F070P01A-AATo Driveshafts and BootsCheck the drive shafts, boots and clamps for
cracks, deterioration, or damage. Replace any
damaged parts and, if necessary, repack the
grease.F070N01A-AATo Power Steering Pump, Belt and HosesCheck the power steering pump and hoses for
leakage and damage. Replace any damaged or
leaking parts immediately. Inspect the power
steering belt for evidence of cuts, cracks, ex-
cessive wear, oiliness and proper tension.
Replace or adjust it if necessary.
Page 207 of 273
6
Engine Compartment .................................................... 6-2
General Checks ............................................................ 6-4
Checking the Engine Oil ............................................... 6-5
Changing the Oil and Filter ............................................ 6-6
Checking and Changing the Engine Coolant ................ 6-8
Spark Plugs................................................................6-10
Changing the Air Cleaner Filter ...................................6-11
Checking the Transaxle Oil (Manual) .........................6-13
Checking the Transaxle Fluid (Automatic)..................6-14
Checking the Brakes ..................................................6-15
Checking the Clutch Fluid...........................................6-16
Air Conditioning Care..................................................6-17
Changing the Air Conditioner Filter .............................6-18
Checking the Free-play...............................................6-19
Checking Drive Belts ..................................................6-21
Checking and Replacing Fuses..................................6-21
Checking the Battery..................................................6-23
Power Steering Fluid Level .........................................6-24
Replacement of Light Bulbs ........................................6-26
Bulb Wattage ...............................................................6-34
Fuse Panel Description...............................................6-35
6
DO-IT-YOURSELF MAINTENANCE
Page 208 of 273
6
DO-IT-YOURSELF MAINTENANCE
2
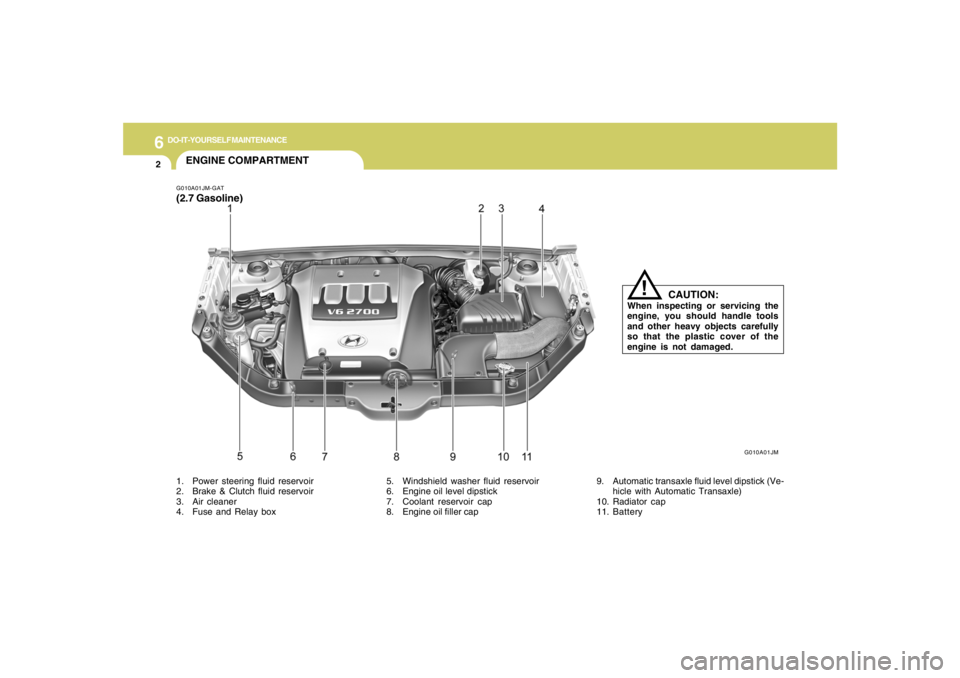
ENGINE COMPARTMENTG010A01JM-GAT(2.7 Gasoline)1. Power steering fluid reservoir
2. Brake & Clutch fluid reservoir
3. Air cleaner
4. Fuse and Relay box5. Windshield washer fluid reservoir
6. Engine oil level dipstick
7. Coolant reservoir cap
8. Engine oil filler cap9. Automatic transaxle fluid level dipstick (Ve-
hicle with Automatic Transaxle)
10. Radiator cap
11. Battery
G010A01JM
CAUTION:
When inspecting or servicing the
engine, you should handle tools
and other heavy objects carefully
so that the plastic cover of the
engine is not damaged.
!
Page 209 of 273
6
DO-IT-YOURSELF MAINTENANCE
3
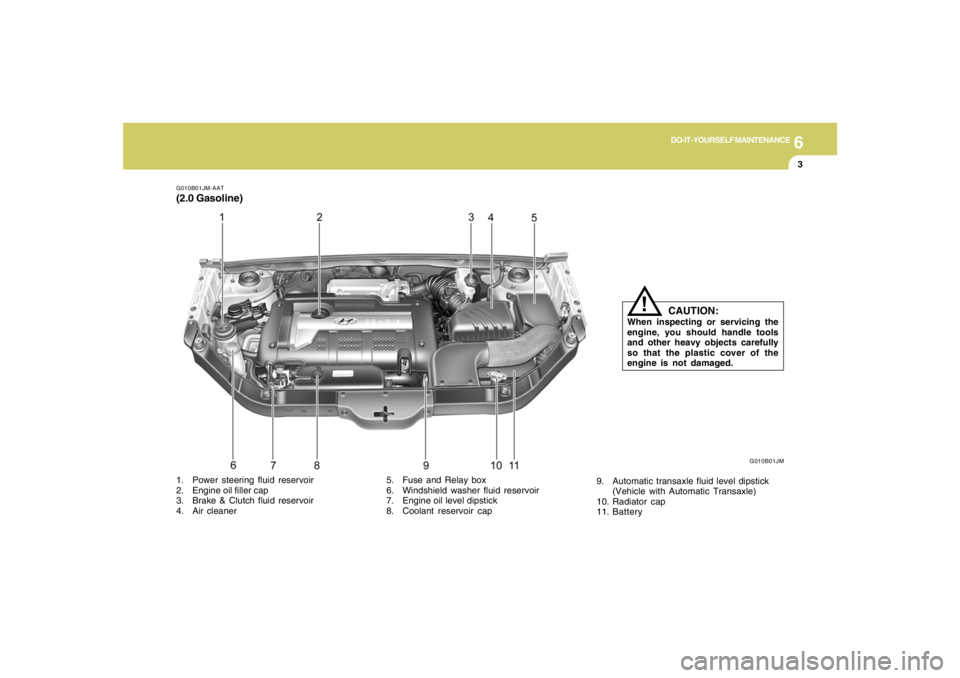
G010B01JM-AAT(2.0 Gasoline)
G010B01JM
1. Power steering fluid reservoir
2. Engine oil filler cap
3. Brake & Clutch fluid reservoir
4. Air cleaner5. Fuse and Relay box
6. Windshield washer fluid reservoir
7. Engine oil level dipstick
8. Coolant reservoir cap9. Automatic transaxle fluid level dipstick
(Vehicle with Automatic Transaxle)
10. Radiator cap
11. Battery
CAUTION:
When inspecting or servicing the
engine, you should handle tools
and other heavy objects carefully
so that the plastic cover of the
engine is not damaged.
!
Page 210 of 273
6
DO-IT-YOURSELF MAINTENANCE
4
GENERAL CHECKS
G020C01A-AATVehicle InteriorThe following should be checked each time
when the vehicle is driven:
o Lights operation
o Windshield wiper operation
o Horn operation
o Defroster, heating system operation (and air
conditioning, if installed)
o Steering operation and condition
o Mirror condition and operation
o Turn signal operation
o Accelerator pedal operation
o Brake operation, including parking brake
o Manual transaxle operation, including clutch
operation
o Automatic transaxle operation, including
"Park" mechanism operation
o Seat control condition and operation
o Seat belt condition and operation
o Sunvisor operation
If you notice anything that does not operate
correctly or appears to be functioning correctly,
inspect it carefully and seek assistance from
your Hyundai dealer if service is needed.
G020B01A-AATVehicle ExteriorThe following should be checked monthly:
o Overall appearance and condition
o Wheel condition and wheel nut torque
o Exhaust system condition
o Light condition and operation
o Windshield glass condition
o Wiper blade condition
o Paint condition and body corrosion
o Fluid leaks
o Door and hood lock condition
o Tire pressure and condition
(including spare tire)
G020A01A-AATEngine CompartmentThe following should be checked regularly:
o Engine oil level and condition
o Transaxle fluid level and condition
o Brake fluid level
o Clutch fluid level
o Engine coolant level
o Windshield washer fluid level
o Accessory drive belt condition
o Engine coolant hose condition
o Fluid leaks (on or below components)
o Power steering fluid level
o Battery condition
o Air filter condition
Page 223 of 273
6
DO-IT-YOURSELF MAINTENANCE
17
!
G130B02A-AATTo Replace the FluidRecommended brake fluid conforming to DOT
3 or DOT 4 specification should be used. The
reservoir cap must be fully tightened to avoid
contamination from foreign matter or moisture.NOTE:Do not allow any other liquids to contami-
nate the brake fluid. Seal damage will result.
WARNING:
Use caution when handling brake fluid. It
can damage your vision if you get it in your
eyes. It will also damage your vehicle's
paint if spilled on it and not removed imme-
diately.
G190A01GK
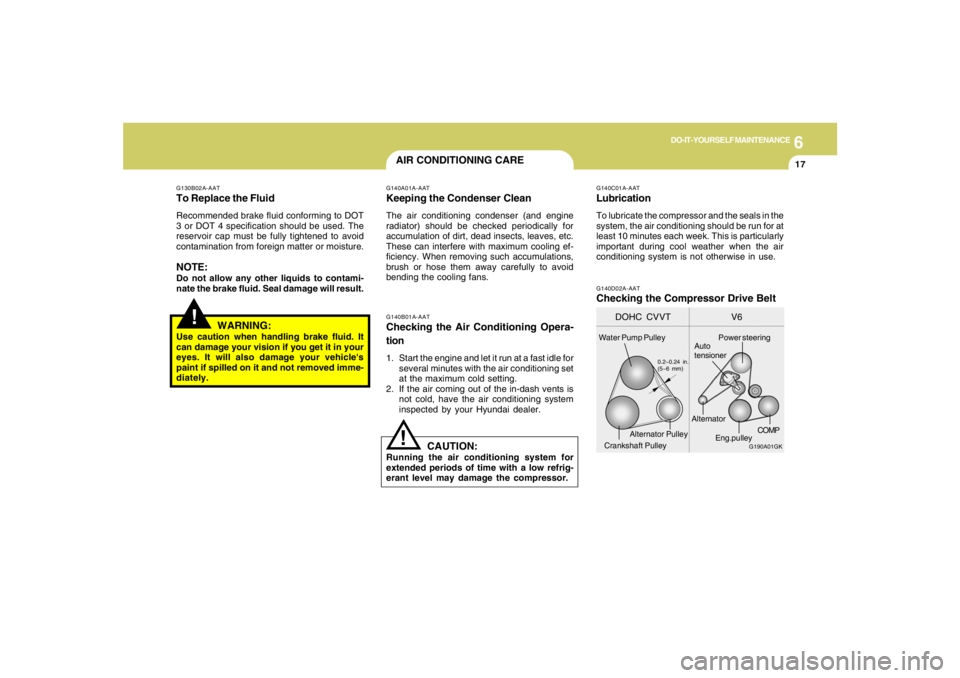
DOHC CVVT V6
Water Pump Pulley
0.2~0.24 in.
(5~6 mm)
Power steering
COMP
Auto
tensioner
Alternator Pulley
Crankshaft PulleyAlternator
Eng.pulley
AIR CONDITIONING CARE
G140D02A-AATChecking the Compressor Drive Belt
!
G140A01A-AATKeeping the Condenser CleanThe air conditioning condenser (and engine
radiator) should be checked periodically for
accumulation of dirt, dead insects, leaves, etc.
These can interfere with maximum cooling ef-
ficiency. When removing such accumulations,
brush or hose them away carefully to avoid
bending the cooling fans.
G140C01A-AATLubricationTo lubricate the compressor and the seals in the
system, the air conditioning should be run for at
least 10 minutes each week. This is particularly
important during cool weather when the air
conditioning system is not otherwise in use.
G140B01A-AATChecking the Air Conditioning Opera-
tion1. Start the engine and let it run at a fast idle for
several minutes with the air conditioning set
at the maximum cold setting.
2. If the air coming out of the in-dash vents is
not cold, have the air conditioning system
inspected by your Hyundai dealer.
CAUTION:
Running the air conditioning system for
extended periods of time with a low refrig-
erant level may damage the compressor.
Page 227 of 273
6
DO-IT-YOURSELF MAINTENANCE
21
G190A01GK
DOHC CVVT V6
Water Pump Pulley
0.2~0.24 in.
(5~6 mm)
Power steering
COMP
Auto
tensioner
Alternator Pulley
Crankshaft PulleyAlternator
Eng.pulley
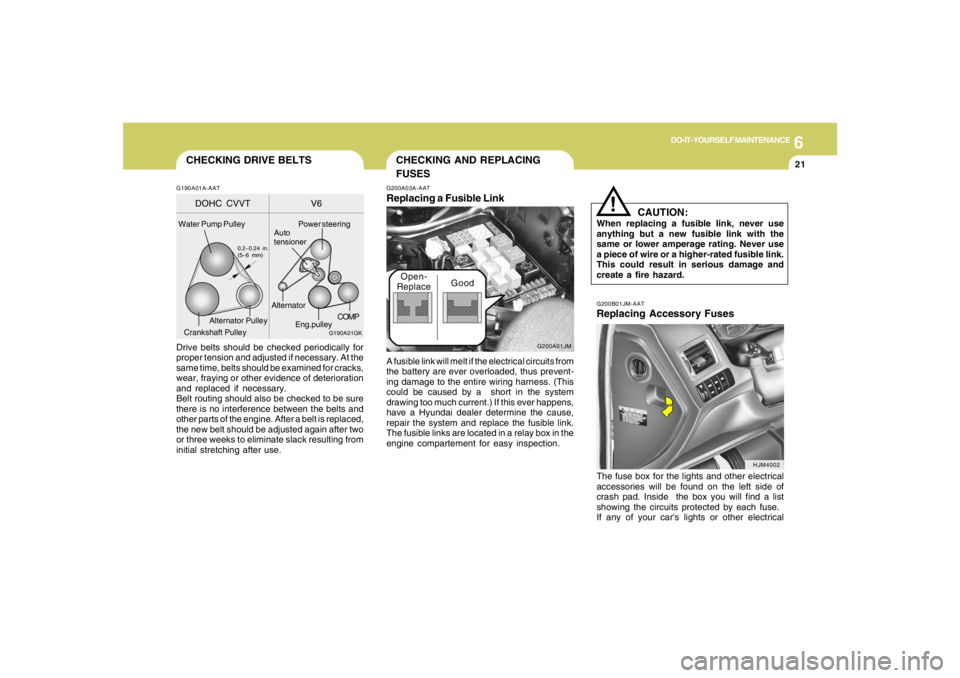
CHECKING DRIVE BELTSDrive belts should be checked periodically for
proper tension and adjusted if necessary. At the
same time, belts should be examined for cracks,
wear, fraying or other evidence of deterioration
and replaced if necessary.
Belt routing should also be checked to be sure
there is no interference between the belts and
other parts of the engine. After a belt is replaced,
the new belt should be adjusted again after two
or three weeks to eliminate slack resulting from
initial stretching after use.G190A01A-AAT
CHECKING AND REPLACING
FUSES
!
G200B01JM-AATReplacing Accessory FusesCAUTION:When replacing a fusible link, never use
anything but a new fusible link with the
same or lower amperage rating. Never use
a piece of wire or a higher-rated fusible link.
This could result in serious damage and
create a fire hazard.
The fuse box for the lights and other electrical
accessories will be found on the left side of
crash pad. Inside the box you will find a list
showing the circuits protected by each fuse.
If any of your car's lights or other electrical
G200A03A-AATReplacing a Fusible LinkA fusible link will melt if the electrical circuits from
the battery are ever overloaded, thus prevent-
ing damage to the entire wiring harness. (This
could be caused by a short in the system
drawing too much current.) If this ever happens,
have a Hyundai dealer determine the cause,
repair the system and replace the fusible link.
The fusible links are located in a relay box in the
engine compartement for easy inspection.
HJM4002
G200A01JM
Open-
ReplaceGood