2005 HYUNDAI TUCSON light
[x] Cancel search: lightPage 107 of 273
1FEATURES OF YOUR HYUNDAI96
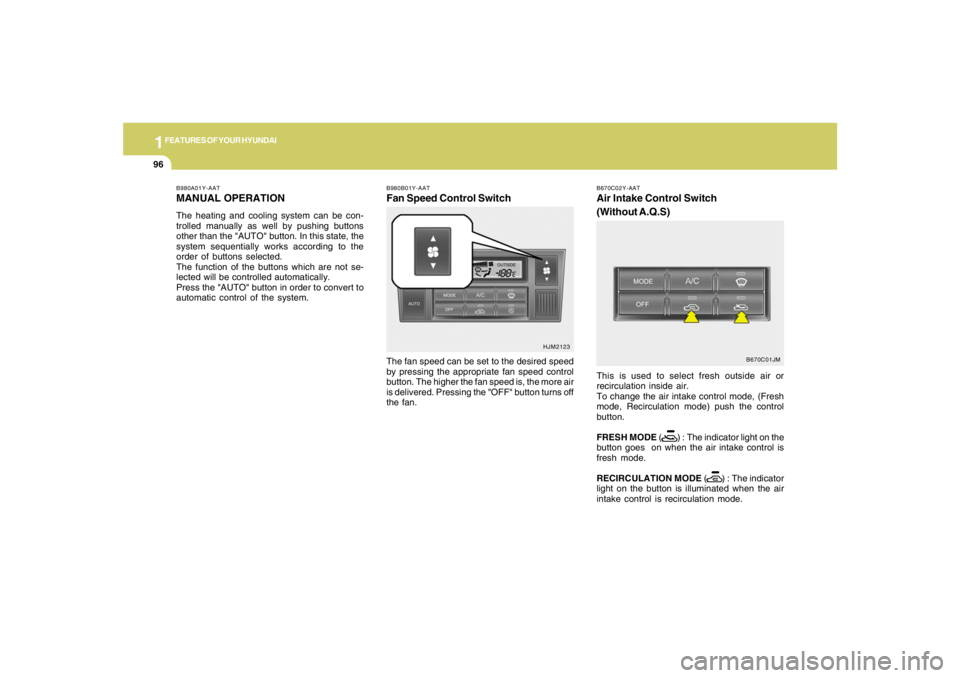
B980B01Y-AATFan Speed Control SwitchThe fan speed can be set to the desired speed
by pressing the appropriate fan speed control
button. The higher the fan speed is, the more air
is delivered. Pressing the "OFF" button turns off
the fan.
HJM2123 B980A01Y-AAT
MANUAL OPERATIONThe heating and cooling system can be con-
trolled manually as well by pushing buttons
other than the "AUTO" button. In this state, the
system sequentially works according to the
order of buttons selected.
The function of the buttons which are not se-
lected will be controlled automatically.
Press the "AUTO" button in order to convert to
automatic control of the system.
B670C02Y-AATAir Intake Control Switch
(Without A.Q.S)This is used to select fresh outside air or
recirculation inside air.
To change the air intake control mode, (Fresh
mode, Recirculation mode) push the control
button.
FRESH MODE ( ) : The indicator light on the
button goes on when the air intake control is
fresh mode.
RECIRCULATION MODE ( ) : The indicator
light on the button is illuminated when the air
intake control is recirculation mode.
B670C01JM
Page 109 of 273
1FEATURES OF YOUR HYUNDAI98
B980D01Y-AATHeating and Cooling System OffPress the "OFF" button to stop the operation of
the heating and cooling system.
!ated in "AUTO" mode when turning the
ignition to the "ON" position if the
"AUTO" mode was used before shutting
off the engine.
CAUTION:
If the windows fog up with the Recircula-
tion or A.Q.S mode selected, set the air
intake control to the Fresh air position or
A.Q.S control to "OFF".
HJM2111
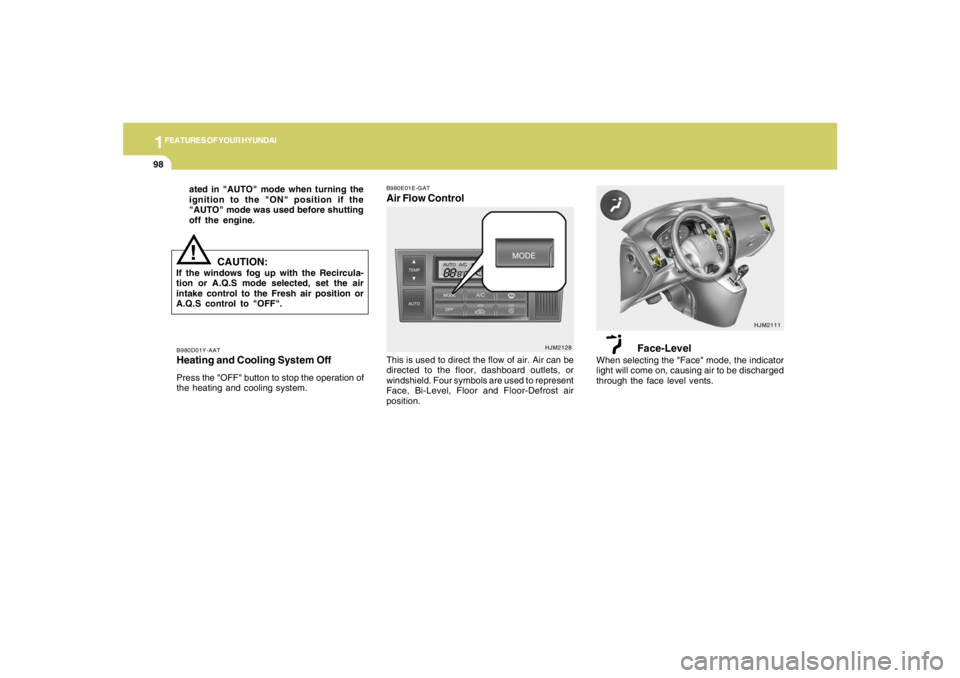
B980E01E-GATAir Flow Control
HJM2128
This is used to direct the flow of air. Air can be
directed to the floor, dashboard outlets, or
windshield. Four symbols are used to represent
Face, Bi-Level, Floor and Floor-Defrost air
position.
Face-Level
When selecting the "Face" mode, the indicator
light will come on, causing air to be discharged
through the face level vents.
Page 110 of 273
1
FEATURES OF YOUR HYUNDAI
99
HJM2113HJM2112
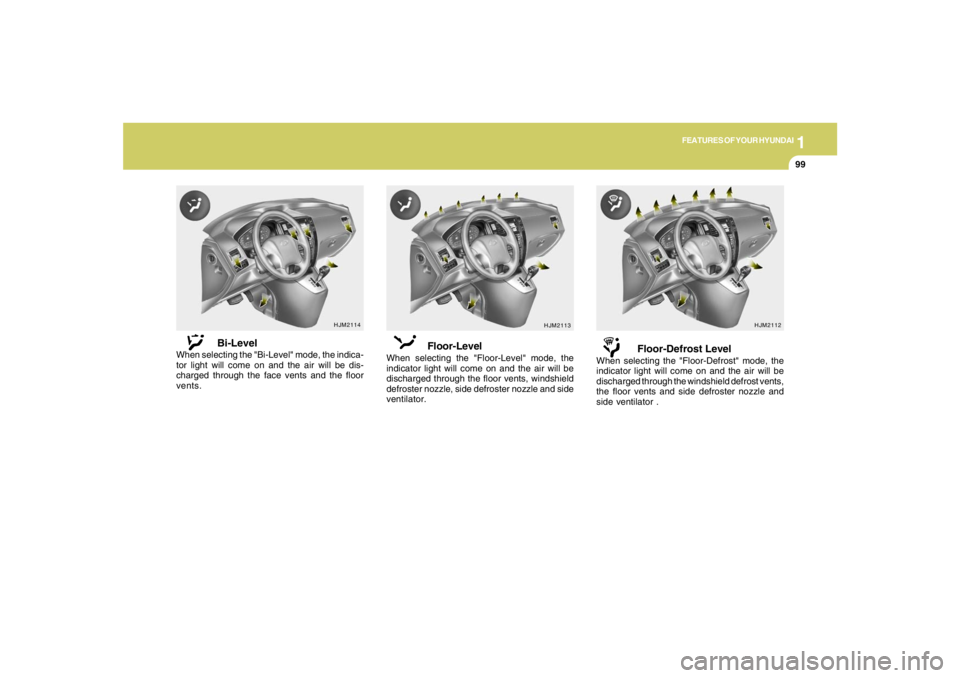
Floor-Level
When selecting the "Floor-Level" mode, the
indicator light will come on and the air will be
discharged through the floor vents, windshield
defroster nozzle, side defroster nozzle and side
ventilator.
Floor-Defrost Level
When selecting the "Floor-Defrost" mode, the
indicator light will come on and the air will be
discharged through the windshield defrost vents,
the floor vents and side defroster nozzle and
side ventilator .
HJM2114
Bi-Level
When selecting the "Bi-Level" mode, the indica-
tor light will come on and the air will be dis-
charged through the face vents and the floor
vents.
Page 140 of 273

1
FEATURES OF YOUR HYUNDAI
129
J290F02JM-GAT1. LOAD ButtonThis compact disc playing will accommodate up
to six discs.
To insert one disc do the following:
1. Press and release the LOAD Button.
2. Green light on both sides of the slot will be
illuminated and the will blink ten times on
the display.
3. Load a disc while the is blinking. Insert a
disc partway into the slot, label side up. The
player will pull the disc in.NOTE:o The disc can be only inserted while the
light is blinking.
o This CD player is suitable only for 12 cm
discs, do not use irregular shaped CDs.
When the disc is inserted, the disc will begin to
play automatically.
To insert multiple discs do the followings:
1. Press and hold the LOAD button for two
seconds or more.
You will then hear two beeps and the green
light on the both sides of the slot will be
illuminated.2. Load a disc while the is blinking. Insert
a disc partway into the slot, label side up. The
player will pull the disc in.
Once the disc is loaded, the numbers of the
vacant disc will blink on the display continu-
ously. If the next "DISC NO." is appeared on
the display with the both side of the slot
illuminated, you can then load another disc.
3. Load the remaining disc by following the same
procedures 1 and 2.
When you finished loading 6 discs, the CD
player will begin to play the last CD loaded.
4. To load more than one disc but less than six,
complete Steps 1 and 2. When you have
finished loading discs, press LOAD button to
cancel the loading function or wait for 10
seconds. The CD player will begin to play the
last CD loaded.
As each CD starts to play, the DISC number will
appear on the display.
NOTE:The disc player takes up to six discs. Do not
try to load more than six.
2. Playing CDo Press the 6CDC to start CD playback,
during radio operation or cassette tape play-
ing.
o When discs are in the CD deck, if you press
the 6CDC button the CD player will begin
playing even if the radio or cassette player
is being used.
o The CD player can be used when the ignition
switch is in either the "ON" or "ACC" position.3. EJECT Buttono When the EJECT button is pressed with
a CD loaded, the CD will eject.
o To eject all of the discs, press this button for
2 seconds or more.4.DISC Select ButtonTo select the CD you want, push "DISC
" or "DISC " to change the disc number.
Page 144 of 273
1
FEATURES OF YOUR HYUNDAI
133
CARE OF CASSETTE TAPES
CARE OF DISCS
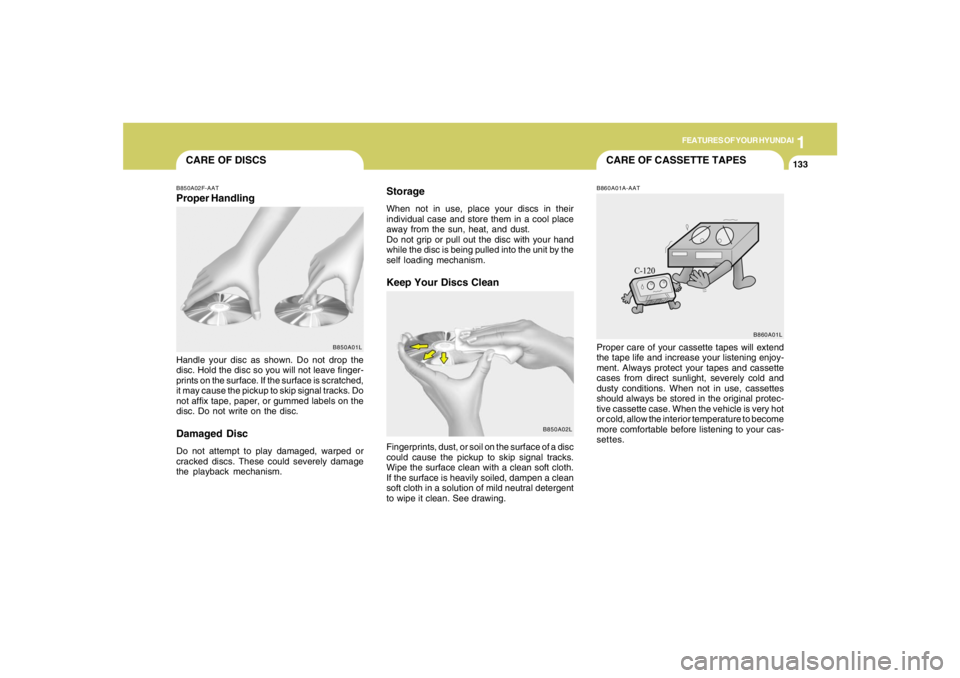
B850A02L B850A02F-AAT
Proper HandlingStorage
When not in use, place your discs in their
individual case and store them in a cool place
away from the sun, heat, and dust.
Do not grip or pull out the disc with your hand
while the disc is being pulled into the unit by the
self loading mechanism.Keep Your Discs Clean
Handle your disc as shown. Do not drop the
disc. Hold the disc so you will not leave finger-
prints on the surface. If the surface is scratched,
it may cause the pickup to skip signal tracks. Do
not affix tape, paper, or gummed labels on the
disc. Do not write on the disc.Damaged DiscDo not attempt to play damaged, warped or
cracked discs. These could severely damage
the playback mechanism.Fingerprints, dust, or soil on the surface of a disc
could cause the pickup to skip signal tracks.
Wipe the surface clean with a clean soft cloth.
If the surface is heavily soiled, dampen a clean
soft cloth in a solution of mild neutral detergent
to wipe it clean. See drawing.
B860A01A-AATProper care of your cassette tapes will extend
the tape life and increase your listening enjoy-
ment. Always protect your tapes and cassette
cases from direct sunlight, severely cold and
dusty conditions. When not in use, cassettes
should always be stored in the original protec-
tive cassette case. When the vehicle is very hot
or cold, allow the interior temperature to become
more comfortable before listening to your cas-
settes.
B850A01LB860A01L
Page 150 of 273
2
DRIVING YOUR HYUNDAI
4
KEY POSITIONS
TO START THE ENGINE
C040A01A-AAT
CAUTION:
The engine should not be turned off or the
key removed from the ignition key cylinder
while the car is in motion. The steering
wheel is locked by removing the key.
!
C030A01E-AATCOMBINATION IGNITION SWITCHo If your Hyundai is equipped with a manual
transaxle, place the shift lever in neutral and
depress the clutch pedal fully.
o If your Hyundai has an automatic transaxle,
place the shift lever in "P" (park).
o To start the engine, insert the ignition key and
turn it to the "START" position. Release it as
soon as the engine starts. Do not hold the
key in the "START" position for more that 15
seconds.NOTE:o For safety, the engine will not start if the
clutch pedal is not depressed fully
(Manual Transaxle) or the shift lever is
not in "P" or "N" Position (Automatic
Transaxle).
o The ignition key cannot be turned from
"ACC" position to "LOCK" position un-
less the shift lever is in the "P" (Park)
position or the negative battery terminal
is disconnected from the battery. To
remove the key, always confirm that the
shift lever is securely positioned in "P"
(Park) (For Automatic Transaxle).
o For additional information about start-
ing, see page 2-5.
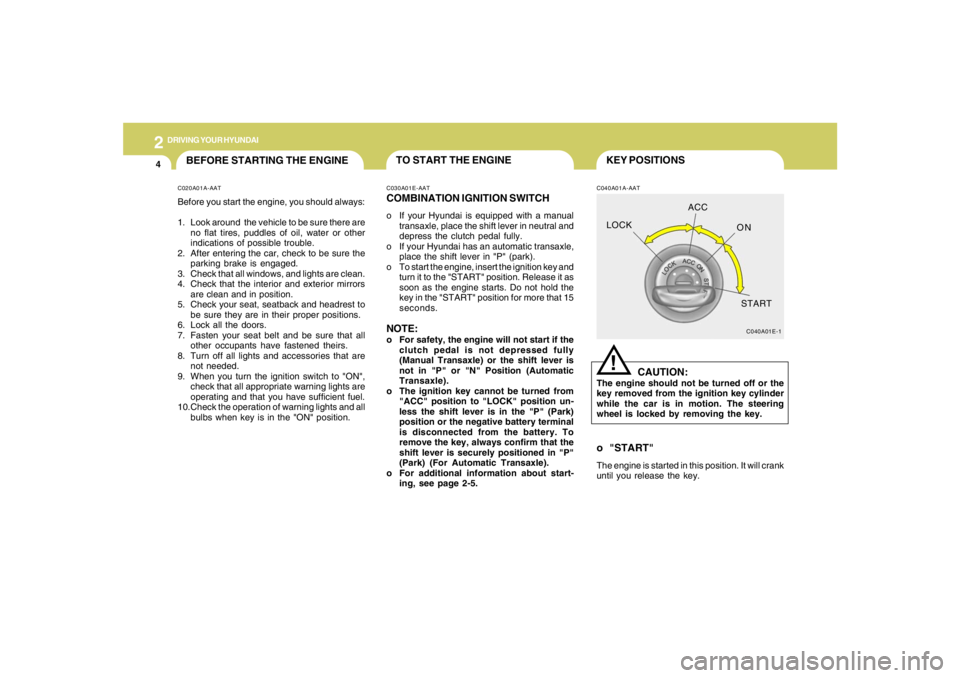
o "START"The engine is started in this position. It will crank
until you release the key.
C040A01E-1
LOCKACC
ON
START
BEFORE STARTING THE ENGINEC020A01A-AATBefore you start the engine, you should always:
1. Look around the vehicle to be sure there are
no flat tires, puddles of oil, water or other
indications of possible trouble.
2. After entering the car, check to be sure the
parking brake is engaged.
3. Check that all windows, and lights are clean.
4. Check that the interior and exterior mirrors
are clean and in position.
5. Check your seat, seatback and headrest to
be sure they are in their proper positions.
6. Lock all the doors.
7. Fasten your seat belt and be sure that all
other occupants have fastened theirs.
8. Turn off all lights and accessories that are
not needed.
9. When you turn the ignition switch to "ON",
check that all appropriate warning lights are
operating and that you have sufficient fuel.
10.Check the operation of warning lights and all
bulbs when key is in the "ON" position.
Page 152 of 273
2
DRIVING YOUR HYUNDAI
6
OPERATING THE MANUAL
TRANSAXLE
4. Turn the ignition key to the "START" position
and release it when the engine starts.
After the engine has started, allow the engine
to run for 10 to 20 seconds prior to placing
the vehicle in gear.
The starter should not be operated for more
than 15 seconds at a time. Wait 15-30 sec-
onds between starting attempts to protect
the starter from overheating.
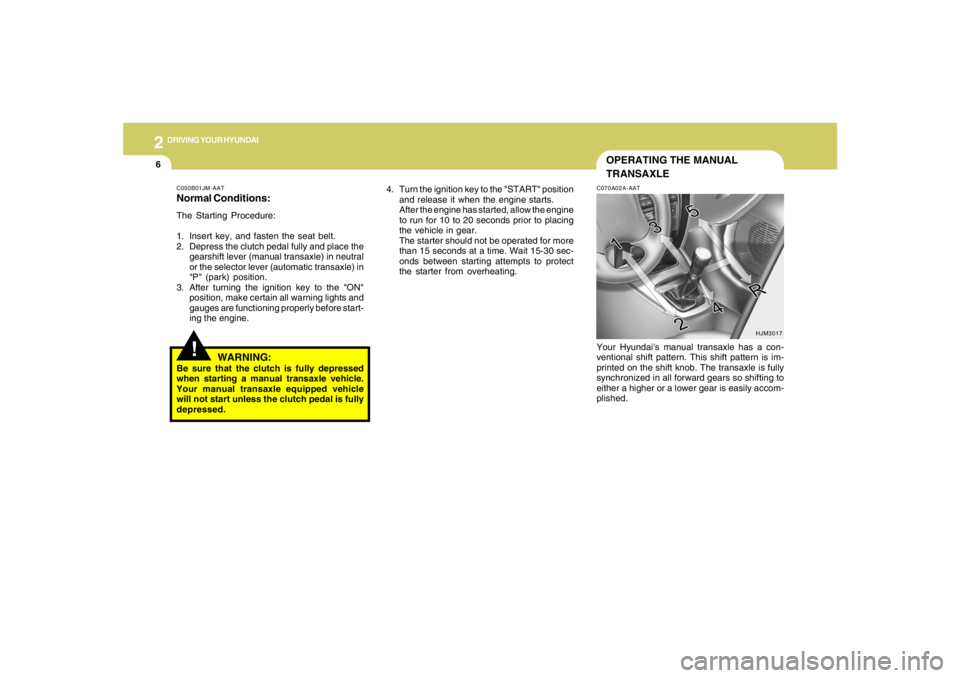
C070A02A-AATYour Hyundai's manual transaxle has a con-
ventional shift pattern. This shift pattern is im-
printed on the shift knob. The transaxle is fully
synchronized in all forward gears so shifting to
either a higher or a lower gear is easily accom-
plished.
HJM3017
C050B01JM-AATNormal Conditions:The Starting Procedure:
1. Insert key, and fasten the seat belt.
2. Depress the clutch pedal fully and place the
gearshift lever (manual transaxle) in neutral
or the selector lever (automatic transaxle) in
"P" (park) position.
3. After turning the ignition key to the "ON"
position, make certain all warning lights and
gauges are functioning properly before start-
ing the engine.
WARNING:
Be sure that the clutch is fully depressed
when starting a manual transaxle vehicle.
Your manual transaxle equipped vehicle
will not start unless the clutch pedal is fully
depressed.
!
Page 155 of 273
2
DRIVING YOUR HYUNDAI
9
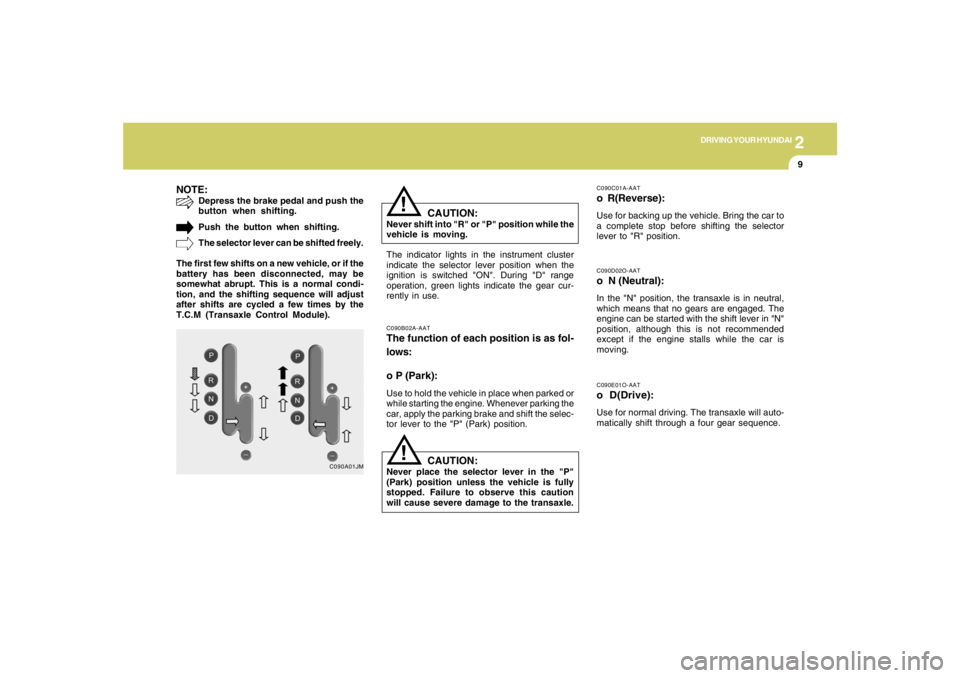
NOTE:
Depress the brake pedal and push the
button when shifting.
Push the button when shifting.
The selector lever can be shifted freely.
The first few shifts on a new vehicle, or if the
battery has been disconnected, may be
somewhat abrupt. This is a normal condi-
tion, and the shifting sequence will adjust
after shifts are cycled a few times by the
T.C.M (Transaxle Control Module).
C090A01JM
!
C090E01O-AATo D(Drive):Use for normal driving. The transaxle will auto-
matically shift through a four gear sequence.C090D02O-AATo N (Neutral):In the "N" position, the transaxle is in neutral,
which means that no gears are engaged. The
engine can be started with the shift lever in "N"
position, although this is not recommended
except if the engine stalls while the car is
moving.
C090B02A-AATThe function of each position is as fol-
lows:
o P (Park):Use to hold the vehicle in place when parked or
while starting the engine. Whenever parking the
car, apply the parking brake and shift the selec-
tor lever to the "P" (Park) position.
C090C01A-AATo R(Reverse):Use for backing up the vehicle. Bring the car to
a complete stop before shifting the selector
lever to "R" position.
The indicator lights in the instrument cluster
indicate the selector lever position when the
ignition is switched "ON". During "D" range
operation, green lights indicate the gear cur-
rently in use.
CAUTION:
Never shift into "R" or "P" position while the
vehicle is moving.
!
CAUTION:
Never place the selector lever in the "P"
(Park) position unless the vehicle is fully
stopped. Failure to observe this caution
will cause severe damage to the transaxle.