2005 HYUNDAI TUCSON air conditioning
[x] Cancel search: air conditioningPage 207 of 273
6
Engine Compartment .................................................... 6-2
General Checks ............................................................ 6-4
Checking the Engine Oil ............................................... 6-5
Changing the Oil and Filter ............................................ 6-6
Checking and Changing the Engine Coolant ................ 6-8
Spark Plugs................................................................6-10
Changing the Air Cleaner Filter ...................................6-11
Checking the Transaxle Oil (Manual) .........................6-13
Checking the Transaxle Fluid (Automatic)..................6-14
Checking the Brakes ..................................................6-15
Checking the Clutch Fluid...........................................6-16
Air Conditioning Care..................................................6-17
Changing the Air Conditioner Filter .............................6-18
Checking the Free-play...............................................6-19
Checking Drive Belts ..................................................6-21
Checking and Replacing Fuses..................................6-21
Checking the Battery..................................................6-23
Power Steering Fluid Level .........................................6-24
Replacement of Light Bulbs ........................................6-26
Bulb Wattage ...............................................................6-34
Fuse Panel Description...............................................6-35
6
DO-IT-YOURSELF MAINTENANCE
Page 210 of 273
6
DO-IT-YOURSELF MAINTENANCE
4
GENERAL CHECKS
G020C01A-AATVehicle InteriorThe following should be checked each time
when the vehicle is driven:
o Lights operation
o Windshield wiper operation
o Horn operation
o Defroster, heating system operation (and air
conditioning, if installed)
o Steering operation and condition
o Mirror condition and operation
o Turn signal operation
o Accelerator pedal operation
o Brake operation, including parking brake
o Manual transaxle operation, including clutch
operation
o Automatic transaxle operation, including
"Park" mechanism operation
o Seat control condition and operation
o Seat belt condition and operation
o Sunvisor operation
If you notice anything that does not operate
correctly or appears to be functioning correctly,
inspect it carefully and seek assistance from
your Hyundai dealer if service is needed.
G020B01A-AATVehicle ExteriorThe following should be checked monthly:
o Overall appearance and condition
o Wheel condition and wheel nut torque
o Exhaust system condition
o Light condition and operation
o Windshield glass condition
o Wiper blade condition
o Paint condition and body corrosion
o Fluid leaks
o Door and hood lock condition
o Tire pressure and condition
(including spare tire)
G020A01A-AATEngine CompartmentThe following should be checked regularly:
o Engine oil level and condition
o Transaxle fluid level and condition
o Brake fluid level
o Clutch fluid level
o Engine coolant level
o Windshield washer fluid level
o Accessory drive belt condition
o Engine coolant hose condition
o Fluid leaks (on or below components)
o Power steering fluid level
o Battery condition
o Air filter condition
Page 223 of 273
6
DO-IT-YOURSELF MAINTENANCE
17
!
G130B02A-AATTo Replace the FluidRecommended brake fluid conforming to DOT
3 or DOT 4 specification should be used. The
reservoir cap must be fully tightened to avoid
contamination from foreign matter or moisture.NOTE:Do not allow any other liquids to contami-
nate the brake fluid. Seal damage will result.
WARNING:
Use caution when handling brake fluid. It
can damage your vision if you get it in your
eyes. It will also damage your vehicle's
paint if spilled on it and not removed imme-
diately.
G190A01GK
DOHC CVVT V6
Water Pump Pulley
0.2~0.24 in.
(5~6 mm)
Power steering
COMP
Auto
tensioner
Alternator Pulley
Crankshaft PulleyAlternator
Eng.pulley
AIR CONDITIONING CARE
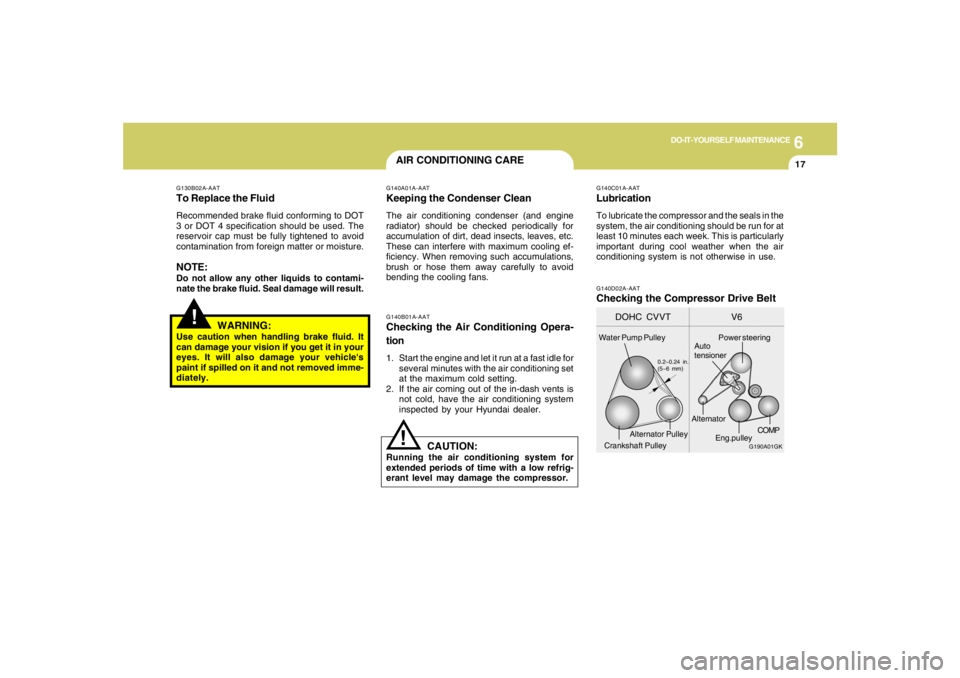
G140D02A-AATChecking the Compressor Drive Belt
!
G140A01A-AATKeeping the Condenser CleanThe air conditioning condenser (and engine
radiator) should be checked periodically for
accumulation of dirt, dead insects, leaves, etc.
These can interfere with maximum cooling ef-
ficiency. When removing such accumulations,
brush or hose them away carefully to avoid
bending the cooling fans.
G140C01A-AATLubricationTo lubricate the compressor and the seals in the
system, the air conditioning should be run for at
least 10 minutes each week. This is particularly
important during cool weather when the air
conditioning system is not otherwise in use.
G140B01A-AATChecking the Air Conditioning Opera-
tion1. Start the engine and let it run at a fast idle for
several minutes with the air conditioning set
at the maximum cold setting.
2. If the air coming out of the in-dash vents is
not cold, have the air conditioning system
inspected by your Hyundai dealer.
CAUTION:
Running the air conditioning system for
extended periods of time with a low refrig-
erant level may damage the compressor.
Page 224 of 273
6
DO-IT-YOURSELF MAINTENANCE
18
When the air conditioning is being used regu-
larly, the compressor drive belt tension should
be checked at least once a month with the
engine turned off.
To check the drive belt tension, press down on
the belt halfway between the engine crankshaft
and compressor pulleys. Pressing with your
finger, you should not be able to deflect this belt
anymore than 1/3 of an inch. If the belt is too
loose, have it adjusted by your Hyundai dealer.
CHANGING THE AIR
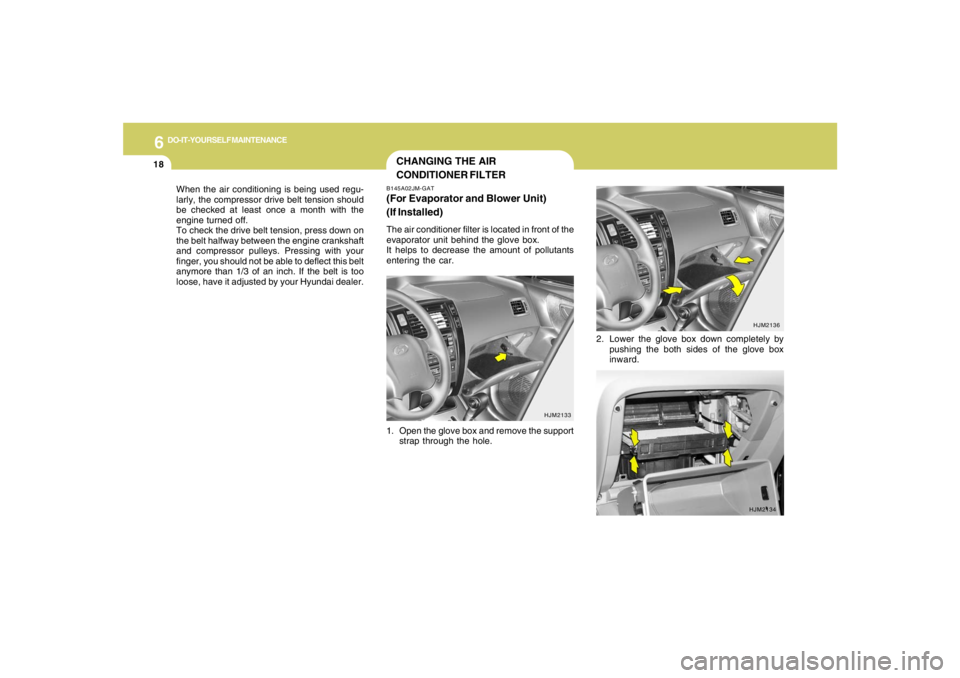
CONDITIONER FILTERB145A02JM-GAT(For Evaporator and Blower Unit)
(If Installed)The air conditioner filter is located in front of the
evaporator unit behind the glove box.
It helps to decrease the amount of pollutants
entering the car.
2. Lower the glove box down completely by
pushing the both sides of the glove box
inward.
1. Open the glove box and remove the support
strap through the hole.
HJM2133HJM2136
HJM2134
Page 230 of 273
6
DO-IT-YOURSELF MAINTENANCE
24
POWER STEERING FLUID LEVELG230A03A-AAT
G220C01A-AAT
Checking Condenser Cooling FanThe condenser cooling fan should come on
automatically whenever the air conditioning is in
operation.
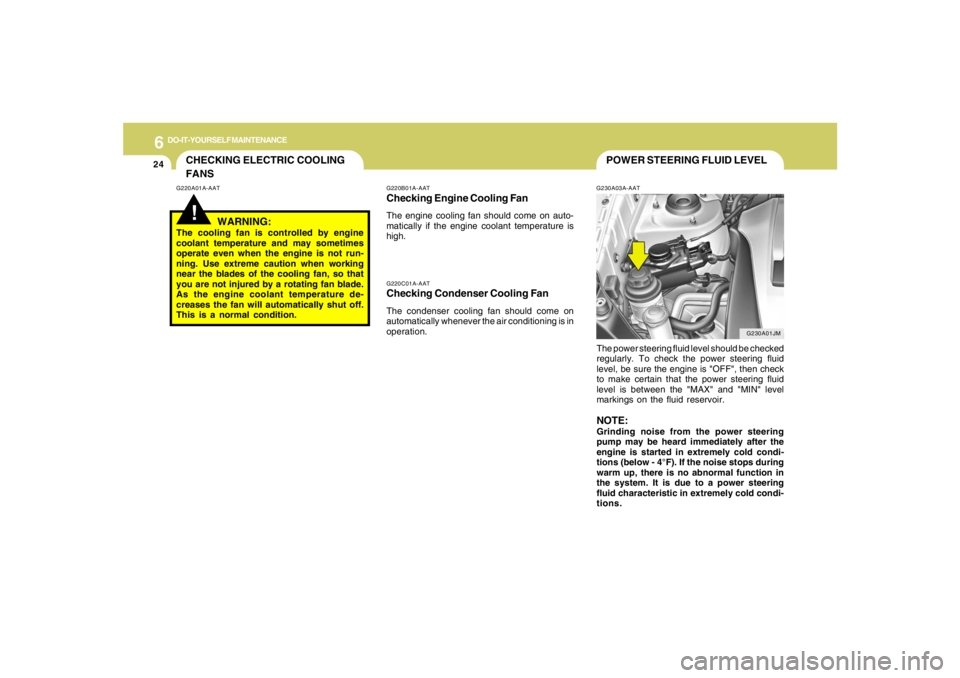
The power steering fluid level should be checked
regularly. To check the power steering fluid
level, be sure the engine is "OFF", then check
to make certain that the power steering fluid
level is between the "MAX" and "MIN" level
markings on the fluid reservoir.
NOTE:Grinding noise from the power steering
pump may be heard immediately after the
engine is started in extremely cold condi-
tions (below - 4°F). If the noise stops during
warm up, there is no abnormal function in
the system. It is due to a power steering
fluid characteristic in extremely cold condi-
tions.
G220B01A-AATChecking Engine Cooling FanThe engine cooling fan should come on auto-
matically if the engine coolant temperature is
high.
CHECKING ELECTRIC COOLING
FANS!
G220A01A-AAT
WARNING:
The cooling fan is controlled by engine
coolant temperature and may sometimes
operate even when the engine is not run-
ning. Use extreme caution when working
near the blades of the cooling fan, so that
you are not injured by a rotating fan blade.
As the engine coolant temperature de-
creases the fan will automatically shut off.
This is a normal condition.
G230A01JM
Page 253 of 273
8
CONSUMER INFORMATION & REPORTING SAFETY DEFECTS6
I030D01JM-AATTIRE TERMINOLOGY AND DEFINI-
TIONS
Air Pressure: The amount of air inside
the tire pressing outward on the tire. Air
pressure is expressed in pounds per
square inch (psi) or kilopascal (kPa).
Accessory Weight: This means the
combined weight of optional accesso-
ries. Some examples of optional ac-
cessories are, automatic transmission,
power seats, and air conditioning.
Aspect Ratio: The relationship of a
tire's height to its width.
Belt: A rubber coated layer of cords that
is located between the plies and the
tread. Cords may be made from steel or
other reinforcing materials.
Bead: The tire bead contains steel
wires wrapped by steel cords that hold
the tire onto the rim.
Bias Ply Tire: A pneumatic tire in which
the plies are laid at alternate angles
less than 90 degrees to the centerline of
the tread.Cold Tire Pressure: The amount of air
pressure in a tire, measured in pounds
per square inch (psi) or kilopascals
(kPa) before a tire has built up heat from
driving.
Curb Weight: This means the weight of
a motor vehicle with standard and op-
tional equipment including the maxi-
mum capacity of fuel, oil and coolant,
but without passengers and cargo.
DOT Markings: A code molded into the
sidewall of a tire signifying that the tire
is in compliance with the U.S. Depart-
ment of Transportation motor vehicle
safety standards. The DOT code in-
cludes the Tire Identification Number
(TIN), an alphanumeric designator which
can also identify the tire manufacturer,
production plant, brand and date of
production.
GVWR: Gross Vehicle Weight Rating
GAWR FRT: Gross Axle Weight Rating
for the front Axle.
GAWR RR: Gross Axle Weight Rating
for the rear axle. 6. Maximum load rating
This number indicates the maximum
load in kilograms and pounds that
can be carried by the tire. When
replacing the tires on the vehicle,
always use a tire that has the same
load rating as the factory installed
tire.
7. Uniform Tire Quality Grading
(UTQG):
Tire manufacturers are required to
grade tires based on three perfor-
mance factors: treadwear, traction
and temperature resistance. For more
information, see Uniform Tire Qual-
ity Grading on page 8-12.
Page 267 of 273
10
INDEX
2
A
Air bag ...............................................................................................1-30
Air Cleaner Filter ...............................................................................6-11
Air Conditioning
Care..............................................................................................6-17
Operation............................................................................ 1-92, 6-17
Switch...........................................................................................1-92
Antenna..........................................................................................1-135
Ashtray..............................................................................................1-60
Audio System
Cassette Tape player operation (J290)...................................1-126
Cassete tape player operation (M280)....................................1-112
Compact disc player operation (K260)....................................1-106
Compact disc player operation (M280)....................................1-115
CD changer operation (M280) ..................................................1-119
Compact disc player / CD Auto changer operation (J290) .....1-128
Stereo radio operation (J290) ...................................................1-123
Stereo radio operation (K260)..................................................1-103
Stereo radio operation (M280) ..................................................1-109
B
Battery..................................................................................... 2-20, 6-23
Brake
Anti-lock brake system ................................................................2-12
Traction control system (TCS) ...................................................2-12
Checking the brakes ....................................................................6-15Electronic Stability Program (ESP) ...................................................2-14
Fluid ..............................................................................................6-13
Pedal clearance...........................................................................6-20
Pedal free-play.............................................................................6-20
Practices......................................................................................2-18
Breaking-In your New Hyundai .......................................................... 1-3
Bulb Replacement.............................................................................6-26
C
Care of Cassette Tapes ................................................................1-133
Care of Disc ...................................................................................1-133
Catalytic Converter............................................................................. 7-3
Child-Protector Rear Door Lock ......................................................... 1-7
Child Restraint System.....................................................................1-23
Installing a Child Restraint Seat with the
"Tether Anchorage" System .....................................................1-25
Securing the Child Restraint Seat with the "ISOFIX" System ....1-26
Cigarette Lighter................................................................................1-58
Clock.................................................................................................1-58
Clutch
Checking fluid...............................................................................6-16
Pedal free-play.............................................................................6-20
Combination Light
Auto light.......................................................................................1-54
Headlight flasher..........................................................................1-53
Headlight switch...........................................................................1-53
High-beam switch........................................................................1-53
Lane change signal ......................................................................1-53
Parking light auto off .....................................................................1-53
Turn signal operation...................................................................1-52