Page 65 of 262
1FEATURES OF YOUR HYUNDAI54
2. Insert the hexagonal head wrench provided
with the vehicle into the socket. This wrench
can be found in the vehicle’s trunk or glove
box.
3. Push and turn the wrench clockwise to close
or counterclockwise to open the sunroof.
HGK2025 B460C01S-AAT
Tilting the Sunroof SystemThe sunroof can be tilted by pushing the "UP"
button with the sunroof closed. Release the
button when the sunroof reaches the desired
position. To close the sunroof, press the
"DOWN" button.NOTE:After washing the car or after there is rain,
be sure to wipe off any water that is on the
sunroof before operating it.
HGK2023
B460D03GK-AATManual Operation of SunroofIf the sunroof does not electrically operate:
1. Remove the cap located in the rear roof
panel by using a coin or screw driver.
HGK2024
Page 66 of 262

1
FEATURES OF YOUR HYUNDAI
55
HGK2087 B460E03GK-GAT
Resetting the Sunroof SystemIf the battery has been recharged, discon-
nected or is manually with operating the hex-
agonal head wrench, you may need to reset the
sunroof.To do this;1. Turn the ignition switch "OFF".
2. With pressing " " "up" button at the same
time, turn the ignition switch "ON".
The resetting is failed when the ignition
key to the "OFF" within 1.5 seconds.
3. If the sunroof is set like this, the sunroof is
reset with tilting up/down automatically once
for all.
CAUTION:
If the sunroof is not reset, it may not operate
normally.
!
INTERIOR LIGHTB480A01GK-GATMAP LIGHT(1) Push in the map light switch to turn on the
driver side light.
(2) In the "DOOR" position, the interior cour-
tesy light comes on when any door is
opened regardless of the ignition key posi-
tion. The light goes out gradually 6 seconds
after the door is closed.
(3) Push in the map light switch to turn on the
driver side light.(1)
(2)
(3)
SPECTACLE CASE!
B491A01F-AATThe spectacle case is located on the front
overhead console.
Push the end of the cover to open or close the
spectacle case.
HGK2122
WARNING:
Do not open the spectacle case while the
vehicle is moving.
The rear view mirror of the vehicle can be
blocked by an open spectacle case.
Page 67 of 262

1FEATURES OF YOUR HYUNDAI56
!
2. Next, adjust the mirror angle by depressing
the appropriate perimeter switch as illus-
trated.
CAUTION:
o Do not operate the switch continuously
for an unnecessary length of time.
o Scraping ice from the mirror face could
cause permanent damage. To remove
any ice, use a sponge, soft cloth or
approved deicer.
WARNING:
Be careful when judging the size or dis-
tance of any object seen in the passenger
side rear view mirror. It is a convex mirror
with a curved surface. Any objects seen in
this mirror are closer than they appear.
!
GLOVE BOX
MIRRORB510B01A-AATOUTSIDE REAR VIEW MIRROR
Electric Type
HGK2053
The outside rearview mirrors can be adjusted
to your preferred rear vision, both directly be-
hind the vehicle, and to the rear of the left and
right sides.
The remote control outside rearview mirror
switch controls the adjustments for both the
right and left outside mirror.To adjust the position of either mirror:1. Move the selecting switch to the right or left
to activate the adjustable mechanism for the
corresponding door mirror.
!
B500A01A-AAT
WARNING:
To avoid the possibility of injury in case of
an accident or a sudden stop, the glove box
door should be kept closed when the car is
in motion.
HGK2121
o To open the glove box, pull on the glove box
release lever.
Page 68 of 262

1
FEATURES OF YOUR HYUNDAI
57
DAY/NIGHT INSIDE REAR VIEW
MIRROR
B510D01Y-AATOUTSIDE REARVIEW MIRROR HEATER
(If Installed)The outside rearview mirror heater is actuated
in connection with the rear window defroster. To
heat the outside rearview mirror glass, push in
the switch for the rear window defroster. The
rearview mirror glass will be heated for defrost-
ing or defogging and will give you improved rear
vision in inclement weather conditions. Push the
switch again to turn the heater off. The outside
rearview mirror heater automatically turns itself
off after 15 minutes.
HGK2090-1
Type A
Type B
!
B510C01A-AATFOLDING THE OUTSIDE REAR VIEW
MIRRORSTo fold the outside rear view mirrors, push them
toward the rear.
The outside rear view mirrors can be folded
rearward for parking in narrow areas.
HGK2055
WARNING:
Do not adjust or fold the outside rear view
mirrors while the vehicle is moving. This
could result in loss of control, and an acci-
dent which could cause death, serious in-
jury or death.
B520A01A-AATYour Hyundai is equipped with a day/night inside
rear view mirror. The "night" position is selected
by flipping the tab at the bottom of the mirror
toward you. In the "night" position, the glare of
headlights of cars behind you is reduced.
HGK2052
Page 69 of 262

1FEATURES OF YOUR HYUNDAI58
HIGH-MOUNTED REAR STOP LIGHTB550A01S-GATIn addition to the lower-mounted rear stoplights
on either side of the car, the high mounted rear
stoplight in the center of the rear window or
inserted in the rear spoiler also lights when the
brakes are applied.
B550A02GK
Type A Type B Type C
PARKING BRAKEB530A01A-AATAlways engage the parking brake before leav-
ing the car. This also turns on the parking brake
indicator light when the key is in the "ON" or
"START" position. Before driving away, be sure
that the parking brake is fully released and the
indicator light is off.
o To engage the parking brake, pull the lever
up as far as possible.
o To release the parking brake, pull up the
lever and press the thumb button. Then,
while holding the button in, lower the brake
lever.
HGK3019 B520B02O-GAT
(Electric type) (If installed)The electric type day/night inside rearview mir-
ror automatically controls the glare of headlights
of the car behind you.
1. Pressing the button turns the auto-
dimming function OFF which is indicated by
the green Status Indicator LED turning off.
2. Pressing the button again turns the auto-
dimming function ON which is indicated by
the green Status Indicator LED turning on.NOTE:The mirror defaults to the "ON" position
each time the vehicle is started.
HLZ2068-1
Page 70 of 262
1
FEATURES OF YOUR HYUNDAI
59
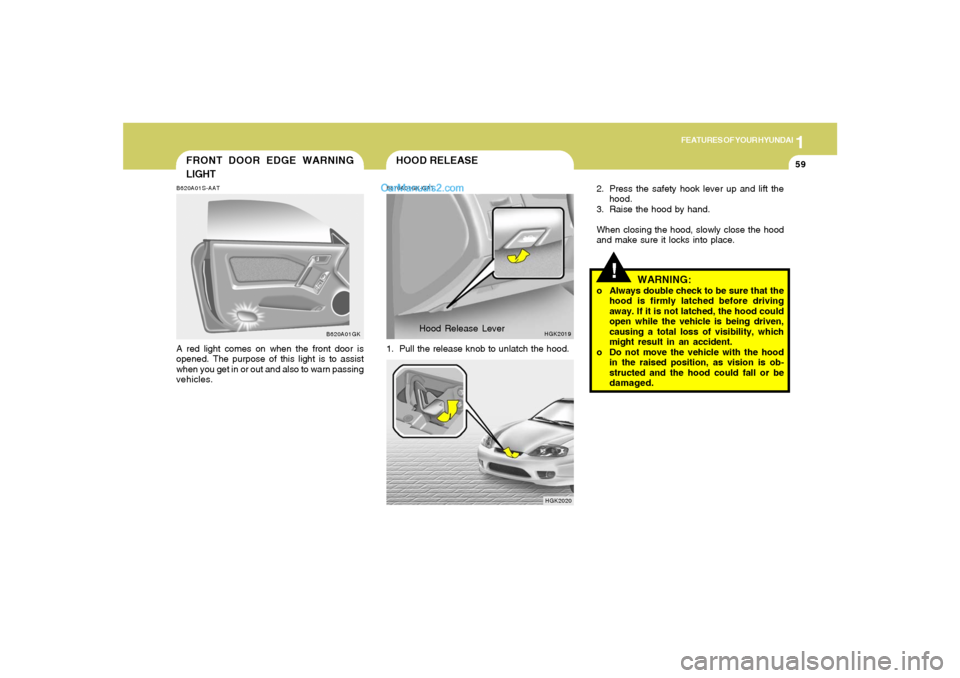
FRONT DOOR EDGE WARNING
LIGHTB620A01S-AATA red light comes on when the front door is
opened. The purpose of this light is to assist
when you get in or out and also to warn passing
vehicles.
B620A01GK
!
HOOD RELEASEB570A01GK-GAT1. Pull the release knob to unlatch the hood.
HGK2019
2. Press the safety hook lever up and lift the
hood.
3. Raise the hood by hand.
When closing the hood, slowly close the hood
and make sure it locks into place.
HGK2020
WARNING:
o Always double check to be sure that the
hood is firmly latched before driving
away. If it is not latched, the hood could
open while the vehicle is being driven,
causing a total loss of visibility, which
might result in an accident.
o Do not move the vehicle with the hood
in the raised position, as vision is ob-
structed and the hood could fall or be
damaged. Hood Release Lever
Page 71 of 262

1FEATURES OF YOUR HYUNDAI60
WARNING:
o The fuel cap must be tightened until cap
clicks, otherwise " " light will
illuminate.
o Gasoline vapors are dangerous. Before
refueling, always stop the engine and
never allow sparks or open flames near
the filler area. If you need to replace the
filler cap, use a genuine Hyundai re-
placement part.
o If you open the fuel filler cap during high
ambient temperatures, a slight "pres-
sure sound" may be heard. This is nor-
mal and not a cause for concern.
Whenever you open the fuel filler cap,
turn it slowly.
o Make sure the fuel filler cap is replaced
and securely seated after fueling. Failure
to replace or fully seat the fuel filler cap
will result in fuel vapors escaping into
the atmosphere and the MIL indicator
illuminating.
o Do not "TOP-OFF" after the first nozzle
shut off when refueling.
o Automotive fuels are flammable/explo-
sive materials. When refueling, please
note the following guidelines carefully.
!
NOTE:If the fuel-filler lid will not open because ice
has formed around it, tap lightly or push on
the lid to break the ice and release the lid. Do
not pry on the lid. If necessary, spray around
the lid with an approved deicer fluid (do not
use radiator anti-freeze) or move the ve-
hicle to a warm place and allow the ice to
melt.
HGK2018Q
REMOTE FUEL-FILLER LID
RELEASEB560A02JM-AATThe fuel-filler lid may be opened from inside the
vehicle by pulling up on the fuel-filler lid opener
located on the front floor area on the left side of
the vehicle.
HGK2017
Page 72 of 262

1
FEATURES OF YOUR HYUNDAI
61
o Before touching the fuel nozzle or fuel
filler cap, have one's hands in contact
with metal parts away from the filler neck
to discharge static electricity.
o Do not get back in the vehicle while
refueling. Do not operate anything that
can produce static electricity. Static elec-
tricity discharge can ignite fuel vapors
resulting in explosion.
o When using a portable fuel container be
sure to place the container on the ground
while refueling. Static electricity dis-
charge from the container can ignite fuel
vapors causing a fire. While starting re-
fueling contact should be maintained
until the filling is complete.
o Do not use cellular phones around a gas
station. The electric current or electronic
interference from cellular phones can
ignite fuel vapors causing a fire.
o When refueling always shut the engine
off. Sparks by electrical equipment of
the engine can ignite fuel vapors caus-
ing a fire. After refueling, check to make
sure the fuel filler cap is securely closed,
and then start the engine.
o Do not smoke or try to light cigarettes
around a gas station. Automotive fuels
are flammable.
!
TAIL GATEB540A01F-AATRemote Tail Gate ReleaseTo open the tail gate without using the key, pull
up the lid release lever located on the driver's
door panel.
To close, lower the tail gate, then press down on
it until it locks. To be sure the tail gate is securely
fastened, always try to pull it up again.
HGK2012
WARNING:
The tail gate should always be kept com-
pletely closed while the vehicle is in motion.
If it is left open or ajar, poisonous exhaust
gases may enter the car resulting in serious
illness or death to the occupants. See addi-
tional warnings concerning exhaust gases
on page 2-2.