2005 Hyundai Terracan child restraint
[x] Cancel search: child restraintPage 331 of 539
1CONTROLS AND EQUIPMENT
26
SB090C1-E Larger Children Larger children should occupy the rear seat and be restrained at all times. Therestraint may take the form of a special safety belt or the original factory fitted seat belt used in conjunction with anapproved booster cushion depending upon the size and weight of the child. Under no circumstances should chil-dren be allowed to travel standing, kneeling or lying on the seat. Never allow childen to ride in the frontpassenger seat. SB090O1-E Pregnant Women The use of a seat belt is recommended for pregnant women. The seat beltshould be worn as low and snugly as possible across the hips, not across the abdomen. A qualified Medical Prac-titioner should be consulted for further information. SB090E1-E Injured Persons A seat belt should be used when an injured person is being transported.For specific recommendations, the advice of a qualified Medical Practioner should be sought. SB090F1-E Seat Belt Occupancy The seat belts are designed to be used by one seat occupant only. The use of a seat belt by more than one personincreases the levels of injury which may be sustained in the event of an accident. SE090G1-E Do Not Lie Down To ensure that the maximum level of protection may be afforded by the seat belt system, all passengers should be sitting in an upright position throughoutthe journey. The seat belt will be un- able to afford maximum protection if the front seats are at or near the fullyreclined position.SB090H1-E CARE OF SEAT BELTS Seat belt assemblies must never be disassembled or modified in any way.In addition, care should be exercised to ensure that the belt assemblies do not become damaged by being trappedin seat mechanisms, door shuts etc. SB090I-E Periodic Inspection It is recommended that all seat belts be inspected periodically for wear or damage of any kind. Parts of the sys-tem that are damaged should be re- placed as soon as possible. Under no circumstances must any part of theseat belt assemblies be dismantled or repaired.
Page 336 of 539
1
CONTROLS AND EQUIPMENT
31
!
B220D04HP
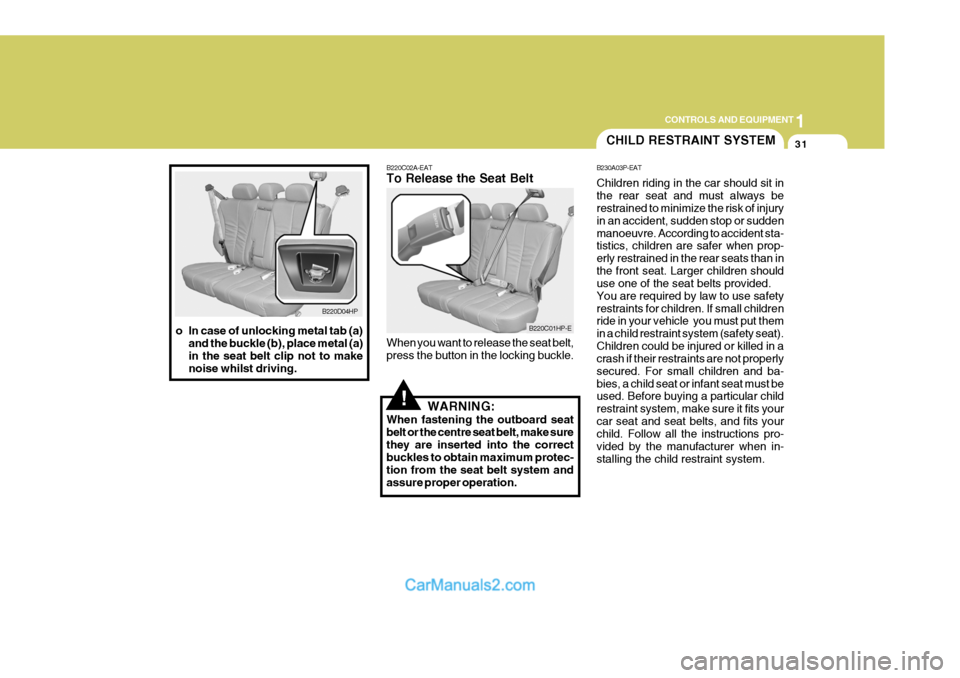
o In case of unlocking metal tab (a) and the buckle (b), place metal (a) in the seat belt clip not to makenoise whilst driving. B220C02A-EAT To Release the Seat Belt When you want to release the seat belt, press the button in the locking buckle.
WARNING:
When fastening the outboard seatbelt or the centre seat belt, make surethey are inserted into the correct buckles to obtain maximum protec- tion from the seat belt system andassure proper operation.
B220C01HP-E
CHILD RESTRAINT SYSTEM
B230A03P-EAT Children riding in the car should sit in the rear seat and must always be restrained to minimize the risk of injury in an accident, sudden stop or suddenmanoeuvre. According to accident sta- tistics, children are safer when prop- erly restrained in the rear seats than inthe front seat. Larger children should use one of the seat belts provided. You are required by law to use safetyrestraints for children. If small children ride in your vehicle you must put them in a child restraint system (safety seat).Children could be injured or killed in a crash if their restraints are not properly secured. For small children and ba-bies, a child seat or infant seat must be used. Before buying a particular child restraint system, make sure it fits yourcar seat and seat belts, and fits your child. Follow all the instructions pro- vided by the manufacturer when in-stalling the child restraint system.
Page 337 of 539
1CONTROLS AND EQUIPMENT
32
!WARNING:
o A child restraint system must be placed in the rear seat. Never install a child or infant seat on the front passenger's seat. Should an accident occur andcause the passenger side airbag to deploy, it could severely in- jure or kill an infant or child seatedin an infant or child seat. Thus, only use a child restraint in the rear seat of your vehicle.
o Since a safety belt or child re-
straint system can become veryhot if it is left in a closed vehicle, be sure to check the seat cover and buckles before placing achild there.
o When the child restraint system
is not in use, fasten it with asafety belt so that it will not be thrown forward in the case of a sudden stop or an accident. o Children who are too large to be in
a child restraint should sit in the rear seat and be restrained with the available lap/shoulder belts.Never allow children to ride in the front passanger seat.
o Always make sure that the shoul- der belt portion of the outboardlap/shoulder belt is positioned midway over the shoulder, neveracross the neck. Moving the child closer to the centre of the vehicle may help provide a good shoul-der belt fit. The lap belt portion of the lap/shoulder belt or the cen- tre seat lap belt must always bepositioned as low as possible on the child's hips and as snug as possible.
o If the seat belt will not properly fit the child, we recommend the useof an approved booster seat inthe rear seat in order to raise the child's seating height so that the seat belt will properly fit the child.
o Never allow a child to stand up or kneel on the seat. o Never use an infant carrier or child
safety seat that "hooks" over aseatback; it may not provide ad-equate security in an accident.
o Never allow a child to be held in a
person's arms whilst they are in amoving vehicle, as this could re- sult in serious injury to the child in the event of an accident or asudden stop. Holding a child in a moving vehicle does not provide the child with any means of pro-tection during an accident, even if the person holding the child is wearing a seat belt.
o If the child restraint seat is not
anchored properly, the risk of achild being seriously injured or killed in a collision greatly in- creases.
Page 338 of 539
1
CONTROLS AND EQUIPMENT
33
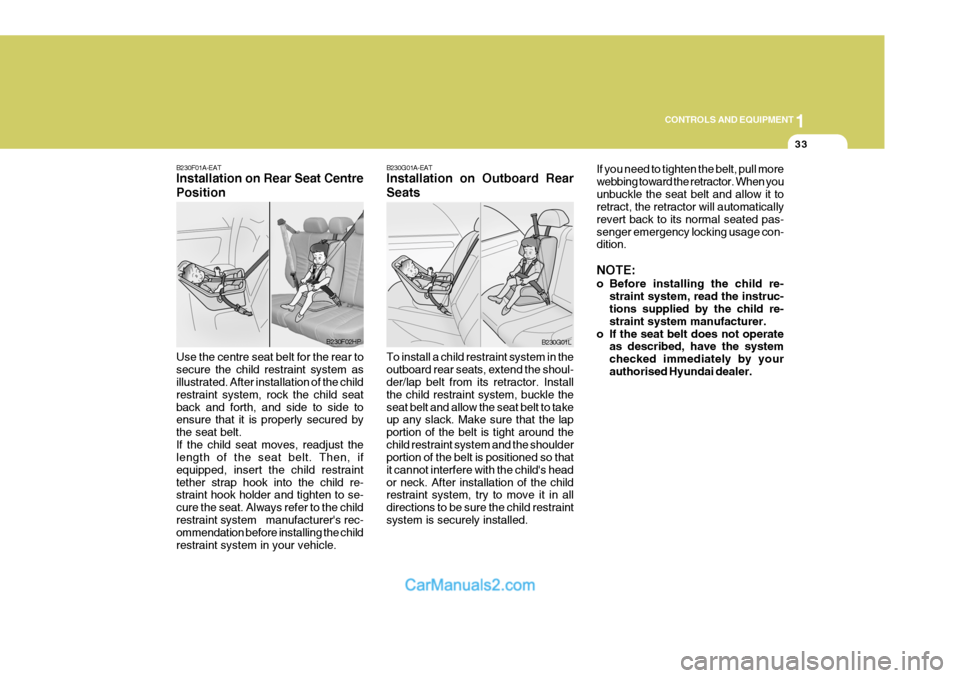
B230F01A-EAT Installation on Rear Seat Centre Position Use the centre seat belt for the rear to secure the child restraint system as illustrated. After installation of the child restraint system, rock the child seatback and forth, and side to side to ensure that it is properly secured by the seat belt.If the child seat moves, readjust the length of the seat belt. Then, if equipped, insert the child restrainttether strap hook into the child re- straint hook holder and tighten to se- cure the seat. Always refer to the childrestraint system manufacturer's rec- ommendation before installing the child restraint system in your vehicle.
B230F02HP
B230G01A-EAT Installation on Outboard Rear Seats To install a child restraint system in the outboard rear seats, extend the shoul- der/lap belt from its retractor. Install the child restraint system, buckle theseat belt and allow the seat belt to take up any slack. Make sure that the lap portion of the belt is tight around thechild restraint system and the shoulder portion of the belt is positioned so that it cannot interfere with the child's heador neck. After installation of the child restraint system, try to move it in all directions to be sure the child restraintsystem is securely installed. If you need to tighten the belt, pull morewebbing toward the retractor. When youunbuckle the seat belt and allow it to retract, the retractor will automatically revert back to its normal seated pas-senger emergency locking usage con- dition. NOTE:
o Before installing the child re-
straint system, read the instruc- tions supplied by the child re- straint system manufacturer.
o If the seat belt does not operate as described, have the systemchecked immediately by yourauthorised Hyundai dealer.
B230G01L
Page 339 of 539
1CONTROLS AND EQUIPMENT
34
!WARNING:
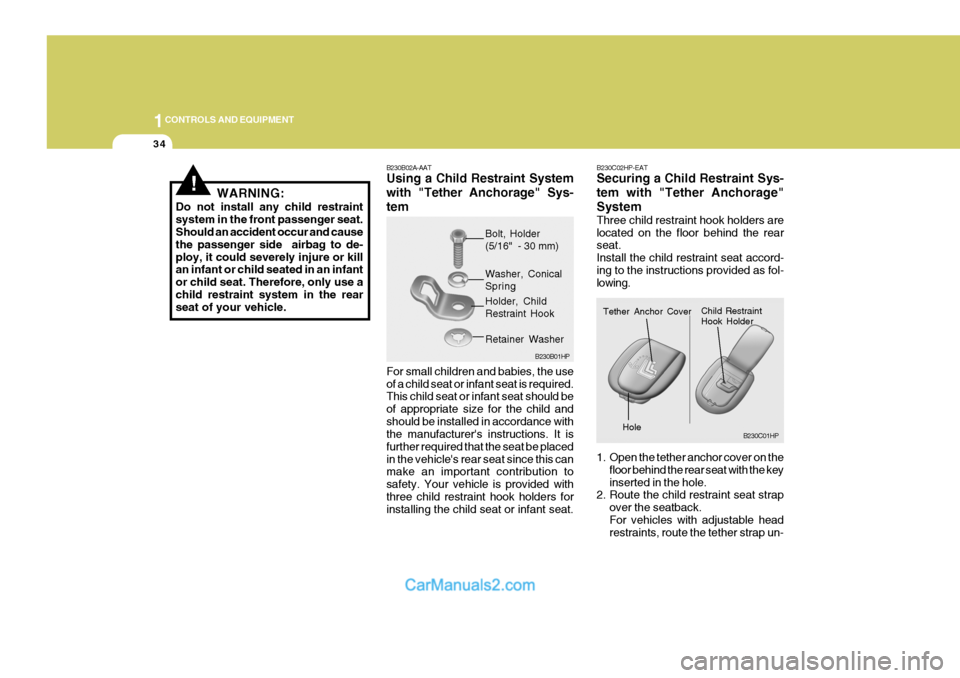
Do not install any child restraint system in the front passenger seat. Should an accident occur and cause the passenger side airbag to de-ploy, it could severely injure or kill an infant or child seated in an infant or child seat. Therefore, only use achild restraint system in the rear seat of your vehicle. B230B02A-AAT Using a Child Restraint System with "Tether Anchorage" Sys-tem For small children and babies, the use of a child seat or infant seat is required. This child seat or infant seat should be of appropriate size for the child andshould be installed in accordance with the manufacturer's instructions. It is further required that the seat be placedin the vehicle's rear seat since this can make an important contribution to safety. Your vehicle is provided withthree child restraint hook holders for installing the child seat or infant seat.B230C02HP-EAT Securing a Child Restraint Sys- tem with "Tether Anchorage"System Three child restraint hook holders are located on the floor behind the rear seat. Install the child restraint seat accord-ing to the instructions provided as fol- lowing.
1. Open the tether anchor cover on the
floor behind the rear seat with the key inserted in the hole.
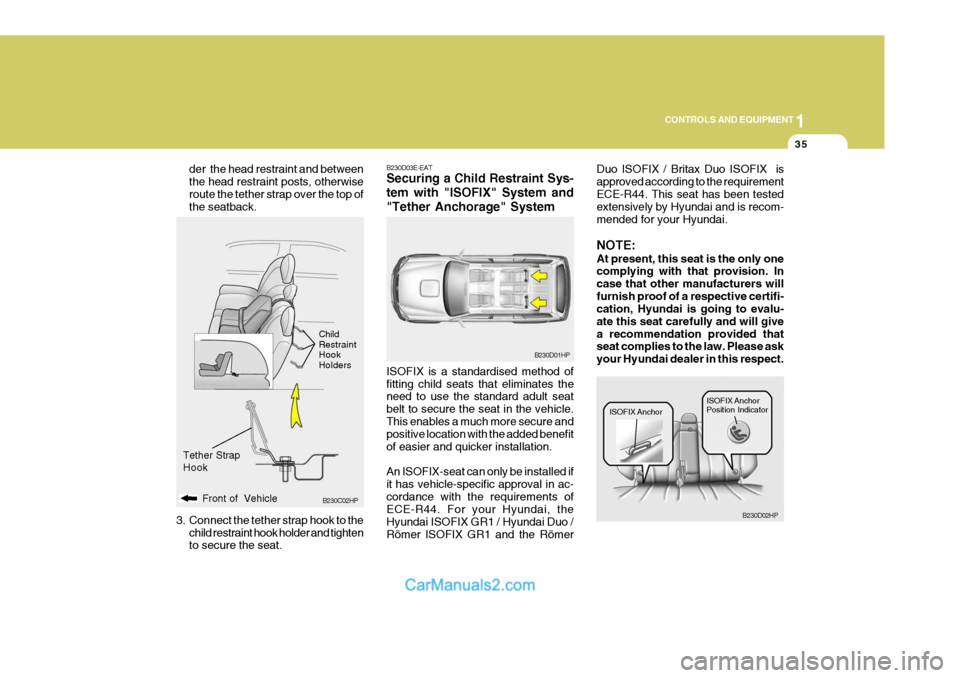
2. Route the child restraint seat strap
over the seatback.For vehicles with adjustable head restraints, route the tether strap un-
B230B01HP
Bolt, Holder (5/16" - 30 mm)
Washer, ConicalSpring Holder, Child Restraint Hook
Retainer Washer
B230C01HP
Tether Anchor Cover
Child Restraint Hook HolderHole
Page 340 of 539
1
CONTROLS AND EQUIPMENT
35
B230C02HP
Front of Vehicle
der the head restraint and between the head restraint posts, otherwiseroute the tether strap over the top of the seatback.
3. Connect the tether strap hook to the child restraint hook holder and tightento secure the seat. Child RestraintHookHolders
Tether Strap Hook
B230D03E-EAT Securing a Child Restraint Sys- tem with "ISOFIX" System and"Tether Anchorage" System ISOFIX is a standardised method of fitting child seats that eliminates the need to use the standard adult seat belt to secure the seat in the vehicle.This enables a much more secure and positive location with the added benefit of easier and quicker installation. An ISOFIX-seat can only be installed if it has vehicle-specific approval in ac-cordance with the requirements of ECE-R44. For your Hyundai, the Hyundai ISOFIX GR1 / Hyundai Duo /Römer ISOFIX GR1 and the Römer Duo ISOFIX / Britax Duo ISOFIX isapproved according to the requirementECE-R44. This seat has been tested extensively by Hyundai and is recom- mended for your Hyundai. NOTE: At present, this seat is the only one complying with that provision. In case that other manufacturers willfurnish proof of a respective certifi- cation, Hyundai is going to evalu- ate this seat carefully and will givea recommendation provided that seat complies to the law. Please ask your Hyundai dealer in this respect.
B230D01HP
ISOFIX Anchor
B230D02HPISOFIX Anchor Position Indicator
Page 341 of 539
1CONTROLS AND EQUIPMENT
36
!
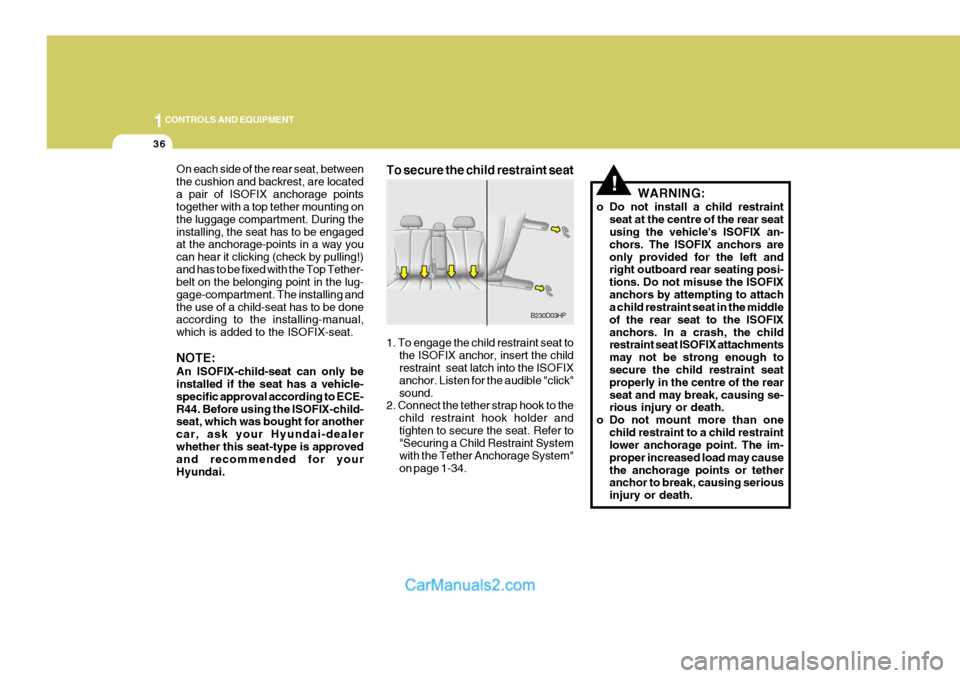
On each side of the rear seat, between the cushion and backrest, are locateda pair of ISOFIX anchorage points together with a top tether mounting on the luggage compartment. During theinstalling, the seat has to be engaged at the anchorage-points in a way you can hear it clicking (check by pulling!)and has to be fixed with the Top Tether- belt on the belonging point in the lug- gage-compartment. The installing andthe use of a child-seat has to be done according to the installing-manual, which is added to the ISOFIX-seat. NOTE: An ISOFIX-child-seat can only be installed if the seat has a vehicle- specific approval according to ECE-R44. Before using the ISOFIX-child- seat, which was bought for another car, ask your Hyundai-dealerwhether this seat-type is approved and recommended for your Hyundai. To secure the child restraint seat 1. To engage the child restraint seat to
the ISOFIX anchor, insert the child restraint seat latch into the ISOFIX anchor. Listen for the audible "click"sound.
2. Connect the tether strap hook to the
child restraint hook holder andtighten to secure the seat. Refer to "Securing a Child Restraint System with the Tether Anchorage System"on page 1-34. WARNING:
o Do not install a child restraint seat at the centre of the rear seat using the vehicle's ISOFIX an- chors. The ISOFIX anchors areonly provided for the left and right outboard rear seating posi- tions. Do not misuse the ISOFIXanchors by attempting to attach a child restraint seat in the middle of the rear seat to the ISOFIXanchors. In a crash, the child restraint seat ISOFIX attachments may not be strong enough to secure the child restraint seat properly in the centre of the rearseat and may break, causing se- rious injury or death.
o Do not mount more than one child restraint to a child restraintlower anchorage point. The im- proper increased load may causethe anchorage points or tether anchor to break, causing serious injury or death.
B230D03HP
Page 342 of 539
1
CONTROLS AND EQUIPMENT
37
o Attach the ISOFIX or ISOFIX-com-
patible child restraint seat only to the appropriate locations shown in the illustration.
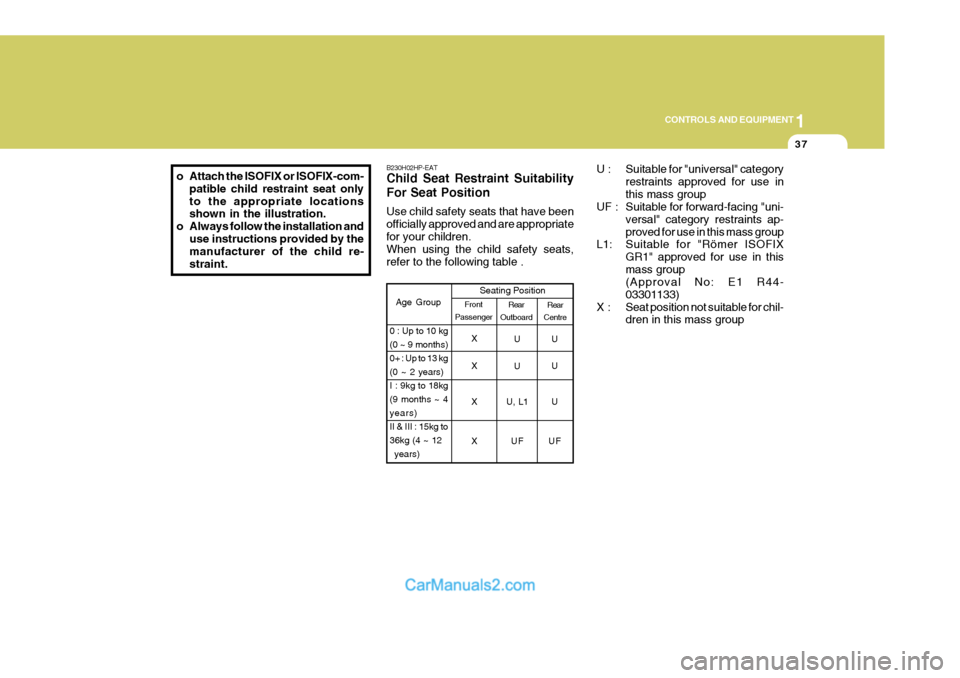
o Always follow the installation and use instructions provided by themanufacturer of the child re- straint. B230H02HP-EAT Child Seat Restraint Suitability For Seat Position Use child safety seats that have been officially approved and are appropriatefor your children. When using the child safety seats, refer to the following table .
U : Suitable for "universal" category
restraints approved for use inthis mass group
UF : Suitable for forward-facing "uni-
versal" category restraints ap-proved for use in this mass group
L1: Suitable for "Römer ISOFIX
GR1" approved for use in thismass group (Approval No: E1 R44- 03301133)
X : Seat position not suitable for chil- dren in this mass group
Rear
Centre
Age Group Seating Position
UU
X UU
Rear
Outboard
Front
Passenger
0 : Up to 10 kg (0 ~ 9 months)0+ : Up to 13 kg(0 ~ 2 years)I : 9kg to 18kg(9 months ~ 4years)II & III : 15kg to36kg (4 ~ 12 years) X
X U, L1 U XU
FUF