2005 Hyundai Terracan set clock
[x] Cancel search: set clockPage 83 of 539
1
FEATURES OF YOUR HYUNDAI
69MULTIMETER
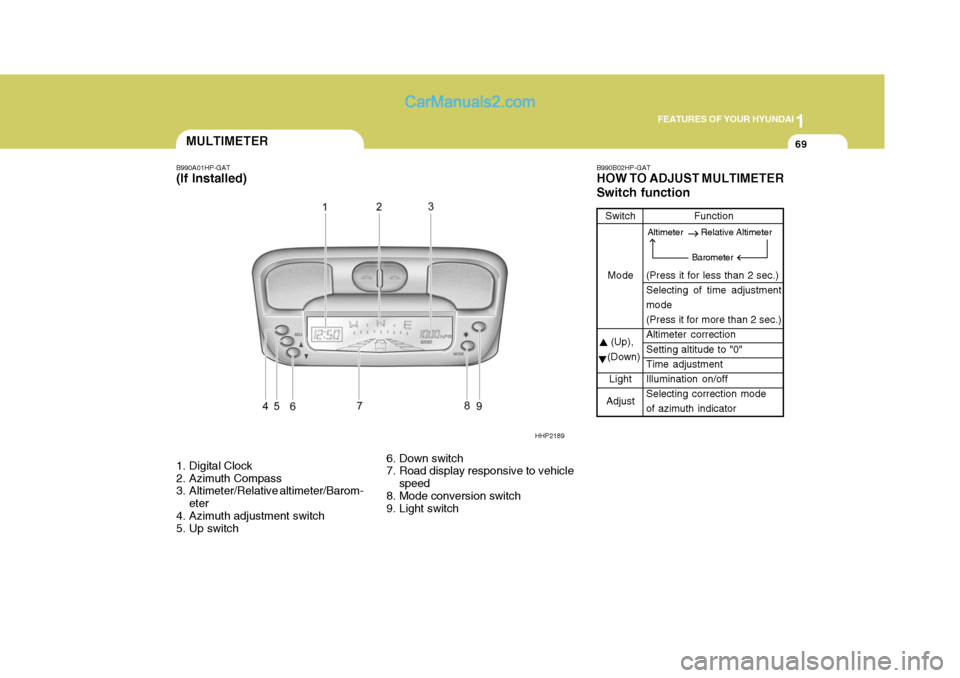
B990A01HP-GAT (If Installed)
1. Digital Clock
2. Azimuth Compass
3. Altimeter/Relative altimeter/Barom-
eter
4. Azimuth adjustment switch
5. Up switch 6. Down switch
7. Road display responsive to vehicle
speed
8. Mode conversion switch
9. Light switch B990B02HP-GAT HOW TO ADJUST MULTIMETER Switch function
Switch
Mode
(Up),
(Down)
Light
Adjust Function
(Press it for less than 2 sec.) Selecting of time adjustment mode (Press it for more than 2 sec.)Altimeter correction Setting altitude to "0" Time adjustmentIllumination on/off Selecting correction mode of azimuth indicator
HHP2189
Altimeter Relative Altimeter
Barometer
Page 93 of 539
1
FEATURES OF YOUR HYUNDAI
79INSTRUMENT PANEL LIGHT CONTROL (RHEOSTAT)DIGITAL CLOCK
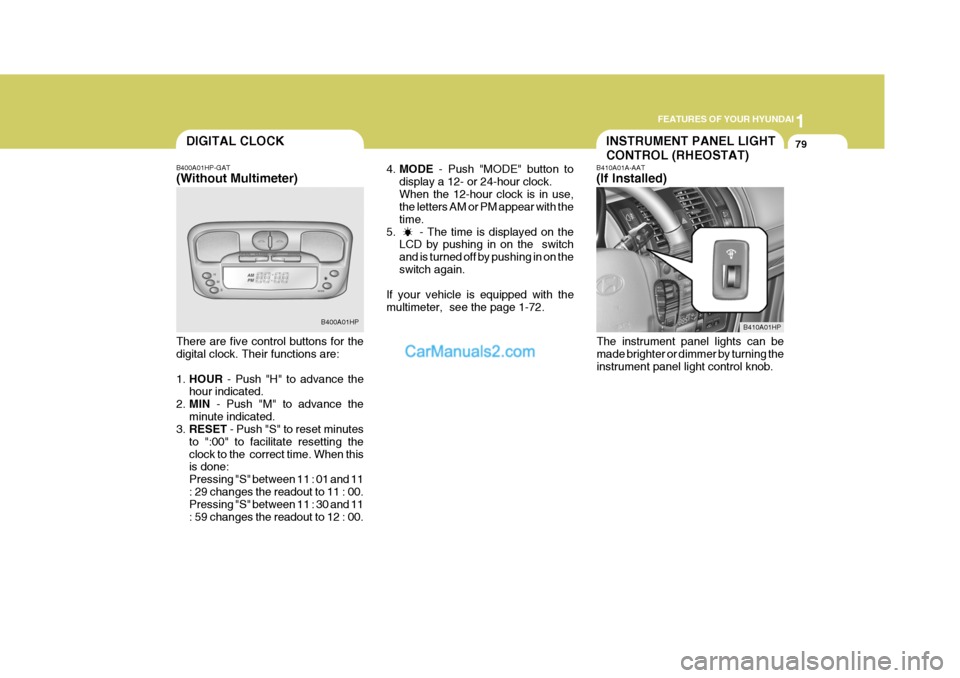
B400A01HP-GAT (Without Multimeter) There are five control buttons for the digital clock. Their functions are: 1. HOUR - Push "H" to advance the
hour indicated.
2. MIN - Push "M" to advance the
minute indicated.
3. RESET - Push "S" to reset minutes
to ":00" to facilitate resetting the clock to the correct time. When this is done: Pressing "S" between 11 : 01 and 11: 29 changes the readout to 11 : 00. Pressing "S" between 11 : 30 and 11 : 59 changes the readout to 12 : 00. B400A01HP
4.
MODE - Push "MODE" button to
display a 12- or 24-hour clock.When the 12-hour clock is in use, the letters AM or PM appear with the time.
5. - The time is displayed on the LCD by pushing in on the switchand is turned off by pushing in on theswitch again.
If your vehicle is equipped with themultimeter, see the page 1-72. B410A01A-AAT (If Installed)
The instrument panel lights can be made brighter or dimmer by turning the instrument panel light control knob.
B410A01HP
Page 136 of 539
1FEATURES OF YOUR HYUNDAI
122
H240B03O-AAT
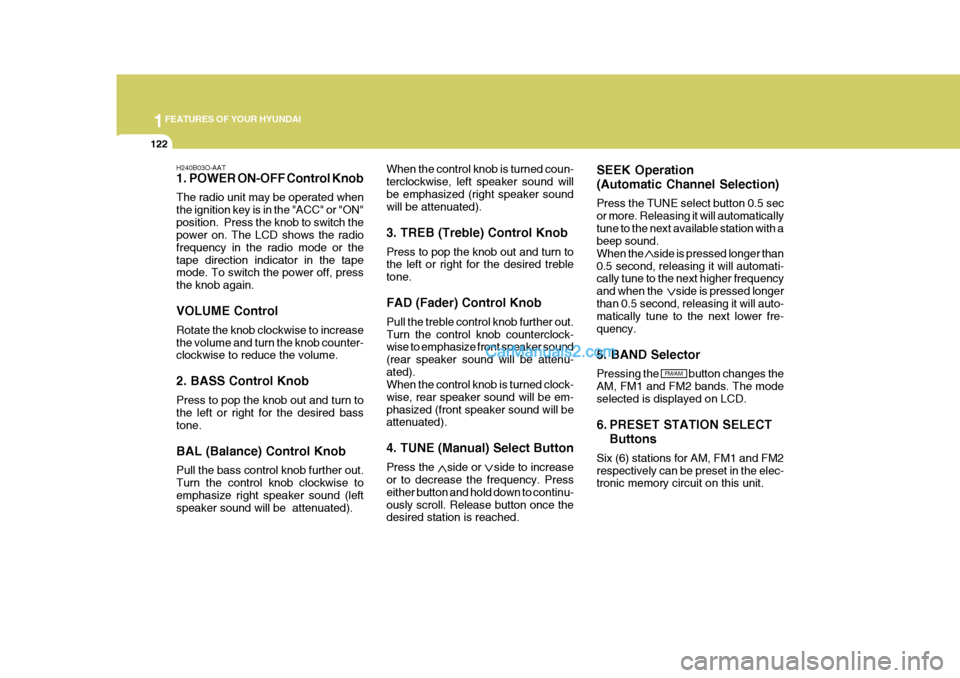
1. POWER ON-OFF Control Knob The radio unit may be operated when the ignition key is in the "ACC" or "ON"position. Press the knob to switch the power on. The LCD shows the radio frequency in the radio mode or thetape direction indicator in the tape mode. To switch the power off, press the knob again. VOLUME Control Rotate the knob clockwise to increase the volume and turn the knob counter- clockwise to reduce the volume. 2. BASS Control Knob Press to pop the knob out and turn to the left or right for the desired bass tone. BAL (Balance) Control Knob Pull the bass control knob further out. Turn the control knob clockwise to emphasize right speaker sound (left speaker sound will be attenuated). When the control knob is turned coun-terclockwise, left speaker sound willbe emphasized (right speaker sound will be attenuated). 3. TREB (Treble) Control Knob Press to pop the knob out and turn to the left or right for the desired treble tone. FAD (Fader) Control Knob Pull the treble control knob further out. Turn the control knob counterclock- wise to emphasize front speaker sound (rear speaker sound will be attenu-ated). When the control knob is turned clock- wise, rear speaker sound will be em-phasized (front speaker sound will be attenuated). 4. TUNE (Manual) Select Button Press the side or side to increase or to decrease the frequency. Press either button and hold down to continu-ously scroll. Release button once the desired station is reached. SEEK Operation (Automatic Channel Selection) Press the TUNE select button 0.5 sec or more. Releasing it will automaticallytune to the next available station with a beep sound. When the side is pressed longer than0.5 second, releasing it will automati- cally tune to the next higher frequency and when the side is pressed longerthan 0.5 second, releasing it will auto- matically tune to the next lower fre- quency. 5. BAND Selector Pressing the button changes the AM, FM1 and FM2 bands. The modeselected is displayed on LCD.
6. PRESET STATION SELECT
Buttons
Six (6) stations for AM, FM1 and FM2 respectively can be preset in the elec- tronic memory circuit on this unit.
FM/AM
Page 141 of 539
1
FEATURES OF YOUR HYUNDAI
127
H290B03E-AAT
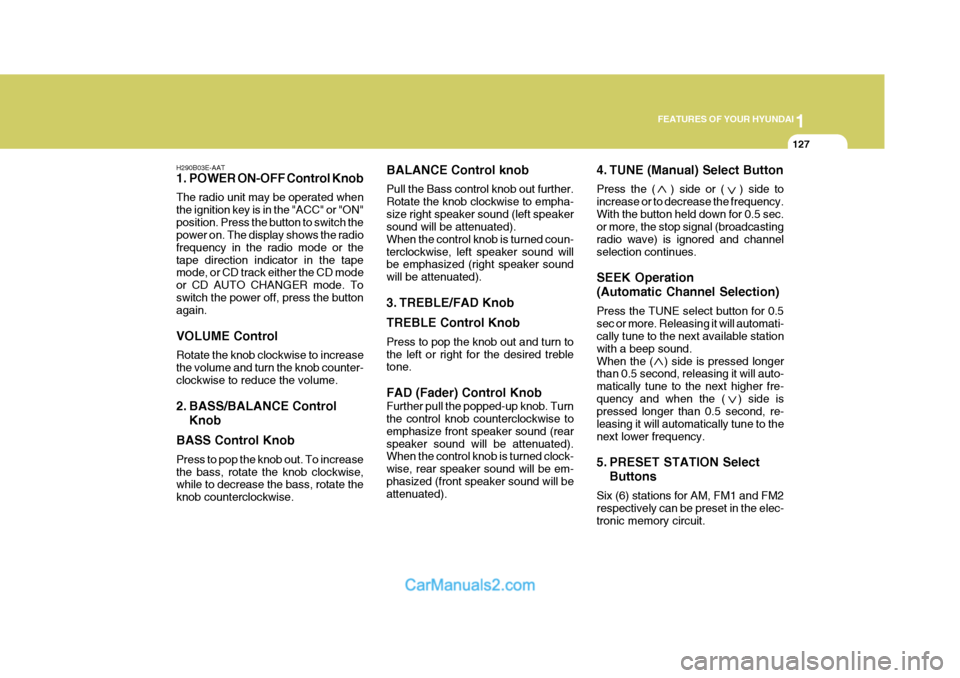
1. POWER ON-OFF Control Knob The radio unit may be operated when the ignition key is in the "ACC" or "ON"position. Press the button to switch the power on. The display shows the radio frequency in the radio mode or thetape direction indicator in the tape mode, or CD track either the CD mode or CD AUTO CHANGER mode. Toswitch the power off, press the button again. VOLUME Control Rotate the knob clockwise to increase the volume and turn the knob counter-clockwise to reduce the volume.
2. BASS/BALANCE Control Knob
BASS Control Knob Press to pop the knob out. To increase the bass, rotate the knob clockwise, while to decrease the bass, rotate the knob counterclockwise. BALANCE Control knob Pull the Bass control knob out further. Rotate the knob clockwise to empha-size right speaker sound (left speaker sound will be attenuated). When the control knob is turned coun-terclockwise, left speaker sound will be emphasized (right speaker sound will be attenuated).
3. TREBLE/FAD Knob TREBLE Control Knob Press to pop the knob out and turn to the left or right for the desired treble tone. FAD (Fader) Control Knob Further pull the popped-up knob. Turn the control knob counterclockwise to emphasize front speaker sound (rearspeaker sound will be attenuated). When the control knob is turned clock- wise, rear speaker sound will be em-phasized (front speaker sound will be attenuated).
4. TUNE (Manual) Select Button Press the ( ) side or ( ) side to increase or to decrease the frequency.With the button held down for 0.5 sec. or more, the stop signal (broadcasting radio wave) is ignored and channelselection continues. SEEK Operation (Automatic Channel Selection) Press the TUNE select button for 0.5 sec or more. Releasing it will automati- cally tune to the next available station with a beep sound.When the ( ) side is pressed longer than 0.5 second, releasing it will auto- matically tune to the next higher fre-quency and when the ( ) side is pressed longer than 0.5 second, re- leasing it will automatically tune to thenext lower frequency.
5. PRESET STATION Select
Buttons
Six (6) stations for AM, FM1 and FM2 respectively can be preset in the elec- tronic memory circuit.
Page 232 of 539
6 DO-IT-YOURSELF MAINTENANCE
10CHANGING THE ENGINE OIL AND FILTER
!
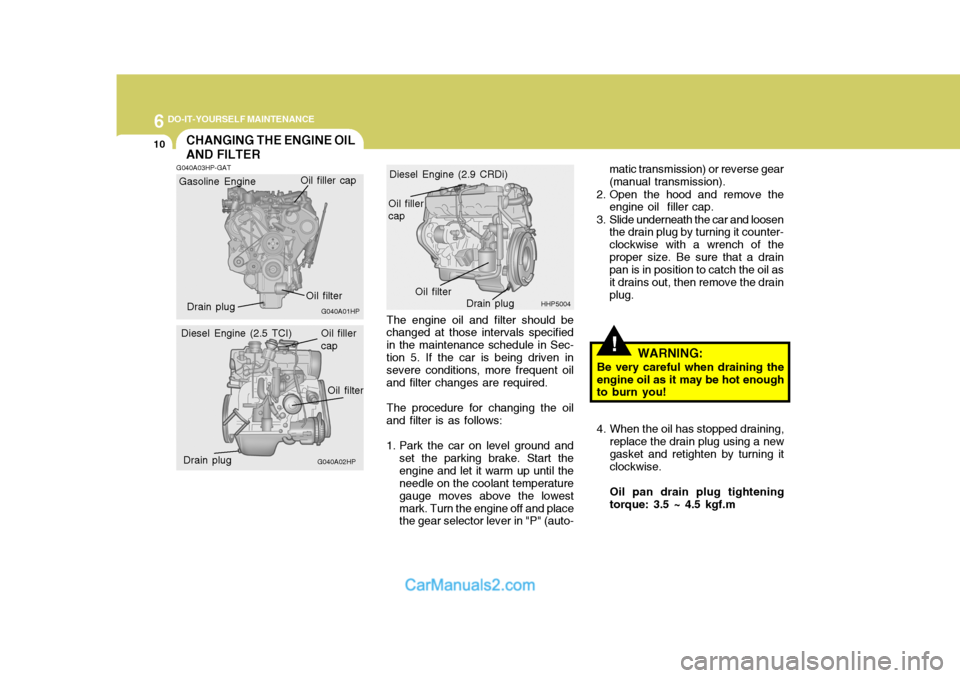
The engine oil and filter should be changed at those intervals specified in the maintenance schedule in Sec- tion 5. If the car is being driven in severe conditions, more frequent oiland filter changes are required. The procedure for changing the oil and filter is as follows:
1. Park the car on level ground and set the parking brake. Start the engine and let it warm up until the needle on the coolant temperature gauge moves above the lowestmark. Turn the engine off and place the gear selector lever in "P" (auto- WARNING:
Be very careful when draining the engine oil as it may be hot enough to burn you!
4. When the oil has stopped draining, replace the drain plug using a new gasket and retighten by turning itclockwise. Oil pan drain plug tightening torque: 3.5 ~ 4.5 kgf.m
G040A03HP-GAT
HHP5004
G040A01HP
G040A02HP matic transmission) or reverse gear (manual transmission).
2. Open the hood and remove the engine oil filler cap.
3. Slide underneath the car and loosen the drain plug by turning it counter-clockwise with a wrench of theproper size. Be sure that a drain pan is in position to catch the oil as it drains out, then remove the drainplug.
Diesel Engine (2.9 CRDi)
Diesel Engine (2.5 TCI)
Gasoline Engine
Oil filter
Drain plug Oil filler cap
Oil filler cap
Oil filter
Drain plug Oil filler cap
Oil filter
Drain plug
Page 289 of 539
10INDEX
2
A Air bag ....................................................................... 1-47
Air Cleaner Filter ....................................................... 6-15
Air Conditioning Care ....................................................................... 6-24
Filter ........................................................... 1-118, 6-26 Operation ................................................... 1-110, 6-25
Switch ................................................................... 1-110
Antenna ................................................................... 1-140
Ashtray ...................................................................... 1-81
Audio Fault Code .................................................... 1-137
Automatic Heating and Cooling Control System .... 1-112
B
Battery ............................................................. 2-26, 6-32 Bi-Level Heating ...................................................... 1-108
Brake
Anti-lock brake system (ABS) ................................ 2-21
Checking the brakes .............................................. 6-22
Fluid ....................................................................... 6-23
Pedal clearance ..................................................... 6-29
Pedal free-play ....................................................... 6-28
Practices ................................................................ 2-22
Breaking-In your New Hyundai ................................... 1-3C
Care of Cassette Tapes ....................
..................... 1-139
Care of Discs .......................................................... 1-138
Cargo Security Screen.............................................. 1-94
Cassette Tape Player Operation (H240) ................1-124
Cassette Tape Player Operation (H280) ................1-129
Catalytic Converter ..................................................... 7-3
CD Auto changer (H 280) .............................. 1-92, 1-134
Center Console Compartment ..................................1-87
Center console armrest .................... ..................... 1-88
Center console box ................................................ 1-87
Child Restraint System............................................. 1-39
Child-Protector Rear Door Lock ...............................1-12
Cigarette Lighter ....................................................... 1-80
Clock ......................................................................... 1-79
Clutch Checking fluid ........................................................ 6-24
Pedal free-play ....................................................... 6-28
Combination Light
Daytime running lights .... .......................................1-74
Headlight flasher .................................................... 1-75
Headlight swi tch ..................................................... 1-73
High-beam swi tch .................................................. 1-74
Lane change si gnal ................................................ 1-73
Parking light auto cut ............................................. 1-74
Turn signal oper ation............................................. 1-73
Compact Disc Player Operation (H 280) .................1-131
Cooling Fans ............................................................. 6-34
Page 371 of 539
1CONTROLS AND EQUIPMENT
66
4.MODE - Push "MODE" button to
display a 12- or 24-hour clock. When the 12-hour clock is in use, the letters AM or PM appear with the time.
5. - The time is displayed on the LCD by pushing in on the switchand is turned off by pushing in on theswitch again.
! CAUTION:
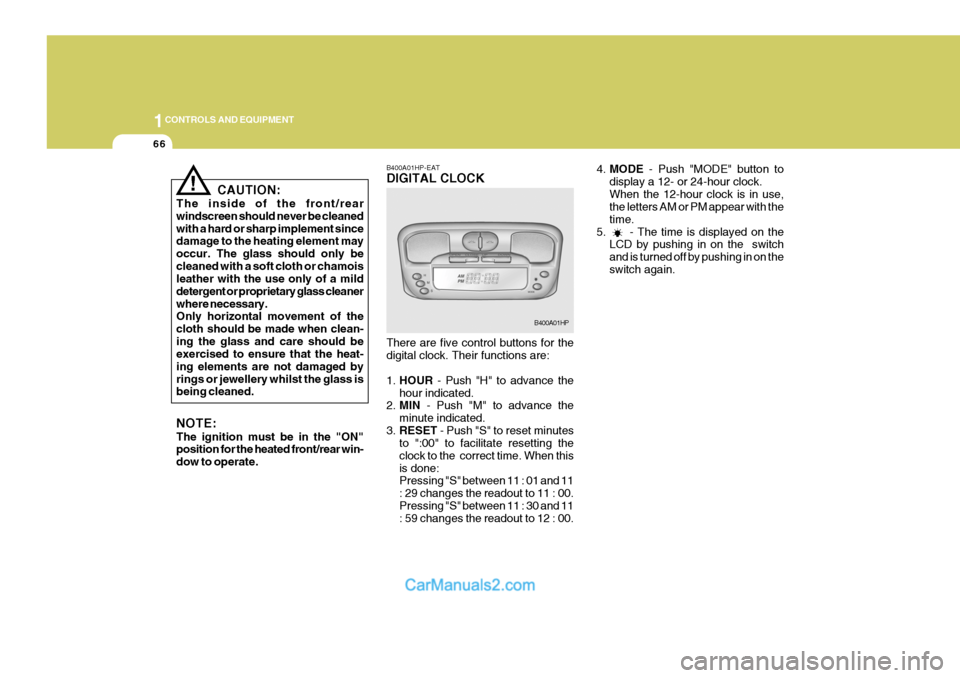
The inside of the front/rear windscreen should never be cleanedwith a hard or sharp implement since damage to the heating element may occur. The glass should only becleaned with a soft cloth or chamois leather with the use only of a mild detergent or proprietary glass cleanerwhere necessary. Only horizontal movement of the cloth should be made when clean-ing the glass and care should be exercised to ensure that the heat- ing elements are not damaged byrings or jewellery whilst the glass is being cleaned. NOTE: The ignition must be in the "ON" position for the heated front/rear win- dow to operate. B400A01HP-EAT DIGITAL CLOCK There are five control buttons for the digital clock. Their functions are: 1.
HOUR - Push "H" to advance the
hour indicated.
2. MIN - Push "M" to advance the
minute indicated.
3. RESET - Push "S" to reset minutes
to ":00" to facilitate resetting the clock to the correct time. When thisis done: Pressing "S" between 11 : 01 and 11 : 29 changes the readout to 11 : 00.Pressing "S" between 11 : 30 and 11 : 59 changes the readout to 12 : 00.
B400A01HP
Page 451 of 539
3
IN CASE OF EMERGENCY
7
!
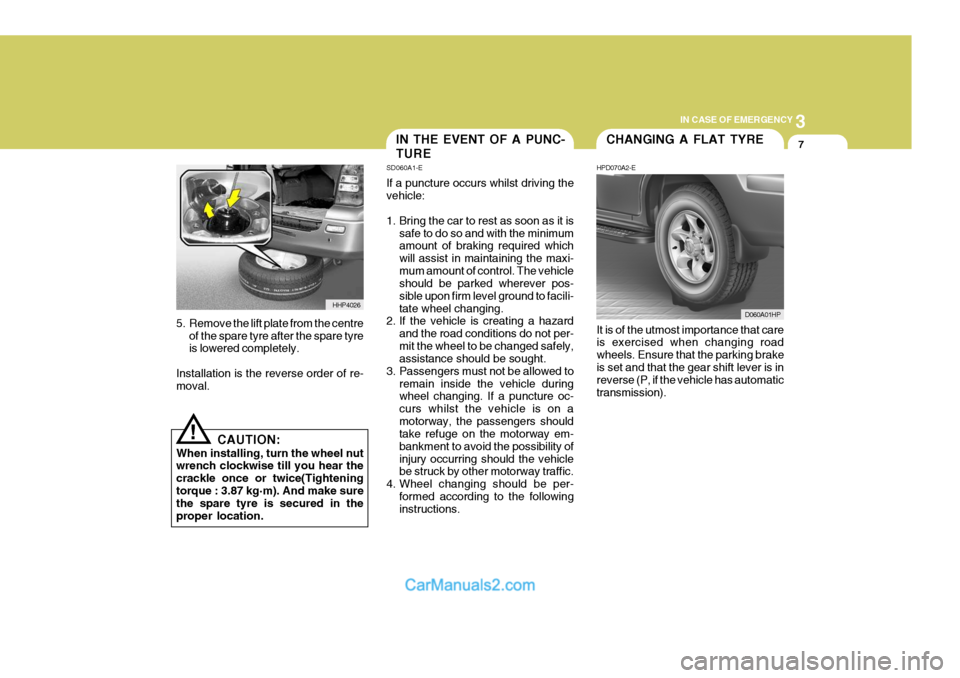
5. Remove the lift plate from the centre
of the spare tyre after the spare tyre is lowered completely.
Installation is the reverse order of re-moval.
CAUTION:
When installing, turn the wheel nutwrench clockwise till you hear the crackle once or twice(Tighteningtorque : 3.87 kg·m). And make sure the spare tyre is secured in the proper location. It is of the utmost importance that care is exercised when changing road wheels. Ensure that the parking brakeis set and that the gear shift lever is in reverse (P, if the vehicle has automatic transmission).
HHP4026
IN THE EVENT OF A PUNC- TURE
SD060A1-E If a puncture occurs whilst driving the vehicle:
1. Bring the car to rest as soon as it is
safe to do so and with the minimum amount of braking required which will assist in maintaining the maxi-mum amount of control. The vehicle should be parked wherever pos- sible upon firm level ground to facili-tate wheel changing.
2. If the vehicle is creating a hazard
and the road conditions do not per-mit the wheel to be changed safely, assistance should be sought.
3. Passengers must not be allowed to remain inside the vehicle duringwheel changing. If a puncture oc- curs whilst the vehicle is on amotorway, the passengers should take refuge on the motorway em- bankment to avoid the possibility ofinjury occurring should the vehicle be struck by other motorway traffic.
4. Wheel changing should be per- formed according to the followinginstructions.CHANGING A FLAT TYRE
HPD070A2-E
D060A01HP