2005 Hyundai Terracan weight
[x] Cancel search: weightPage 263 of 539
6
DO-IT-YOURSELF MAINTENANCE
41
1. Keep all tires inflated to the correct
pressure.
2. Place the vehicle on level ground and press the front bumper & rear bumper down several times. Placevehicle at a distance of 3m (118.1 in.) from the test wall.
3. See that the vehicle is unloaded (except for full levels of coolant, engine oil and fuel, and spare tire,jack, and tools). Have the driver or equivalent weight placed in driver's seat.
4. Clean the headlight lens and turn on the headlight.
5. Open the hood.
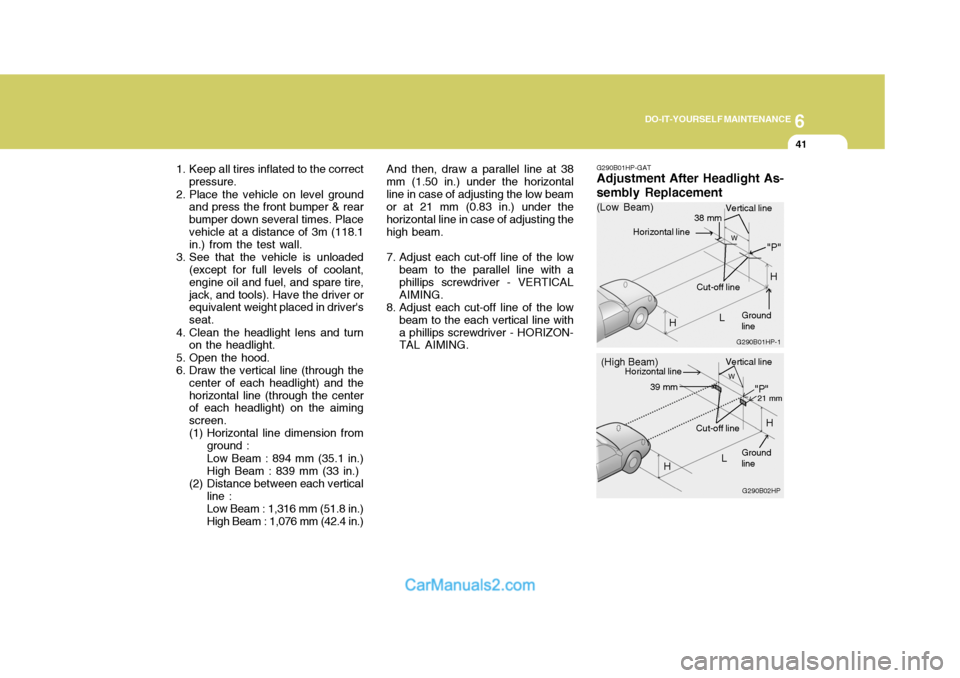
6. Draw the vertical line (through the center of each headlight) and thehorizontal line (through the center of each headlight) on the aiming screen.
(1) Horizontal line dimension from
ground : Low Beam : 894 mm (35.1 in.) High Beam : 839 mm (33 in.)
(2) Distance between each vertical line : Low Beam : 1,316 mm (51.8 in.) High Beam : 1,076 mm (42.4 in.) And then, draw a parallel line at 38
mm (1.50 in.) under the horizontalline in case of adjusting the low beam or at 21 mm (0.83 in.) under the horizontal line in case of adjusting thehigh beam.
7. Adjust each cut-off line of the low beam to the parallel line with a phillips screwdriver - VERTICALAIMING.
8. Adjust each cut-off line of the low beam to the each vertical line witha phillips screwdriver - HORIZON- TAL AIMING. G290B01HP-GAT Adjustment After Headlight As- sembly Replacement
G290B02HP
LW
H Cut-off line
"P"
Vertical line
Horizontal line
Ground line
21 mm39 mm
(High Beam)
H
G290B01HP-1
LW
"P"
38 mm
H
H
(Low Beam)
Vertical line
Ground line
Cut-off line
Horizontal line
Page 322 of 539
1
CONTROLS AND EQUIPMENT
17
!
ZB060C1-E Adjusting Seatback Angle To recline the seatback, lean forward to take your weight off it, then pull up on the recliner control lever at the outside edge of the seat. Now lean back untilthe desired seatback angle is achieved. To lock the seatback into position, release the recliner control lever. WARNING:
To minimize risk of personal injury in event of a collision or sudden stop, both the driver and passen-ger seatbacks should always be in a nearly upright position whilst the vehicle is in motion. The protectionprovided by the seat belts and airbags may be reduced signifi- cantly when the seatbacks are re-clined. There is greater risk that the passenger will slide under the belt resulting in serious injury when the seatbacks are reclined.
HHP2027-E
Lock knob
B080D01HP
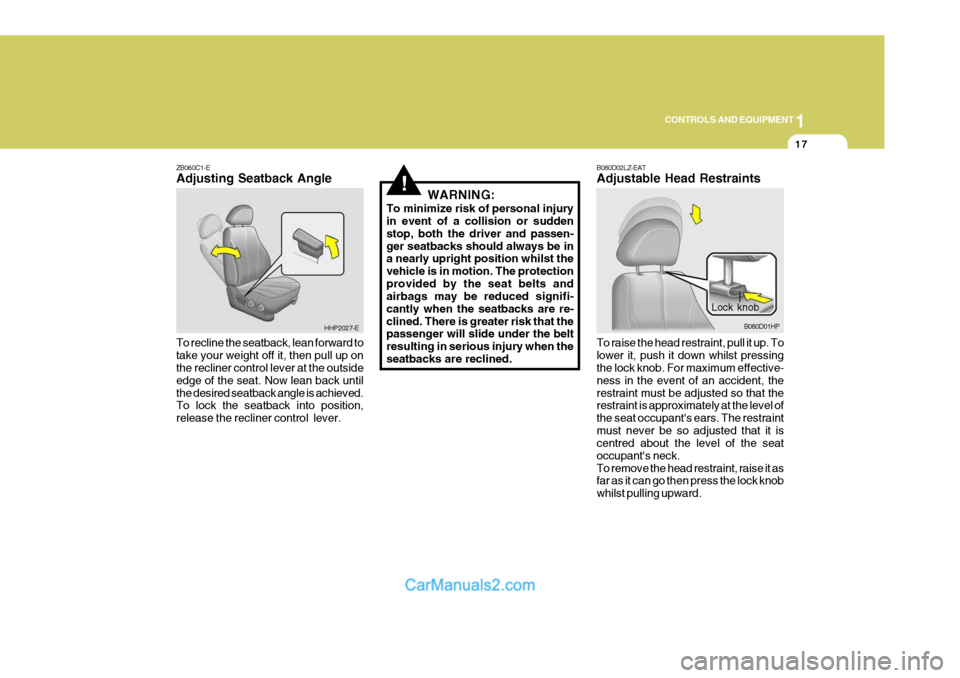
B080D02LZ-EAT Adjustable Head Restraints To raise the head restraint, pull it up. To lower it, push it down whilst pressing the lock knob. For maximum effective- ness in the event of an accident, therestraint must be adjusted so that the restraint is approximately at the level of the seat occupant's ears. The restraintmust never be so adjusted that it is centred about the level of the seat occupant's neck.To remove the head restraint, raise it as far as it can go then press the lock knob whilst pulling upward.
Page 331 of 539
1CONTROLS AND EQUIPMENT
26
SB090C1-E Larger Children Larger children should occupy the rear seat and be restrained at all times. Therestraint may take the form of a special safety belt or the original factory fitted seat belt used in conjunction with anapproved booster cushion depending upon the size and weight of the child. Under no circumstances should chil-dren be allowed to travel standing, kneeling or lying on the seat. Never allow childen to ride in the frontpassenger seat. SB090O1-E Pregnant Women The use of a seat belt is recommended for pregnant women. The seat beltshould be worn as low and snugly as possible across the hips, not across the abdomen. A qualified Medical Prac-titioner should be consulted for further information. SB090E1-E Injured Persons A seat belt should be used when an injured person is being transported.For specific recommendations, the advice of a qualified Medical Practioner should be sought. SB090F1-E Seat Belt Occupancy The seat belts are designed to be used by one seat occupant only. The use of a seat belt by more than one personincreases the levels of injury which may be sustained in the event of an accident. SE090G1-E Do Not Lie Down To ensure that the maximum level of protection may be afforded by the seat belt system, all passengers should be sitting in an upright position throughoutthe journey. The seat belt will be un- able to afford maximum protection if the front seats are at or near the fullyreclined position.SB090H1-E CARE OF SEAT BELTS Seat belt assemblies must never be disassembled or modified in any way.In addition, care should be exercised to ensure that the belt assemblies do not become damaged by being trappedin seat mechanisms, door shuts etc. SB090I-E Periodic Inspection It is recommended that all seat belts be inspected periodically for wear or damage of any kind. Parts of the sys-tem that are damaged should be re- placed as soon as possible. Under no circumstances must any part of theseat belt assemblies be dismantled or repaired.
Page 385 of 539
1CONTROLS AND EQUIPMENT
80
B650A01S-AAT Stowage Precautions
1. Do not place objects on the cargosecurity screen. Such objects may be thrown about inside the vehicle and possibly injure vehicle occu- pants during an accident or whenbraking.
2. For better fuel economy, do not
carry unnecessary weight.
3. Never allow anyone to ride in the luggage compartment. It is designedfor luggage only.
4. Try to maintain the balance of the vehicle and locate the weight as farforward as possible.CARGO SECURITY SCREEN
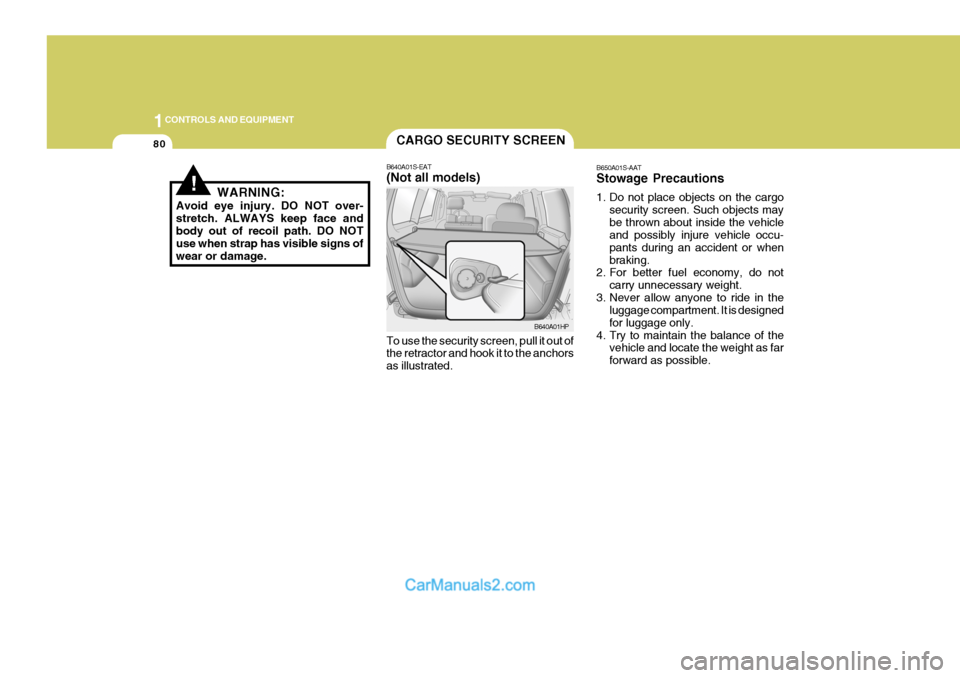
B640A01S-EAT (Not all models) To use the security screen, pull it out of the retractor and hook it to the anchors as illustrated. B640A01HP
!WARNING:
Avoid eye injury. DO NOT over- stretch. ALWAYS keep face andbody out of recoil path. DO NOT use when strap has visible signs of wear or damage.
Page 390 of 539
1
CONTROLS AND EQUIPMENT
85
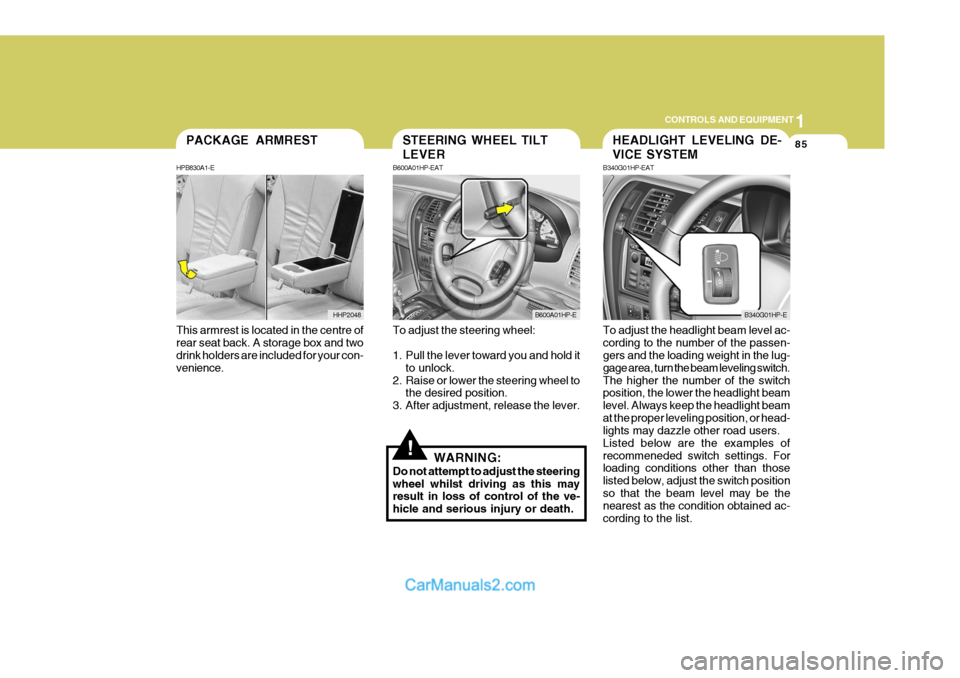
This armrest is located in the centre of rear seat back. A storage box and two drink holders are included for your con- venience.PACKAGE ARMREST
HPB830A1-E
HHP2048
!
To adjust the steering wheel:
1. Pull the lever toward you and hold it to unlock.
2. Raise or lower the steering wheel to the desired position.
3. After adjustment, release the lever.
WARNING:
Do not attempt to adjust the steering wheel whilst driving as this may result in loss of control of the ve- hicle and serious injury or death. To adjust the headlight beam level ac-cording to the number of the passen- gers and the loading weight in the lug- gage area, turn the beam leveling switch.The higher the number of the switch position, the lower the headlight beam level. Always keep the headlight beamat the proper leveling position, or head- lights may dazzle other road users. Listed below are the examples ofrecommeneded switch settings. For loading conditions other than those listed below, adjust the switch positionso that the beam level may be the nearest as the condition obtained ac- cording to the list.
STEERING WHEEL TILT LEVER
B600A01HP-EAT
B600A01HP-E
HEADLIGHT LEVELING DE- VICE SYSTEM
B340G01HP-EAT
B340G01HP-E
Page 420 of 539
2
DRIVING YOUR HYUNDAI
7
!
C055B02HP-GAT STARTING AND STOPPING THE ENGINE FOR TURBOCHARGER INTERCOOLER(Diesel Engine)
(1) Do not race or suddenly accelerate
the engine immediately after start- ing it. If the engine is cold, allow theengine to idle for several seconds before it is driven to ensure suffi- cient lubrication of the turbo chargerunit.
(2) After high speed driving or prolonged
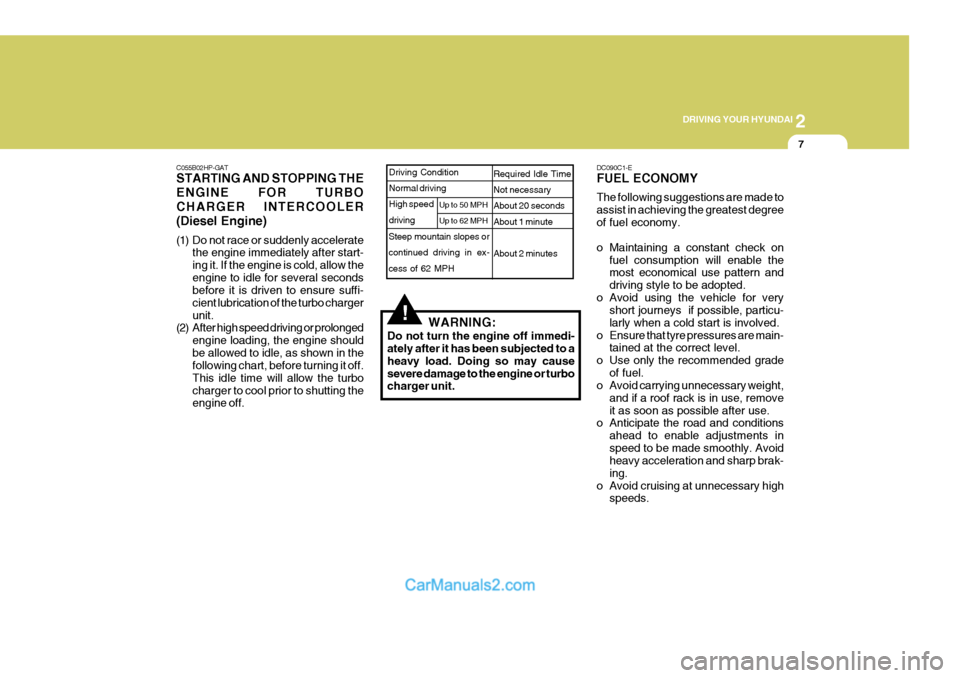
engine loading, the engine shouldbe allowed to idle, as shown in the following chart, before turning it off. This idle time will allow the turbocharger to cool prior to shutting the engine off. WARNING:
Do not turn the engine off immedi-ately after it has been subjected to a heavy load. Doing so may causesevere damage to the engine or turbo charger unit. Steep mountain slopes or continued driving in ex-
cess of 62 MPH
Required Idle Time Not necessary About 20 secondsAbout 1 minute About 2 minutesDriving Condition Normal driving High speed driving
Up to 50 MPH Up to 62 MPHDC090C1-E FUEL ECONOMY The following suggestions are made to assist in achieving the greatest degreeof fuel economy.
o Maintaining a constant check on
fuel consumption will enable the most economical use pattern and driving style to be adopted.
o Avoid using the vehicle for very short journeys if possible, particu-larly when a cold start is involved.
o Ensure that tyre pressures are main- tained at the correct level.
o Use only the recommended grade of fuel.
o Avoid carrying unnecessary weight,
and if a roof rack is in use, removeit as soon as possible after use.
o Anticipate the road and conditions
ahead to enable adjustments inspeed to be made smoothly. Avoid heavy acceleration and sharp brak- ing.
o Avoid cruising at unnecessary high speeds.
Page 437 of 539
2 DRIVING YOUR HYUNDAI
24
ZC170B1-E Electrical System Winter conditions impose severe de- mands upon vehicle electrical systems, particularly the charging circuit. The battery condition and performance along with the alternator performance and drive belt condition should bechecked prior to the onset of winter.WINTER DRIVING
DC170A1-E The onset of winter conditions subject motor vehicles to greater operating demands. Therefore, the following suggestions will assist in maintainingpeak performance and reliability dur- ing these periods:
lowed to accumulate on the under- side of the car. This extra weight canresult in increased fuel consumption and also contribute to corrosion.
o Travel lightly. Don't carry unneces- sary weight in your car. Weight re-duces fuel economy.
o Don't let the engine idle longer than necessary. If you are waiting (andnot in traffic), turn off your engine and restart only when you're readyto go.
o Remember, your Hyundai does not
require extended warm-up. As soonas the engine is running smoothly, you can drive away. In very cold weather, however, give your enginea slightly longer warm-up period.
o Don't "labour" or "over-rev" the en-
gine. Labouring is driving too slowlyin too high a gear resulting in the vehicle kangarooing. If this happens, shift to a lower gear. Over-revving isracing the engine beyond its safe limit. This can be avoided by shifting at the recommended speeds.
o Use your air conditioning sparingly. The air conditioning system is oper-ated by engine power so your fueleconomy is reduced when you use it.SMOOTH CORNERING
C150A01A-EAT Avoid braking or gear changing in cor- ners, especially when roads are wet. Ideally, corners should always be taken under gentle acceleration. If you followthese suggestions, tyre wear will be held to a minimum.
Page 439 of 539
2 DRIVING YOUR HYUNDAI
26
YC200B2-E Trailer Towbars Select the correct towbar and ball com- bination, making sure that its location is compatible with that of the trailer or vehicle being towed.Use a quality non-equalizing towbar which distributes the nose weight uni- formly throughout the chassis. The towbar should be bolted securely to the car and installed by a qualifiedtechnician.
!
o The formation of snow or ice build
up inside the wheel arches may interfere with the roadwheels or steering mechanism. In such in- stances, unusual noises or an in-crease in steering effort may re- sult. Therefore, ensure that the wheelarches are checked peri-odically and any accumulated snow or ice removed.
o It is advisable to carry emergency equipment including, torch,shovel, tow rope, blankets etc., if a journey is to be undertakeninto areas of severe road condi- tions. CAUTION:
Do not do any towing with your carduring its first 1,000 miles in order to allow the engine to have properlyrun-in. Failure to heed this caution may result in serious engine or trans- mission damage.
TRAILER OR VEHICLE TOWING
HPC200A2-E If you are considering towing with your car, you should first check with your Local Laws to determine their legal requirements.Since laws vary from county to county, the requirements for towing trailers, cars, or other types of vehicles orapparatus may differ. Ask your Hyundai dealer for further details before towing.