2005 Hyundai Terracan warning lights
[x] Cancel search: warning lightsPage 186 of 539
2
DRIVING YOUR HYUNDAI
31
C190F01HP-GAT Trailer or Vehicle Towing Tips
1. Before towing, check hitch and safety chain connections as well as proper operation of the trailer running lights, brake lights, and turn signals.
2. Always drive your vehicle at a mod- erate speed (Less than 100 km/h).
3. Trailer towing requires more fuel than normal conditions.
4. To maintain engine braking effi-
ciency, do not tow a trailer with thetransmission in fifth gear (manual transmission) or an overdrive gear (automatic transmission).
5. Always secure items in the trailer to prevent load shift while driving.
6. Check the condition and air pres- sure of all tires on the trailer and your car. Low tire pressure can seriously affect the handling. Alsocheck the spare tire.
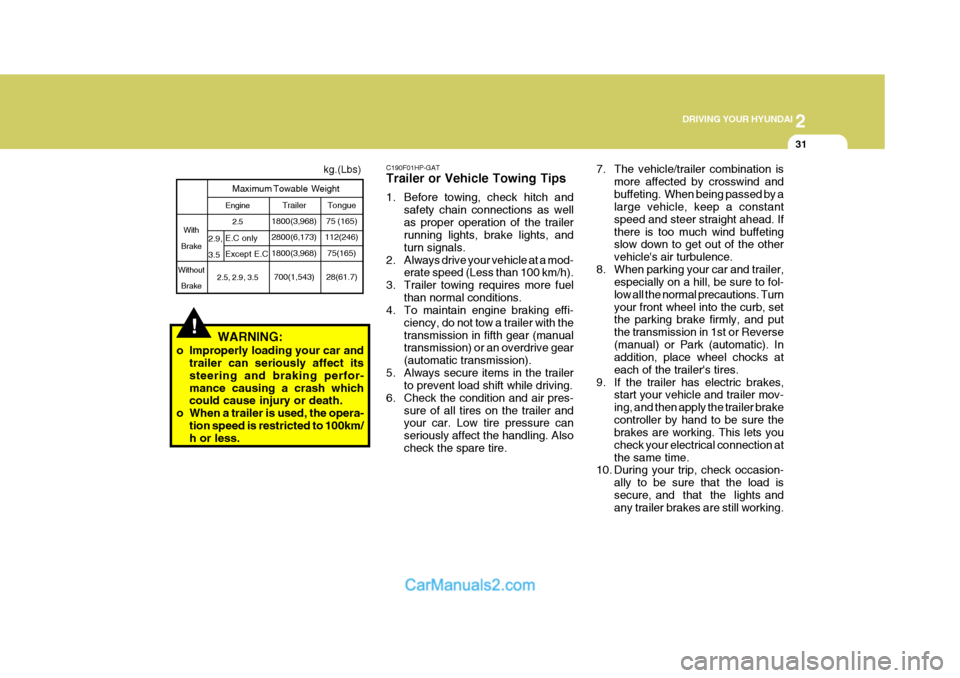
Tongue
75 (165)
112(246)
75(165)
28(61.7)
Engine
2.5
2.5, 2.9, 3.5
!WARNING:
o Improperly loading your car and trailer can seriously affect its steering and braking perfor-mance causing a crash which could cause injury or death.
o When a trailer is used, the opera- tion speed is restricted to 100km/h or less.
With
Brake
Without BrakeE.C only Except E.C
2.9,3.5
Maximum Towable Weight
Trailer
1800(3,968) 2800(6,173) 1800(3,968)
700(1,543)
7. The vehicle/trailer combination is more affected by crosswind and buffeting. When being passed by a large vehicle, keep a constant speed and steer straight ahead. Ifthere is too much wind buffeting slow down to get out of the other vehicle's air turbulence.
8. When parking your car and trailer, especially on a hill, be sure to fol-low all the normal precautions. Turnyour front wheel into the curb, set the parking brake firmly, and put the transmission in 1st or Reverse(manual) or Park (automatic). In addition, place wheel chocks at each of the trailer's tires.
9. If the trailer has electric brakes, start your vehicle and trailer mov-ing, and then apply the trailer brakecontroller by hand to be sure the brakes are working. This lets you check your electrical connection atthe same time.
10. During your trip, check occasion-
ally to be sure that the load issecure, and that the lights and any trailer brakes are still working.
kg.(Lbs)
Page 190 of 539
3
WHAT TO DO IN AN EMERGENCY
3JUMP STARTING
!
D020A02A-AAT
WARNING:
The gas produced by the battery during the jump-start operation is highly explosive. If these instruc- tions are not followed exactly, seri-ous personal injury and damage to the vehicle may occur! If you are not sure how to follow this proce-dure, seek qualified assistance. Automobile batteries contain sul- furic acid. This is poisonous andhighly corrosive. When jump start- ing, wear protective glasses and be careful not to get acid on yourself,your clothing or on the car. o If you should accidentally get acid
on your skin or in your eyes,immediately remove any contami- nated clothing and flush the area with clear water for at least 15 min-utes. Then promptly obtain medical attention. If you must be transported to an emergency facility, continue toapply water to the affected area with a sponge or cloth.
o The gas produced by the battery
during the jump-start operation ishighly explosive. Do not smoke or allow a spark or an open flame inthe vicinity.
o The battery being used to provide
the jump start must be 12-volt. If youcannot determine that it is a 12-volt battery, do not attempt to use it for the jump start.
o To jump start a car with a discharged battery, follow this procedure ex-actly:
1. If the booster battery is installed in another vehicle, be sure the twovehicles are not touching. 2. Turn off all unnecessary lights and
acces-sories in both vehicles.
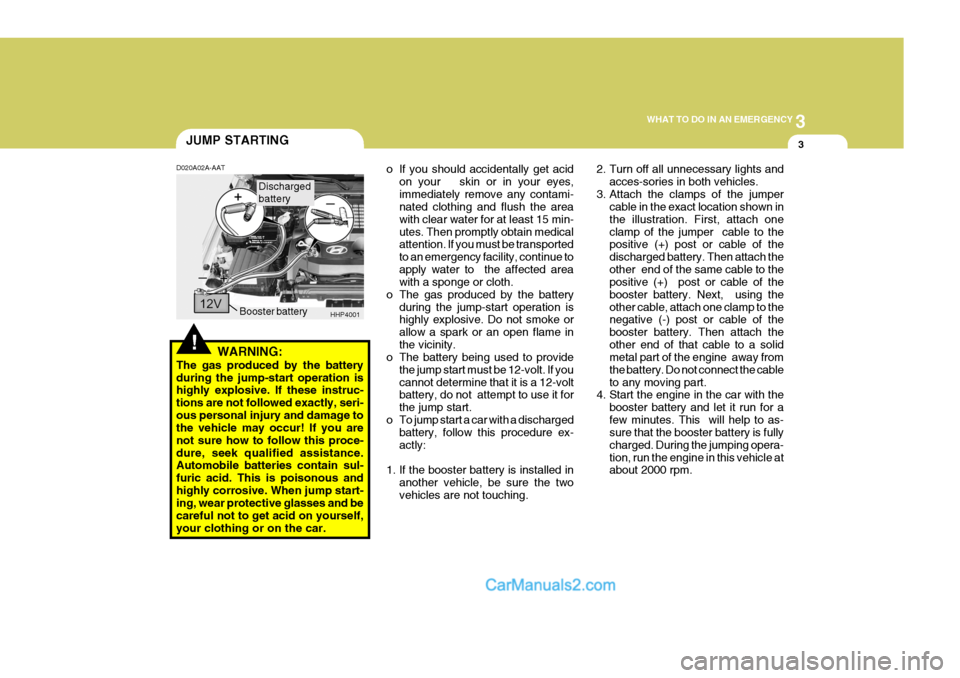
3. Attach the clamps of the jumper cable in the exact location shown inthe illustration. First, attach oneclamp of the jumper cable to the positive (+) post or cable of the discharged battery. Then attach theother end of the same cable to the positive (+) post or cable of the booster battery. Next, using theother cable, attach one clamp to the negative (-) post or cable of the booster battery. Then attach theother end of that cable to a solid metal part of the engine away from the battery. Do not connect the cableto any moving part.
4. Start the engine in the car with the
booster battery and let it run for afew minutes. This will help to as- sure that the booster battery is fully charged. During the jumping opera-tion, run the engine in this vehicle at about 2000 rpm.
HHP4001
Booster battery
Discharged battery
Page 191 of 539
3 WHAT TO DO IN AN EMERGENCY
4IF THE ENGINE OVERHEATS
!
5. Start the engine in the car with the
discharged battery using the nor- mal starting procedure. After the engine starts, leave the jumper cables connected and let the enginerun at fast idle or about 2000 rpm for several minutes.
6. carefully remove the jumper cables in the reverse order of attachment.
If you do not know why your battery became discharged (because the lights were left on, etc.), have the charging system checked by your Hyundaidealer. D030A02HP-AAT If your temperature gauge indicates overheating, you experience a loss of power, or hear loud pinging or knock- ing, the engine is probably too hot. Ifthis happens to you, you should:
1. Pull off the road and stop as soon as
it is safe to do so.
2. Place the gear selector lever in "P"
(automatic), or neutral (manual transmission) and set the parking brake. If the air conditioning is on, turn it off.
3. If engine coolant is running out un- der the car or steam is coming outfrom under the hood, stop the en-gine. Do not open the hood until the engine coolant has stopped running or the steaming has stopped. If thereis no visible loss of coolant and no steam, leave the engine running and check to be sure the enginecooling fan is operating. If the fan is not running, turn the engine off. 4. Check to see if the water pump drive
belt is missing. If it is not missing, check to see that it is tight. If the drive belt seems to be satisfactory, check for engine coolant leakingfrom the radiator, hoses or under the car. (If the air conditioning had been in use, it is normal for coldwater to be draining from it when you stop).
WARNING:
While the engine is running, keephands and clothing away from mov- ing parts such as the fan and drivebelts to prevent injury.
Page 291 of 539
10INDEX
4
G General Checks .......................................................... 6-5
Glove Box ................................................................. 1-86
HHazard Warning Syst em ........................................... 1-78
Headlight Aiming Adjustment ....................................6-40
Headlight Leveling Device Syst em ...........................1-99
Heating and Ventilation ................. ......................... . 1-104
Air flow control ......................................... 1-105, 1-116 Temperature control ............................................. 1-107
High-Mounted Rear Stop Light ................................. 1-95
Hood Release ........................................................... 1-96
Horn .......................................................................... 1-98
IIgnition Sw itch ............................................................. 2-3
Immobilizer S ystem ..................................................... 1-5
Limp Home Procedures ................................... 1-7, 1-9
Key ................................................................... 1-5, 1-8
Indicator and Warning Lights.................................... 1-58
Instrument Cluster and Indicator Li ghts................... 1-54
Instrument Panel Light Control (Rheo stat)............... 1-79
Interior Light .............................................................. 1-85
Intermittent Wiper ..................................................... 1-77
J Jump Starting .............................................................. 3-3 K
Key .............................................................................. 1-4
If you lose your keys ............................................. 3-17
Positions ................................................................... 2-4
L Limited-Slip D ifferential ............................................. 2-22
Luggage Compartment
Cargo Security Scr een ........................................... 1-94
Light ....................................................................... 1-93
Net .......................................................................... 1-93
M Maintenance Intervals Explanation of scheduled maintenance items ......... 5-9
Maintenance under severe usage conditions .......... 5-8 Scheduled maintenance ........................................... 5-4
Service requ irements............................................... 5-2
Mirrors Day/night inside rearview .......................................1-91
Outside rearview .................................................... 1-88
Multimet er ................................................................. 1-69
Altimeter ................................................................. 1-70
Barometer .............................................................. 1-72
Digital Clock ........................................................... 1-72
Electrical azi muth compass ................................... 1-70
Relative altimeter ................................................... 1-71
Page 293 of 539
10INDEX
6
Pressure ................................................................... 8-3
Replacement ............................................................ 8-6
Rotation .................................................................... 8-5
Snow tires ................................................................ 8-4
Spare tire ................................................................. 3-5
Traction .................................................................... 8-5
Towing
A trailer (or vehicle) ............................................... 2-28
Emergency ............................................................. 3-16
If your car must be towed .....................................3-14
Transmission
Automatic transmission ............................................ 2-9
Automatic transmission fluid checking ...................6-20
Manual transmission ................................................ 2-7
Manual transmission oil checking .......................... 6-18
Trip Odometer ........................................................... 1-67
U Under T ray ................................................................ 1-23
V Vehicle Identification Number ..................................... 8-2
Vehicle Specifications ................................................. 9-1 WWarning Lights
.......................................................... 1-39
Windows
Power ..................................................................... 1-17
Windshield Wiper and Washer................................. 1-76
Rear Wiper and Washer Switch ............................1-77
Windshield Wiper Blades ..................... ..................... 6-16
Page 305 of 539
YOUR VEHICLE AT A GLANCE
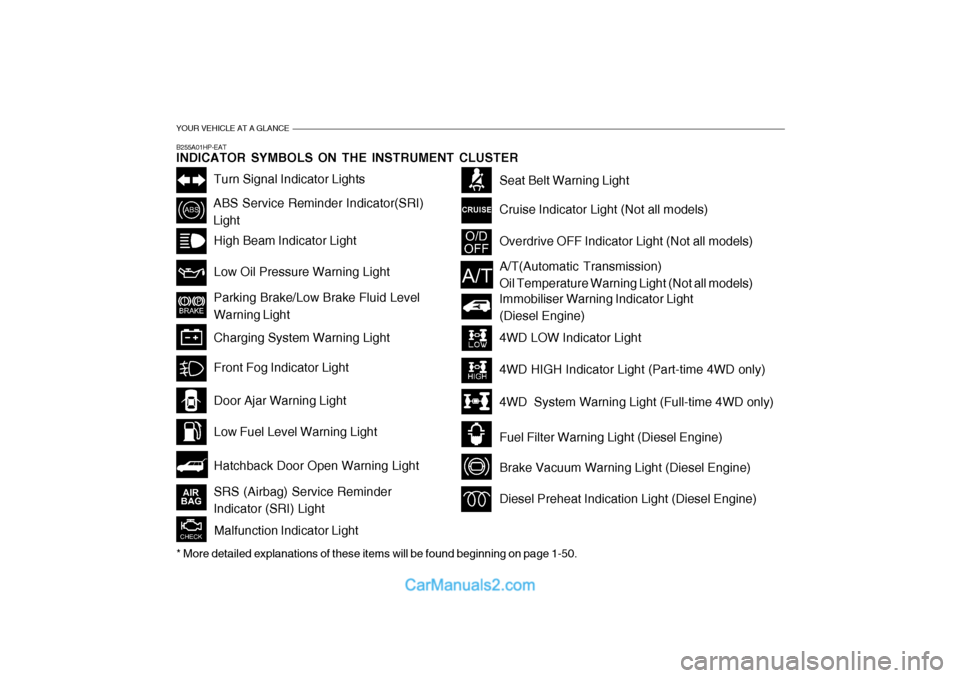
B255A01HP-EAT INDICATOR SYMBOLS ON THE INSTRUMENT CLUSTER
Turn Signal Indicator Lights
ABS Service Reminder Indicator(SRI) LightHigh Beam Indicator Light Low Oil Pressure Warning Light Parking Brake/Low Brake Fluid Level Warning Light Charging System Warning Light
Hatchback Door Open Warning Light
Door Ajar Warning Light Low Fuel Level Warning Light
Front Fog Indicator Light
Overdrive OFF Indicator Light (Not all models)
Immobiliser Warning Indicator Light (Diesel Engine)
Seat Belt Warning Light Cruise Indicator Light (Not all models)
Malfunction Indicator Light
A/T(Automatic Transmission) Oil Temperature Warning Light (Not all models)
4WD LOW Indicator Light 4WD HIGH Indicator Light (Part-time 4WD only)
4WD System Warning Light (Full-time 4WD only)
Fuel Filter Warning Light (Diesel Engine)
Brake Vacuum Warning Light (Diesel Engine)
Diesel Preheat Indication Light (Diesel Engine)
* More detailed explanations of these items will be found beginning on page 1-50.SRS (Airbag) Service Reminder Indicator (SRI) Light
Page 306 of 539
Fuel Recommendations ............................................... 1-2
Running In Your Hyundai .............................................. 1-4
Immobiliser System ...................................................... 1-5
Door Locks ................................................................... 1-9Theft-Alarm System ..................................................... 1-11
Power Windows ........................................................... 1-14
Seats ........................................................................... 1-16
Seat Belts .................................................................... 1-25
Child Restraint System ................................................ 1-31
Supplemental Restraint (AIRBAG) System .................1-40
Instrument Cluster and Indicator Lights .......................1-46
Warning and Indicator Lights....................................... 1-50
Multi-Function Switch .................................................. 1-60
Windscreen Wiper/Washer Switch ..............................1-63
Sunroof ........................................................................ 1-70
Mirror ........................................................................... 1-75
Bonnet Release ........................................................... 1-83
Cruise Co ntrol.............................................................. 1-86
Heating and Cooling Control .......... ..............................1-89
Stereo Sound System ............................................... 1-105
Antenna ..................................................................... 1-107
CONTROLS AND EQUIPMENT
1
1
Page 355 of 539
1CONTROLS AND EQUIPMENT
50
!!
!
B260P02Y-EAT
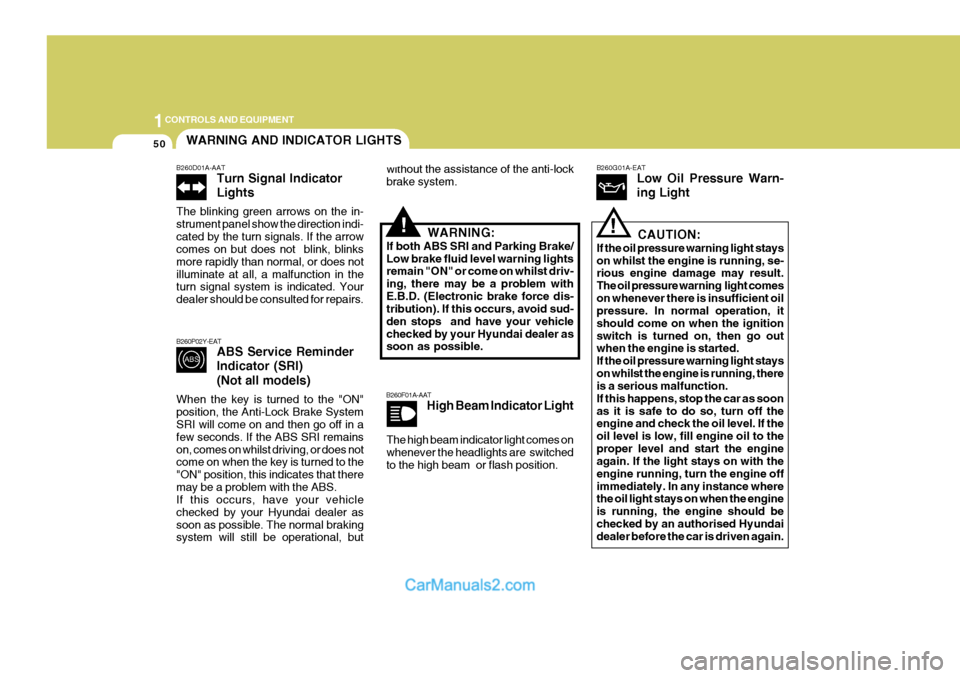
ABS Service Reminder Indicator (SRI) (Not all models)
When the key is turned to the "ON" position, the Anti-Lock Brake System SRI will come on and then go off in a few seconds. If the ABS SRI remainson, comes on whilst driving, or does not come on when the key is turned to the "ON" position, this indicates that theremay be a problem with the ABS. If this occurs, have your vehicle checked by your Hyundai dealer assoon as possible. The normal braking system will still be operational, but without the assistance of the anti-lock brake system.
WARNING:
If both ABS SRI and Parking Brake/Low brake fluid level warning lights remain "ON" or come on whilst driv- ing, there may be a problem withE.B.D. (Electronic brake force dis- tribution). If this occurs, avoid sud- den stops and have your vehiclechecked by your Hyundai dealer as soon as possible.
B260F01A-AAT High Beam Indicator Light B260G01A-EAT
Low Oil Pressure Warn- ing Light
CAUTION:
If the oil pressure warning light stays on whilst the engine is running, se- rious engine damage may result. The oil pressure warning light comeson whenever there is insufficient oil pressure. In normal operation, it should come on when the ignitionswitch is turned on, then go out when the engine is started. If the oil pressure warning light stayson whilst the engine is running, there is a serious malfunction. If this happens, stop the car as soonas it is safe to do so, turn off the engine and check the oil level. If the oil level is low, fill engine oil to theproper level and start the engine again. If the light stays on with the engine running, turn the engine offimmediately. In any instance where the oil light stays on when the engine is running, the engine should bechecked by an authorised Hyundai dealer before the car is driven again.
WARNING AND INDICATOR LIGHTS
B260D01A-AAT Turn Signal Indicator Lights
The blinking green arrows on the in- strument panel show the direction indi-cated by the turn signals. If the arrow comes on but does not blink, blinks more rapidly than normal, or does notilluminate at all, a malfunction in the turn signal system is indicated. Your dealer should be consulted for repairs.
The high beam indicator light comes on whenever the headlights are switched to the high beam or flash position.