2005 Hyundai Sonata low beam
[x] Cancel search: low beamPage 12 of 271

YOUR VEHICLE AT A GLANCE
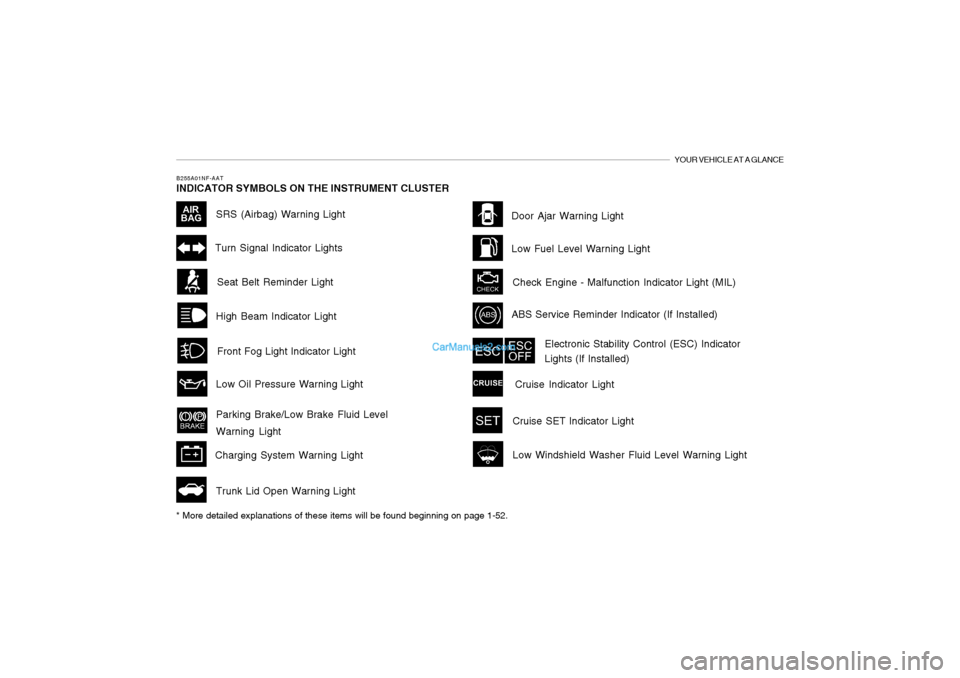
B255A01NF-AATINDICATOR SYMBOLS ON THE INSTRUMENT CLUSTER
High Beam Indicator LightDoor Ajar Warning LightSeat Belt Reminder LightTurn Signal Indicator Lights
ABS Service Reminder Indicator (If Installed)
Low Oil Pressure Warning Light
Parking Brake/Low Brake Fluid Level
Warning Light
Charging System Warning Light
SRS (Airbag) Warning Light
Cruise Indicator Light Check Engine - Malfunction Indicator Light (MIL)
Electronic Stability Control (ESC) Indicator
Lights (If Installed)
Low Windshield Washer Fluid Level Warning LightFront Fog Light Indicator Light
Cruise SET Indicator LightLow Fuel Level Warning Light
Trunk Lid Open Warning Light
* More detailed explanations of these items will be found beginning on page 1-52.
Page 64 of 271

1
FEATURES OF YOUR HYUNDAI
51
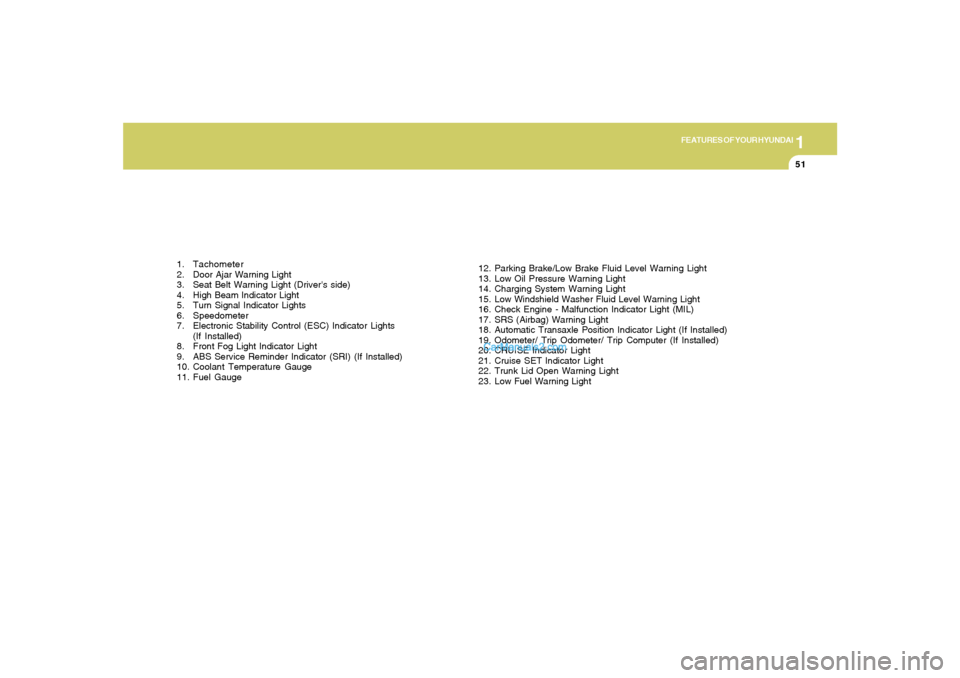
1. Tachometer
2. Door Ajar Warning Light
3. Seat Belt Warning Light (Driver's side)
4. High Beam Indicator Light
5. Turn Signal Indicator Lights
6. Speedometer
7. Electronic Stability Control (ESC) Indicator Lights
(If Installed)
8. Front Fog Light Indicator Light
9. ABS Service Reminder Indicator (SRI) (If Installed)
10. Coolant Temperature Gauge
11. Fuel Gauge12. Parking Brake/Low Brake Fluid Level Warning Light
13. Low Oil Pressure Warning Light
14. Charging System Warning Light
15. Low Windshield Washer Fluid Level Warning Light
16. Check Engine - Malfunction Indicator Light (MIL)
17. SRS (Airbag) Warning Light
18. Automatic Transaxle Position Indicator Light (If Installed)
19. Odometer/ Trip Odometer/ Trip Computer (If Installed)
20. CRUISE Indicator Light
21. Cruise SET Indicator Light
22. Trunk Lid Open Warning Light
23. Low Fuel Warning Light
Page 65 of 271

1FEATURES OF YOUR HYUNDAI52
WARNING AND INDICATOR LIGHTSB260B01JM-AAT
SRS (Airbag) Warning Light
The SRS warning light comes on for about 6
seconds after the key is turned to the "ON"
position or after the engine is started, after which
it will go out.
This light also comes on when the SRS is not
working properly. If the AIRBAG warning light
does not come on, or continuously remains on
after operating for about 6 seconds when you
turned the ignition key to the "ON" position or
started the engine, or if it comes on while driving,
have the SRS inspected by an authorized
Hyundai dealer.B260D01A-AAT
Turn Signal Indicator Lights
The blinking green arrows on the instrument
panel show the direction indicated by the turn
signals. If the arrow comes on but does not blink,
blinks more rapidly than normal, or does not
illuminate at all, a malfunction in the turn signal
system is indicated. Your dealer should be
consulted for repairs.
B260E01NF-AAT
Seat Belt Reminder Light
and Chime (Driver's side)
The driver's seat belt reminder light blinks and
the warning chime sounds for 6 seconds when
the ignition key is turned from the "OFF" position
to the "ON" or "START" position to remind the
driver to fasten the driver's seat belt.B260F01A-AAT
High Beam Indicator Light
The high beam indicator light comes on when-
ever the headlights are switched to the high
beam or flash position.
B260G01A-AAT
Low Oil Pressure Warning Light
CAUTION:
If the low oil pressure warning light stays on
while the engine is running, serious engine
damage may result. The oil pressure warning
light comes on whenever there is insufficient
oil pressure. In normal operation, it should
come on when the ignition switch is turned on,
then go out when the engine is started. If the
oil pressure warning light stays on while the
engine is running, there is a serious malfunc-
tion.
If this happens, stop the car as soon as it is safe
to do so, turn off the engine and check the oil
level. If the oil level is low, fill the engine oil to
the proper level and start the engine again. If
the light stays on with the engine running, turn
the engine off immediately. In any instance
where the oil light stays on when the engine
is running, the engine should be checked by
a Hyundai dealer before the car is driven again.
!
B260A01Y-GAT
Front Fog Light Indicator Light
This fog indicator light comes on when the
ignition key is turned to the "ON" position and the
front fog light switch is on.
Page 75 of 271

1FEATURES OF YOUR HYUNDAI62
B340D01A-AATHigh-beam Switch
B340B01A-AATLane Change SignalTo indicate a lane change, move the lever up or
down to a point where it begins flashing.
The lever will automatically return to the center
position when released.
B340C03A-AATHeadlight SwitchTo operate the headlights, turn the barrel on the
end of the multi-function switch. The first posi-
tion turns on the parking lights, sidelights, tail
lights and instrument panel lights. The second
position turns on the headlights.NOTE:The ignition must be in the "ON" position
to turn on the headlights.Parking Light Auto OffIf you do not turn the parking lights "OFF" after
driving, the parking lights will automatically shut
"OFF" when the driver's door is opened.
To turn them "ON" again, you must simply turn
the ignition key to the "ON" position.
B340B01NFB340C01NF
To turn on the headlight high beams, push the
lever forward (away from you). The High Beam
Indicator Light will come on at the same time. For
low beams, pull the lever back toward you.
B340D01NF
Page 77 of 271

1FEATURES OF YOUR HYUNDAI64
WINDSHIELD WIPER AND WASHER
SWITCHB350A01A-AATThe windshield wiper switch has three posi-
tions:
1. Intermittent wiper operation
2. Low-speed operation
3. High-speed operationNOTE:To prevent damage to the wiper system, do
not attempt to wipe away heavy accumula-
tions of snow or ice. Accumulated snow
and ice should be removed manually. If
there is only a light layer of snow or ice,
operate the heater in the defrost mode to
melt the snow or ice before using the wiper.
HNF2101-A(1)
(2)
(3)
B350B01O-GATWindshield Washer OperationTo use the windshield washer, pull the wiper/
washer lever toward the steering wheel. When
the washer lever is operated, the wipers auto-
matically make two passes across the wind-
shield. The washer continues to operate until
the lever is released.NOTE:o Do not operate the washer more than 15
seconds at a time or when the fluid
reservoir is empty.
o In icy or freezing weather, be sure the
wiper blades are not frozen to the glass
prior to operating the wipers.
o In areas where water freezes in winter,
use windshield washer antifreeze.
HNF2103-A
FRONT FOG LIGHT SWITCHB360B01L-AATTo turn on the front fog lights, place the switch
in the "ON" position. They will light when the
headlight switch is in the second position.NOTE:If you turn on the headlight high beams, the
front fog lights will be turned off.
B360B02NF
Page 86 of 271

1
FEATURES OF YOUR HYUNDAI
73
!
CAUTION:
If the sunroof is not reset, it may not operate
properly.B460E01NF-AATResetting the sunroofWhenever the vehicle battery is disconnected
or discharged, or you use the emergency handle
to operate the sunroof, you have to reset your
sunroof system as follows:
1. Turn the ignition key to the "ON" position.
2. According to the position of the sunroof, do
as follows.
1) In case that the sunroof has closed com-
pletely or been tilted : Press the TILT UP
button for 1 second.
2) In case that the sunroof has been opened:
Press and hold the TILT UP button for
more than 5 seconds until the sunroof
has closed completely. Then press the
TILT UP button for 1 second.
3. Then, release it.
4. Press and hold the TILT UP button once
again until the sunroof has returned to the
original TILT UP position after it raises a little
higher than the maximum TILT UP position.
When this is complete, the sunroof system
is reset.
B480B01Y-AATMap LightPush in the map light switch to turn the light on
or off. This light produces a spot beam for
convenient use as a map light at night or as a
personal light for the driver and the passenger.
B480B01NF
INTERIOR LIGHTWithout sunroofWith sunroof
B490A02NF-GATInterior LightThe interior courtesy light has two buttons. The
two buttons are:
o DOOR
In the "DOOR" position, the interior courtesy
light comes on when any door is opened regard-
less of the ignition key position. The light goes
out gradually 30 seconds after the door is
closed.
oON
In the "ON" position, the light stays on at all
times.
HNF2110
Page 163 of 271

2
DRIVING YOUR HYUNDAI
19
C190B01S-AATTrailer HitchesSelect the proper hitch and ball combination,
making sure that its location is compatible with
that of the trailer or vehicle being towed.
Use a quality non-equalizing hitch which distrib-
utes the tongue load uniformly throughout the
chassis.
The hitch should be bolted securely to the car
and installed by a qualified technician. DO NOT
USE A HITCH DESIGNED FOR TEMPORARY
INSTALLATION AND NEVER USE ONE THAT
ATTACHES ONLY TO THE BUMPER.C190C01Y-AATTrailer BrakesIf your trailer is equipped with a braking system,
make sure it conforms to federal and/or local
regulations and that it is properly installed and
operating correctly.NOTE:If you tow a trailer or vehicle, your car will
require more frequent maintenance due to
the additional load. See Maintenance Under
Severe Usage Conditions" on page 5-6.
TRAILER OR VEHICLE TOWING!
C190A01S-AATIf you are considering towing with your car, you
should first check with your State's Department
of Motor Vehicles to determine their legal re-
quirements.
Since laws vary from State to State the require-
ments for towing trailers, cars, or other types of
vehicles or apparatus may differ. Ask your
Hyundai dealer for further details before towing.
CAUTION:
Do not do any towing with your car during
its first 1,200 miles (2,000 km) in order to
allow the engine to properly break in. Fail-
ure to heed this caution may result in seri-
ous engine or transaxle damage.
USE OF LIGHTSC180A01A-AATCheck your lights regularly for correct opera-
tion and always keep them clean. When driving
during the day in conditions of poor visibility, it
is helpful to drive with headlights on low beam.
This enables you to be seen as well as to see.
Page 228 of 271

6
DO-IT-YOURSELF MAINTENANCE
30
HEADLIGHT AIMING ADJUSTMENTG290A02O-AATBefore performing aiming adjustment, make
sure of the following.
1. Keep all tires inflated to the correct pressure.
2. Place the vehicle on level ground and press
the front bumper & rear bumper down sev-
eral times.
Place vehicle at a distance of 118 in. (3m)
from the test wall.
3. See that the vehicle is unloaded (except for
full levels of coolant, engine oil and fuel, and
spare tire, jack, and tools). Have the driver
or equivalent weight placed in driver's seat.
4. Clean the headlight lenses and turn on the
headlights (Low beam).
5. Open the hood.
G290A01NF-A
Vertical
aiming
!
6. Draw a vertical line (through the center of
each headlight beam pattern) and a horizon-
tal line (through the center of each headlight
beam pattern) on the aiming screen.
And then, draw a parallel line at 0.8 in. (21
mm) under the horizontal line.
7. Adjust each cut-off line of the low beam to the
parallel line with a phillips screwdriver -
VERTICAL AIMING.
WARNING:
Horizontal aiming should be adjusted by
an authorized Hyundai dealer.
G290B01NF-AATAdjustment After Headlight Assembly
Replacement
G260B01GK
L
W
H
H
Cut-off line
Ground line
"P"
Horizontal line
Vertical line
0.8 in.(21 mm)
If the vehicle has had front body repair and the
headlight assembly has been replaced, the
headlight aiming should be checked using the
aiming screen as shown in the illustration. Turn
on the headlight switch (Low Beam Position).
1. Adjust headlights so that main axis of light is
parallel to the center line of the body and is
aligned with point "P" shown in the illustration.
2. Dotted lines in the illustration show the center
of the headlights.