Page 175 of 271

3
WHAT TO DO IN AN EMERGENCY
5
SPARE TIRED040A02GK-AATTEMPORARY SPARE TIRE
The following instructions for the tem-
porary spare tire should be observed:
1. Check inflation pressure as soon as
practical after installing the spare
tire, and adjust to the specified pres-
sure. The tire pressure should be
periodically checked and maintained
at the specified pressure while the
tire is stored.Tire Size
Inflation Pressure
T125/80 D16
420 KPA(60 PSI)
4. As the temporary spare tire is spe-
cifically designed for your car, it
should not be used on any other
vehicle.
5. The temporary spare tire should not
be used on any other wheels, nor
should standard tires, snow tires,
wheel covers or trim rings be used
with the temporary spare wheel. If
such use is attempted, damage to
these items or other car components
may occur.
6. The temporary spare tire pressure
should be checked once a month
while the tire is stored.
2. The spare tire should only be used
temporarily and should be returned
to the luggage compartment as soon
as the original tire can be repaired or
replaced.
3. Continuous use at speeds of over 50
mph (80 km/h) is not recommended. Spare Tire Pressure
CAUTION:
o Do not use snow chains with your
temporary spare tire.
o Do not use more than one tempo-
rary spare tire at a time.
o Do not tow a trailer while the tem-
porary spare tire is installed.
!
D040B01NF-GATHandling the Spare Tire
To remove the spare tire, take out the
tool receptacle and remove the installa-
tion bolt by turning it counterclockwise.
To replace the spare tire in its storage
compartment, tighten the bolt firmly
with your fingers until there is no more
play in the spare tire.
HNF4008
Page 176 of 271

36WHAT TO DO IN AN EMERGENCY
CHANGING A FLAT TIRE
IF YOU HAVE A FLAT TIRE
D060A01A-AATThe procedure described on the follow-
ing pages can be used to rotate tires as
well as to change a flat tire. When
preparing to change a flat tire, check to
be sure the gear selector lever is in "P"
(automatic transaxle) or reverse gear
(manual transaxle) and that the parking
brake is set, then:
D050A01A-AATIf a tire goes flat while you are driving:
1. Take your foot off the accelerator pedal
and let the car slow down while driving
straight ahead. Do not apply the brakes
immediately or attempt to pull off the
road as this may cause a loss of
control. When the car has slowed to
such a speed that it is safe to do so,
brake carefully and pull off the road.
Drive off the road as far as possible
and park on firm, level ground. If you
are on a divided highway, do not park
in the median area between the two
traffic lanes.
2. When the car is stopped, turn on your
emergency hazard flashers, set the
parking brake and put the transaxle in
"P" (automatic) or reverse (manual
transaxle).
3. Have all passengers get out of the car.
Be sure they all get out on the side of
the car that is away from traffic.
4. Change the tire according to the in-
structions provided as follows.
D060A01NF-A
D060B01NF-GAT1. Obtain Spare Tire and Tool
D060B01NF-A
Take out the tool receptacle and turn
the installation bolt counterclockwise
to remove spare tire from the trunk.
Page 177 of 271
3
WHAT TO DO IN AN EMERGENCY
7
D060C01A-AAT2. Block the Wheel
Block the wheel that is diagonally oppo-
site from the flat to keep the vehicle
from rolling when the car is raised on the
jack.
HNF4009
Flat tire
D060E01A-AAT4. Put the Jack in Place
The base of the jack should be placed
on firm, level ground. The jack should
be positioned as shown in the drawing.
D060D01A-AAT3. Loosen Wheel Nuts
The wheel nuts should be loosened
slightly before raising the car. To loosen
the nuts, turn the wrench handle coun-
terclockwise. When doing this, be sure
that the socket is seated completely
over the nut so it cannot slip off. For
maximum leverage, position the wrench
so the handle is to the left as shown in
the drawing. Then, while holding the
wrench near the end of the handle, push
down on it with steady pressure. Do not
remove the nuts at this time. Just
loosen them about one-half turn.
HNF4011-A
D060E01NF-A
Page 178 of 271

38WHAT TO DO IN AN EMERGENCY
!
Raise the car high enough so that the
fully inflated spare tire can be installed.
To do this, you will need more ground
clearance than is required to remove
the flat tire.
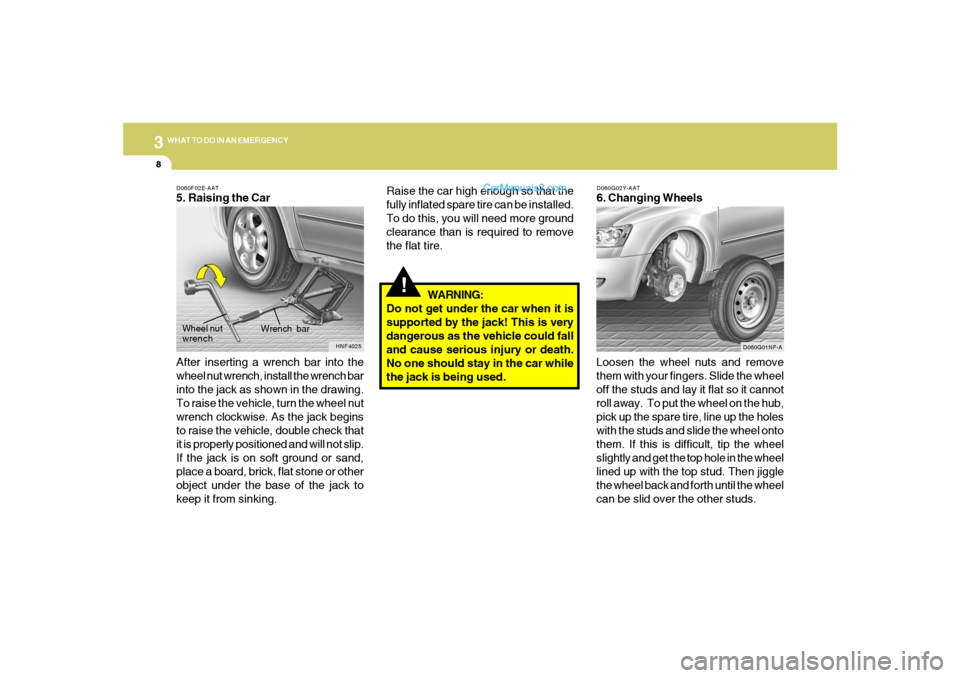
D060F02E-AAT5. Raising the Car
After inserting a wrench bar into the
wheel nut wrench, install the wrench bar
into the jack as shown in the drawing.
To raise the vehicle, turn the wheel nut
wrench clockwise. As the jack begins
to raise the vehicle, double check that
it is properly positioned and will not slip.
If the jack is on soft ground or sand,
place a board, brick, flat stone or other
object under the base of the jack to
keep it from sinking.WARNING:
Do not get under the car when it is
supported by the jack! This is very
dangerous as the vehicle could fall
and cause serious injury or death.
No one should stay in the car while
the jack is being used.
D060G02Y-AAT6. Changing Wheels
Loosen the wheel nuts and remove
them with your fingers. Slide the wheel
off the studs and lay it flat so it cannot
roll away. To put the wheel on the hub,
pick up the spare tire, line up the holes
with the studs and slide the wheel onto
them. If this is difficult, tip the wheel
slightly and get the top hole in the wheel
lined up with the top stud. Then jiggle
the wheel back and forth until the wheel
can be slid over the other studs.
HNF4025
Wrench bar Wheel nut
wrench
D060G01NF-A
Page 180 of 271

310
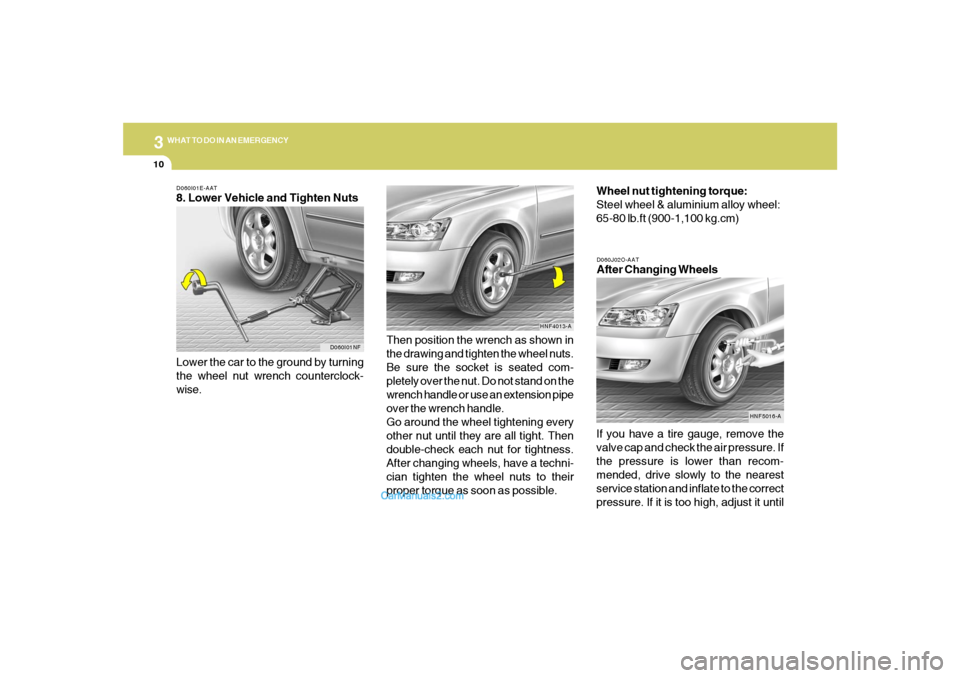
WHAT TO DO IN AN EMERGENCYD060I01E-AAT8. Lower Vehicle and Tighten Nuts
D060J02O-AATAfter Changing Wheels
Lower the car to the ground by turning
the wheel nut wrench counterclock-
wise.
If you have a tire gauge, remove the
valve cap and check the air pressure. If
the pressure is lower than recom-
mended, drive slowly to the nearest
service station and inflate to the correct
pressure. If it is too high, adjust it until Then position the wrench as shown in
the drawing and tighten the wheel nuts.
Be sure the socket is seated com-
pletely over the nut. Do not stand on the
wrench handle or use an extension pipe
over the wrench handle.
Go around the wheel tightening every
other nut until they are all tight. Then
double-check each nut for tightness.
After changing wheels, have a techni-
cian tighten the wheel nuts to their
proper torque as soon as possible.Wheel nut tightening torque:
Steel wheel & aluminium alloy wheel:
65-80 lb.ft (900-1,100 kg.cm)
D060I01NF
HNF4013-A
HNF5016-A
Page 204 of 271
6
DO-IT-YOURSELF MAINTENANCE
6
!!
G030D01O-AATAdding Oil
1. Remove the oil filler cap by turning it counter-
clockwise.
2. Add oil, then check the level again. Do not
overfill.
3. Replace the cap by turning it clockwise.
The distance between the "F" and "L" marks is
equal to about 1 quart of oil.
CAUTION:
Slowly pour the recommended oil into a
funnel. Do not overfill to avoid damage to
the engine.
WARNING:
Be very careful not to touch the radiator
hose when adding the engine oil as it may
be hot enough to burn you.
If the oil level is close to or below the "L" mark,
add oil until it reaches the "F" mark. To add oil:
G030D01NF
G030D02NF
(3.3L)(2.4L)
CHANGING THE ENGINE OIL AND
FILTERG040A01NF-AAT
HNF5005(3.3L)(2.4L)
G040A01NFOil filter
Oil filler
cap
Oil level
dipstick Oil filler
cap
Oil filter
Page 205 of 271

6
DO-IT-YOURSELF MAINTENANCE
7
!
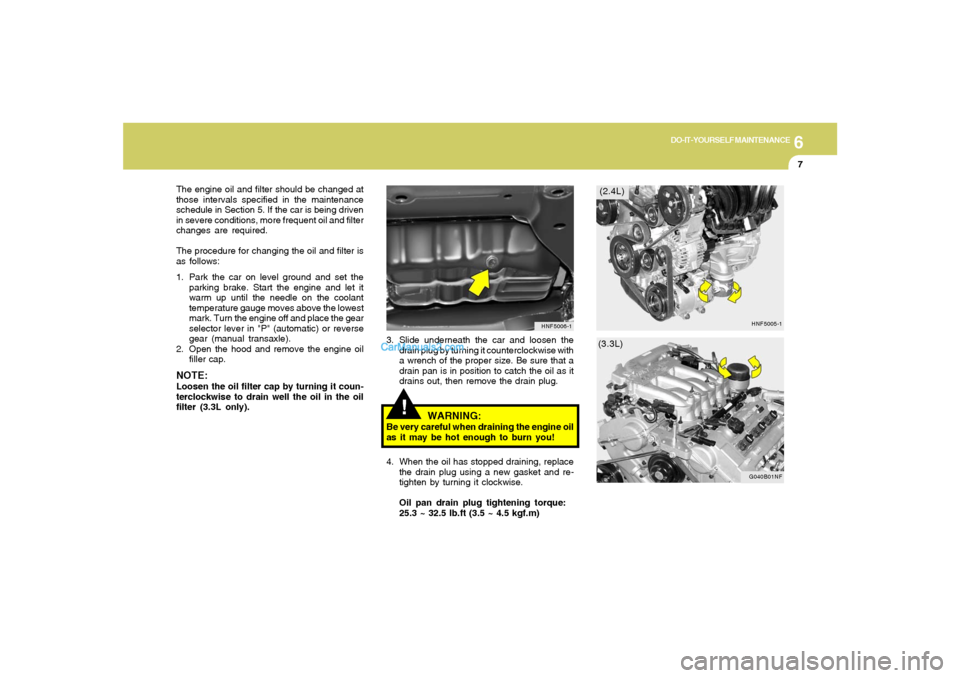
3. Slide underneath the car and loosen the
drain plug by turning it counterclockwise with
a wrench of the proper size. Be sure that a
drain pan is in position to catch the oil as it
drains out, then remove the drain plug.
4. When the oil has stopped draining, replace
the drain plug using a new gasket and re-
tighten by turning it clockwise.
Oil pan drain plug tightening torque:
25.3 ~ 32.5 lb.ft (3.5 ~ 4.5 kgf.m)
HNF5006-1
(2.4L)
(3.3L) The engine oil and filter should be changed at
those intervals specified in the maintenance
schedule in Section 5. If the car is being driven
in severe conditions, more frequent oil and filter
changes are required.
The procedure for changing the oil and filter is
as follows:
1. Park the car on level ground and set the
parking brake. Start the engine and let it
warm up until the needle on the coolant
temperature gauge moves above the lowest
mark. Turn the engine off and place the gear
selector lever in "P" (automatic) or reverse
gear (manual transaxle).
2. Open the hood and remove the engine oil
filler cap.
NOTE:Loosen the oil filter cap by turning it coun-
terclockwise to drain well the oil in the oil
filter (3.3L only).
WARNING:
Be very careful when draining the engine oil
as it may be hot enough to burn you!
HNF5005-1
G040B01NF
Page 206 of 271

6
DO-IT-YOURSELF MAINTENANCE
8
CHECKING AND CHANGING THE
ENGINE COOLANT!
G050A01A-AAT
WARNING:
Do not remove the radiator cap when the
engine is hot. When the engine is hot, the
engine coolant is under pressure and may
erupt through the opening if the cap is
removed. You could be seriously burned if
you do not observe this precaution. Do not
remove the radiator cap until the radiator is
cool to the touch.
!
5. Remove the oil filter by turning it counter-
clockwise with a oil filter wrench of the proper
size. A certain amount of oil will come out
when you remove the filter. So be sure to
have your drain pan in place underneath it.
6. Install a new oil filter in accordance with the
instructions on the carton or on the filter itself.
Do not over-tighten.
Tightening torque:
8.7 ~ 11.6 lb.ft (1.2 ~ 1.6 kgf.m)
Be sure that the mounting surface on the
engine is clean and that the old gasket is
removed completely. Lubricate the new
gasket on the filter with clean engine oil
before installation.
7. Remove the engine oil level dipstick.
8. Refill the crankcase with the recommended
engine oil. Refer to the specification in chap-
ter 9 for engine oil capacity.
CAUTION:
Slowly pour the recommended oil into a
funnel. Do not overfill to avoid damage to
the engine.
NOTE:Always dispose of used engine oil in an
environmentally acceptable manner. It is
suggested that it be placed in a sealed
container and taken to a service station for
reclamation. Do not pour the oil on the
ground or put it into the household trash.
PROPOSITION 65 WARNING:
Used engine oil may cause irritation or
cancer of the skin if left in contact with the
skin for prolonged periods of time. Used
engine oil contains chemicals that have
caused cancer in laboratory animals. Al-
ways protect your skin by washing your
hands thoroughly with soap and warm
water as soon as possible after handling
used oil.
!
9. Start the engine and check to be sure no oil
is leaking from the drain plug or oil filter.
10.Shut off the engine and recheck the oil level.