2005 Hyundai Azera air conditioning
[x] Cancel search: air conditioningPage 144 of 297

1
FEATURES OF YOUR HYUNDAI
127
CAUTION:
If the windows fog up with the Recir- culation or A.Q.S mode selected, setthe air intake control to the Fresh air position or A.Q.S control to "OFF".
!
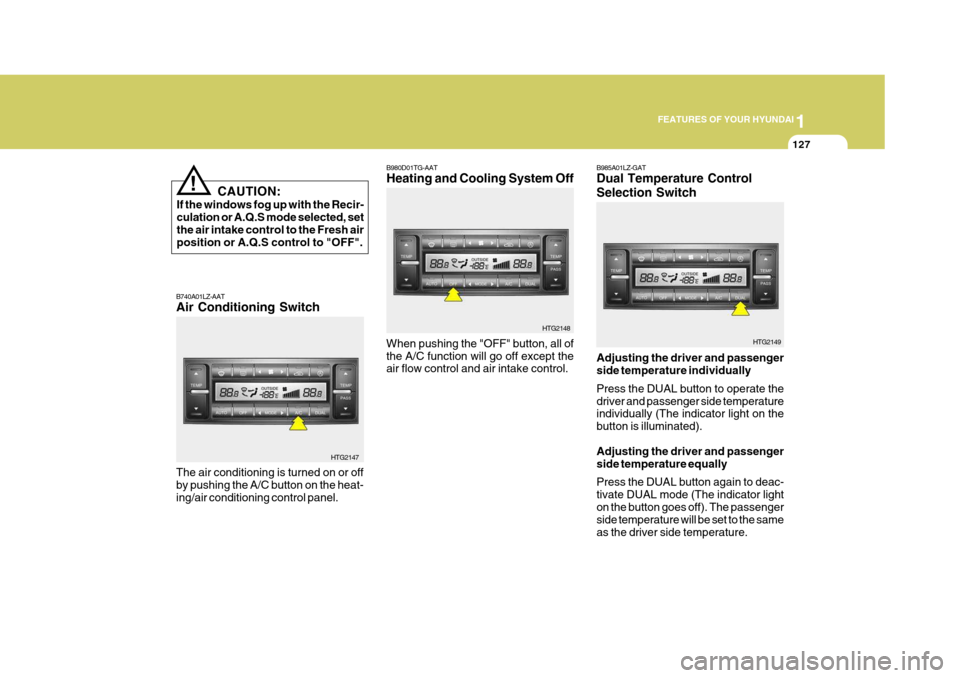
B980D01TG-AAT Heating and Cooling System Off
B740A01LZ-AAT Air Conditioning Switch The air conditioning is turned on or off by pushing the A/C button on the heat-ing/air conditioning control panel. HTG2147When pushing the "OFF" button, all ofthe A/C function will go off except the air flow control and air intake control.
HTG2148B985A01LZ-GAT Dual Temperature Control Selection Switch Adjusting the driver and passenger side temperature individually Press the DUAL button to operate the driver and passenger side temperature individually (The indicator light on the button is illuminated). Adjusting the driver and passenger side temperature equally Press the DUAL button again to deac- tivate DUAL mode (The indicator lighton the button goes off). The passenger side temperature will be set to the same as the driver side temperature. HTG2149
Page 146 of 297

1
FEATURES OF YOUR HYUNDAI
129
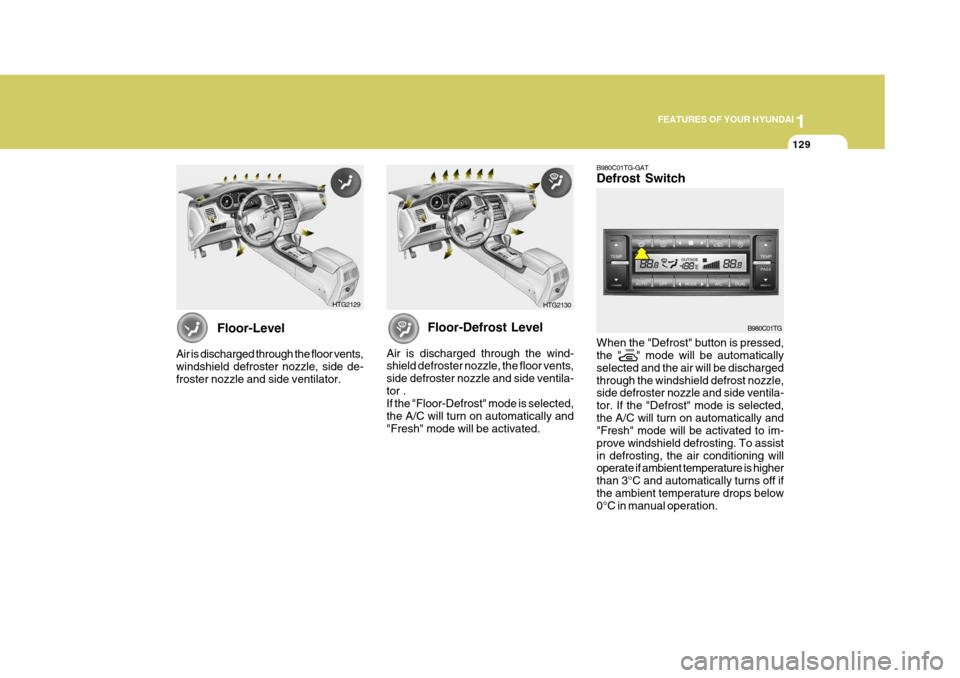
Floor-Defrost Level
Air is discharged through the wind- shield defroster nozzle, the floor vents, side defroster nozzle and side ventila-tor . If the "Floor-Defrost" mode is selected, the A/C will turn on automatically and"Fresh" mode will be activated. B980C01TG-GAT Defrost Switch When the "Defrost" button is pressed, the " " mode will be automatically selected and the air will be dischargedthrough the windshield defrost nozzle, side defroster nozzle and side ventila- tor. If the "Defrost" mode is selected,the A/C will turn on automatically and "Fresh" mode will be activated to im- prove windshield defrosting. To assistin defrosting, the air conditioning will operate if ambient temperature is higher than 3°C and automatically turns off ifthe ambient temperature drops below 0°C in manual operation.
B980C01TG
Floor-Level
Air is discharged through the floor vents, windshield defroster nozzle, side de-froster nozzle and side ventilator. HTG2129
HTG2130
Page 148 of 297

1
FEATURES OF YOUR HYUNDAI
131
B980G01TG-GAT Auto de-humidified control (If Installed)
NOTE: When the A/C is operated continu- ously on the floor-defrost level ( ) or defrost level ( ), it may causefog to form on the exterior wind- shield. If this occurs, set the air flow control to the face level position ( )and fan speed control to the low position.
There is a humidity sensor on the cen- ter fascia panel. If it becomes very humid inside the car, the air condition-ing is turned on automatically to control the humidity. B980G01TG
B730A01L-AAT Operation Tips
o To keep dust or unpleasant fumes
from entering the car through the ventilation system, temporarily set the air intake control at the
posi-
tion. Be sure to return the control to the
position when the irritation
has passed to keep fresh air in the vehicle. This will help keep the driveralert and comfortable.
o Air for the heating/cooling system is
drawn in through the grilles just aheadof the windshield. Care should be taken that these are not blocked by leaves, snow, ice or other obstruc-tions.
o To prevent interior fog on the wind-
shield, set the air intake control tothe fresh air (
) position and fan
speed to the desired position, turn on the air conditioning system, and ad-just temperature control to desired temperature.
Page 199 of 297

2
DRIVING YOUR HYUNDAI
15
o Keep your car clean. For maximum service, your Hyundai should be kept clean and free of corrosive materials. It is especially important that mud, dirt, ice, etc. not be al-lowed to accumulate on the under- side of the car. This extra weight can result in increased fuel con-sumption and also contribute to cor- rosion.
o Travel lightly. Don't carry unneces- sary weight in your car. Weight re-duces fuel economy.
o Don't let the engine idle longer than necessary. If you are waiting (andnot in traffic), turn off your engine and restart only when you're readyto go.
o Remember, your Hyundai does not
require extended warm-up. As soonas the engine is running smoothly, you can drive away. In very cold weather, however, give your enginea slightly longer warm-up period.
your foot resting on the brake pedalmay cause the brakes to overheat,which reduces their effectiveness and may lead to more serious con- sequences.
o Take care of your tires. Keep them inflated to the recommended pres-sure. Incorrect inflation, either toomuch or too little, results in unnec- essary tire wear. Check the tire pres- sures at least once a month.
o Be sure that the wheels are aligned correctly. Improper alignment canresult from hitting curbs or drivingtoo fast over irregular surfaces. Poor alignment causes faster tire wear and may also result in other prob-lems as well as greater fuel con- sumption.
o Keep your car in good condition. For
better fuel economy and reducedmaintenance costs, maintain your car in accordance with the mainte-nance schedule in Section 5. If you drive your car in severe conditions, more frequent maintenance is re-quired (see Section 5 for details). o Don't "lug" or "over-rev" the engine.
Lugging is driving too slowly in too high a gear resulting in the engine bucking. If this happens, shift to alower gear. Over-revving is racing the engine beyond its safe limit. This can be avoided by shifting atthe recommended speeds.
o Use your air conditioning sparingly.
The air conditioning system is oper-ated by engine power so your fuel economy is reduced when you use it.
Page 211 of 297

3 WHAT TO DO IN AN EMERGENCY
4
!
!
IF THE ENGINE OVERHEATS
(If the air conditioning had been in use, it is normal for cold water to bedraining from it when you stop).
D030A01TG-AAT If your temperature gauge indicates overheating, you experience a loss of power, or hear loud pinging or knock- ing, the engine is probably too hot. Ifthis happens to you, you should:
1. Pull off the road and stop as soon as
it is safe to do so.
2. Place the gear selector lever in "P"
and set the parking brake. If the air conditioning is on, turn it off.
3. If engine coolant is running out under
the car or steam is coming out fromthe hood, stop the engine. Do not open the hood until the engine coolant has stopped running or thesteaming has stopped. If there is no visible loss of coolant and no steam, leave the engine running and checkto be sure the engine cooling fan is operating. If the fan is not running, turn the engine off.
4. Check to see if the water pump drive belt is missing. If it is not missing,check to see that it is tight. If thedrive belt seems to be satisfactory, check for engine coolant leaking from the radiator, hoses or under the car.
6. Carefully remove the jumper cables
in the reverse order of attachment.
If you do not know why your batterybecame discharged (because the lightswere left on, etc.), have the charging system checked by your Hyundai dealer. WARNING:
While the engine is running, keephands and clothing away from mov-ing parts such as the fan and drive belts to prevent injury.
5. If the water pump drive belt is broken or coolant is leaking out, stop theengine immediately and call the near- est Hyundai dealer for assistance.
WARNING:
Do not remove the radiator cap whenthe engine is hot. This can allow coolant to be blown out of the open- ing and cause serious burns.
Page 232 of 297

5
VEHICLE MAINTENANCE REQUIREMENTS
5
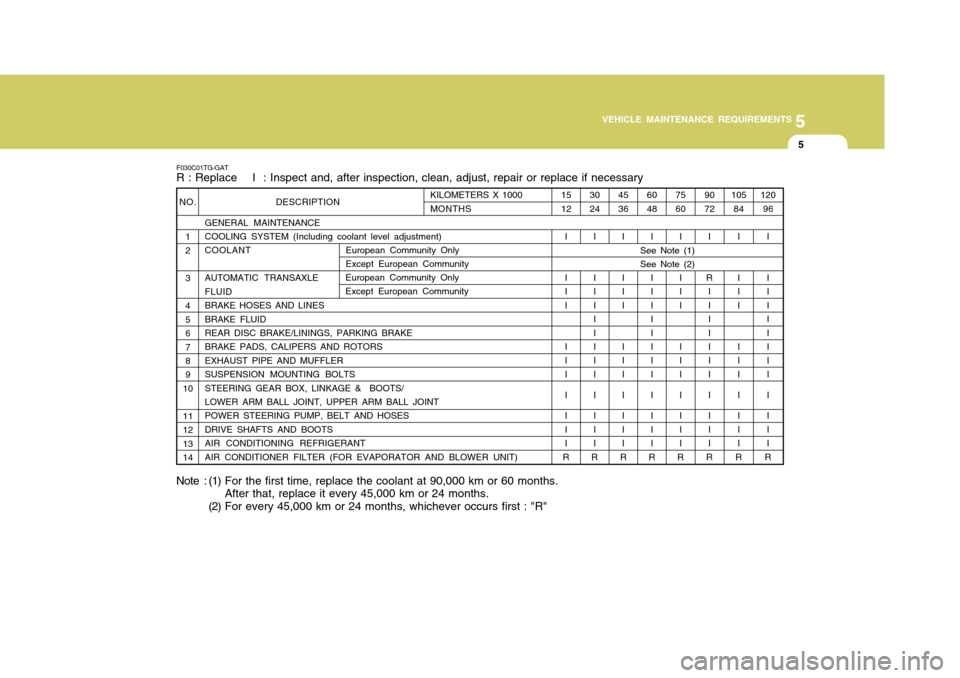
F030C01TG-GAT R : Replace I : Inspect and, after inspection, clean, adjust, repair or replace if necessary
Note : (1) For the first time, replace the coolant at 90,000 km or 60 months. After that, replace it every 45,000 km or 24 months.
(2) For every 45,000 km or 24 months, whichever occurs first : "R"
NO.
1 2 34 567 8 9
10 11 12 1314 DESCRIPTION
GENERAL MAINTENANCECOOLING SYSTEM (Including coolant level adjustment) COOLANT AUTOMATIC TRANSAXLE FLUIDBRAKE HOSES AND LINESBRAKE FLUID REAR DISC BRAKE/LININGS, PARKING BRAKE BRAKE PADS, CALIPERS AND ROTORSEXHAUST PIPE AND MUFFLERSUSPENSION MOUNTING BOLTSSTEERING GEAR BOX, LINKAGE & BOOTS/ LOWER ARM BALL JOINT, UPPER ARM BALL JOINT POWER STEERING PUMP, BELT AND HOSESDRIVE SHAFTS AND BOOTSAIR CONDITIONING REFRIGERANTAIR CONDITIONER FILTER (FOR EVAPORATOR AND BLOWER UNIT)
120 96
I I IIII I II I I II
R
105
84
I I II I II I I II
R
9072
I
R IIII I II I I II
R
7560
I I II I II I I II
R
6048
I I IIII I II I I II
R
4536
I I II I II I I II
R
3024
I I IIII I II I I II
R
1512
I I II I II I I II
R
KILOMETERS X 1000MONTHS
See Note (1) See Note (2)
European Community Only Except European Community
European Community Only Except European Community
Page 236 of 297

5
VEHICLE MAINTENANCE REQUIREMENTS
9
F070G02A-AAT
o Brake Fluid
Check brake fluid level in the brake fluid reservoir. The level should be between "MIN" and "MAX" marks on the side of the reservoir. Use onlyhydraulic brake fluid conforming to DOT 3 or DOT 4. F070H01TG-AAT
o Rear Disc Brake /
Linings, Parking Brake
Check the rear disc brake and linings for scoring, burning, leaking fluid, bro- ken parts, and excessive wear. In-spect the parking brake system in- cluding the parking brake pedal and cables. For detailed service proce-dures, refer to the Shop Manual. F070J01A-AAT
o Brake Pads, Calipers and
Rotors
Check the pads for excessive wear, discs for run out and wear, and cali-pers for fluid leakage. F070K01A-AAT
o Exhaust Pipe and Muffler
Visually inspect the exhaust pipes,
muffler and hangers for cracks, dete- rioration, or damage. Start the engine and listen carefully for any exhaustgas leakage. Tighten connections or replace parts as necessary.
F070L01A-AAT
o Suspension Mounting Bolts
Check the suspension connections for
looseness or damage. Retighten to thespecified torque.
F070M01Y-AAT
o Steering Gear Box, Linkage &
Boots/Lower Arm Ball Joint, Upper Arm Ball Joint
With the vehicle stopped and engine
off, check for excessive free-play in the steering wheel.
Check the linkage for bends or dam-
age. Check the dust boots and ball joints for deterioration, cracks, or dam-age. Replace any damaged parts. F070N01A-AAT
o Power Steering Pump,
Belt and Hoses
Check the power steering pump and hoses for leakage and damage. Re- place any damaged or leaking parts immediately. Inspect the power steer-ing belt for evidence of cuts, cracks, excessive wear, oiliness and proper tension. Replace or adjust it if neces-sary. F070P01A-AAT o Drive Shafts and Boots Check the drive shafts, boots and clamps for cracks, deterioration, ordamage. Replace any damaged parts and, if necessary, repack the grease. F070Q01A-AAT
o Air Conditioning Refrigerant Check the air conditioning lines and connections for leakage and damage. Check air conditioning performanceaccording to the relevant shop manual if necessary.
Page 237 of 297

Engine Compartment .................................................... 6-2
General Checks ........................................................... 6-3
Maintenance Precautions ............................................. 6-4
Checking the Engine Oil .............................................. 6-4
Checking and Changing the Engine Coolant ............... 6-7
Spark Plugs .................................................................. 6-9
Changing the Air Cleaner Filter ...................................6-10
Checking the Transaxle Fluid (Automatic) .................6-14
Checking the Brakes .................................................. 6-16
Air Conditioning Care .................................................. 6-18
Changing the Air Conditioner Filter .............................6-18
Checking Drive Belts .................................................. 6-21
Checking and Replacing Fuses ..................................6-21
Checking the Battery .................................................. 6-23
Checking the Eclectric Cooling Fans .........................6-25
Power Steering Fluid Level ......................................... 6-25
Headlight Aiming Adjustment ...................................... 6-26
Replacement of Light Bulbs ........................................6-28
Bulb Wattage ............................................................... 6-36
Fuse Panel D escription ............................................... 6-37
DO-IT-YOURSELF MAINTENANCE
6
6