Page 229 of 414
 or down ( ). Press the top
or bottom of the button and hold it
until the desired volume is reached,
then release it.
The MODE but")
�Û�Ý�´
�µ �´
�µ
�´ �µ
The VOL button adjusts the volume
up ( ) or down ( ). Press the top
or bottom of the button and hold it
until the desired volume is reached,
then release it.
The MODE button changes the
mode. Pressing the button
repeatedly selects FM1, FM2, AM,
XM Radio (U.S. models), CD (if a
disc is loaded) or a tape (if the
optional tape player is installed and a
tape is loaded).
If you are listening to the radio, use
the CH button to change stations.
Each time you press the top ( ) of
the button, the system goes to the
next preset station on the band you
are listening to. Press the bottom
( ) to go back to the previous
station. If youareplayingaCD,thesystem
skips to the beginning of the next
track each time you press the top
( ) of the CH button. Press the
bottom ( ) to return to the
beginning of the current track. Press
it again to return to the previous
track. You will see the disc and track
numbers in the display.
Three controls f or the audio system
are mounted in the steering wheel
hub. These let you control basic
f unctions without removing your
hand f rom the steering wheel. If youareplayingatape,pressthe
top ( ) of the CH button to advance
to the next selection. Press the
bottom( )togobacktothe
previous selection. The system
senses a silent period, then goes
back to play mode.
On EX and Touring models
Steering Wheel Controls
228
MODE BUTTON
VOL BUTTON
CH BUTTON
Page 230 of 414

Your vehicle’s audio system will
disable itself if it is disconnected
f rom electrical power f or any reason.
To make it work again, you must
enter a specif ic f ive-digit code with
the preset buttons. Because there
are hundreds of number
combinations possible f rom the f ive
digits, making the system work
without knowing the exact code is
nearly impossible.
Youshouldhavereceivedacardthat
lists your audio system code number
and serial number. It is best to store
this card in a saf e place at home. In
addition, you should write the audio
system’s serial number in this
Owner’s Manual.
If youshouldhappentolosethecard,
you must obtain the code number
f rom a Honda dealer. To do this, you
will need the system’s serial number.If your vehicle’s battery is discon-
nected or goes dead, or the radio
f use is removed, the audio system
will disable itself . If this happens,
youwillsee‘‘ ’’inthe
frequencydisplaythenexttimeyou
turn on the system. Use the preset
buttons to enter the five-digit code.
The code is located on the radio code
card included in your Owner’s
Manual kit. When it is entered
correctly, the radio will start playing.
If you make a mistake entering the
code, do not start over; complete the
f ive-digit sequence, then enter the
correct code. You have ten tries to
enter the correct code. If you are
unsuccessful in ten attempts, you
must then leave the system on for 1
hour bef ore trying again.
You will have to store your favorite
stations in the preset buttons after
the system begins working. Your
original settings were lost when the
power was disconnected.
On EX and Touring models
Radio T hef t Prot ect ion
Features
229
Page 232 of 414
, press the RR
CTRL knob. The system’s icon
shows in the upper display. Your
passengers can then operate the rea")
Press the REAR PWR button. To
turn on the rear controls (ceiling
panel/remote control), press the RR
CTRL knob. The system’s icon
shows in the upper display. Your
passengers can then operate the rear
system with the control panel in the
ceiling. The rear control panel can be
used as a remote control when it is
detached f rom the ceiling unit. Press
the RR CTRL knob again to turn the
rear controls of f . You will see the
RearControlsOff iconintheupper
display.
The rear system selects the source it
waslastsetto.Ifthatsourcehas
been removed (the DVD has been
ejected f rom the player, f or example),
you will see ‘‘DVD EJECT’’ in the
display. You must select another
source.Whenyouturnonthesystem,the
rear speakers are automatically
turned of f if the rear system selects
a dif f erent entertainment source
than the front system. You will see
the Rear Speakers Of f icon in the
upper display. The sound f or the rear
system is sent to the wireless
headphones.
Your vehicle is equipped with a rear
entertainment system that includes a
DVD player f or the enjoyment of the
rear passengers.
With this system, the rear
passengers can enjoy a dif f erent
entertainment source (radio, CD
changer, DVD player, or optional
tape player) than the f ront seat
occupants. The audio is broadcast
through the supplied wireless
headphones.
If youwanttoturntherearspeakers
on again, press and hold the REAR
PWR button until the Rear Speakers
Of f icon goes of f .
The rear speakers are
connected to the f ront system, so
they will always play the source that
the f ront system is set to.
The ignition switch must be in the
ACCESSORY (I) or ON (II) position
to operate the rear entertainment
system.
Available on EX with Leather and
Touring modelsTo Turn On the System Rear Speakers
Rear Entertainment System
Features
231
NOTE:
Page 235 of 414

�µ
�´
�µ
�´ �µ�µ
Press and hold the
side to move forward; you will see
‘‘CUE’’ in the display. Press and hold
the sidetomovebackward;you
will see ‘‘REV’’ in the display.
Release the bar when the system
reaches the point you want.
Each time you press and release the side of the SEEK/SKIP bar, the
system skips f orward to the
beginning of the next track or
chapter. Press and release the
side of the bar to skip backward to
the beginning of the current track or
chapter. Press it again to skip to the
beginning of the previous track or
chapter. Press the eject button to
remove the DVD from the drive.
To return f ront panel control to the
front audio system, turn the REAR
CTRL knob counterclockwise. To turn on the rear entertainment
system f rom the rear control panel,
press the PWR button. Use the AM/
FM button, XM RADIO button (U.S.
models), CD button, DVD/AUX
button (U.S. models), or AUX button
(Canadian models) to select the
entertainment source. The selected
source will be shown in the display.
Make sure the rear control operation
has not been disabled with the REAR
CTRL knob on the f ront panel.
SEEK /SK IP
EJECT
To Return to Front Audio
Controls Using the Rear Control Panel
Rear Entertainment System
234
Page 239 of 414
When you press the DISP button
while a DVD is playing, the title,
chapter, elapsed time, and personal
surround logo are displayed
(STATUS 1).When you press the DISP button
again, the subtitle, audio, angle,
sound characteristics, and personal
surround logo are displayed
(STATUS 2).To go back to play, press the DISP
button.
DISP Button
Rear Entertainment System
238
Page 241 of 414
�Ý�Û�Ý�Û
�Ý�Û
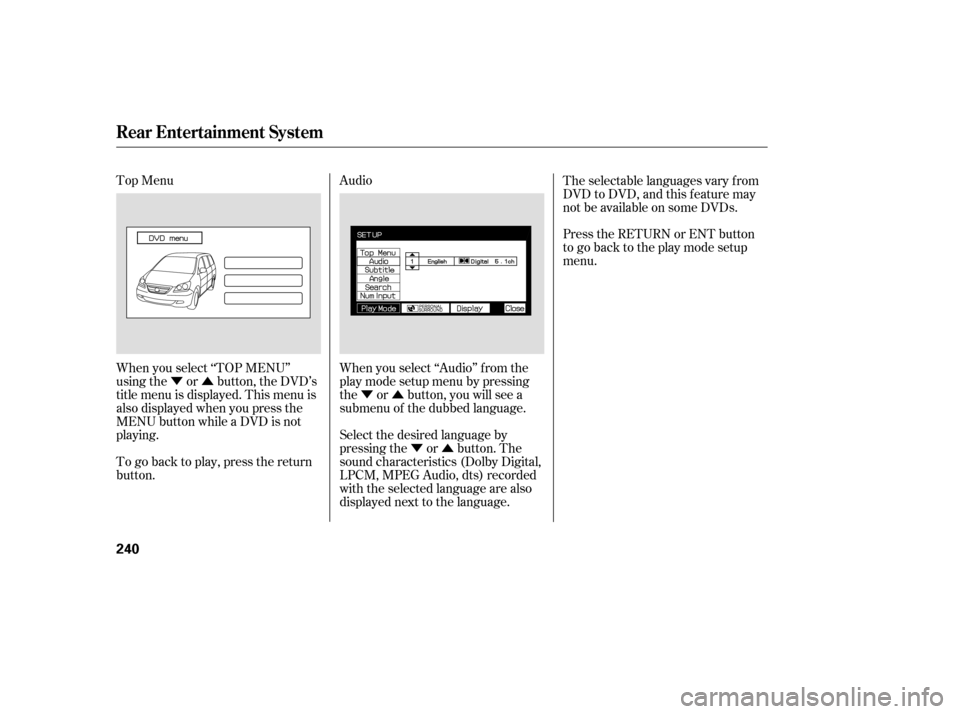
Top Menu
Audio
When you select ‘‘TOP MENU’’
using the or button, the DVD’s
title menu is displayed. This menu is
also displayed when you press the
MENU button while a DVD is not
playing. When you select ‘‘Audio’’ f rom the
play mode setup menu by pressing
the or button, you will see a
submenu of the dubbed language.The selectable languages vary f rom
DVD to DVD, and this feature may
notbeavailableonsomeDVDs.
Press the RETURN or ENT button
to go back to the play mode setup
menu.
Select the desired language by
pressing the or button. The
sound characteristics (Dolby Digital,
LPCM, MPEG Audio, dts) recorded
with the selected language are also
displayed next to the language.
To go back to play, press the return
button.
Rear Entertainment System
240
Page 251 of 414
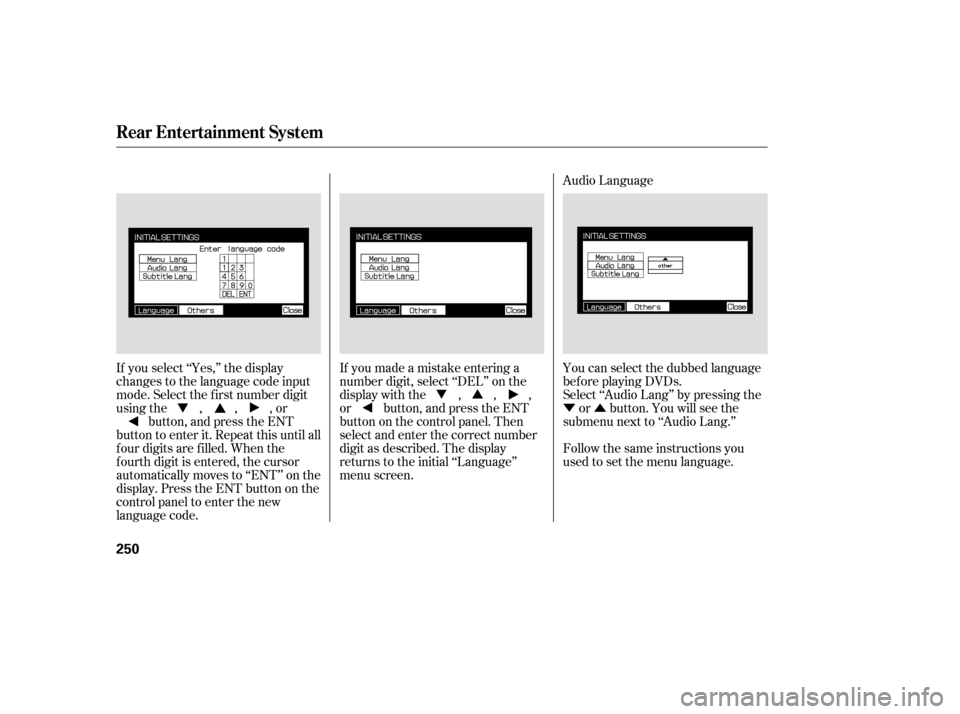
�Ý�Û Audio Language
If you select ‘‘Yes,’’ the display
changes to the language code input
mode. Select the f irst number digit
usingthe,,,or button, and press the ENT
button to enter it. Repeat this until all
f our digits are f illed. When the
f ourth digit is entered, the cursor
automatically moves to ‘‘ENT’’ on the
display. Press the ENT button on the
control panel to enter the new
language code. If you made a mistake entering a
number digit, select ‘‘DEL’’ on the
display with the , , ,
or button, and press the ENT
buttononthecontrolpanel.Then
select and enter the correct number
digit as described. The display
returns to the initial ‘‘Language’’
menu screen.
You can select the dubbed language
bef ore playing DVDs.
Select ‘‘Audio Lang’’ by pressing the
or button. You will see the
submenu next to ‘‘Audio Lang.’’
Follow the same instructions you
used to set the menu language.
Rear Entertainment System
250
Page 261 of 414

Each headphone uses one AAA
battery. The battery is under the
cover on the lef t earpiece. To
remove the cover, insert a coin in the
slot and twist it slightly to pry the
cover away f rom the earpiece. Pull
the cover outward, and pivot it out of
the way.
Some state and local government
agencies prohibit the use of
headphones by the driver of a motor
vehicle. Always obey applicable laws
and regulations. The audio f or the rear entertainment
system is sent to the wireless
headphones that come with the
system. When using the headphones,
make sure you wear them correctly:
L (lef t) and R (right) are marked on
the sides of the frame. The antennas
are in the f ront of the earpieces. If
you wear the headphones backwards,
the antennas will be aimed away
from the system, affecting the sound
quality and range.
To use the headphones, pivot the
earpieces outward. This turns them
on. To adjust the volume, turn the
dial on the bottom of the right
earpiece. When you remove the
headphones, the earpieces
automatically pivot inward, and the
headphones turn of f . When not in
use, store the headphones in the
pocket of either f ront seat.
Rear Entertainment System
Replacing Bat t eriesWireless Headphones
260
VOLUME
DIAL
TAB
.When you press the DISP button
again, the subtitle, audio,")