Page 228 of 414

If your vehicle’s battery is
disconnected or goes dead, you will
need to set the clock.You can quickly set the time to the
nearest hour. If the displayed time is
bef ore the half hour, pressing and
holding the CLOCK button, then
pressing the R (RESET) button sets
the clock back to the previous hour.
If the displayed time is after the half
hour, the clock sets f orward to the
beginning of the next hour. When you are f inished, press the
CLOCK button again.For example: 1:06 will reset to 1:00
1:52 will reset to 2:00
Press and hold the CLOCK button
until the clock f lashes. Change the
hours by pressing the H button until
the numbers advance to the desired
time. Change the minutes by
pressing the M button until the
numbers advance to the desired time. Ref er to the Navigation system
manual f or how to adjust the time.
On models with Navigation System
On models without Navigation System
Setting the Clock
LX model
EX model
Features
227
CLOCK BUTTON
H BUTTON R BUTTON
M BUTTON CLOCK BUTTON
H BUTTON R BUTTON
M BUTTON
Page 233 of 414

To operate the rear entertainment
system from the front panel, turn the
RR CTRL knob clockwise. The
amber RR LED comes on to show
that the control panel is enabled.
If CDs are loaded in the CD changer,
select CD. If a CD is loaded in the
lower player, select DVD/AUX. To play the radio, the buttons for the
f ront entertainment system have the
same f unctions.The DVD player in your rear
entertainment system can play DVD
video discs and CDs.
Open the overhead screen by
pushing the OPEN button. The
screen will swing down part-way.
Pivot the screen the rest of the way.
If you pivot the screen too f ar
f orward, past the second detent, the
display will turn of f . Pivot the screen
back to the second or first detent to
turn the display back on. To close
the screen, pivot it up until it latches.
To Select Rear Entertainment
f rom the Front Control Panel
Operating the DVD Player f rom
the Front Control Panel
Rear Entertainment System
232
REAR CONTROL PANEL
OPEN BUTTON
OVERHEAD SCREEN
Page 234 of 414
�µ�µ
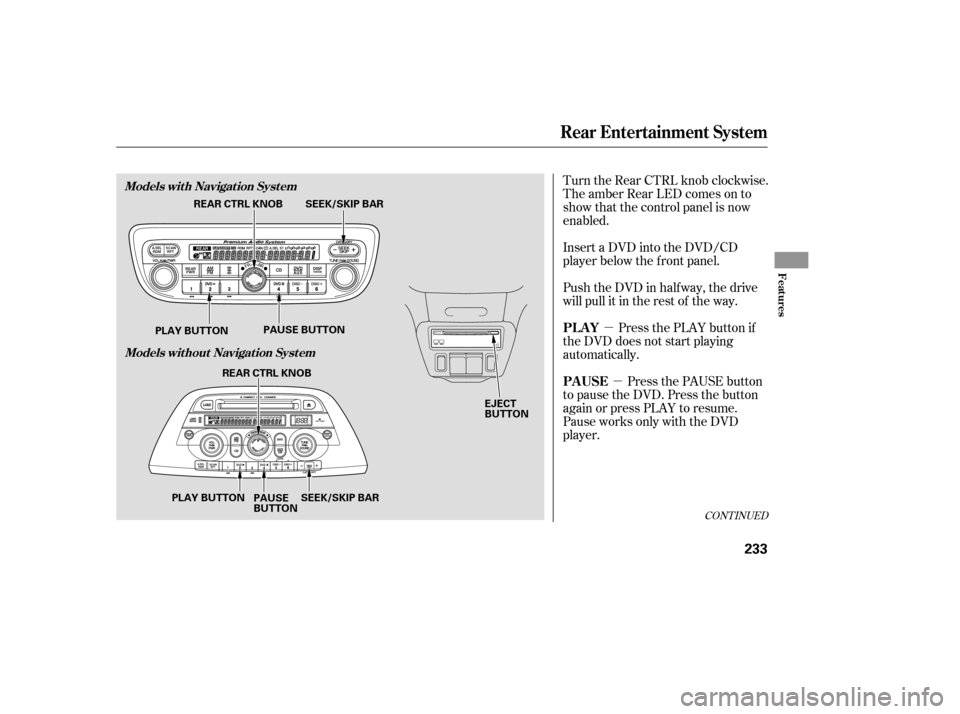
Turn the Rear CTRL knob clockwise.
The amber Rear LED comes on to
show that the control panel is now
enabled.
Insert a DVD into the DVD/CD
player below the f ront panel.
Push the DVD in half way, the drive
will pull it in the rest of the way.
Press the PLAY button if
the DVD does not start playing
automatically.
Press the PAUSE button
to pause the DVD. Press the button
again or press PLAY to resume.
Pause works only with the DVD
player.
CONT INUED
PL A Y
PAUSE
Rear Entertainment System
Features
Models with Navigation System
Models without Navigation System
233
EJECT
BUTTON
SEEK/SKIP BAR
REAR CTRL KNOB
PLAY BUTTON PAUSE BUTTON
SEEK/SKIP BAR
REAR CTRL KNOB
PLAY BUTTON PAUSE
BUTTON
Page 235 of 414

�µ
�´
�µ
�´ �µ�µ
Press and hold the
side to move forward; you will see
‘‘CUE’’ in the display. Press and hold
the sidetomovebackward;you
will see ‘‘REV’’ in the display.
Release the bar when the system
reaches the point you want.
Each time you press and release the side of the SEEK/SKIP bar, the
system skips f orward to the
beginning of the next track or
chapter. Press and release the
side of the bar to skip backward to
the beginning of the current track or
chapter. Press it again to skip to the
beginning of the previous track or
chapter. Press the eject button to
remove the DVD from the drive.
To return f ront panel control to the
front audio system, turn the REAR
CTRL knob counterclockwise. To turn on the rear entertainment
system f rom the rear control panel,
press the PWR button. Use the AM/
FM button, XM RADIO button (U.S.
models), CD button, DVD/AUX
button (U.S. models), or AUX button
(Canadian models) to select the
entertainment source. The selected
source will be shown in the display.
Make sure the rear control operation
has not been disabled with the REAR
CTRL knob on the f ront panel.
SEEK /SK IP
EJECT
To Return to Front Audio
Controls Using the Rear Control Panel
Rear Entertainment System
234
Page 333 of 414
When the radiator and engine are
cool, relieve any pressure in the
cooling system by turning the
radiator cap counterclockwise,
without pressing down.
Remove the radiator cap by
pushing down and turning
counterclockwise.The coolant level should be up to
the base of the f iller neck. Add
coolant if it is low.Pour coolant into the reserve tank.
Fill it to half way between the MAX
and MIN marks. Put the cap back
on the reserve tank.
Do not add any rust inhibitors or
other additives to your vehicle’s
cooling system. They may not be
compatible with the coolant or
engine components. Put the radiator cap back on, and
tighten it fully.
Pour the coolant slowly and caref ully
so you do not spill. Clean up any spill
immediately; it could damage
components in the engine
compartment. 3. 4.
5.
1.
2.
Engine Coolant
332
RADIATOR CAP RESERVE TANK
Page 339 of 414
Remove the electrical connector
f rom the bulb by pushing on the
tab and pulling the connector
down.
Remove the bulb by turning it one-
quarter turn counterclockwise.Open the hood. Remove the
socket f rom the headlight
assembly by turning it one-quarter
turn counterclockwise.
Pull the burned out bulb straight
out of its socket.
Push the new bulb straight into
the socket until it bottoms.
Push the electrical connector back
onto the bulb. Make sure it is on
all the way.
Turn on the headlights to test the
new bulb.
If you replaced the high beam
headlight bulb on the passenger’s
side, reinstall the power steering
f luid reservoir.
Insert the new bulb into the hole,
and turn it one-quarter turn clock-
wise to lock it in place. 5.
6.
7.
2.
3.
4. 2. 1.
Lights
Replacing a Front T urn Signal
Bulb
338
TAB
Page 340 of 414
Insert the socket back into the
headlight assembly. Turn it
clockwise to lock it in place.
Turn on the lights to make sure
the new bulb is working.Open the hood. Remove the
socket f rom the headlight
assembly by turning it one-quarter
turn counterclockwise.
Pull the bulb straight out of its
socket. Push the new bulb straight
into the socket until it bottoms.Insert the socket back into the
headlight assembly. Turn it
clockwise to lock it in place.
Turn on the lights to make sure
the new bulb is working.
3.
4.
1.
2.
3.
4.
Lights
Replacing a Front Parking/Side
Marker Bulb
Maint enance
339
Page 341 of 414
Use a wrench to remove the
mounting bolt f rom the underbody
through the hole in the splash
shield.
Remove the f og light assembly
f rom the bumper by pulling its
inner edge f irst, then the whole
assembly out of the bumper.Remove the electrical connector
f rom the bulb by pushing on the
tab and pulling the connector
down.
Remove the bulb f rom the f og
light assembly by turning it one-
quarter turn counterclockwise.Push the electrical connector onto
the new bulb.
Turn on the f og lights to test the
new bulb.
Reinstall the f og light assembly
into the bumper. Tighten the
mounting bolt. Insert the new bulb into the
assembly and turn it one-quarter
turn clockwise to lock it in place.
1.
2. 3.
4.5.
6.
7.
8.
Touring model only
Lights
Replacing a Front Fog L ight Bulb
340