Page 207 of 249

�´�´
Although this seems like a simple
procedure, you should take several
precautions.
You cannot start your vehicle with an
automatic transmission by pushing
or pulling it. Open the hood, and check the
physical condition of the battery.
In very cold weather, check the
condition of the electrolyte. If it
seems slushy or f rozen, do not try
jump starting until it thaws.
Connect one jumper cable to the
positive ( ) terminal on your
battery. Connect the other end to
the positive ( ) terminal on the
booster battery. Turn of f all the electrical acces-
sories: heater, A/C, stereo system,
lights, etc. Put the transmission in
neutral or Park, and set the
parking brake.
1.
2.
3.
CONT INUED
To Jump Start Your Vehicle:
Jump Starting
T aking Care of t he Unexpect ed
205
A battery can explode if you do
not follow the correct procedure,
seriously injuring anyone
nearby.
Keep all sparks, open flames,
and smoking materials away
from the battery.If a battery sits in extreme cold, the
electrolyte inside can f reeze.
Attempting to jump start with a f rozen
battery can cause it to rupture.
Page 208 of 249
�µ
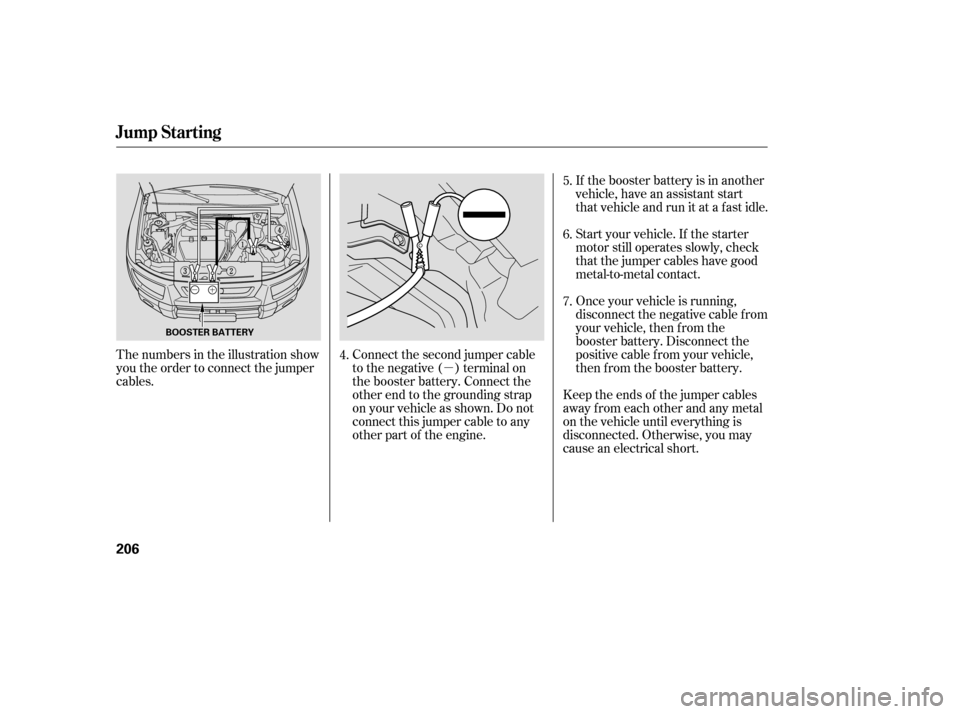
If the booster battery is in another
vehicle, have an assistant start
that vehicle and run it at a fast idle.
The numbers in the illustration show
you the order to connect the jumper
cables. Start your vehicle. If the starter
motor still operates slowly, check
that the jumper cables have good
metal-to-metal contact.
Once your vehicle is running,
disconnect the negative cable f rom
your vehicle, then f rom the
booster battery. Disconnect the
positive cable f rom your vehicle,
then from the booster battery.
Keep the ends of the jumper cables
away from each other and any metal
on the vehicle until everything is
disconnected. Otherwise, you may
cause an electrical short.
Connect the second jumper cable
to the negative ( ) terminal on
the booster battery. Connect the
other end to the grounding strap
on your vehicle as shown. Do not
connect this jumper cable to any
other part of the engine.
4. 5.
6.
7.
Jump Starting
206
BOOSTER BATTERY
Page 211 of 249
. An engine
very low on oil can lose pressure
during cornering and other driving
maneuvers.
If necessary, add oil t")
Let the vehicle sit f or a minute.
Open the hood, and check the oil
level (see page ). An engine
very low on oil can lose pressure
during cornering and other driving
maneuvers.
If necessary, add oil to bring the
level back to the full mark on the
dipstick (see page ).If the charging system
indicator comes on brightly
when the engine is running, the
battery is not being charged.
Immediately turn of f all electrical
accessories. Try not to use other
electrically operated controls such as
the power windows. Keep the engine
running; starting the engine will
discharge the battery rapidly.
Go to a service station or garage
where you can get technical
assistance.
Saf ely pull of f the road, and shut
of f the engine. Turn on the hazard
warning lights.
This indicator should never
come on when the engine is
running. If it starts f lashing or stays
on, the oil pressure has dropped very
low. Serious engine damage is
possible and you should take
immediate action.
Start the engine, and watch the oil
pressure indicator. If it does not go
out within 10 seconds, turn of f the
engine. There is a mechanical
problem that needs to be repaired
bef ore you can continue driving
(seeon page
).
1.
2.
4. 3.
126
170
217
L ow Oil Pressure Indicator
Charging System Indicator
Emergency T owing
L ow Oil Pressure Indicator, Charging System Indicator
T aking Care of t he Unexpect ed
209
Running the engine with low oil
pressure can cause serious mechanical
damage almost immediately. Turn of f
the engine as soon as you can saf ely get
the vehicle stopped.
Page 212 of 249

If you have recently ref ueled your
vehicle, the indicator coming on
could be due to a loose or missing
f uel f ill cap. Tighten the cap until it
clicks at least three times.
Tightening the cap will not turn the
indicator of f immediately; it takes at
least three days of normal driving.If the indicator comes on repeatedly,
even though it may turn of f as you
continue driving, have the vehicle
checked by the dealer as soon as
possible.
If your vehicle battery has been
disconnected or gone dead, these
codes are erased. It takes at least
three days of driving under various
conditions to set the codes again.
Your vehicle has certain ‘‘readiness
codes’’ that are part of the on-board
diagnostics f or the emissions
systems. In some states, part of the
emissions testing is to make sure
these codes are set. If they are not
set, the test cannot be completed.
If this indicator comes on
while driving, it means one
of the engine’s emissions control
systems may have a problem. Even
though you may f eel no dif f erence in
your vehicle’s perf ormance, it can
reduce your f uel economy and cause
increased emissions. Continued
operation may cause serious damage. To check if they are set, turn the
ignition to ON (II), without starting
the engine. The malf unction
indicator lamp will come on f or 20
seconds. If it then goes of f , the
readiness codes are set. If it blinks
f ive times, the readiness codes are
not set. If possible, do not take your
vehicle f or a state emissions test
until the readiness codes are set.
Refer to
f or more inf ormation (see page ).
230
Readiness Codes
State Emissions T esting
Malf unction Indicator L amp
210
If you keep driving with the
malf unction indicator lamp on, you can
damage your vehicle’s emissions
controls and engine. Those repairs may
not be covered by your vehicle’s
warranties.
Page 218 of 249
�µ
�µ
�µ
No.Circuits Protected
Amps.
1
2
3
4
5
6
7
8
9
10
11
12
13
14
15
16
17
18
19
20 Condenser Fan
Small Light
Interior Light
Cooling Fan Motor
Hazard
IGP
Horn, Stop
Not Used
Back Up
ABS Motor
Rear Defroster
Heater Motor
Power Window
Option
Lef t Headlight
Door Lock
Right Headlight
ABS F/S
Battery
Ignition 1
Spare Fuses
30 A
15 A
7.5 A 20 A
15 A
15 A
15 A
10 A
30 A
20 A
40 A
40 A
40 A
15 A
15 A
15 A
30 A
100 A 50 A
21 257.5A 30A
Fuse Locations
216
UNDER-HOOD FUSE BOX
Page 225 of 249

16.9 18.7 oz (480 530")
�µ�µ�µ
�µ
�µ
�µ
�µ
�µ
�µ
�µ
�µ
�µ
�µ
�µ
�µ
�µ
Specif ications
T echnical Inf ormation
223
Air Conditioning
Lights
Battery Fuses
Alignment
Tires
HFC-134a (R-134a)
16.9 18.7 oz (480 530 g) SP-10
12 V 60/55 W (H4/HB2)
12 V 12 V
12 V
12 V
12 V
12 V
12 V
8W
4CP
8W
5W
18 W (21 CP)
21/5 W
21 W P215/70R16 99S1°50’
1°
0°13’
0.08 in (2.0 mm) 0.0in(0mm)
12 V 21/5 W
12 V 3 CP
12 V 21 W
32 psi (220 kPa , 2.2 kgf/cm
)
34 psi (235 kPa , 2.4 kgf/cm)
45 AH/20 HR
12 V
Refrigerant type
Charge quantity
Lubricant type
Headlights
Front turn signal/parking
lights
Front side marker lights
Rear turn signal lights
Brake/Taillights
Back-up lights
License plate lights
Ceiling light
Spotlights
Cargo area light
High-mount brake light
Capacity Interior
Under-hood
Toe-in
Camber
Caster
Size
Pressure
60 psi (420 kPa , 4.2 kgf/cm)
See page
215or the fuse label
attached to the inside of the fuse
box door under the steering
column.
See page 216or the fuse box
cover.
Front
Rear
Front
Rear
Front
Front/Rear
Front
Rear
Spare
Page 232 of 249

Make sure the ambient
temperature is between 20° and
95°F.Without touching the accelerator
pedal, start the engine, and let it
idle f or 20 seconds.
If you take your vehicle f or a state
emissions test shortly af ter the
battery has been disconnected or
gone dead, it may not pass the test.
This is because of certain ‘‘readiness
codes’’ that must be set in the on-
board diagnostics f or the emissions
systems. These codes are erased
when the battery is disconnected,
and set again only after several days
of driving under a variety of
conditions. If the testing f acility determines that
the readiness codes are not set, you
will be requested to return at a later
date to complete the test. If you must
get the vehicle retested within the
next two or three days, you can
condition the vehicle f or retesting by
doing the f ollowing.
Make sure the vehicle has been
parked with the engine of f f or 8
hours or more. Make sure the f uel tank is nearly,
but not completely f ull (around
3/4). Keep the vehicle in Park
(automatic transmission) or
neutral (manual transmission).
Increase the engine speed to 2,000
rpm,andholditthereuntilthe
temperature gauge rises to at least
1/4of thescale(about3minutes).
T esting of Readiness Codes
St at e Emissions T est ing
230
Page 237 of 249

�µ�µ
�µ �µ
�µ �µ
�µ �µ
�µ
Your new vehicle is covered by these
warranties:
covers your new vehicle, except f or
the battery, emissions control
systems, and accessories, against
def ects in materials and
workmanship.
provides prorated
coverage f or a replacement battery
purchased f rom your dealer.
these two
warranties cover your vehicle’s
emissions control systems. Time,
mileage, and coverage are
conditional. Please read your
warranty manual f or exact
inf ormation. a seat
belt that f ails to f unction properly is
coveredfortheusefullifeof the
vehicle.
all exterior body panels are
covered f or rust-through f rom the
inside f or the specif ied time period
with no mileage limit.
Honda accessories are covered
under this warranty. Time and
mileage limits depend on the type of
accessory and other f actors. Please
read your warranty manual f or
details.
covers all Honda
replacement parts against defects in
materials and workmanship. provides
coverageforaslongasthepur-
chaser of the muf f ler owns the
vehicle.
Restrictions and exclusions apply to
all these warranties. Please read the
2005 Honda Warranty Inf ormation
booklet that came with your vehicle
f or precise inf ormation on warranty
coverages. Your vehicle’s original
tires are covered by their
manuf acturer. Tire warranty inf or-
mation is in a separate booklet.
Please ref er to the 2005 Warranty
Manual that came with your vehicle.
this warranty gives up
to 100 percent credit toward a
replacement battery.
Warranty Coverages
U.S. Owners
Canadian Owners
New Vehicle L imit ed Warrant y Replacement Bat t ery L imit ed
Warranty
Emissions Cont rol Syst ems Def ect s Warrant y and EmissionsPerf ormance Warranty Seat Belt Limited Warranty
Rust Perf orat ion L imit ed Warrant y
Accessory Limited Warranty
Replacement Part s L imit edWarranty Replacement Muf f ler L if et ime
Limited Warranty
Original Equipment Bat t ery L imit ed WarrantyWarrant y and Cust omer Relat ions
235