Page 143 of 223
(f or Normal and Severe Schedules)Maintenance Record
152
85,000 mi
90,000 mi
95,000 mi
100,000 mi
105,000 mi
110,000 mi
115,000 mi
120,000 mi125,000 mi
130,000 mi
135,000 mi
140,000 mi
145,000 mi
150,000 mi
155,000 mi
160,000 mi
136,000 km
144,000 km
152,000 km
160,000 km
(or 5 years)
168,000 km
176,000 km
184,000 km
192,000 km
(or 6 years) Signature or dealer stamp mi/km
Date
mi/kmDate
mi/kmDate
mi/kmDate
mi/kmDate
mi/kmDate
mi/kmDate
mi/kmDate200,000 km
208,000 km
216,000 km
224,000 km
(or 7 years)
232,000 km
240,000 km
248,000 km
256,000 km
(or 8 years)Signature or dealer stamp mi/km
Date
mi/kmDate
mi/kmDate
mi/kmDate
mi/kmDate
mi/kmDate
mi/kmDate
mi/kmDate
�����—�����—�����y�
�������������y���
�(�����������y���
�����y
Page 146 of 223
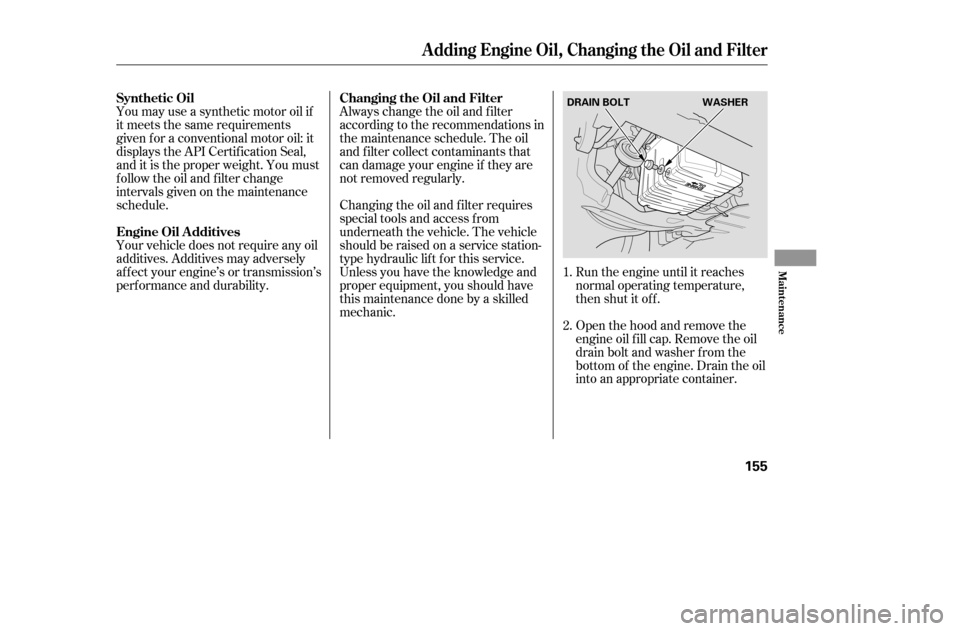
Run the engine until it reaches
normal operating temperature,
then shut it off.
Open the hood and remove the
engine oil f ill cap. Remove the oil
drain bolt and washer f rom the
bottom of the engine. Drain the oil
into an appropriate container.
Always change the oil and f ilter
according to the recommendations in
the maintenance schedule. The oil
and f ilter collect contaminants that
can damage your engine if they are
not removed regularly.
Changing the oil and f ilter requires
special tools and access f rom
underneath the vehicle. The vehicle
should be raised on a service station-
type hydraulic lif t f or this service.
Unless you have the knowledge and
proper equipment, you should have
this maintenance done by a skilled
mechanic.
You may use a synthetic motor oil if
it meets the same requirements
given f or a conventional motor oil: it
displays the API Certif ication Seal,
and it is the proper weight. You must
f ollow the oil and f ilter change
intervals given on the maintenance
schedule.
Your vehicle does not require any oil
additives. Additives may adversely
af f ect your engine’s or transmission’s
perf ormance and durability.
1. 2.
Changing the Oil and Filter
Synthetic Oil
Engine Oil A dditives
A dding Engine Oil, Changing the Oil and Filter
Maint enance
155
DRAIN BOLT WASHER
�����—�����—�����y�
���������
���y���
�(�����������y���
�����y
Page 150 of 223
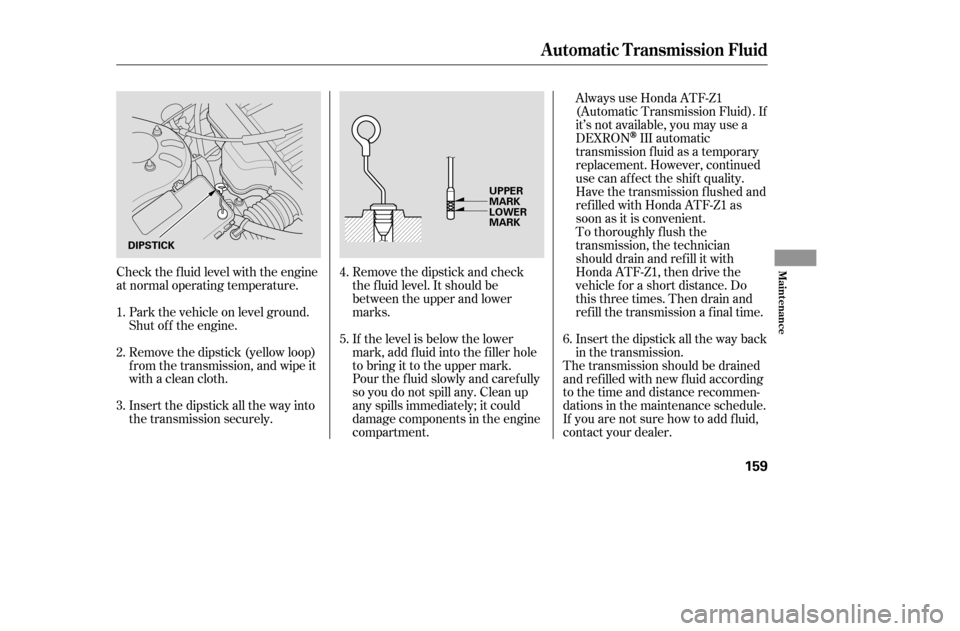
Check the f luid level with the engine
at normal operating temperature.Park the vehicle on level ground.
Shut of f the engine.
Remove the dipstick (yellow loop)
f rom the transmission, and wipe it
with a clean cloth.
Insert the dipstick all the way into
the transmission securely. Remove the dipstick and check
the f luid level. It should be
between the upper and lower
marks.
If the level is below the lower
mark, add f luid into the f iller hole
to bring it to the upper mark.Always use Honda ATF-Z1
(Automatic Transmission Fluid). If
it’s not available, you may use a
DEXRON
III automatic
transmission f luid as a temporary
replacement. However, continued
use can af f ect the shif t quality.
Have the transmission f lushed and
ref illed with Honda ATF-Z1 as
soon as it is convenient.
Pour the f luid slowly and caref ully
so you do not spill any. Clean up
any spills immediately; it could
damage components in the engine
compartment. To thoroughly f lush the
transmission, the technician
should drain and ref ill it with
Honda ATF-Z1, then drive the
vehicle f or a short distance. Do
this three times. Then drain and
ref ill the transmission a f inal time.
Insert the dipstick all the way back
in the transmission.
The transmission should be drained
and ref illed with new f luid according
to the time and distance recommen-
dations in the maintenance schedule.
If you are not sure how to add f luid,
contact your dealer.
3. 4. 5.
1. 2.
6.
Automatic Transmission Fluid
Maint enance
159
DIPSTICKUPPER
MARK
LOWER
MARK
�����—�����—�����y�
�������������y���
�(�����������y���
�����y
Page 151 of 223
�µ�µ
If Honda MTF is not available, you
may use an SAE 10W-30 or 10W-40
viscosity motor oil with the API
Certif ication seal that says ‘‘FOR
GASOLINE ENGINES’’ as a
temporary replacement. However,
motor oil does not contain the proper
additives, and continued use can
cause stiffer shifting. Replace as
soon as it is convenient.
The transmission should be drained
and ref illed with new f luid according
to the time and distance recommen-
dations in the maintenance schedule.
In very high temperatures
(over 110°F, 43°C).
In very low temperatures
(under 20°F, 29°C).
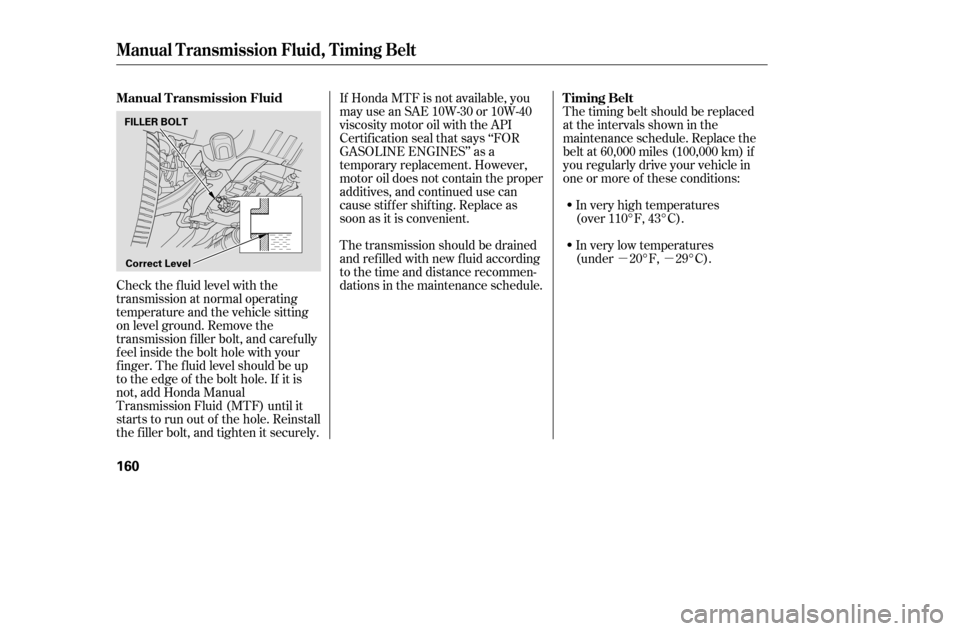
Check the f luid level with the
transmission at normal operating
temperature and the vehicle sitting
on level ground. Remove the
transmission f iller bolt, and caref ully
f eel inside the bolt hole with your
f inger. The f luid level should be up
to the edge of the bolt hole. If it is
not, add Honda Manual
Transmission Fluid (MTF) until it
starts to run out of the hole. Reinstall
the f iller bolt, and tighten it securely. The timing belt should be replaced
at the intervals shown in the
maintenance schedule. Replace the
belt at 60,000 miles (100,000 km) if
you regularly drive your vehicle in
one or more of these conditions:
Manual T ransmission Fluid, T iming Belt
Timing Belt
Manual Transmission Fluid
160
FILLER BOLT
Correct Level
�����—�����—�����y�
���������
�
�y���
�(�����������y���
�����y
Page 152 of 223
Check the brake f luid level in the
reservoirs monthly.
Always use Honda Heavy Duty
Brake Fluid DOT 3. If it is not
available, you should use only DOT 3
or DOT 4 f luid, f rom a sealed
container, as a temporary
replacement.
Using any non-Honda brake f luid can
cause corrosion and decrease the lif e
of the system. Have the brake
system f lushed and ref illed with
Honda Heavy Duty Brake Fluid
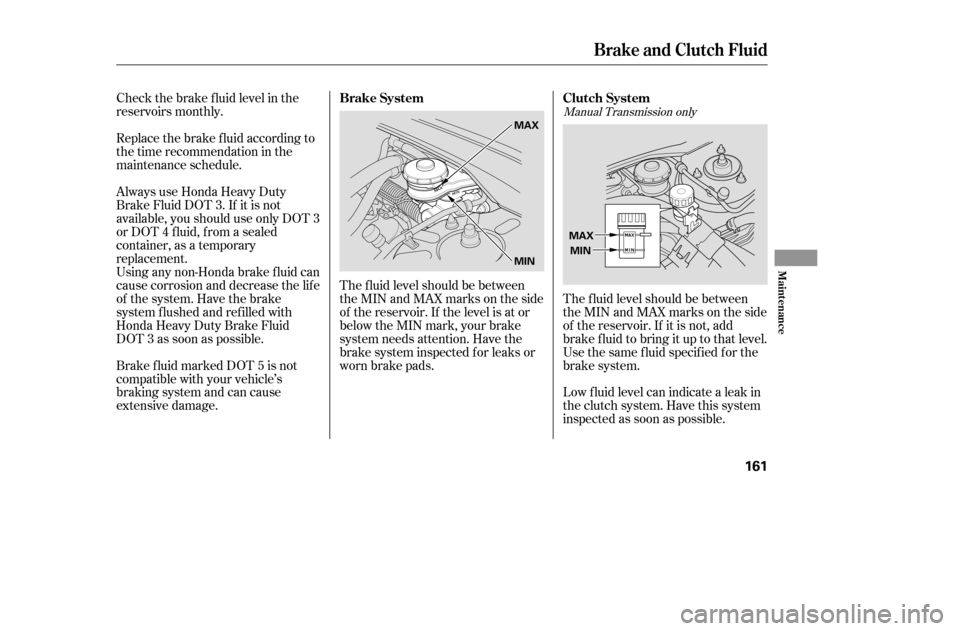
DOT 3 as soon as possible.The f luid level should be between
theMINandMAXmarksontheside
of the reservoir. If the level is at or
below the MIN mark, your brake
system needs attention. Have the
brake system inspected f or leaks or
worn brake pads.The f luid level should be between
theMINandMAXmarksontheside
of the reservoir. If it is not, add
brake f luid to bring it up to that level.
Use the same fluid specified for the
brake system.
Low f luid level can indicate a leak in
the clutch system. Have this system
inspected as soon as possible.
Brake f luid marked DOT 5 is not
compatible with your vehicle’s
braking system and can cause
extensive damage.
Replace the brake f luid according to
the time recommendation in the
maintenance schedule.
Manual Transmission only
Brake and Clutch Fluid
Brake System Clutch System
Maint enance
161
MAX
MIN
MAX
MIN
�����—�����—�����y�
�������������y���
�(�����������y���
�����y
Page 153 of 223
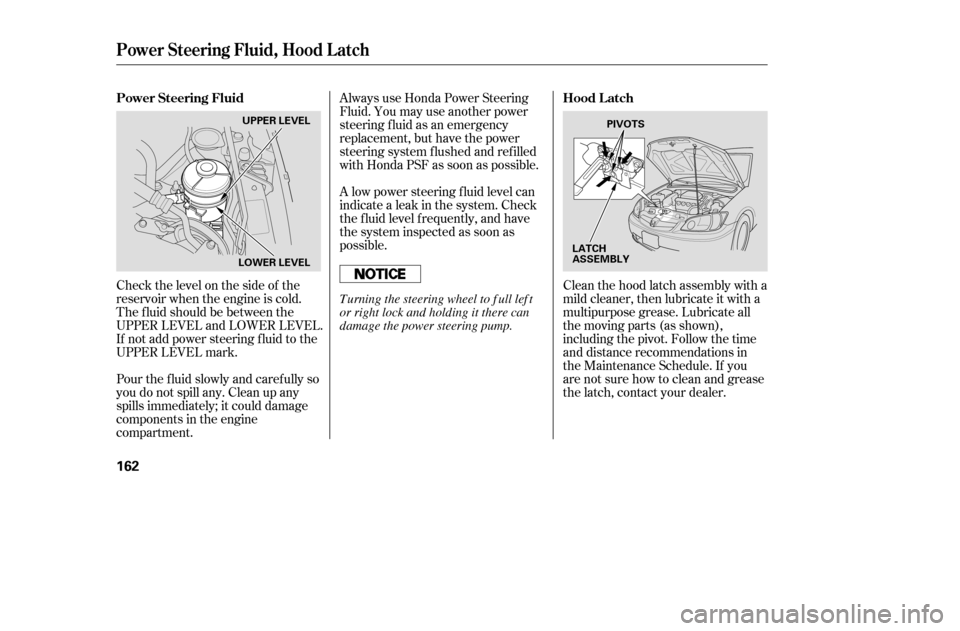
Check the level on the side of the
reservoir when the engine is cold.
The f luid should be between the
UPPER LEVEL and LOWER LEVEL.
If not add power steering f luid to the
UPPER LEVEL mark.Clean the hood latch assembly with a
mild cleaner, then lubricate it with a
multipurpose grease. Lubricate all
the moving parts (as shown),
including the pivot. Follow the time
and distance recommendations in
the Maintenance Schedule. If you
are not sure how to clean and grease
the latch, contact your dealer.
Always use Honda Power Steering
Fluid. You may use another power
steering f luid as an emergency
replacement, but have the power
steering system f lushed and ref illed
with Honda PSF as soon as possible.
Pour the f luid slowly and caref ully so
you do not spill any. Clean up any
spills immediately; it could damage
components in the engine
compartment. A low power steering f luid level can
indicate a leak in the system. Check
the f luid level f requently, and have
the system inspected as soon as
possible.
Power Steering Fluid, Hood L atch
Power Steering Fluid
Hood L atch
162
UPPER LEVEL
LOWER LEVEL PIVOTS
LATCH
ASSEMBLY
T urning the steering wheel to f ull lef t
or right lock and holding it there can
damage the power steering pump.
�����—�����—�����y�
�������������y���
�(�����������y���
�����y
Page 162 of 223
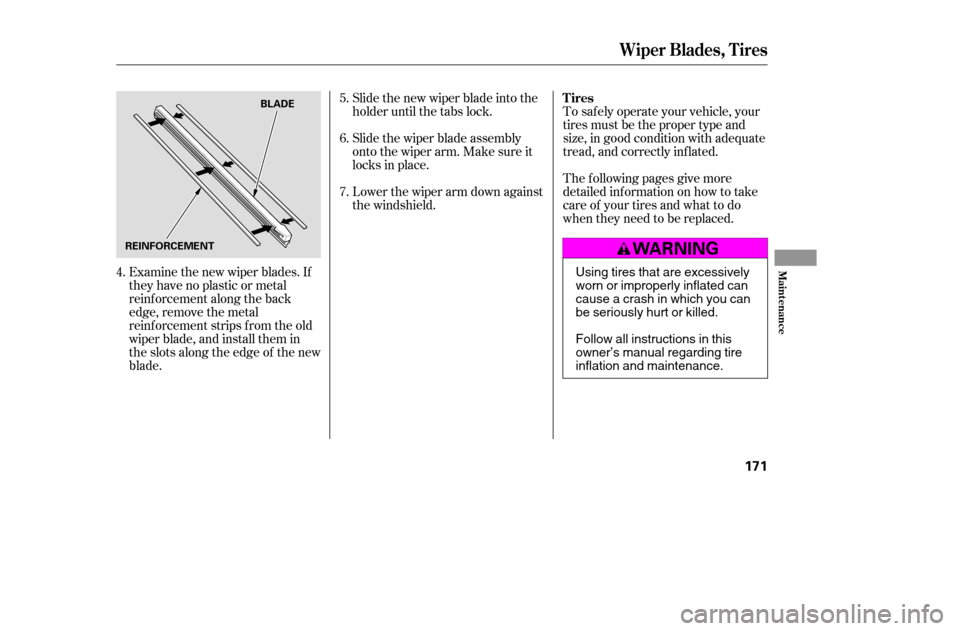
Examine the new wiper blades. If
they have no plastic or metal
reinf orcement along the back
edge, remove the metal
reinf orcement strips f rom the old
wiper blade, and install them in
the slots along the edge of the new
blade.Slide the new wiper blade into the
holder until the tabs lock.
Slide the wiper blade assembly
onto the wiper arm. Make sure it
locks in place.
Lower the wiper arm down against
the windshield.
To saf ely operate your vehicle, your
tires must be the proper type and
size, in good condition with adequate
tread, and correctly inf lated.
The f ollowing pages give more
detailed inf ormation on how to take
care of your tires and what to do
when they need to be replaced.
4. 5. 6. 7.
Wiper Blades, Tires
Tires
Maint enance
171
BLADE
REINFORCEMENT
Using tires that are excessively
worn or improperly inflated can
cause a crash in which you can
be seriously hurt or killed.
Follow all instructions in this
owner’s manual regarding tire
inflation and maintenance.
�����—�����—�����y�
�������������y���
�(�����������y���
�����y
Page 165 of 223
Every time you check inf lation, you
should also examine the tires f or
damage, f oreign objects, and wear.
Youshouldlookfor:Bumps or bulges in the tread or
side of the tire. Replace the tire if
youfindeitherof theseconditions.
Cuts, splits, or cracks in the side
of the tire. Replace the tire if you
can see f abric or cord.
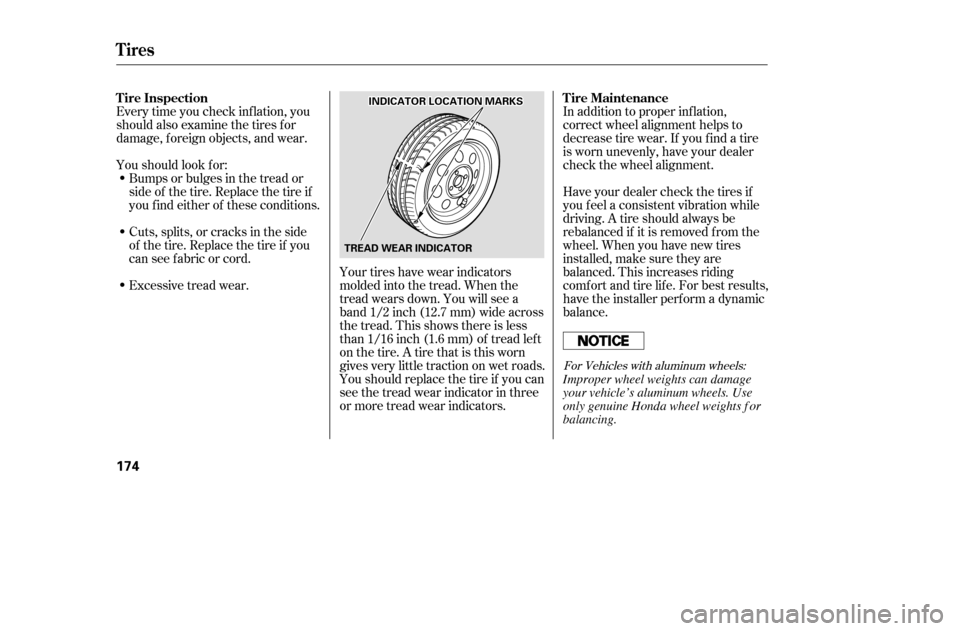
Excessive tread wear. Your tires have wear indicators
molded into the tread. When the
tread wears down. You will see a
band 1/2 inch (12.7 mm) wide across
the tread. This shows there is less
than 1/16 inch (1.6 mm) of tread lef t
on the tire. A tire that is this worn
gives very little traction on wet roads.
Youshouldreplacethetireif youcan
see the tread wear indicator in three
or more tread wear indicators. In addition to proper inf lation,
correct wheel alignment helps to
decrease tire wear. If you f ind a tire
is worn unevenly, have your dealer
check the wheel alignment.
Have your dealer check the tires if
you f eel a consistent vibration while
driving. A tire should always be
rebalanced if it is removed f rom the
wheel. When you have new tires
installed, make sure they are
balanced. This increases riding
comf ort and tire lif e. For best results,
have the installer perform a dynamic
balance.
For Vehicles with aluminum wheels:
Tire Inspection
Tire Maintenance
Tires
174
TREAD WEAR INDICATOR
IINNDDIICCAATTOORRLLOOCCAATTIIOONNMMAARRKKSS
Improper wheel weights can damage
your vehicle’s aluminum wheels. Use
only genuine Honda wheel weights f or
balancing.
�����—�����—�����y�
�������������y���
�(�����������y���
�����y