Page 2 of 205
�Î
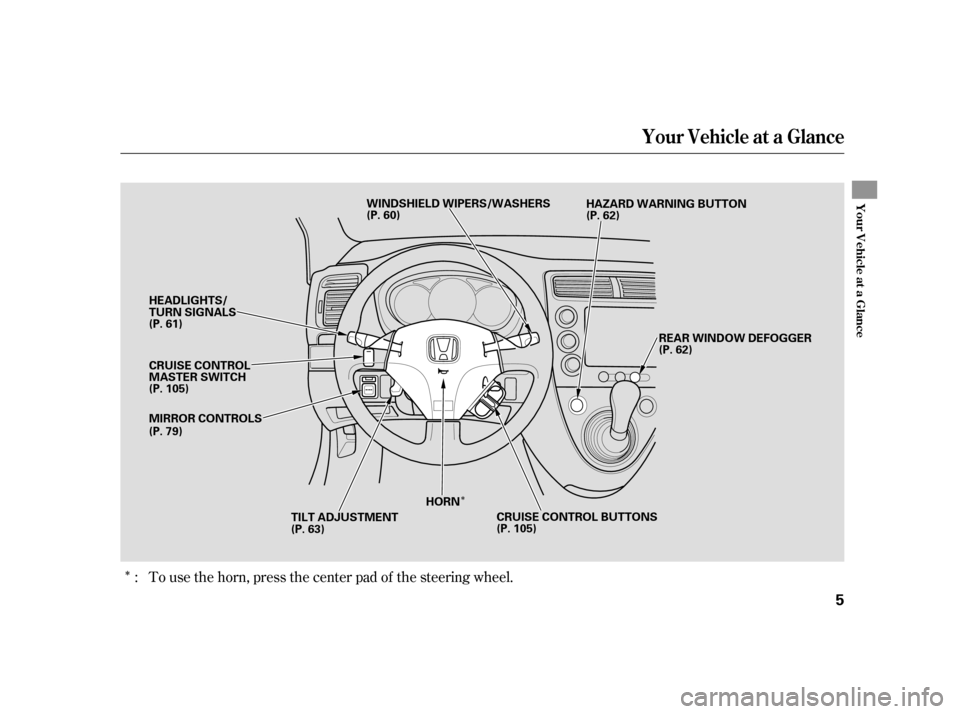
�ΠTo use the horn, press the center pad of the steering wheel.
:
Your Vehicle at a Glance
Your Vehicle at a Glance
5
WINDSHIELD WIPERS/WASHERS
REAR WINDOW DEFOGGER
HORN
TILT ADJUSTMENT
HEADLIGHTS/
TURN SIGNALS
CRUISE CONTROL
MASTER SWITCH
MIRROR CONTROLS
CRUISE CONTROL BUTTONS
(P. 61)
(P. 105)
(P. 79) (P. 60)
(P. 62)
(P. 62)
(P. 63) (P. 105)HAZARD WARNING BUTTON
�����—�����—�
���y�
���������
���y���
�(���)�������y���������y
Page 4 of 205

�µ
You’ll f ind many saf ety
recommendations throughout this
section, and throughout this manual.
Therecommendationsonthispage
are the ones we consider to be the
most important.
Excessive speed is a major f actor in
crash injuries and deaths. Generally,
the higher the speed, the greater the
risk, but serious injuries can also
occur at lower speeds. Never drive
f aster than is saf e f or current
conditions, regardless of the
maximum speed posted.
Having a tire blowout or a
mechanical f ailure can be extremely
hazardous. To reduce the possibility
of such problems, check your tire
pressures and condition f requently,
and perform all regularly scheduled
maintenance (see page ).
A seat belt is your best protection in
all types of collisions. Airbags are
designed to supplement seat belts,
not replace them. So even though
your vehicle is equipped with airbags,
make sure you and your passengers
always wear your seat belts, and
wear them properly (see page ).
Children age 12 and under should
ride properly restrained in a back
seat. Infants and small children
should be restrained in a child seat.
Larger children should use a booster
and a lap/shoulder belt until they
canusethebeltproperlywithouta
booster (see page ). While airbags can save lives, they
can cause serious or fatal injuries to
occupants who sit too close to them,
or are not properly restrained.
Inf ants, young children, and short
adults are at the greatest risk. Be
sure to f ollow all instructions and
warnings in this manual.
Alcohol and driving don’t mix. Even
one drink can reduce your ability to
respond to changing conditions, and
your reaction time gets worse with
every additional drink. So don’t drink
and drive, and don’t let your f riends
drink and drive, either.
131
15
29 46
Important Saf ety Precautions
Always Wear Your Seat Belt Control Your Speed
K eep Your Vehicle in Saf e
Condition
Restrain All Children Be Aware of Airbag Hazards
Don’t Drink and Drive
8
�����—�����—�
���y�
�������������y���
�(���)�������y�����
�
�y
Page 27 of 205
�µ
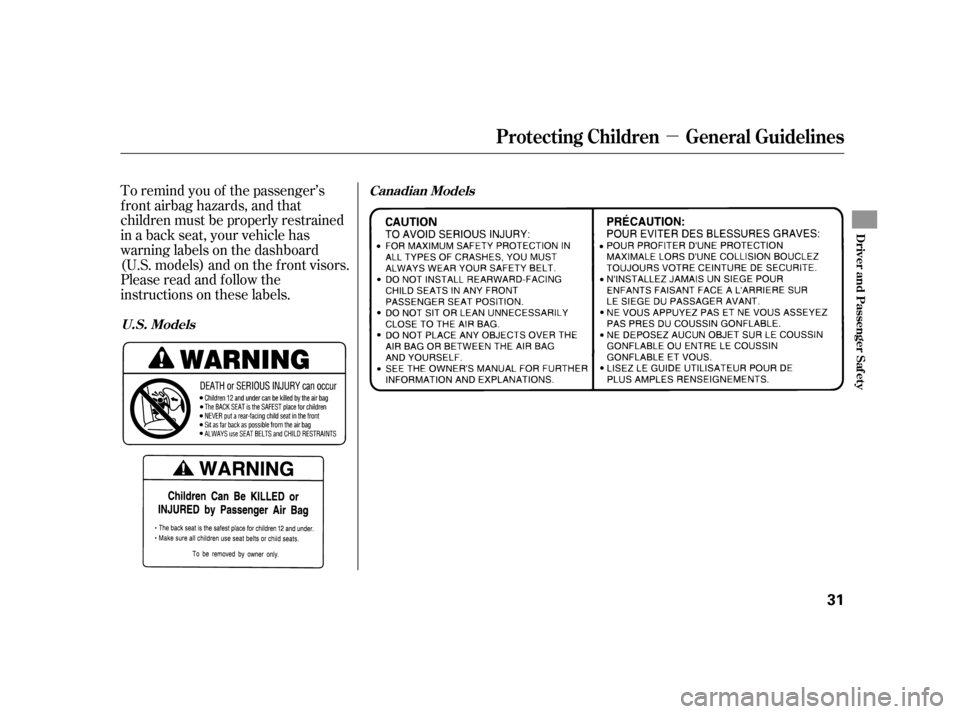
To remind you of the passenger’s
f ront airbag hazards, and that
children must be properly restrained
in a back seat, your vehicle has
warninglabelsonthedashboard
(U.S. models) and on the f ront visors.
Please read and follow the
instructions on these labels.
Protecting Children General Guidelines
Canadian Models
U.S. Models
Driver and Passenger Saf ety
31
�����—�����—�
���y�
������
������y���
�(���)�������y���������y
Page 48 of 205
. It is a
reminder to check the parking
brake. Driving with the parking
brake not f ully released can
damage the brakes and tires.
This indicator has")
Itcomesonwhenyouturnthe
ignition switch to ON (II). It is a
reminder to check the parking
brake. Driving with the parking
brake not f ully released can
damage the brakes and tires.
This indicator has two f unctions:
This indicator comes on when you
turn the ignition switch to ON (II)
with the headlight switch off and the
parking brake set. It should go of f if
youturnontheheadlightsorrelease
the parking brake. If it comes on at
any other time, it means there is a
problem with the DRL. There may
also be a problem with the high
beam headlights.
The lef t or right turn signal indicator
blinks when you signal a lane change
or turn. If the indicator does not
blink or blinks rapidly, it usually
means one of the turn signal bulbs is
burned out (see page ). Replace
the bulb as soon as possible, since
other drivers cannot see that you are
signaling.
This indicator comes on with the
high beam headlights. For more
inf ormation, see page .
If it stays on lit af ter you have f ully
released the parking brake while
the engine is running, or if it
comes on while driving, there
could be a problem with the brake
system. For more inf ormation, see
page .
On Canadian models, this indicator
comes on with reduced brightness
when the Daytime Running Lights
(DRL) are on (see page ).
This indicator comes on if the hatch
is not closed tightly.
When you press the Hazard Warning
button, both turn signal indicators
blink. All turn signals on the outside
of the vehicle should f lash.
1. 2.
179 146
61
61
Canadian model only
Parking Brake
and Brake
System
Indicator
‘‘Daytime Running
Lights’’ Indicator
High Beam Indicator
Turn Signal and
Hazard Warning
Indicators
Hatch-open Indicator
Instrument Panel Indicators
Inst rument s and Cont rols
53
U.S. Canada
�����—�����—�
���y�
�����������
�y���
�(���)�������y���������y
Page 54 of 205
�Î
�Î To use the horn, press the pad around the ‘‘H’’ logo.
Controls Near the Steering Wheel
Inst rument s and Cont rols
59
REAR WINDOW DEFOGGER
MIRROR CONTROLS TILT ADJUSTMENTHORN
HEADLIGHTS/TURN SIGNALS
WINDSHIELD WIPERS/WASHERS
(P. 61) (P. 60)
(P. 62)
(P. 105)
(P. 79) (P. 63)
(P. 62)
CRUISE CONTROL
MASTER SWITCH
(P. 105)
HAZARD WARNING BUTTONCRUISE CONTROL
BUTTONS
�����—�����—�
���y�
���������
���y���
�(���)�������y���������y
Page 57 of 205
. This causes all four
outside turn signals and both
indicators in the instrument panel to
f lash. Use the hazard warning lights")
Pushtheredbuttontoturnonthe
hazard warning lights (f our-way
flashers). This causes all four
outside turn signals and both
indicators in the instrument panel to
f lash. Use the hazard warning lights
if you need to park in a dangerous
area near heavy traffic, or if your
vehicle is disabled.
The knob on the instrument panel
controls the brightness of the instru-
ment panel lights. Turn the knob to
adjust the brightness.
The rear window def ogger will clear
fog,frost,andthinicefromthe
window. Push the def ogger button to
turn it on and of f . The indicator
above the button comes on to show
the def ogger is on. If you do not turn
it of f , the def ogger will shut itself of f
af ter about 15 minutes. It also shuts
of f when you turn of f the ignition
switch. You have to turn the
def ogger on again when you restart
the vehicle.
Instrument Panel Brightness, Hazard Warning Button, Rear Window Def ogger
Rear Window Def ogger
Instrument Panel Brightness Hazard Warning Button
62
�����—�����—�
���y�
�������������y���
�(���)�������y���������y
Page 66 of 205
�µ
See pages f or important saf ety
inf ormation and warnings about how toproperly position seats and seat-backs. 14
12
Make all seat adjustments bef ore
you start driving.
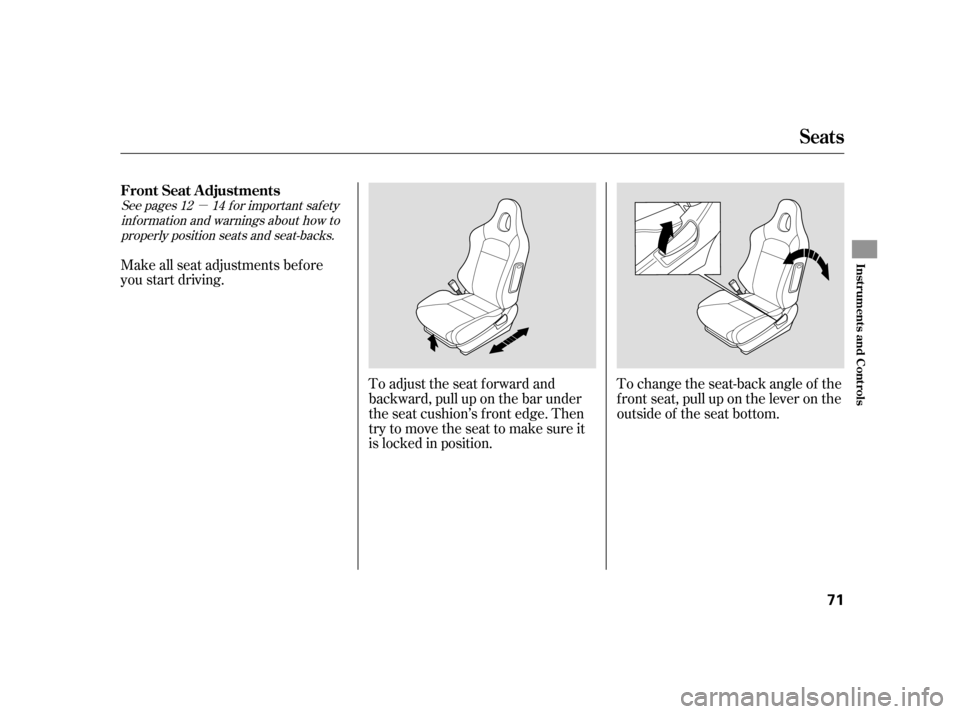
To adjust the seat forward and
backward, pull up on the bar under
the seat cushion’s f ront edge. Then
trytomovetheseattomakesureit
is locked in position.To change the seat-back angle of the
f ront seat, pull up on the lever on the
outside of the seat bottom.
Seats
FrontSeatAdjustments
Inst rument s and Cont rols
71
�����—�����—�
���y�
���������
���y���
�(���)�������y���������y
Page 67 of 205

See page f or important saf etyinf ormation and a warning about how toproperly position the head restraints. 15
The head restraints help protect you
and your passengers f rom whiplash
and other injuries. They are most
ef f ective when you adjust them so
the back of the occupant’s head rests
against the center of the restraint.
The head restraints in the rear
outboard seating positions adjust f or
height. You need both hands to
adjust the restraint. To raise it, pull
upward. To lower the restraint, push
the release button sideways and
push the restraint down.
Your vehicle is equipped with head
restraints in the rear outboard
seating positions. To get into the rear seat on the
driver’s side, pull up on the seat-back
adjustment lever.
To get into the rear seat on the
passenger’s side, push down on the
release lever at the base of the seat-
back. The seat-back will tilt forward,
and the seat will slide forward to
allow easier access to the rear seat.
Seats
Head Restraints
Rear Seat Access
72 RELEASE BUTTON
�����—�����—�
���y�
�������������y���
�(���)�������y���������y