Page 118 of 205

If the vehicle is f acing uphill, turn
the f ront wheels away f rom the
curb, and put the transmission in
f irst gear.
If the vehicle is f acing downhill,
turn the front wheels toward the
curb, and put the transmission in
reverse gear.
Make sure the parking brake is
f ully released bef ore driving away.
Driving with the parking brake
partially set can overheat or
damage the rear brakes.Your vehicle is not designed to tow a
trailer, attempting to do so can void
your warranties.
Never park over dry leaves, tall
grass, or other f lammable
materials. The hot three way
catalytic converter could cause
these materials to catch on fire.
Lock the doors.
Place any packages, valuables, etc.
in the cargo area, or take them
with you.
Turn of f the lights.
Make sure the moonroof and the
windows are closed.
Always use the parking brake when
you park your vehicle. Make sure
the parking brake is set f irmly or
your vehicle may roll if it is parked
on an incline.
Towing a Trailer
Parking T ips
Parking
Parking, Towing a Trailer
126
�����—�����—�
���y�
����
��������y���
�(���)�������y���
�����y
Page 120 of 205

such as trying to take a
corner too f ast or making a sudden
lane change.
Always steer moderately
when you are braking hard. Severe
or sharp steering wheel movement
can still cause your vehicle to veer
into oncoming traffic or off the road. It only helps with steering
control during braking.
on loose or
uneven surfaces, such as gravel or
snow, than a vehicle without anti-
lock.
Let the ABS work f or you by always
keeping f irm, steady pressure on the
brake pedal. This is sometimes
ref erred to as ‘‘stomp and steer.’’
You will f eel a pulsation in the brake
pedal when the ABS activates, and
you may hear some noise. This is
normal: it is the ABS rapidly
pumpingthebrakes.Ondry
pavement, you will need to press on
thebrakepedalveryhardbeforethe
ABS activates. However, you may
feel the ABS activate immediately if
you are trying to stop on snow or ice. If the ABS indicator comes on while
driving, test the brakes as shown on
page .
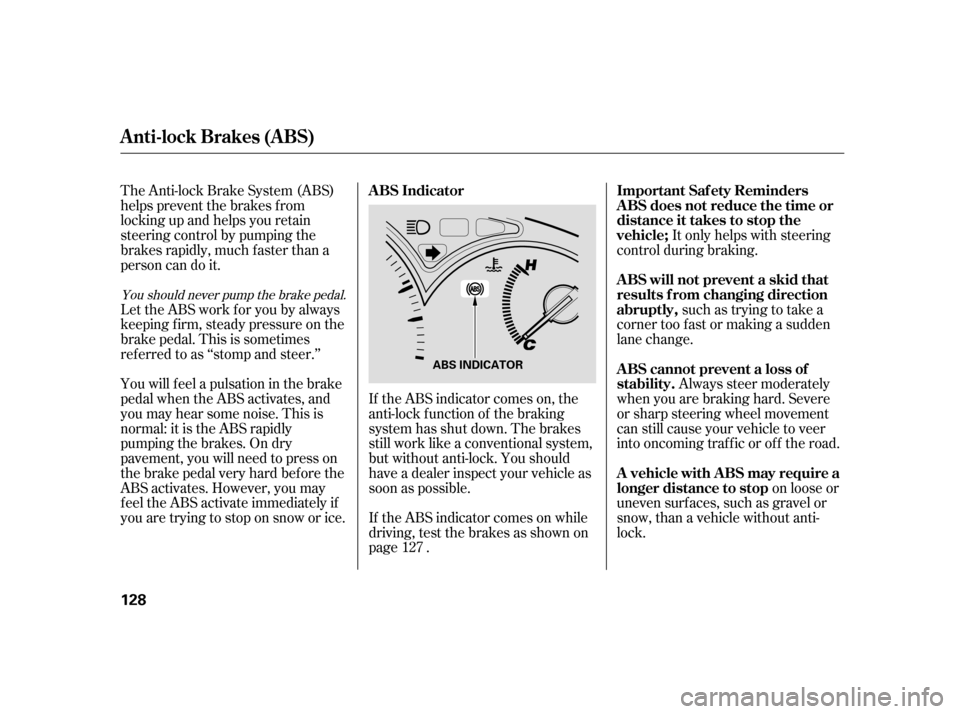
The Anti-lock Brake System (ABS)
helps prevent the brakes f rom
locking up and helps you retain
steering control by pumping the
brakes rapidly, much f aster than a
person can do it.
If the ABS indicator comes on, the
anti-lock f unction of the braking
system has shut down. The brakes
still work like a conventional system,
but without anti-lock. You should
have a dealer inspect your vehicle as
soon as possible.127
You should never pump the brake pedal.
ABS Indicator Important Saf ety Reminders
A BS will not prevent a skid that
results f rom changing direction
abruptly,
A BS cannot prevent a loss of
stability.
A BS does not reduce the time or
distance it takes to stop the
vehicle;
A vehicle with A BS may require a
longer distance to stop
Anti-lock Brakes (ABS)
128 ABS INDICATOR
�����—�����—�
���y�
����
��������y���
�(���)�������y���
���
�y
Page 125 of 205

�Ì �Î�µ
�Ì�Ì
�ΠFollow the Severe Maintenance
Schedule if you drive your vehicle
MAINLY under one or more of the
f ollowing conditions:
Extensive idling or long periods of
stop and go driving, such as a taxi or
a commercial delivery vehicle.
Driving with a roof rack, or driving
in mountainous conditions.
Driving less than 5 miles (8 km) per
trip or, in f reezing temperatures,
driving less than 10 miles (16 km)
per trip.
Driving in extremely hot [over 90°F
(32°C)] conditions.
Driving on muddy, dusty, or de-iced
roads.
Follow the
Maintenance Schedule f or Severe
Conditions.
Canadian Owners
134 miles x 1,000
km x 1,000
((OOtthheerrwwiisseeaaddjjuussttoonnllyyiiffnnooiissyy))
((OOrreevveerryy22yyeeaarrss,,wwhhiicchheevveerrccoommeessffiirrsstt))Every 15,000 miles (24,000 km) (Use normal schedule
except in dusty conditions)
10 16
2032 304840645080 70
112 80
128 100160
Check oil and coolant at each fuel stop 130208
140224
Service the items listed at the indicated distance (or time, if given).
Every 10,000 miles (16,000 km)
Check inflation and condition once a month
Every 5,000 miles (8,000 km) or every 6 months, whichever comes first
((OOrreevveerryy11yyeeaarr,,wwhhiicchheevveerrccoommeessffiirrsstt))
((OOrreevveerryy11yyeeaarr,,wwhhiicchheevveerrccoommeessffiirrsstt))
60 96 90
144 120192150240
((OOrreevveerryy33yyeeaarrss,,wwhhiicchheevveerrccoommeessffiirrsstt))Every 160,000 miles (256,000 km) 110 176
120,000 miles (192,000 km) or 10 years, then every 60,000 miles (96,000 km) or 5 years
Every 3 years (independent of mileage) See dust and pollen filter on page for
replacement information under special
driving conditions.
Check engine oil and coolant
Check tires
Replace engine oil
Rotate tires (follow pattern on page 160)
Replace engine oil filter
Check front and rear brakes
Lubricate all hinges, locks, and latches
Inspect the following items:
Tie rod ends, steering gear box and boots
Suspension components, Driveshaft boots
Check parking brake adjustment
Inspect the following items:
Brake hoses and lines (including ABS)
All fluid levels and condition of fluids
Exhaust system , Fuel lines and connections
Lights and controls/vehicle underbody
Inspect drive belts
Replace Dust and Pollen Filter
Replace air cleaner element
Replace spark plugs
Inspect valve clearance
Replace manual transmission fluid
Inspect idle speed
Replace engine coolant
Replace brake fluid See information on maintenance and
emissions warranty on page .
: :
153
132Maintenance Schedule for Severe Conditions
�����—�����—�
���y�
����
��������y���
�(���)�������y���
�����y
Page 133 of 205

When the radiator and engine are
cool, relieve any pressure in the
cooling system by turning the
radiator cap counterclockwise,
without pressing down.
Remove the radiator cap by
pushing down and turning
counterclockwise.Put the radiator cap back on and
tighten it.
Pour coolant into the reserve tank.
Fill it to half way between the MAX
and MIN marks. Put the cap back
on the reserve tank.
Do not add any rust inhibitors or
other additives to your vehicle’s
cooling system. They may not be
compatible with the coolant or
engine components. The coolant level should be up to
the base of the f iller neck. Add
coolant if it is low. Pour the
coolant slowly and caref ully so you
do not spill. Clean up any spill
immediately; it could damage
components in the engine
compartment.
Check the f luid level in the
windshield washer reservoir at least monthly during normal use.
The low washer
level indicator comes on when the
level is low (see page ).
Fill the reservoir with a good-quality
windshield washer f luid. This
increases the cleaning capability and
prevents f reezing in cold weather.
When you ref ill the reservoir, clean
the edges of the windshield wiper
blades with windshield washer fluid
on a clean cloth. This will help to
condition them.
2. 3. 4. 5.
1. 54
On Canadian models:
Engine Coolant, Windshield Washers
Windshield Washers
142 RADIATOR CAP
Do not use engine antif reeze or a
vinegar/water solution in the
windshield washer reservoir. Antif reeze
can damage your vehicle’s paint, while
a vinegar/water solution can damage
the windshield washer pump. Use only
commercially-available windshield
washer f luid.
�����—�����—�
���y�
����
��������y���
�(���)�������y���
�����y
Page 137 of 205
If you are changing the bulb on
the driver’s side, start the engine,
turn the steering wheel all the way
to the right, and turn off the
engine. If you are changing the
bulb on the passenger’s side, turn
the steering wheel to the left.Use a f lat-tipped screwdriver to
remove the holding clip f rom the
inner f ender.
Pull the inner f ender cover back.
Remove the bulb by turning it one-
quarter turn counterclockwise.
Insert the new bulb into the hole
and turn it one-quarter turn clock-
wise to lock it in place.
Push the electrical connector back
onto the bulb. Make sure it is on
all the way.
Turn on the headlights to test the
new bulb.
If you loosened the bolt on the
battery plate, tighten it securely.
3. 4. 5.
1.
3.
2.
6. 7.
Lights
Replacing a Front T urn Signal Bulb
146 HOLDING CLIP
�����—�����—�
���y�
�������������y���
�(���)�������y���
�����y
Page 138 of 205
Remove the socket from the
headlight assembly by turning it
one-quarter turn counterclockwise.Front bumper: Push the f ront
edge of the side marker lens
toward the rear of the vehicle. The
f ront edge will pop out of the
bumper.
Rear bumper: Push the rear edge
of thesidemarkerlenstowardthe
f ront of the vehicle. The rear edge
will pop out of the bumper.
Pull the bulb straight out of its
socket. Push the new bulb straight
into the socket until it bottoms. Insert the socket back into the
headlight assembly. Turn it
clockwise to lock it in place.
Testthelightstomakesurethe
new bulb is working.
Put the inner f ender cover in place.
Install the holding clip. Lock it in
placebypushingonthecenter.
4. 5. 6.7. 8.
1.
Lights
Replacing a Side Marker Bulb
Maint enance
147
SOCKET
BULB
SOCKET
BULB
�����—�����—�
���y�
�������������y���
�(���)�������y���
�����y
Page 139 of 205

Turn the socket one-quarter turn
counterclockwise to remove it
from the lens.
Pull the bulb straight out of its
socket. Push the new bulb straight
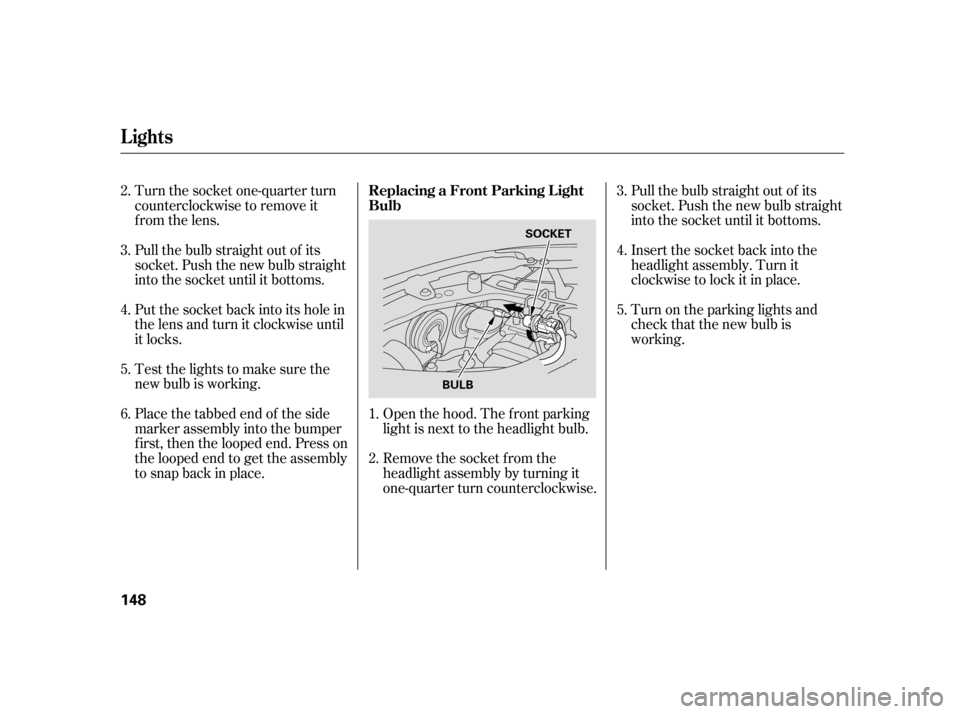
into the socket until it bottoms.Open the hood. The f ront parking
light is next to the headlight bulb.
Remove the socket from the
headlight assembly by turning it
one-quarter turn counterclockwise.Pull the bulb straight out of its
socket. Push the new bulb straight
into the socket until it bottoms.
Put the socket back into its hole in
the lens and turn it clockwise until
it locks.
Testthelightstomakesurethe
new bulb is working.
Place the tabbed end of the side
marker assembly into the bumper
f irst, then the looped end. Press on
the looped end to get the assembly
to snap back in place. Insert the socket back into the
headlight assembly. Turn it
clockwise to lock it in place.
Turn on the parking lights and
check that the new bulb is
working.
1. 2. 3. 4.5.
3.4.5. 6.
2.
Replacing a Front Parking L ight Bulb
Lights
148 SOCKET
BULB
�����—�����—�
���y�
�������������y���
�(���)�������y���
���
�y
Page 140 of 205
Open the hatch.
Remove the cover f rom the inside
panel by caref ully prying on its
upper f ront edge with a small f lat-
tipped screwdriver.Remove the socket f or that bulb
by turning it one-quarter turn
counterclockwise.
Remove the burned out bulb f rom
thesocketbypushingitinand
turning the bulb counterclockwise
until it unlocks.
Install the new bulb in the socket.
Reinstall the socket in the taillight
assembly and turn it clockwise to
lock it in place.
Testthelightstomakesurethe
new bulb is working. Reinstall the
cover over the taillight assembly.
Determine which bulb, stop/
taillight, back-up light, or turn
signal is burned out.
1.
3.
2. 4. 5. 6. 7. 8.
Lights
Replacing Rear Bulbs
Maint enance
149
COVER BULB
SOCKET
�����—�����—�
���y�
������
������y���
�(���)�������y���
�����y