Page 146 of 226

�Ì
�Î �Î�Î�Î �Ì�Ì
�Î
�Î
�Î �Ì�Î
154
Service the items listed at the indicated distance (or time, if given). miles x 1,000
km x 1,000 101620323048 40645080 70
112 80
128 130208
Check oil and coolant at each fuel stop
Check inflation and condition once a month
Every 5,000 miles (8,000 km) or every 6 months, whichever comes first Every 10,000 miles (16,000 km)
Every 10,000 miles (16,000 km) or every 1 year, whichever comes first
Every 20,000 miles (32,000 km) or every 1 year, whichever comes first
Every 30,000 miles (48,000 km) or every 2 years, whichever comes first
Every 15,000 miles (24,000 km) (Use normal schedule except in dusty conditions)
Inspect every 110,000 miles (176,000 km), otherwise adjust only if noisy
Every 3 years (independent of mileage)
At 120,000 miles (192,000 km) or 10 years, then every 60,000 miles (96,000 km) or 5 years Every 110,000 miles (176,000 km) or every 7 years, whichever comes first
See information on maintenance and emissions warranty, middle column, page .
See dust and pollen filter on page for replacement information under special driving conditions.
Replace at 60,000 miles (96,000 km) or 3 years, then every 30,000 miles (48,000 km) or 2 years.
Replace at 60,000 miles (96,000 km) or 3 years, then every 40,000 miles (64,000 km) or 2 years.
See timing belt on page for replacement information under special driving conditions. Every 60,000 miles (96,000 km) or every 3 years, whichever comes first90
144 120192 150240
110176 140224
100160
6096
Check engine oil and coolant
Check tires
Replace engine oil
Rotate tires (follow pattern on page 181 )
Replace engine oil filter
Check front and rear brakes
Lubricate all hinges, locks and latches
Inspect the following items: Tie-rod ends, steering gearbox, and boots
Suspension components, Driveshaft boots
Check parking brake adjustment
Inspect the following items: Brake hoses and lines (including ABS)
All fluid levels and condition of fluids
Exhaust system , Fuel lines and connections
Lights and controls/vehicle underbody
Inspect and adjust drive belts
Replace dust and pollen filter
Replace air cleaner element
Replace spark plugs
Inspect valve clearance
Replace automatic transmission fluid
Replace manual transmission fluid
Replace CVT fluid
Inspect idle speed
Replace timing belt , inspect auto-tensioner and water pump
Replace engine coolant
Replace brake fluid
:
1:2:3:4: 152
176
169 1
2
3
,4
Maintenance Schedule for Severe Conditions
�����—�����—�����y�
�����������
�y���
�(���%�������y���
�����y
Page 150 of 226
Fluid Locations
158
BRAKE FLUID
(Gray cap)WASHER FLUID
(Blue cap)
POWER STEERING
FLUID (Red cap)
AUTOMATIC
TRANSMISSION FLUID
DIPSTICK (CVT)
(Yellow loop)
RADIATOR CAP
ENGINE
COOLANT
RESERVOIR ENGINE OIL DIPSTICK
(Orange loop)
AUTOMATIC
TRANSMISSION
FLUID DIPSTICK
(except CVT)
(Yellow loop) CLUTCH FLUID
(Manual
transmission only)
(Gray cap)
ENGINE OIL
FILL CAP
�����—�����—�����y�
�������������y���
�(���%�������y���
���
�y
Page 161 of 226

�µ�µ
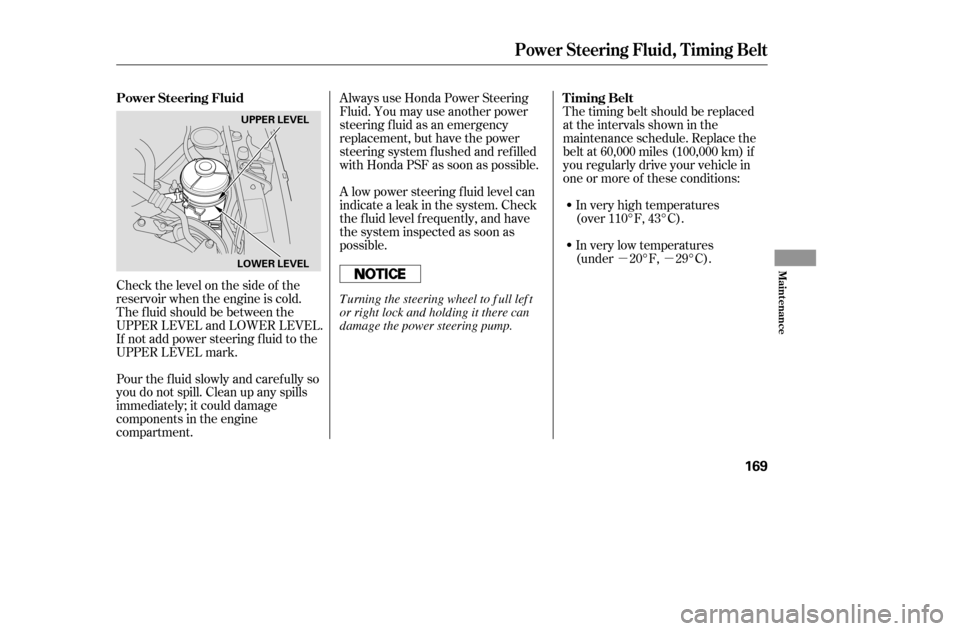
Check the level on the side of the
reservoir when the engine is cold.
The f luid should be between the
UPPER LEVEL and LOWER LEVEL.
If not add power steering f luid to the
UPPER LEVEL mark. Always use Honda Power Steering
Fluid. You may use another power
steering f luid as an emergency
replacement, but have the power
steering system f lushed and ref illed
with Honda PSF as soon as possible.
A low power steering f luid level can
indicate a leak in the system. Check
the f luid level f requently, and have
the system inspected as soon as
possible.
The timing belt should be replaced
at the intervals shown in the
maintenance schedule. Replace the
belt at 60,000 miles (100,000 km) if
you regularly drive your vehicle in
one or more of these conditions:
In very high temperatures
(over 110°F, 43°C).
In very low temperatures
(under 20°F, 29°C).
Pour the f luid slowly and caref ully so
you do not spill. Clean up any spills
immediately; it could damage
components in the engine
compartment.
Power Steering Fluid
T iming Belt
Power Steering Fluid, Timing Belt
Maint enance
169
UPPER LEVEL
LOWER LEVEL
T urning the steering wheel to f ull lef t
or right lock and holding it there can
damage the power steering pump.
�����—�����—�����y�
�������������y���
�(���%�������y���
�����y
Page 162 of 226
If you need to change the
headlight bulb on the driver’s side,
remove the power steering
reservoir tank by pulling it out of
its holder.
Theheadlightswereproperlyaimed
when your vehicle was new. If you
regularly carry heavy items in the
trunk, readjustment may be required.
Adjustment should be done by your
dealer or other qualif ied mechanic.
Your vehicle has halogen headlight
bulbs. When replacing a bulb, handle
it by its base, and protect the glass
f rom contact with your skin or hard
objects. If you touch the glass, clean
it with denatured alcohol and a clean
cloth.
1.
Lights
Headlight A iming Replacing a Headlight Bulb
170
HOLDERHalogen headlight bulbs get very hot
when lit. Oil, perspiration, or a scratch
on the glass can cause the bulb to
overheat and shatter.
�����—�����—�����y�
�������������y���
�(���%�������y���
�����y
Page 163 of 226
If you need to change a headlight
bulb on the passenger’s side, remove
the bolt from the stay and push the
battery toward windshield to obtain
enough working space.Remove the electrical connector
f rom the bulb by pushing on the
tab and pulling the connector
down.
Remove the bulb by turning it one-
quarter turn counterclockwise.Push the electrical connector back
onto the bulb. Make sure it is on
all the way.
Turn on the headlights to test the
new bulb.
Put the battery back to its original
position, reinstall the bolt in the
stay and tighten it securely.
Reinstall the power steering
reservoir.
(Passenger’s side)
(Driver’s side)
Insert the new bulb into the hole
and turn it one-quarter turn clock-
wise to lock it in place.
2. 3. 4. 5.6. 7.
Lights
Maint enance
171
STAY
TAB
BULB
CONNECTOR
�����—�����—�����y�
���������
���y���
�(���%�������y���
�����y
Page 164 of 226

If you are changing the bulb on
the driver’s side, start the engine,
turn the steering wheel all the way
to the right, and turn off the
engine. If you are changing the
bulb on the passenger’s side, turn
the steering wheel to the left.Use a f lat-tipped screwdriver to
remove the holding clip f rom the
inner f ender, and pull the inner
f ender cover back.
Remove the socket from the
headlight assembly by turning it
one-quarter turn counterclockwise.Remove the bulb f rom the socket
bypushingitinandturningthe
bulb counterclockwise until it
unlocks.
Install the new bulb in the socket.
Turn it clockwise to lock it in place.
Insert the socket back into the
headlight assembly. Turn it
clockwise to lock it in place.
Put the inner f ender cover in place.
Install the holding clip. Lock it in
place by pushing on the center.
2.
1.
3.4. 5. 6. 7.
Lights
Replacing the Front Side Marker/
Turn Signal and Parking L ightBulb
172
BULB
SOCKET
�����—�����—�����y�
�������������y���
�(���%�������y���
�����y
Page 173 of 226

In addition to proper inf lation,
correct wheel alignment helps to
decrease tire wear. If you f ind a tire
is worn unevenly, have your dealer
check the wheel alignment.
Have your dealer check the tires if
you f eel a consistent vibration while
driving. A tire should always be
rebalanced if it is removed f rom the
wheel. When you have new tires
installed, make sure they are
balanced. This increases riding
comf ort and tire lif e. For best results,
have the installer perform a dynamic
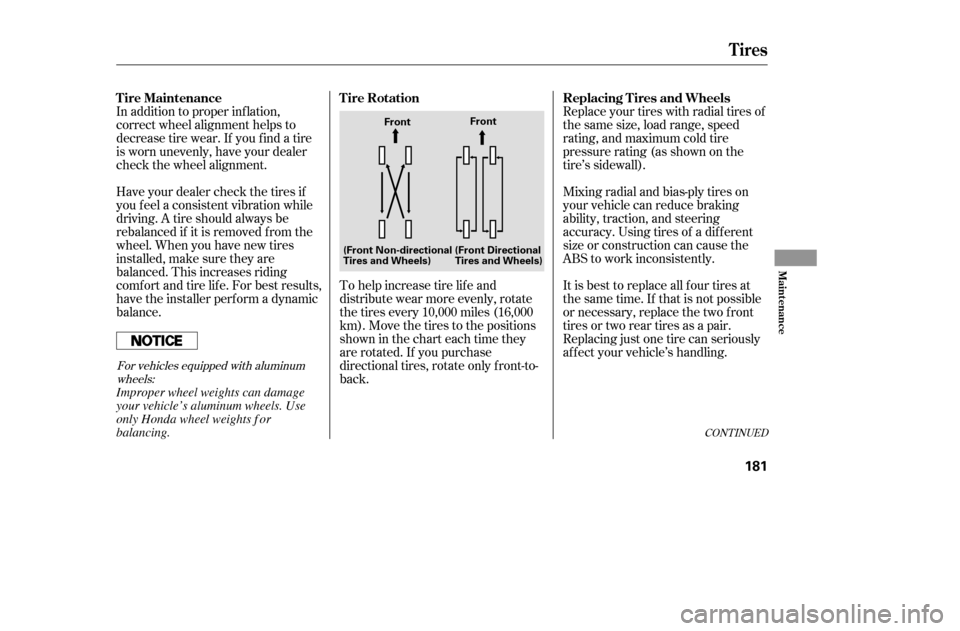
balance.To help increase tire lif e and
distribute wear more evenly, rotate
the tires every 10,000 miles (16,000
km). Move the tires to the positions
showninthecharteachtimethey
are rotated. If you purchase
directional tires, rotate only f ront-to-
back.Replace your tires with radial tires of
the same size, load range, speed
rating, and maximum cold tire
pressure rating (as shown on the
tire’s sidewall).
Mixing radial and bias-ply tires on
your vehicle can reduce braking
ability, traction, and steering
accuracy. Using tires of a dif f erent
size or construction can cause the
ABS to work inconsistently.
It is best to replace all f our tires at
thesametime.If thatisnotpossible
or necessary, replace the two f ront
tires or two rear tires as a pair.
Replacing just one tire can seriously
af f ect your vehicle’s handling.
For vehicles equipped with aluminum
wheels:
CONT INUED
T ire Maintenance T ire Rotation Replacing T ires and Wheels
Tires
Maint enance
181
Front Front
(Front Non-directional
Tires and Wheels) (Front Directional
Tires and Wheels)
Improper wheel weights can damage
your vehicle’s aluminum wheels. Use
only Honda wheel weights f or
balancing.
�����—�����—�����y�
�������������y���
�(���%�������y���
�����y
Page 195 of 226
Turn the ignition switch to LOCK
(0). Make sure the headlights and
all other accessories are off.
Remove the cover f rom the f use
box.
The vehicle’s f uses are contained in
two f use boxes.
The under-hood f use box is in the
engine compartment on the
passenger’s side next to the battery.
To open it, push the tabs as shown.If something electrical in your
vehicle stops working, check f or a
blown f use f irst. Determine f rom the
chart on pages and , or the
diagram on the f use box lid, which
f use or f uses control that device.
Check those f uses f irst, but check all
the f uses bef ore deciding that a
blown f use is the cause. Replace any
blown f uses, and check if the device
works.
The interior f use box is underneath
the steering column. To open it, turn
the knobs as shown. 1. 2.207 208
Fuses
Checking and Replacing Fuses
204
UNDER-HOOD
TAB
INTERIOR
�����—�����—�����y�
�����������
�y���
�(���%�������y���������y