Page 51 of 226
. It is a
reminder to check the parking
brake. Driving with the parking
brake not f ully released can
damag")
CONT INUED
This indicator has two f unctions:Itcomesonwhenyouturnthe
ignition switch ON (II). It is a
reminder to check the parking
brake. Driving with the parking
brake not f ully released can
damage the brakes and tires.
If it remains lit af ter you have f ully
released the parking brake while
the engine is running, or if it
comes on while driving, there
could be a problem with the brake
system. For more inf ormation, see
page . This indicator normally comes on f or
a f ew seconds when you turn the
ignition switch to ON (II), and when
the ignition switch is turned to
START (III). If it comes on at any
other time, there is a problem with
theABS.If thishappens,haveyour
vehicle checked at a dealer. With
this indicator on, your vehicle still
has normal braking ability but no
anti-lock f unction. For more
inf ormation, see page .
This indicator comes on with the
high beam headlights. For more
inf ormation, see page .
On Canadian models, this indicator
comes on with reduced brightness
when the Daytime Running Lights
(DRL) are on (see page ).
This indicator comes on when you
turn the ignition switch to ON (II)
with the headlight switch off and the
parking brake set. It should go of f if
youturnontheheadlightsorrelease
the parking brake. If it comes on at
any other time, it means there is a
problem with the DRL. There may
also be a problem with the high
beam headlights.
1. 2.
202 14762
62
If equipped
Canadian models only
Anti-lock Brake System
(A BS) Indicator
Parking Brake and Brake System
Indicator High Beam Indicator
‘‘Daytime Running
Lights’’ Indicator
Instrument Panel Indicators
Inst rument s and Cont rols
55
U.S. Canada
�����—�����—�����y�
�������������y���
�(���%�������y���������y
Page 52 of 226

This indicator comes on if the trunk
lid is not closed tightly.
This indicator comes on as a
reminder that you must ref uel soon.
This indicator comes on when you
set the cruise control. See page
f or inf ormation on operating the
cruise control.
This indicator also blinks several
times when you turn the ignition
switch f rom ON (II) to ACCESSORY
(I) or LOCK (0). This indicator comes on when the
washer f luid level is low. Add washer
fluidwhenyouseethisindicator
(see page ).
The lef t or right turn signal indicator
blinks when you signal a lane change
or turn. If the indicator does not
blink or blinks rapidly, it usually
means one of the turn signal bulbs is
burned out (see page ). Replace
the bulb as soon as possible, since
other drivers cannot see that you are
signaling.
When you press the hazard warning
button, both turn signal indicators
blink. All turn signals on the outside
of the vehicle should f lash.
This indicator comes on f or a f ew
seconds when you turn the ignition
switch to ON (II). It will then go of f
if you have inserted a properly-coded
ignition key. If it is not a properly-
coded key, the indicator will blink,
and the engine will not start (see
page ).
172
117
67 164
Canadian models only
If equipped
Trunk-open Indicator
Low Fuel Indicator
Washer Level Indicator
Cruise Control Indicator
Immobilizer System
Indicator
Turn Signal and Hazard Warning
Indicators
Instrument Panel Indicators
56
�����—�����—�����y�
������
������y���
�(���%�������y���������y
Page 53 of 226
.
Hold the knob f or about 10
seconds until the indicator goes
of f .
If you exceed 10,000 mile")
Press and hold the Select/Reset
knob in the instrument panel, then
turn the ignition switch to ON (II).
Hold the knob f or about 10
seconds until the indicator goes
of f .
If you exceed 10,000 miles (16,000
km) without having the scheduled
maintenance perf ormed, this
indicator will remain on as a constant
reminder.
Your dealer will reset this indicator
af ter completing the scheduled
maintenance. If this maintenance is
done by someone other than your
dealer, reset the indicator as f ollows.
This indicator reminds you that it is
time to take your vehicle in for
scheduled maintenance.
Ref er to the Maintenance Schedules
f or Normal and Severe Driving
Conditions on pages and .
For the f irst 8,000 miles (12,800 km)
af ter the Maintenance Required
Indicator is reset, it will come on f or
2 seconds when you turn the ignition
switch to ON (II).
Turn of f the engine.
Between 8,000 miles (12,800 km)
and 10,000 miles (16,000 km), this
indicator will come on f or 2 seconds
when you first turn the ignition
switch to ON (II), and then flash for
10 seconds. 1.
2. 3.
153 154
Maintenance Required
Indicator
Instrument Panel Indicators
Inst rument s and Cont rols
57
�����—�����—�����y�
������
��
���y���
�(���%�������y���������y
Page 54 of 226

The odometer shows the total
distance your vehicle has been
driven. It measures miles in U.S.
models and kilometers in Canadian
models. It is illegal under U.S.
federal law and Canadian provincial
regulations to disconnect, reset, or
alter the odometer with the intent to
change the number of miles or
kilometers indicated.The odometer and the trip meters
use the same display. Switch
between these displays by pressing
the Select/Reset knob repeatedly.
When you turn the ignition switch to
ON (II), the meter you last selected
is displayed.
The trip meter shows the number of
miles (U.S.) or kilometers (Canada)
driven since you last reset it.There are two trip meters: Trip A
and Trip B. Each trip meter works
independently, so you can keep track
of two dif f erent distances.
To reset a trip meter, display it and
then press and hold the Select/Reset
knob until the number resets to ‘‘0.0’’.
Both trip meters will reset if the
vehicle’s battery goes dead or is
disconnected.
This shows how much f uel you have.
It may show slightly more or less
than the actual amount. The needle
returns to the bottom after you turn
of f the ignition.
Gauges
Odometer/T rip Meter
Fuel Gauge
U.S.: HX, L X, EX, and Special Edition, Canada: L X, Si
58
TEMPERATURE GAUGE
FUEL GAUGE
ODOMETER/TRIP METER
TACHOMETER
SPEEDOMETER
SELECT/RESET KNOB
U.S. instrument
panel is shown.
Avoid driving with an extremely low
f uel level. Running out of f uel could
cause the engine to misf ire, damaging
the catalytic converter.
�����—�����—�����y�
������
������y���
�(���%�������y�������
�y
Page 56 of 226
�Î
�Î
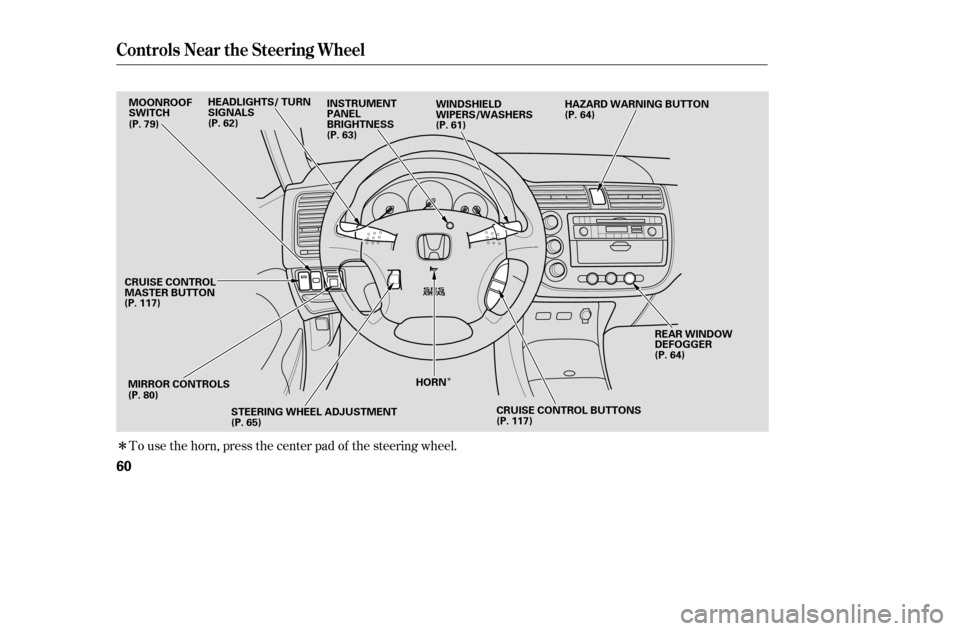
To use the horn, press the center pad of the steering wheel.
Controls Near the Steering Wheel
60
MIRROR CONTROLSREAR WINDOW
DEFOGGER
WINDSHIELD
WIPERS/WASHERS
MOONROOF
SWITCH
(P. 117) (P. 80) STEERING WHEEL ADJUSTMENT
(P. 65) (P. 64)
(P. 64)
(P. 61)
(P. 79)
HORNHAZARD WARNING BUTTON
INSTRUMENT
PANEL
BRIGHTNESS
(P. 63)
HEADLIGHTS/ TURN
SIGNALS
(P. 62)
CRUISE CONTROL BUTTONS
(P. 117)
CRUISE CONTROL
MASTER BUTTON
�����—�����—�����y�
������
����
�y���
�(���%�������y���������y
Page 58 of 226

�µ�µ
�µ
Turn Signal
Of f
Parking and indicator lights
Headlights on
High beams
Flashhighbeams Push down on the
lef t lever to signal a lef t turn and up
to signal a right turn. To signal a lane
change, push lightly on the lever and
hold it. The lever will return to
center when you release it or
complete a turn.
Turning the
switch to the ‘‘ ’’ position turns
on the parking lights, taillights,
instrument panel lights, side-marker
lights, and rear license plate lights.
Turning the switch to the ‘‘ ’’
position turns on the headlights. If
you leave the lights on with the key
removed f rom the ignition switch,
you will hear a reminder tone when
you open the driver’s door.
Push the lever
f orward until you hear a click to turn
on the high beams. The blue high
beam indicator will come on (see
page ). Pull the lever back to return to the low beams.
To f lash the high beams, pull the
lever back lightly, then release it.
The high beams will stay on as long
as you hold the lever back.
With the headlight switch off, the
high beam headlights and the high
beam indicator come on with
reduced brightness when you turn
the ignition switch to ON (II) and
release the parking brake. They
remain on until you turn the ignition
switch of f , even if you set the
parking brake.
The headlights revert to normal
operation when you turn them on
with the switch.
1.2.3.4.5.6.
55
Canadian models only
Turn Signal and Headlights
Turn Signal
Headlights On
High BeamsDaytime Running L ights
62
�����—�����—�����y�
�������������y���
�(���%�������y���������y
Page 59 of 226

The knob on the instrument panel
controls the brightness of the instru-
ment panel lights. Turn the knob to
adjust the brightness.Adjust the brightness to the desired
level with the headlight switch of f ,
and also with the headlight switch on.
To reduce glare at night, the
instrument panel illumination dims
when you turn the light switch to
or . Turning the Select/
Reset knob f ully to the right will
return the instrument panel to the
brightness adjusted with the
headlight switch of f and a tone willsound.
There are six brightness levels.
When you turn the knob, the
odometer/trip meter display
changes to circles that show you the
current level. You will hear a tone
when you reach the maximum or
minimum brightness.On all models except DX, Value Package and REVERB
Instrument Panel Brightness
Inst rument s and Cont rols
63
SELECT/RESET KNOB
KNOB
DX, Value Package
and REVERB models All models except DX, Value
Package and REVERB
�����—�����—�����y�
���������
���y���
�(���%�������y���������y
Page 60 of 226

Make sure the rear window is clear
and you have good visibility bef ore
starting to drive.
The def ogger and antenna wires on
the inside of the rear window can be
accidentally damaged. When
cleaning the glass, always wipe side
to side.
Push the button between the center
vents to turn on the hazard warning
lights (f our-way f lashers). This
causes all f our outside turn signals
and both indicators in the instrument
panel to f lash. Use the hazard
warning lights if you need to park in
a dangerous area near heavy traffic,
or if your vehicle is disabled. The rear window def ogger will clear
fog, frost, and thin ice from the
window. Push the def ogger button to
turn it on and off. The indicator in
the button comes on to show the
def ogger is on. If you do not turn it
of f , the def ogger will shut itself of f
af ter about 15 minutes. It also shuts
of f when you turn of f the ignition
switch. You have to turn the
def ogger on again when you restart
the vehicle.
Rear Window Def ogger
Hazard Warning Button
Hazard Warning Button, Rear Window Def ogger
64
�����—�����—�����y�
���������
���y���
�(���%�������y���������y