Page 69 of 226
�µ
To change the seat-back angle, pull
up on the lever on the outside of the
seat bottom.
Make all seat adjustments bef ore
you start driving.
To adjust the seat forward and
backward, pull up on the bar under
the seat cushion’s f ront edge. Try to
movetheseattomakesureitis
locked in position.
See pages f or important saf etyinf ormation and warnings about how toproperly position the seats and seat-
backs. 11 13
FrontSeatAdjustments
Seats
Inst rument s and Cont rols
73
�����—�����—�����y�
�������������y���
�(���%�������y���������y
Page 70 of 226
To get into the rear seat on the
driver’s side, pull up on the seat-back
adjustment lever.On all other models, push down the
release lever at the base of the seat-
back. The seat-back will tilt f orward
and the whole seat will slide f orward.
The height of the driver’s seat is
adjustable. Turn the dial on the
outside of the seat cushion. To get into the rear seat f rom the
passenger’s side in the U.S. DX and
Value Package models, pull up the
seat-back adjustment lever. The seat-
back will tilt f orward. If more room is
needed, use the seat adjustment bar
to move the seat forward.If equipped
Driver’s Seat Height Adjustment Rear Seat Access
Seats
74
RELEASE
LEVER
SEAT-BACK
ADJUSTMENT LEVER
�����—�����—�����y�
�������������y���
�(���%�������y���������y
Page 71 of 226

When you return the seat-back
upright, the seat stays in the fully
f orward position. Use the seat
adjustment bar and the seat-back
adjustment lever to move the seat to
the desired position. Make sure the
seat is f ully latched bef ore sitting in
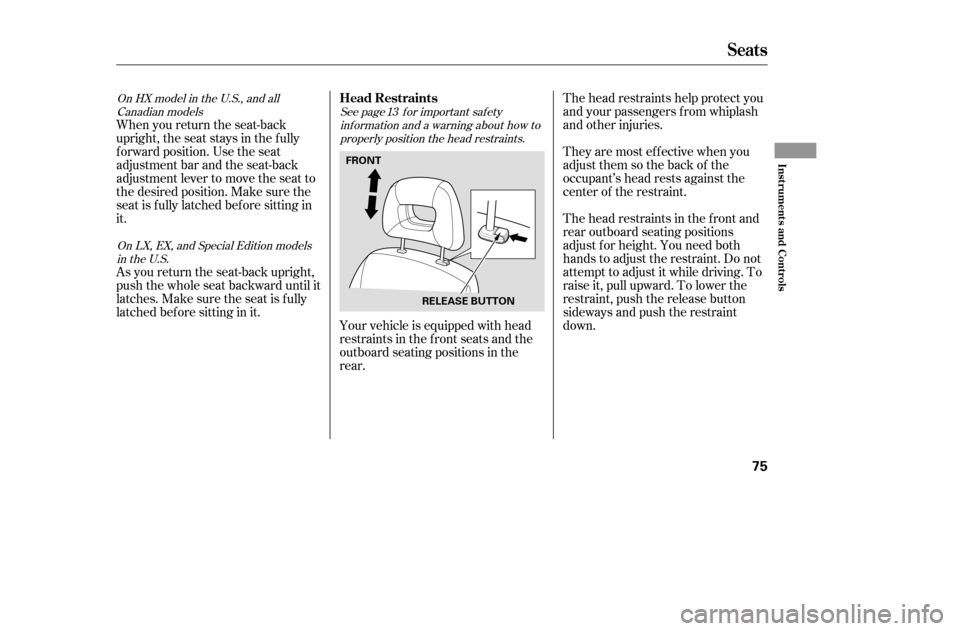
it.Your vehicle is equipped with head
restraints in the f ront seats and the
outboard seating positions in therear.
As you return the seat-back upright,
push the whole seat backward until it
latches. Make sure the seat is f ully
latched bef ore sitting in it. The head restraints help protect you
and your passengers f rom whiplash
and other injuries.
They are most ef f ective when you
adjust them so the back of the
occupant’s head rests against the
center of the restraint.
The head restraints in the f ront and
rear outboard seating positions
adjust f or height. You need both
hands to adjust the restraint. Do not
attempt to adjust it while driving. To
raise it, pull upward. To lower the
restraint, push the release button
sideways and push the restraint
down.
See page f or important saf ety
inf ormation and a warning about how toproperly position the head restraints.
On HX model in the U.S., and all
Canadian models 13
On LX, EX, and Special Edition modelsin the U.S.
Head Restraints
Seats
Inst rument s and Cont rols
75
FRONT
RELEASE BUTTON
�����—�����—�����y�
�������������y���
�(���%�������y���������y
Page 127 of 226
Fasten your seat belt. Check that
your passengers have f astened
their seat belts (see page ).
Make sure the doors are securely
closed and locked.
Check the steering wheel
adjustment (see page ).
Check the adjustment of the
inside and outside mirrors (see
page ).
Check that any items you may be
carrying are stored properly or
f astened down securely.
Check the seat adjustment (see
page ).
Make sure all windows, mirrors,
and outside lights are clean and
unobstructed. Remove f rost, snow,
or ice.
Youshoulddothefollowingchecks
and adjustments bef ore you drive
your vehicle.
Check that the hood is f ully closed.
Check that the trunk is f ully
closed.
Visually check the tires. If a tire
looks low, use a gauge to check its
pressure. When you start the engine, check
the gauges and indicators in the
instrument panel (see page ).
1. 2. 14
3. 4. 5. 6. 7. 8. 9.
11.
10.
80
73
65 51
Preparing to Drive
134
�����—�����—�����y�
�������������y���
�(���%�������y���
�����y