Page 216 of 289

The f luid level should be up to the
edge of the bolt hole. If it is not, add
Honda Manual Transmission Fluid
(MTF) until it starts to run out of the
hole. Reinstall the f iller bolt, and
tighten it securely.
If Honda MTF is not available, you
may use an SAE 10W-30 or 10W-40
viscosity motor oil with the API
Certif ication seal that says ‘‘FOR
GASOLINE ENGINES’’ as a
temporary replacement. However,
motor oil does not contain the proper
additives, and continued use can
cause stiffer shifting. Replace as
soon as it is convenient.
The transmission should be drained
and ref illed with new f luid according
to the time and distance recommen-
dations in the maintenance schedule.
If you are not sure how to check and
add f luid, contact your dealer.Check the f luid level with the
transmission at normal operating
temperature and the vehicle sitting
on level ground.
Remove the check bolt and look for
transmission f luid coming out of the
bolt hole. If a small amount of f luid
drips out of the bolt hole, reinstall
the check bolt.
If no f luid comes out, remove the
f iller bolt. Slowly add Honda Manual
Transmission Fluid (MTF) until it
starts to run out of the check bolt
hole. Let the f luid run out until it
stops, then reinstall the check bolt
and the f iller bolt.
On EX-V6 model
T ransmission Fluid
Manual Transmission
224
CHECK BOLT
WASHER
DRAIN BOLT FILLER BOLT
WASHER
�����—�����—�����y�
�
��
��������y���
�(���%�������y���������y
Page 221 of 289
Remove the electrical connector
f rom the bulb by squeezing the
connector to unlock the tab, then
slide the connector of f the bulb.
Remove the bulb by turning it
approximately one-quarter turn
counterclockwise.
Install the new bulb and turn it
one-quarter turn clockwise to lock
it in place.Push the electrical connector back
onto the bulb. Make sure it is on
all the way.
Turn on the headlights to test the
new bulb.
(Passenger’s side)
Reinstall the air intake cover.
Reinstall the two fasteners and
secure them by pushing on the
heads until they lock.
3.
2. 4. 5. 6. 7.
CONT INUED
Lights
Maint enance
229
6-cylinder models
AIR INTAKE
COVER
FASTENERS
4-cylinder models 6-cylinder models
TAB BULB
TABBULB
�����—�����—�����y�
�
��
��������y���
�(���%�������y���������y
Page 223 of 289

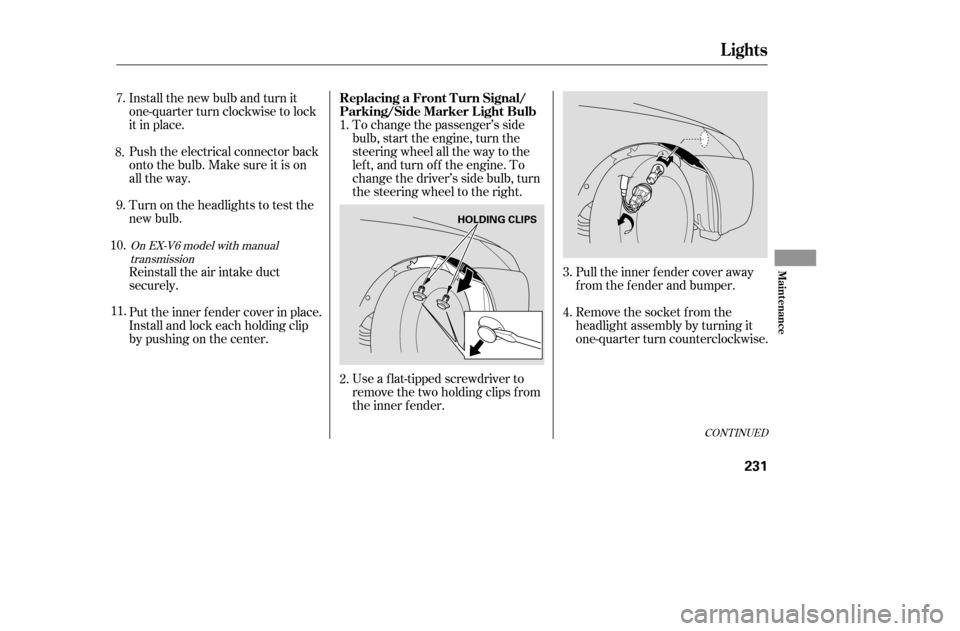
Pull the inner f ender cover away
f rom the f ender and bumper.
Remove the socket from the
headlight assembly by turning it
one-quarter turn counterclockwise.
To change the passenger’s side
bulb, start the engine, turn the
steering wheel all the way to the
lef t, and turn of f the engine. To
change the driver’s side bulb, turn
the steering wheel to the right.
Install the new bulb and turn it
one-quarter turn clockwise to lock
it in place.
Push the electrical connector back
onto the bulb. Make sure it is on
all the way.
Turn on the headlights to test the
new bulb.
Reinstall the air intake duct
securely.
Put the inner f ender cover in place.
Install and lock each holding clip
bypushingonthecenter.
Use a f lat-tipped screwdriver to
remove the two holding clips f rom
the inner f ender.
1.
3.
2. 4.
9.
7.
8.
10. 11.
CONT INUED
On EX-V6 model with manual transmission
Lights
Replacing a Front T urn Signal/
Parking/Side Marker Light Bulb
Maint enance
231
HOLDING CLIPS
�����—�����—�����y�
�
��
����
���y���
�(���%�������y���������y
Page 235 of 289

Thesechainsaretheonlyonesthat
have been approved by Honda f or
use on your vehicle. Since Honda
cannot test all chains, you must be
personally responsible f or proper
selection, installation, and use of
snow chains.
Because your vehicle has limited tire
clearance, Honda strongly
recommends using the chains listed
below, made by Security Chain
Company (SCC).
If you ever hear the chains
contacting the body or chassis, stop
and investigate. If the chains have
loosened, retighten them. Make sure
they do not contact the brake lines
or suspension.
Removethechainsassoonasyou
begin driving on cleared roads.
The chains listed here are available
at many auto supply stores. For a
complete list of stores, visit the SCC
website at www.scc-chain.com.
When installing chains, f ollow the
manuf acturer’s instructions, and
mount them as tightly as you can.
Drive slowly with chains installed.
Mount snow chains on your tires
when required by driving conditions
or local laws. Install them only on the
f ront tires.
Cable-types: SCC Radial Chain
CH2311T or SCC SC Cable SC1030
Link-type: SCC Quick Grip QG1134
Cable-types: SCC Radial Chain
CH2311T or SCC SC Cable SC1030
Cable-types: CH2412T
EX-V6 with manual transmission
LX
EX, LX-V6 and EX-V6 with automatictransmission
Tires
T ire Chains
Maint enance
243
Using the wrong chains, or not
properly installing chains, can
damage the brake lines and
cause a crash in which you can
be seriously injured or killed.
Follow all instructions in this
owner’s manual regarding the
selection and use of tire chains.
�����—�����—�����y�
�
��
��������y���
�(���%�������y���������y
Page 244 of 289
CONT INUED
Remove the center cap before
storing the f lat tire in the trunk
well.Place the flat tire face down in the
spare tire well.
Remove the spacer cone f rom the
wing bolt, turn it over, and put it
back on the bolt.
Securetheflattirebyscrewing
the wing bolt back into its hole.
Tighten the wheel nuts securely in
the same crisscross pattern. Have
the wheel nut torque checked at
the nearest automotive service
f acility.
Tighten the wheel nuts to:
15. 16. 17.
18.
19.
EX and EX-V6 models
Changing a Flat T ire
T aking Care of t he Unexpect ed
253
WING BOLT
SPACER CONEFor
sparetire
For
normaltire
80 lbf·ft (108 N·m , 11 kgf·m)
�����—�����—�����y�
�
��
��������y���
�(���%�������y���������y
Page 245 of 289

Store the jack in its holder. Turn
the jack’s end bracket to lock it in
place. Replace the cover. Store the
tools.
Store the wheel cover or center
cap in the trunk. Make sure it does
not get scratched or damaged.
Lower the trunk f loor, then close
the trunk lid.Diagnosing why the engine won’t
start f alls into two areas, depending
on what you hear when you turn the
key to START (III):
You hear nothing, or almost
nothing. The engine’s starter
motor does not operate at all, or
operates very slowly.
You can hear the starter motor
operating normally, or the starter
motor sounds like it is spinning
f aster than normal, but the engine
does not start up and run.
When you turn the ignition switch to
START (III), you do not hear the
normal noise of the engine trying to
start. You may hear a clicking sound
or series of clicks, or nothing at all.
Check these things: Check the transmission interlock.
If you have a manual transmission,
the clutch pedal must be pushed
all the way to the f loor or the
starter will not operate. With an
automatic transmission, it must be
in Park or Neutral.
Turn the ignition switch to ON (II).
Turn on the headlights, and check
their brightness. If the headlights
areverydimordonotcomeonat
all, the battery is discharged. See
on page .
Turn the ignition switch to START
(III). If the headlights do not dim,
check the condition of the f uses. If
the f uses are OK, there is
probably something wrong with
the electrical circuit f or the
ignition switch or starter motor.
You will need a qualif ied
technician to determine the
problem (see
on page ).
20.
21. 22. 256
269
If the Engine Won’t Start
Nothing Happens or the Starter
Motor Operates Very Slowly
Jump Starting
Emergency T owing
Changing a Flat T ire, If the Engine Won’t Start
254
Loose items can fly around the
interior in a crash and could
seriously injure the occupants.
Store the wheel, jack, and tools
securely before driving.
�����—�����—�����y�
�
��
����
���y���
�(���%�������y���������y
Page 254 of 289

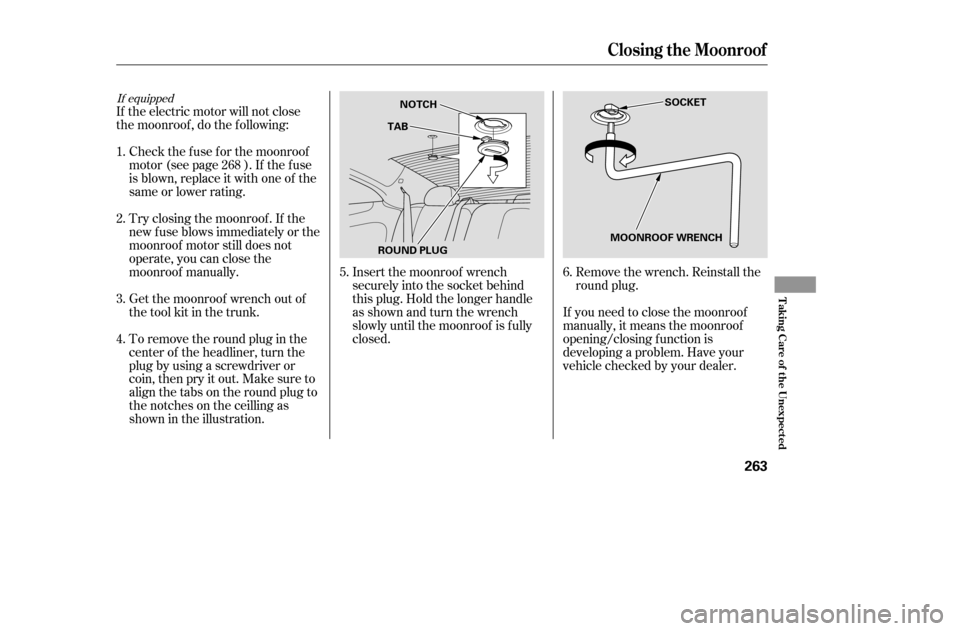
If the electric motor will not close
the moonroof , do the f ollowing:Check the f use f or the moonroof
motor (see page ). If the f use
is blown, replace it with one of the
same or lower rating.
Try closing the moonroof . If the
new f use blows immediately or the
moonroof motor still does not
operate, you can close the
moonroof manually.
Get the moonroof wrench out of
the tool kit in the trunk. Remove the wrench. Reinstall the
round plug.
If you need to close the moonroof
manually, it means the moonroof
opening/closing f unction is
developing a problem. Have your
vehicle checked by your dealer.
To remove the round plug in the
center of the headliner, turn the
plug by using a screwdriver or
coin, then pry it out. Make sure to
align the tabs on the round plug to
the notches on the ceilling as
shown in the illustration. Insert the moonroof wrench
securely into the socket behind
this plug. Hold the longer handle
as shown and turn the wrench
slowly until the moonroof is f ully
closed.
4.
3.
1. 2.
5.6.
268
If equipped
Closing t he Moonroof
T aking Care of t he Unexpect ed
263
SOCKET
ROUND PLUG TAB
NOTCH
MOONROOF WRENCH
�����—�����—�����y�
�
��
��������y���
�(���%�������y���������y
Page 258 of 289
�µ�µ
�Î �Î �Î
�´
�Î
No. Amps. Circuits Protected No. Amps. Circuits Protected No. Amps. Circuits Protected
CONT INUED
: 6-cylinder models
1 2345
10 A
(30A) 10 A
15 A
10 A Left Headlight Low Beam
(Rear Defroster Coil)
Left Headlight High Beam
Small Light
Right Headlight High Beam 6789
10 10 A
7.5 A 15 A
20 A Right Headlight Low Beam
Back Up
FI ECU
Condenser f an
Not Used 111112131415161717181819202122 23
20 A
30 A
7.5 A
20 A
40 A
40 A
15 A
30 A
30 A
20 A
40 A
40 A
(40 A)
40 A
100 A
50 A
50 A Cooling Fan
Cooling Fan
MG. Clutch
Horn, Stop
Rear Defroster
Back Up, ACC
Hazard
ABS Motor
TCS Motor
ABS F/S
TCS
Option
Option
Heater Motor
Battery
Not Used
BIG1Main
Power Window Main
Fuse Locations
T aking Care of t he Unexpect ed
267
UNDER-HOOD FUSE/RELAY BOX
�����—�����—�����y�
�
�����������y���
�(���%�������y���������y